Nesting RadElements in Menu Items
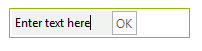
The RadMenuContentItem is a container menu item that allows you to build up custom menu items from other elements. You can assign any RadElement to the ContentElement property of a RadMenuContentItem. The example below demonstrates how to dynamically create two main menu items that contain RadTextBoxElement and RadButtonElement. When the button is clicked a message box displays the text.
Figure 1: Hosting RadElements in menu items
Adding content items
void Form1_Load(object sender, EventArgs e)
{
    RadMenuContentItem textBoxContentItem = new RadMenuContentItem();
    RadTextBoxElement textBox = new RadTextBoxElement();
    textBox.Text = "Enter text here";
    textBox.MinSize = new Size(100, 0);
    textBoxContentItem.ContentElement = textBox;
    radMenu1.Items.Add(textBoxContentItem);
    RadMenuContentItem buttonContentItem = new RadMenuContentItem();
    RadButtonElement button = new RadButtonElement();
    button.Text = "OK";
    button.Click += new EventHandler(button_Click);
    buttonContentItem.ContentElement = button;
    radMenu1.Items.Add(buttonContentItem);
}

void button_Click(object sender, EventArgs e)
{
    RadTextBoxElement textBox = radMenu1.Items[0] as RadTextBoxElement;
    MessageBox.Show("Text is: " + textBox.Text);
}Nesting RadControls in Menu Items
This tutorial demonstrates adding a RadPageView to a RadMenu. Each page will contain a populated drop down list. Clicking the drop down list items displays a message box with the current selection text.
Figure 2: Hosting RadControls in menu items
1. Add a RadMenu to the form. No other design time work needs to be done.
2. Add the necessary items definitions along with a string array for the months and seasons.
private RadDropDownList seasonDropDownList;
private RadDropDownList monthDropDownList;
private RadPageView pageView;
private string[] months = new string[]
{
    ������� "January", "February", "March", "April", "May",
    ������� "June", "July", "August", "September", "October",
    ������� "November", "December", "January"
};
private string[] seasons = new string[] { "Spring", "Summer", "Fall", "Winter" };3. Create a private method that builds and returns a RadDropDownList. In addition, you can display the selected item text by using the SelectedIndexChanged event.
private RadDropDownList CreateRadDropDownListElement(string text, string[] captions)
{
    RadDropDownList ddl = new RadDropDownList();
    ddl.Location = new Point(15, 15);
    ddl.Size = new Size(150, 19);
    ddl.Margin = new Padding(25, 5, 5, 5);
    ddl.Text = text;
    foreach (string caption in captions)
    {
        ddl.Items.Add(new RadListDataItem(caption));
    }
    ddl.SelectedIndexChanged += ddl_SelectedIndexChanged;
    return ddl;
}

void ddl_SelectedIndexChanged(object sender, Telerik.WinControls.UI.Data.PositionChangedEventArgs e)
{
    RadListDataItem item =
        (sender as RadDropDownList).SelectedItem;
    MessageBox.Show(item.Text);
}4. Create a form's Load event handler. In addition, you should add the event prevent the drop down from closing when one is working with the page view. The exit item can be used for closing the drop down in this case.
private void Form1_Load(object sender, EventArgs e)
{
    monthDropDownList = CreateRadDropDownListElement("Select Month", months);
    seasonDropDownList = CreateRadDropDownListElement("Select Season", seasons);

    RadMenuItem rmiSettings = new RadMenuItem("Calendar");
    rmiSettings.DropDownClosing += rmiSettings_DropDownClosing;
    radMenu1.Items.Add(rmiSettings);
    rmiSettings.Items.Add(new RadMenuItem("Options"));
    RadMenuItem closeItem = new RadMenuItem("Exit");
    closeItem.Click += closeItem_Click;
    rmiSettings.Items.Add(closeItem);

    this.pageView = new RadPageView();
    this.pageView.Size = new System.Drawing.Size(300, 100);
    RadPageViewStripElement stripElement = this.pageView.ViewElement as RadPageViewStripElement;
    stripElement.ItemFitMode = StripViewItemFitMode.None;
    stripElement.StripButtons = StripViewButtons.None;

    RadPageViewPage montsPage = new RadPageViewPage("Month");
    RadPageViewPage seasonsPage = new RadPageViewPage("Season");

    montsPage.Controls.Add(monthDropDownList);
    seasonsPage.Controls.Add(seasonDropDownList);

    pageView.Pages.Add(montsPage);
    pageView.Pages.Add(seasonsPage);
    RadMenuHostItem hostItem = new RadMenuHostItem(pageView);
    hostItem.MinSize = new System.Drawing.Size(210, 50);

    rmiSettings.Items.Insert(1, hostItem);
}

void closeItem_Click(object sender, EventArgs e)
{
    RadMenuItem item = (RadMenuItem)sender;
    RadMenuItem parent = item.HierarchyParent as RadMenuItem;
    parent.DropDown.ClosePopup(new PopupCloseInfo(RadPopupCloseReason.CloseCalled, this));
}

void rmiSettings_DropDownClosing(object sender, RadPopupClosingEventArgs args)
{
    args.Cancel = args.CloseReason == RadPopupCloseReason.Mouse;
}
This Load event handler performs the main work of the application.
-
A RadDropDpwnList is created and populated with the months of the year.
-
A second RadDropDpwnList is created and populated with the names of the seasons.
-
A main RadMenuItem Calendar is created with two token menu items Options and Exit.
-
A RadMenuHostItem is created to contain the page view.
-
A RadPageView is created. Two pages are added to the page view. Each one contains the corresponding drop down list. Then, the page view is added to the RadMenuHostItem. In this example the drop down lists are providing choices while the pages allows the tabs to be switched.
-
The RadMenuHostItem is inserted into the second position in the menu.
Press F5 to run the application. Notice the behavior when clicking the tabs and when clicking the items in the combo boxes.