Using with Kendo UI Productivity Tools
You can easily start a new project with KendoReact components by using the Kendo UI Productivity Tools Extension for Visual Studio (VS) Code.
Prerequisites
- React 18 (or a version >= 16.8.x)
- NodeJS LTS (or a version >= 14). Use the
node -vcommand to check your node versions. - Visual Studio Code.
Install VS Code Extensions
You can install the Kendo UI Productivity Tools extension for Visual Studio Code through:
-
The Extensions tab in Visual Studio Code:
- Search for Kendo UI Productivity Tools.
- Select the extension from the results list.
- Click the Install button.

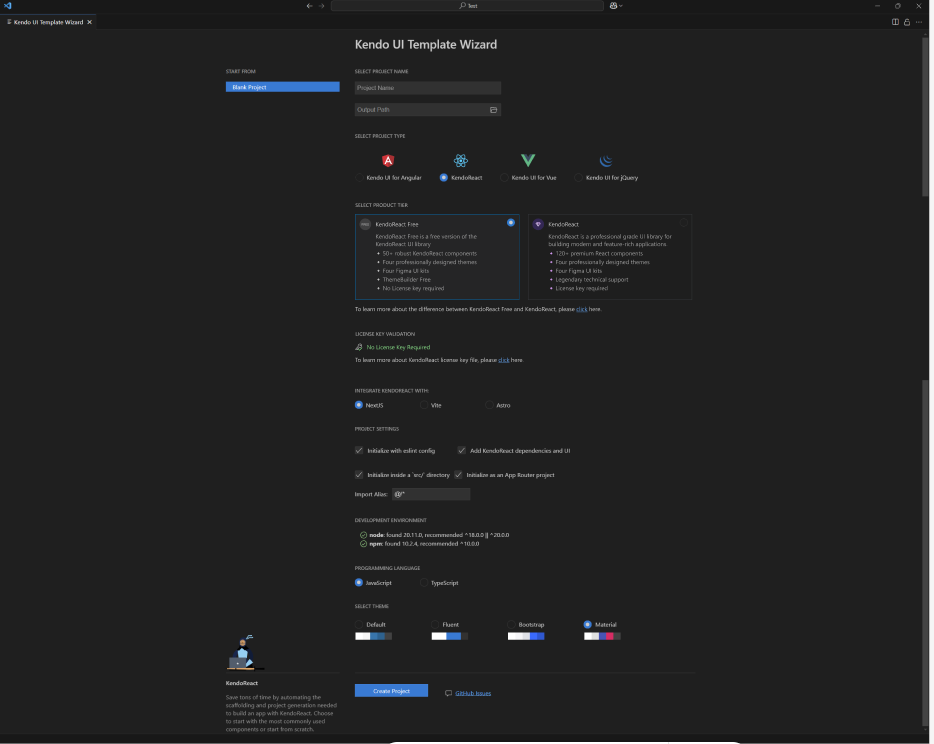
Create a New Project Using the Grid Template Wizard for VS Code
The Template Wizard provides pre-built templates to easily set up React applications using KendoReact components. Follow the steps below to create a new project with a Grid template:
-
Open the VS Code Command Palette (
Ctrl + Shift + Pfor Windows andCommand + Shift + Pfor Mac). -
Type "Kendo UI Template Wizard" and select it.
-
Choose KendoReact as the project type.
-
Select the product tier:
- KendoReact Free (50+ free components, no signup or license required).
- KendoReact (premium) (120+ components, requires a license).
If you select the KendoReact (premium) tier, a valid license key will be required to unlock all premium components and features.
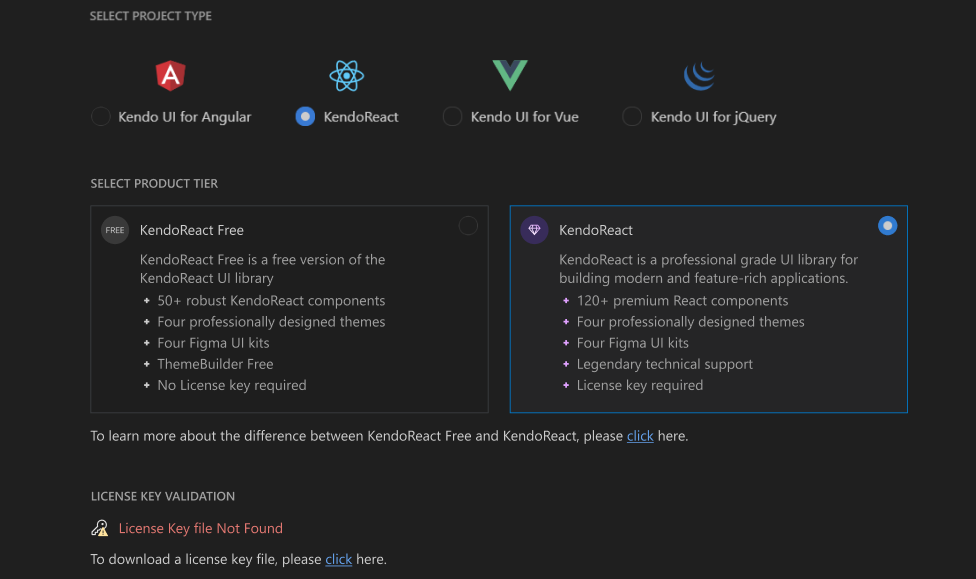
You can switch to the premium version directly from the extension by providing a license key file (trial or paid).
-
Set the project name and path.
-
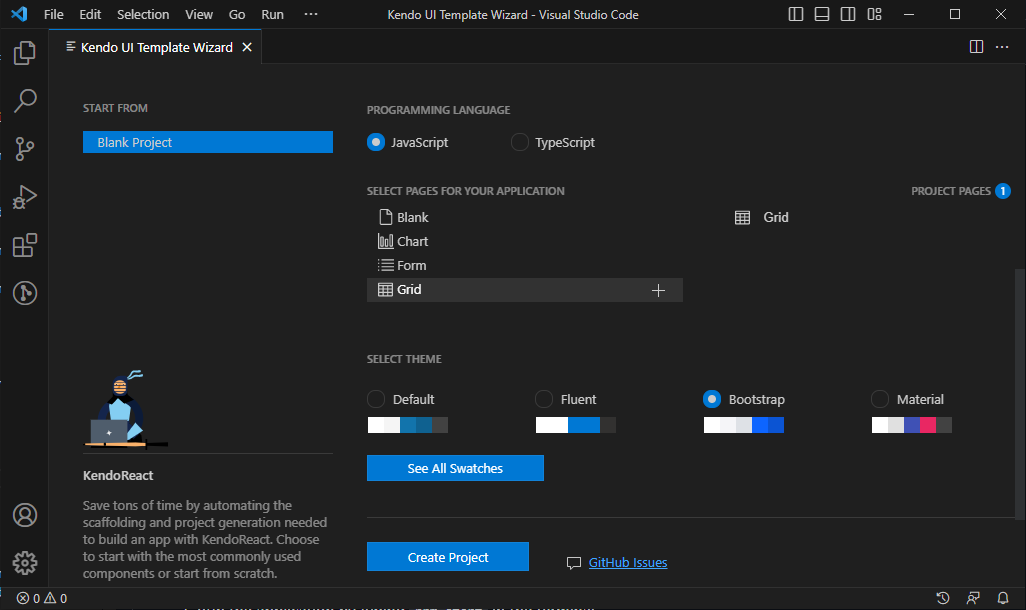
In the Programming Language section, select
JavaScriptorTypeScript. -
Add a Grid template from the Select pages for your application section.
-
In the final step, you will have the option to select one of the supported KendoReact themes and start your application with it. We will choose
Bootstrapfor our sample project. -
Click the Create Project button to finish the setup.
-
Install the NPM dependencies:
shnpm i -
Run the application:
shnpm start -
Navigate to
http://localhost:3000/gridto view the KendoReact Grid page.
You can also check the detailed guide for the Kendo UI Template Wizard for VS Code.
Use a Code Snippet to Add a DropDownList to the Project
The Kendo UI Productivity Tools extension for Visual Studio (VS) Code provides a set of code snippets allowing you to add the components directly to the source code of your project.
Following the steps below, we will add a DropDownListcomponent just above the Grid in the already created project:
- Open the
src/components/Grid.jsxfile in the created project and click just after the<div className="container-fluid">tag. - Type the
kr-snippet prefix to show the available KendoReact snippets - Navigate to the
kr-dropdownlistsnippet and pressEnter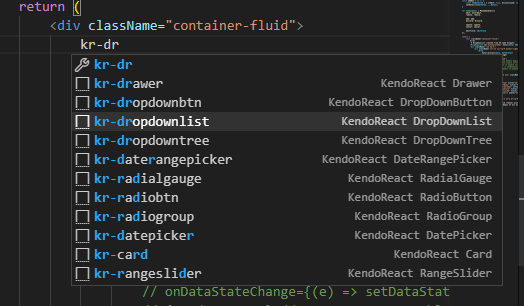
- Make sure that the
DropDownListcomponent is imported on the page:jsximport { DropDownList } from '@progress/kendo-react-dropdowns'; - Use the
dataprop to bind the inserted DropDownList to the already defineddataobject set itstextFieldprop toProductName:
<DropDownList data={data} textField="ProductName" />- Navigate to http://localhost:3000/grid to see the added DropDownList component.
You can see a full list with the code snippets available in the Kendo UI Productivity Tools extension for VS Code here.
Available Scaffolded Components (Free vs. Premium)
The following components can be generated using the Scaffolding Tool:
| Component | Free | Premium |
|---|---|---|
| Grid (Free Features) | Yes | No |
| Grid (Premium Features) | No | Yes |
| Form | No | Yes |
| Chart | No | Yes |
| Scheduler | No | Yes |
Generate a Bar Chart by Scaffolding
Utilizing the Scaffolders functionality of the Kendo UI Productivity Tools extension for Visual Studio (VS) Code you can also generate complex KendoReact components from an interactive wizard-like user interface.
In this section you will see how to scaffold a KendoReact Bar Chart component to an existing React project. To do so:
-
Open the created
MyTemplateProjectproject in VS Code and right-click on a thesrc/componentsfolder on the project tree. -
Select the New KendoReact Project Item option which will open the KendoReact Scaffolding tab.
-
In the loaded Item Generator set the Project Item Type to
Chart, choose a name of the page and selectbarfor Chart Type.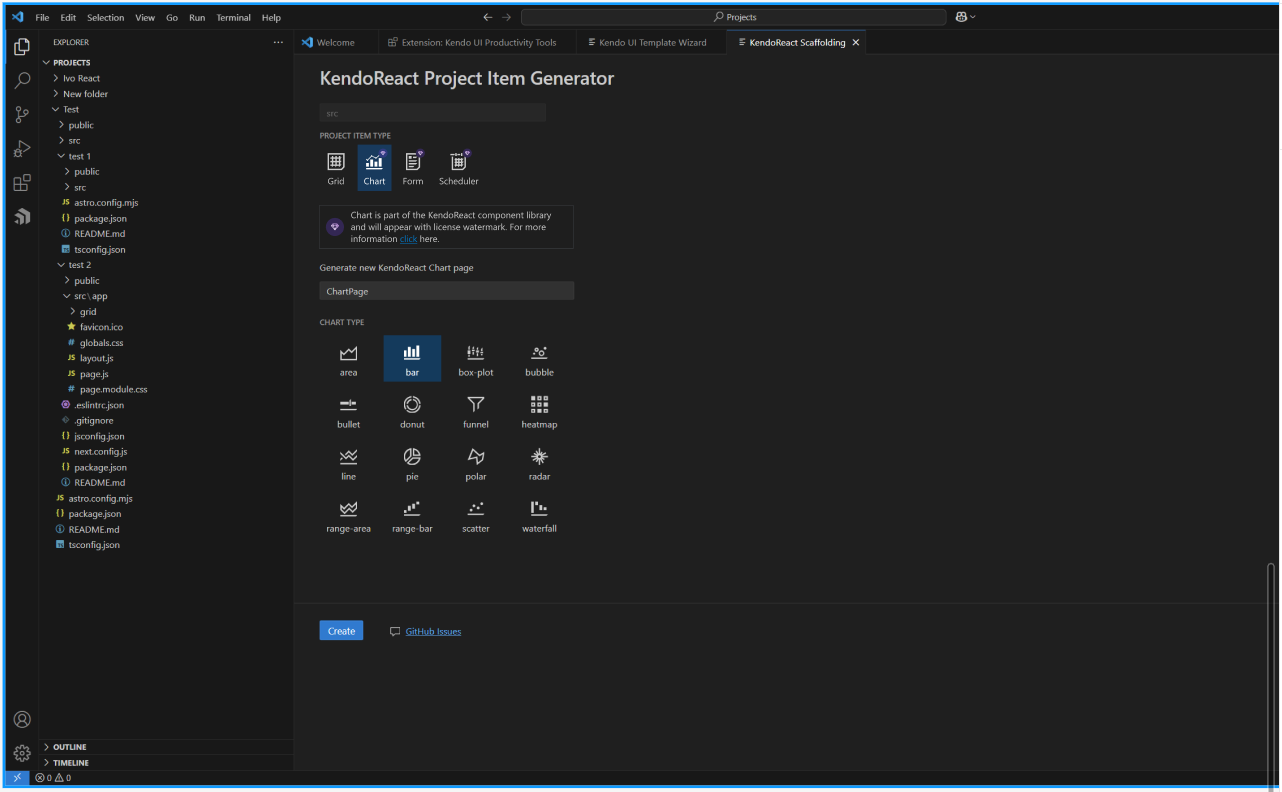 4. Click the Create button to generate the
 Bar Chartcomponent.
The result will be similar to:
import * as React from 'react';
import { Chart, ChartSeries, ChartSeriesItem } from '@progress/kendo-react-charts';

const data = [1, 2, 3, 5, 8, 13];

const ChartPageComponent = (props) => {
    return (
        <Chart>
            <ChartSeries>
                <ChartSeriesItem data={data} name="Fibonacci" />
            </ChartSeries>
        </Chart>
    );
};

export default ChartPageComponent;- Navigate to http://localhost:3000/chartPage to see the added KendoReact Chart component.
Activating Your License Key (Not Needed for Free Components)
KendoReact is an enterprise-grade UI library with 120+ free and premium components. Over 50 components, such as the Calendar, are free to use without a license, even in production. However, if you want to unlock the premium components and features of KendoReact, you need a commercial license.
Using any of the KendoReact premium UI components requires either a commercial license key or an active trial license key.
Since KendoReact version 5.16.0 (25 July 2023), a missing license causes a watermark to appear over selected components. For more information, see the Invalid License section. More information about the introduced changes can be found in this Invalid License section.
To experience the full potential of the KendoReact components, follow the instructions on the My License page to activate your license and hide the invalid/non-activated license attributes.