KendoReact AI Tools OverviewPremium
The KendoReact AI Tools are delivered through a single Model Context Protocol (MCP) server that connects your AI client to KendoReact-specific knowledge and UI-generation capabilities.
From idea to implementation, you can use the MCP server to generate complete pages, configure components correctly, align with the Progress Design System, and reduce repetitive setup work.
What Are the KendoReact AI Tools
KendoReact AI Tools are available through:
The KendoReact MCP server uses an orchestration-first model, centered on the Agentic UI Generator tool. It contains a core set of specialized assistants. Click the cards below for more details on each assistant:
The Agentic UI Generator orchestrates all assistants so you can build pages and components, apply styling and theming, and stay aligned with the design system in one seamless process. You can use the full end-to-end flow when you need complete page generation, or call a specific assistant directly when you need a focused change.
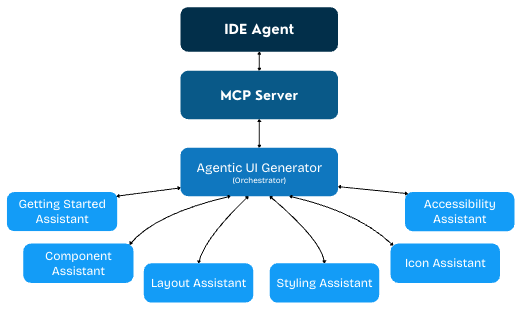
How the Agentic Flow Works
The Agentic UI Generator takes one prompt and manages the flow for you. It decides which assistants to use and combines their output into a single result. Use it when you want to generate a full page quickly, or call a specific assistant when you need a focused update to the layout, components, styling, theme, or icons in your project.
Getting Started Assistant
Use the Getting Started Assistant when you want a guided onboarding flow for first-time setup. Call it to scaffold a React project, configure the MCP server, and complete license activation with minimal manual steps.
It is useful when setting up a new environment, validating your initial MCP integration, or preparing a clean proof of concept quickly.
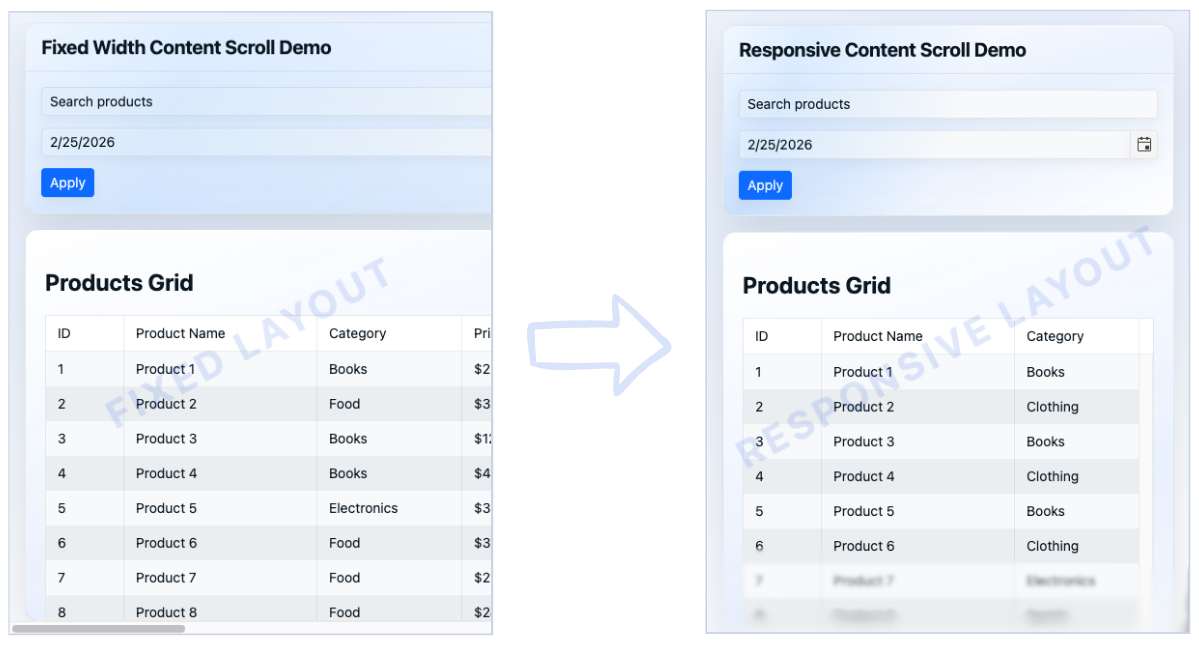
Layout Assistant
Use the Layout Assistant to set up or refine the page structure. It helps with section order, spacing, and responsive behavior so the UI stays clear across desktop, tablet, and mobile.
Typical tasks include adding a new dashboard section, cleaning up visual hierarchy, and converting desktop-first screens into responsive layouts.
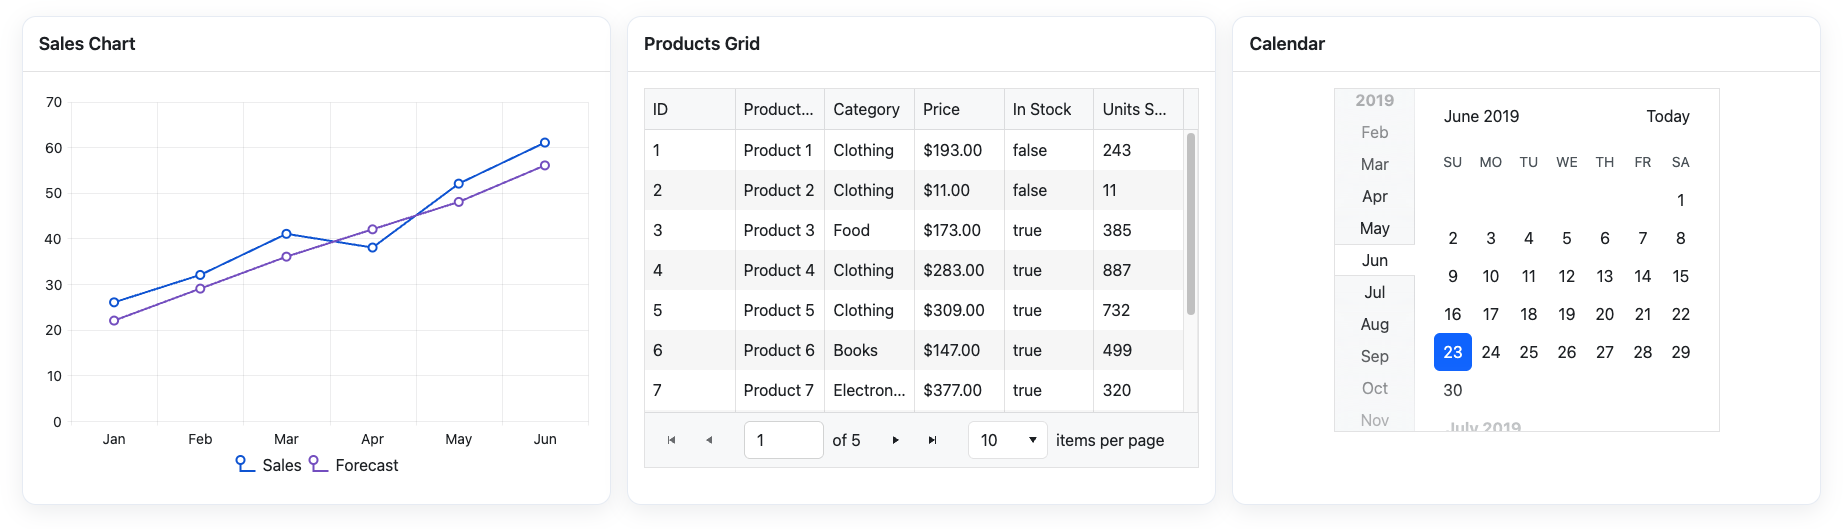
Component Assistant
Use the Component Assistant when you need help implementing or configuring KendoReact components. It helps you pick the right component and wire it correctly with real API patterns.
Common tasks include enabling Grid features (sorting, paging, filtering, grouping), building validated forms, setting up virtual scrolling or export, and using sample data for safe prototyping.
Styling Assistant
Use the Styling Assistant when you want consistent visuals across the app. It helps define reusable tokens and CSS variables for scalable theming.
Typical tasks include applying brand colors, adding dark mode or high-contrast variants, and keeping styling behavior consistent as new pages are added.
Icon Assistant
Use the Icon Assistant to choose icons that match user actions and UI context. It helps keep navigation, status indicators, and action buttons visually consistent.
It is useful for toolbars, navigation menus, cards, and any new section where icon consistency matters.
Accessibility Assistant
Use the Accessibility Assistant to apply WCAG 2.2 Level AA guidance during implementation, not after it. It helps with ARIA usage, keyboard navigation, semantic markup, and color contrast validation for text and UI controls. It is especially useful for interactive templates, complex component flows, and final semantic checks before release.

When to Use Orchestrated vs Targeted Mode
Use #kendo_ui_generator for a complete orchestration-first workflow from a single prompt. When you need finer control or want to adjust just one aspect (such as layout, theme, or a component), you can call a specialized assistant directly by its dedicated handle. For details, see the assistant-specific prompts.
AI Plugin
The Agentic UI Generator also comes with an AI kendo-react-plugin that brings the same capabilities directly into your agent without any manual MCP configuration. Instead of tools, the plugin delivers the functionality as skills: purpose-built instructions that your agent picks up automatically from context or that you can call explicitly with a slash command. It is the fastest way to get started and an alternative to setting up the MCP Server through the Kendo CLI.
To explore the available skills and usage examples, see the Prompt Library.
Start Building in Minutes
Go from zero setup to your first generated UI quickly with the smart Getting Started assistant. Start with Agentic UI Generator Getting Started for a simple, guided flow through MCP setup, license activation, and your first prompt.
Then move faster with ready-to-use examples in the Agentic UI Generator Prompt Library.
License Requirements
The KendoReact MCP server and its tools are offered as a single experience through the Agentic UI Generator (#kendo_ui_generator) in all active Telerik subscription models.
| License Type | Agentic UI Generator |
|---|---|
| Subscription License | |
| Trial License | |
| Perpetual License | No* |
* All AI tools are available with a 30-day AI Tools trial or a KendoReact trial.
Privacy
The KendoReact MCP server operates under the following conditions:
- The MCP server does not have access to your workspace and application code. Note that when using the KendoReact MCP server (or any other MCP server), the LLM generates parameters for the MCP server request, which may include parts of your application code.
- The MCP server does not use your prompts to train Telerik AI models.
- The MCP server does not generate the actual responses and has no access to these responses. The MCP server only provides better context that helps your selected model (for example, GPT, Gemini, Claude) produce better responses.
- The MCP server does not associate your prompts with your Telerik user account. Your prompts and generated context are anonymized and stored for statistical and troubleshooting purposes.
Next Steps
- Install the KendoReact MCP server and get started with the Agentic UI Generator Getting Started guide.
- Check out the Agentic UI Generator Prompt Library.
- Use the KendoReact AI Plugin to bring the same MCP capabilities directly into Claude Code, GitHub Copilot CLI, or VS Code Copilot without manual MCP configuration.
- Review the Changelog for the latest updates.