Installing with NuGet
NuGet is a popular .NET package manager.
Progress maintains the Telerik NuGet Feed for registered users and all Kendo UI for jQuery official releases and service packs are published there as well.
As of R3 2023 the Kendo UI bundles do not include the jQuery library in their
jsdirectories and you candownload jQuery using NuGet package manageror use other source for the jQuery library.
1. Generate a NuGet API Key
As the Telerik NuGet server requires authentication, the first step is to obtain an API key that you will use instead of a password. Using an API key instead of a password is a more secure approach, especially when working with the .NET CLI or a NuGet.Config file.
- Go to the API Keys page in your Telerik account.
- Click Generate New Key +.
- In the Key Note field, add a note that describes the API key.
- Click Generate Key.
- Select Copy and Close. Once you close the window, you can no longer copy the generated key. For security reasons, the API Keys page displays only a portion of the key.
- Store the generated NuGet API key as you will need it in the next steps. Whenever you need to authenticate your system with the Telerik NuGet server, use
api-keyas the username and your generated API key as the password.
API keys expire after two years. Telerik will send you an email when a key is about to expire, but we recommend that you set your own calendar reminder with information about where you used that key: file paths, project links, AzDO and GitHub Action variable names, and so on.
2. Choose the Required Package
The Telerik NuGet Feed provides the following Kendo UI for jQuery packages:
KendoUIProfessional—The commercial Kendo UI for jQuery version.KendoUICore—The open-source Kendo UI distribution which contains only the open-sourced components.
3. Register the Feed on Your System
To add the Telerik NuGet feed as a package source on your machine and access the packages, use either of the following approaches:
- Use the NuGet CLI.
- Use the UI provided from Visual Studio for configuring authenticated NuGet feeds.
Regardless of how you set up the Telerik NuGet feed, you must first generate a NuGet API key needed for the authentication.
Never hard-code your Telerik NuGet API keys in a
NuGet.Configfile in a GitHub repository, Docker image, or any location that may be accessed by unauthorized parties. An API key is valuable and bad actors can use it to access the NuGet packages that are licensed under your account. A credentials abuse can lead to a review of the affected Telerik account.
Add the Feed with the NuGet CLI
To register the Telerik NuGet Feed on your system by using the NuGet CLI:
-
Download the latest NuGet executable.
-
Open a command prompt and change the path to where the
nuget.exeis downloaded. -
Execute the command:
SHNuGet Sources Add -Name "telerik.com" -Source "https://nuget.telerik.com/v3/index.json" -UserName "api-key" -Password "YOUR-NUGET-API-KEY" -StorePasswordInClearTextThe command adds the Telerik NuGet source, uses your NuGet API key for authentication, and stores the API key in plain text in the global config file (in
%AppData%\NuGet\NuGet.config).
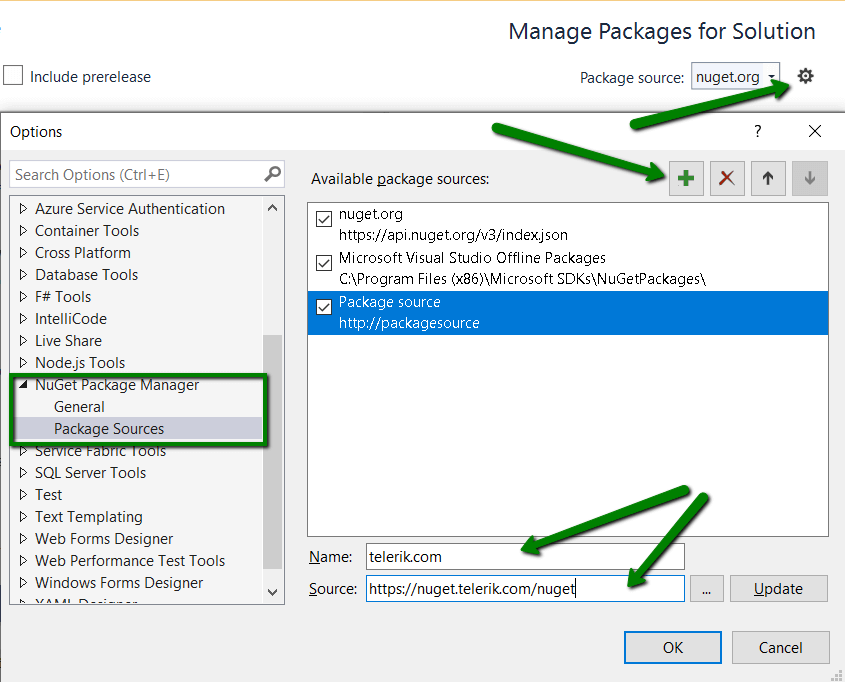
Add the Feed with the NuGet Package Manager
To register the Telerik NuGet Feed on your system by using the NuGet package manager:
-
Open Visual Studio.
-
Go to Tools > NuGet Package Manager > Package Manager Settings, select Package Manager Sources and then click the + button.
-
Select the feed Name, set the feed URL to https://nuget.telerik.com/v3/index.json, and click OK.
-
Select the Browse list of packages.
-
In the Windows authentication prompt:
5.1. Enter
api-keyin the User Name field.5.2. Enter your NuGet API key in the Password field.
5.3. Check the Remember My Password checkbox.
3. Install the Packages
After setting up the Telerik NuGet Feed package source on your computer, install the Kendo UI for jQuery packages by using either of the following utilities:
Regardless of the package installation approach you choose, after the installation, the content scripts and stylesheets will be copied to your application as follows:
-
/Scripts/kendo/<version>/—Contains the minified JavaScript files. -
/Content/kendo/<version>/—Contains the minified CSS files and theme images.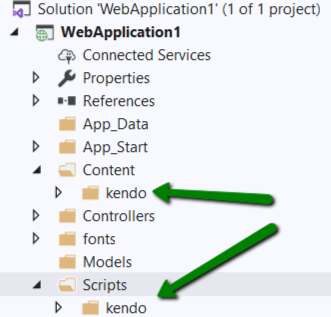
The installation approach with the NuGet works only with .NET MVC projects that have the
ContentandScriptsfolders. In a .NET Core(and newer) projects, the resources(scripts and styles) must be copied manually in thewwwrootfolder.
Install with the Package Manager Dialog
To install the Kendo UI for jQuery packages by using the Package Manager dialog:
-
Right-click Solution or a specific project in Solution, and navigate to Manage NuGet Packages.
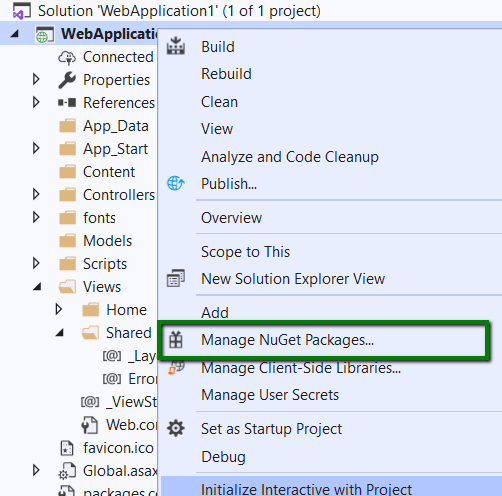
-
Set the package source to
telerik.comand install theKendoUIProfessionalNuGet package.
Install with the Package Manager Console
To install the Kendo UI for jQuery packages by using the Package Manager console:
-
Open the project or solution in Visual Studio, and open the console by selecting Tools > NuGet Package Manager > Package Manager Console.
-
To install the package, substitute
WebApplicationwith the name of your project from the following command and run it.jsInstall-Package KendoUIProfessional -ProjectName WebApplication
Next Steps
- Create Your Own Custom Bundles
- Create Your Own Custom Components
- Initialize Components as jQuery Plugins
- Initialize Components with MVVM