This is a migrated thread and some comments may be shown as answers.

Adding Labels on top of a RadialGauge

3 Answers 131 Views
Gauges
This is a migrated thread and some comments may be shown as answers.
Sparkhound
Top achievements
Rank 1
Sparkhound asked on 25 Sep 2017, 09:56 PM

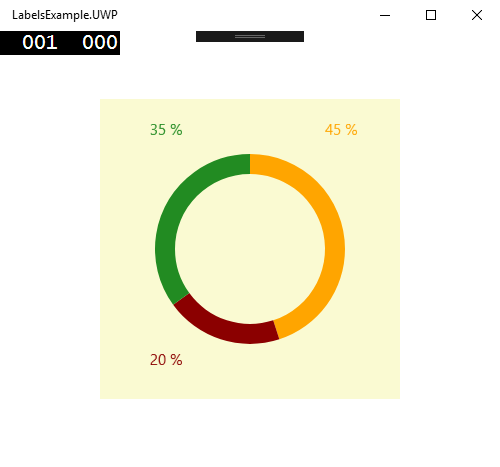
I want to add labels on top of (or next to) a Radial Gauge where the respective GaugeRangeBarIndicator is. 


01.<telerikGauges:RadRadialGauge StartAngle="90" SweepAngle="360" HeightRequest="200">
02.    <telerikGauges:RadRadialGauge.Axis>
03.        <telerikGauges:GaugeLinearAxis Maximum="100"
04.            Minimum="0"
05.            TickLength="10"
06.            TickOffset="2"
07.            ShowLabels="False"
08.            StrokeThickness="0" />
09.        </telerikGauges:RadRadialGauge.Axis>
10.        <telerikGauges:RadRadialGauge.Ranges>
11.            <telerikGauges:GaugeRangesDefinition Offset="0">
12.                <telerikGauges:GaugeRange Color="Gray"
13.                    From="0"
14.                    To="100" />
15.                </telerikGauges:GaugeRangesDefinition>
16.        </telerikGauges:RadRadialGauge.Ranges>
17.        <telerikGauges:RadRadialGauge.Indicators>
18.            <telerikGauges:GaugeBarIndicator EndCap="Flat"
19.                    Fill="Green"
20.                    StartCap="Flat"
21.                    Offset="0"
22.                    Value="{Binding GreenYellow}" />
23.            <telerikGauges:GaugeRangeBarIndicator Fill="Yellow"
24.                    FromCap="Flat"
25.                    ToCap="Flat"
26.                    Offset="0"
27.                    From="{Binding GreenYellow}"
28.                    To="{Binding YellowRed}" />
29.            <telerikGauges:GaugeRangeBarIndicator Fill="Red"
30.                    FromCap="Flat"
31.                    ToCap="Flat"
32.                    Offset="0"
33.                    From="{Binding YellowRed}"
34.                    To="100" />
35.        </telerikGauges:RadRadialGauge.Indicators>
36.    </telerikGauges:RadRadialGauge>

How can I add labels next to the specific indicator section? Or is there a way that I can draw them manually?

3 Answers, 1 is accepted

Sort by
0
Lance | Senior Manager Technical Support
Telerik team
answered on 27 Sep 2017, 04:06 PM
Hi Sparkhound,

Unfortunately, there is nothing on the RadRadialGauge that will help you with this. You need to overlay your own <Label /> element on top of the Gauge. You're already on the right path, the only thing left is for you to position the Labels next to the lines you've already drawn.

You can use whichever method you prefer to position the Label. A popular option to get precise placement is to set the TranslationX and TranslationY values (in respect to the Gauge's parent container).


Example

To help you get started on using Translation, attached is a simple demo. You'll need to tweak your math so that it will always be accurate when you add ranges, but it demonstrates the idea. Let me walk you through the approach.

Let's start with a parent Grid container for the RadialGauge and give it a definitive Width and Height so that I know where to position the Labels (you can dynamically check this at runtime and use values that way, but for the demo's simplicity, I use static values):

<Grid x:Name="GaugeGrid" WidthRequest="300" HeightRequest="300" VerticalOptions="Center" HorizontalOptions="Center" BackgroundColor="LightGoldenrodYellow">
            <telerikGauges:RadRadialGauge x:Name="gauge"
                            WidthRequest="200"
                            HeightRequest="200"
                            AxisRadiusFactor="1"
                            VerticalOptions="Center"
                            HorizontalOptions="Center"
                            StartAngle="90"
                            SweepAngle="360">
                <telerikGauges:RadRadialGauge.AnimationSettings>
                    <common:AnimationSettings Enabled="False"/>
                </telerikGauges:RadRadialGauge.AnimationSettings>
                <telerikGauges:RadRadialGauge.Axis>
                    <telerikGauges:GaugeLinearAxis Maximum="100"
                                     Minimum="0"
                                     ShowLabels="False"
                                     StrokeThickness="0" />
                </telerikGauges:RadRadialGauge.Axis>
                <telerikGauges:RadRadialGauge.Indicators>
                    <telerikGauges:GaugeRangeBarIndicator x:Name="Indicator1" From="0" To="45" Fill="Orange" />
                    <telerikGauges:GaugeRangeBarIndicator x:Name="Indicator2" From="45" To="65" Fill="DarkRed" />
                    <telerikGauges:GaugeRangeBarIndicator x:Name="Indicator3" From="65" To="100" Fill="ForestGreen" />
                </telerikGauges:RadRadialGauge.Indicators>
            </telerikGauges:RadRadialGauge>
        </Grid>


You know you have a 300 x 300 "plotting area" to translate the Labels. Therefore, you can do something like this:

protected override void OnAppearing()
{
    base.OnAppearing();
             
    // For indicator 1
    var label1 = new Label();
    label1.Text = $"{Indicator1.To - Indicator1.From} %";
    label1.TextColor = Indicator1.Fill;
    label1.TranslationX = 225;
    label1.TranslationY = 20;
    GaugeGrid.Children.Add(label1);
 
    // For indicator 2
    var label2 = new Label();
    label2.Text = $"{Indicator2.To - Indicator2.From} %";
    label2.TextColor = Indicator2.Fill;
    label2.TranslationX = 50;
    label2.TranslationY = 250;
    GaugeGrid.Children.Add(label2);
 
     // For indicator 3
    var label3 = new Label();
    label3.Text = $"{Indicator3.To - Indicator3.From} %";
    label3.TextColor = Indicator3.Fill;
    label3.TranslationX = 50;
    label3.TranslationY = 20;
    GaugeGrid.Children.Add(label3);
}


Here is the result at runtime: 


Wrapping Up

If this answers your question, you can let me know by selecting the ticket's "Mark as resolved" button. Thank you for contacting Support and for choosing UI for Xamarin.

Regards,
Lance | Tech Support Engineer, Sr.
Progress Telerik
Do you want to have your say when we set our development plans? Do you want to know when a feature you care about is added or when a bug fixed? Explore the Telerik Feedback Portal and vote to affect the priority of the items
0
Sparkhound
Top achievements
Rank 1
answered on 27 Sep 2017, 04:14 PM
That is kind of what I was already doing with labels, but the part that I couldn't figure out is how to "dynamically check this at runtime". I didn't see a property of the GaugeRangeBarIndicator that would tell me where it is on the RadialGauge.
0
Lance | Senior Manager Technical Support
Telerik team
answered on 27 Sep 2017, 04:32 PM
Hi Sparkhound Developer,

You'll need to use the From and To values against the radius of the gauge.

For example, the first segment starts at 0 and ends at 65 on a range that goes from 0 to 100. that means the first segment takes up 234 degrees of the radius.

Add another 90 degrees because of the gauge's StartAngle and you end up with a starting point at 90 degrees and end point at 324 degrees. The halfway point is 207 degrees.

You'd do the same for all the other ranges and you'll end up with a center point for each range. You then do the math for what that translates to against the Cartesian coordinate of the parent Grid and then translate the Label to that point.

Regards,
Lance | Tech Support Engineer, Sr.
Progress Telerik
Do you want to have your say when we set our development plans? Do you want to know when a feature you care about is added or when a bug fixed? Explore the Telerik Feedback Portal and vote to affect the priority of the items
Tags
Gauges
Asked by
Sparkhound
Top achievements
Rank 1
Answers by
Lance | Senior Manager Technical Support
Telerik team
Sparkhound
Top achievements
Rank 1
Share this question
or