Step by Step: Create Node.js REST API with SQL Server Database

Summarize with AI:
Learn to build a REST API in Node.js that performs read and write operations on a database in SQL Server.
In this article, we’ll take a step-by-step approach to help you in building a REST API in Node.js that performs read and write operations on a database in SQL Server.
At the end of this article, you should able to create a Node.js REST API performing CRUD operations on a database in SQL Server.
API Architecture

Installations
To start with, open the command prompt and run the command:
node -vThe above command should return the version of Node.js installed on your machine. If it does not return a version, install Node.js from here: https://nodejs.org/en/download/.
After installing, again run the above command to verify the successful installation of the Node.js. Also, we are going to use the VS Code for the development, so if not already installed, consider installing the VS Code from here: https://code.visualstudio.com/download.
To test the API, we will use Telerik Fiddler Everywhere. Download and install it from here.
Configuring SQL Server
We are going to use SQL Server as a data store. To connect Node.js and SQL Server instance on the local machine, you need to make sure about specific configurations. So, to cross-check the configuration on a Windows machine, press Windows key + R, and type command compmgmt.msc to open the Computer Management window.
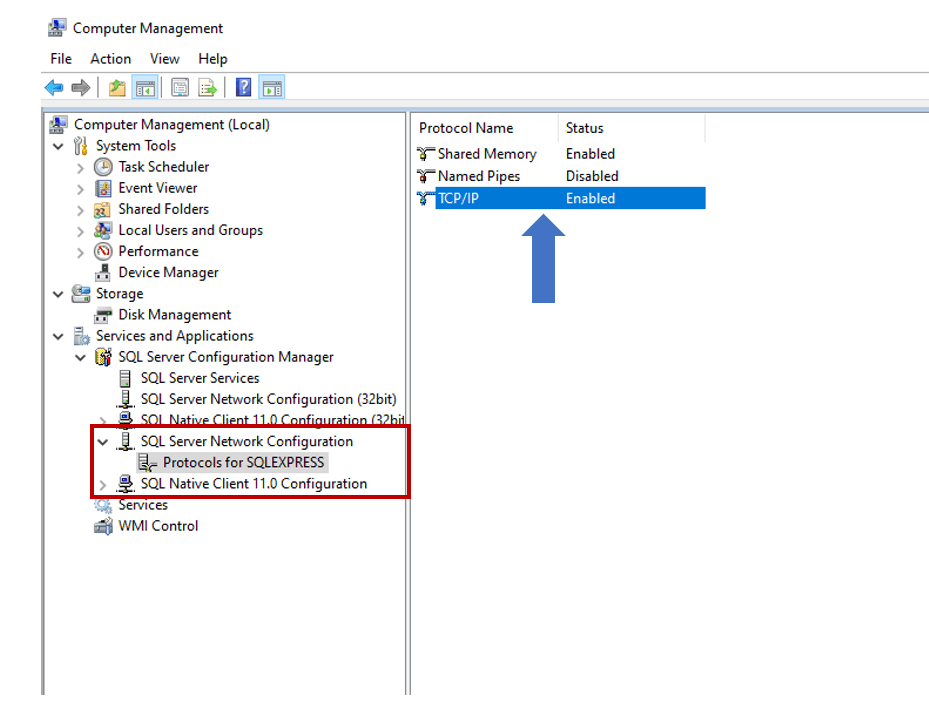
In the computer management window, select SQL Server Network Configuration and make sure TCP/IP option is enabled.
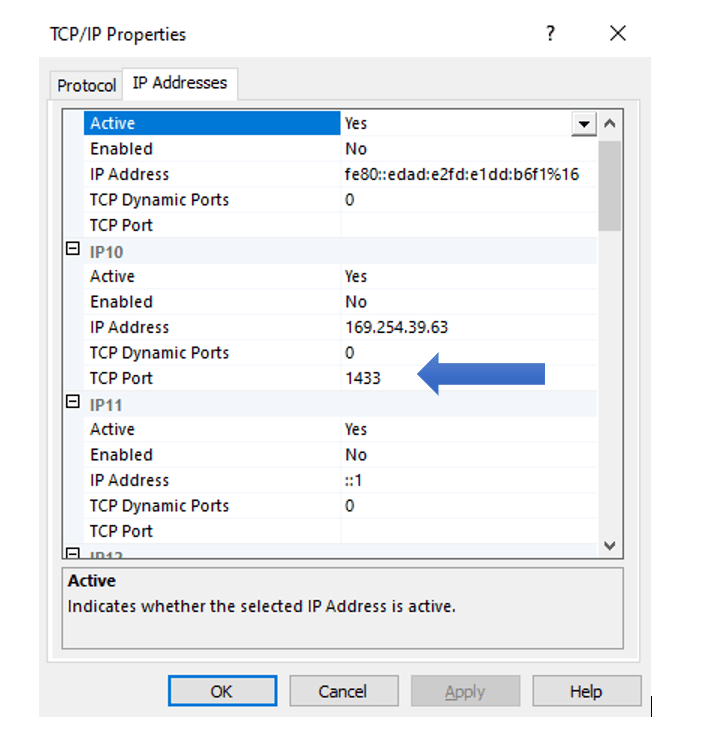
Once the TCP/IP option is enabled, right-click on the TCP/IP and select properties. In the properties window make sure that port is set to 1433.
Next, open SQL Server Management Studio and run the command:
select distinct local_net_address, local_tcp_port from sys.dm_exec_connections where local_net_address is not null
It should return local_net_address and local_tcp_port.
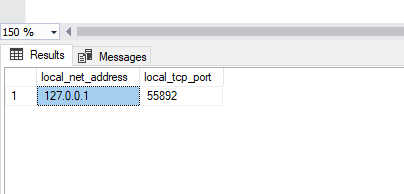
You need these two values in the Node.js to connect to the SQL Server database. To create the API, we have created an Order database with stored procedures.
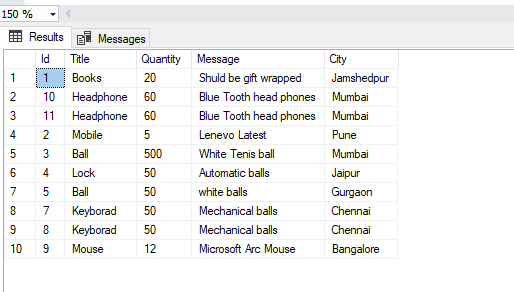
Order table schema looks like this:
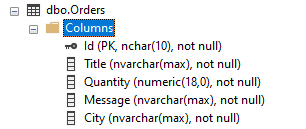
We will perform read and write operations on the above table. Besides the above configurations, note the SQL Server instance name and the SQL user information.
Creating the API Project
To create a project, create a blank folder, and change directory to that. In the directory run the command:
npm init -yThis command will create a package.json file with default values in the project folder. Open the project folder in VS Code, and modify package.json file as shown below.
{
  "name": "nodeapi",
  "version": "1.0.0",
  "description": "",
  "main": "index.js",
  "scripts": {
    "test": "echo \"Error: no test specified\" && exit 1",
    "start":"nodemon api.js"
  },
  "dependencies": {
    "body-parser": "~1.0.1",
    "cors": "2.8.1",
    "express": "~4.0.0",
    "mssql": "^6.2.1"
  },
  "devDependencies": {
    "nodemon": "^2.0.4"
  },
  "keywords": [],
  "author": "Dhananjay Kumar <debugmode@outlook.com> (https://debugmode.net)",
  "license": "ISC"
}
After updating package.json file, on the command prompt run the command:
npm installAfter a successful installation, you will find the node_modules subfolder added to the project. Next, add a file dbconfig.js, and add the below code in it.
const  config = {
  user:  'foo', // sql user
  password:  'foo', //sql user password
  server:  '127.0.0.1', // if it does not work try- localhost
  database:  'Products',
  options: {
    trustedconnection:  true,
    enableArithAbort:  true,
    instancename:  'SQLEXPRESS'  // SQL Server instance name
  },
  port:  55892
}

module.exports = config;
The above file contains configuration to connect to SQL Server. For you, the port number could be different, which you have noted in the previous step.
Next, we will create a class to represent the Order table. For that, add a file order.js in the project and put below code in that.
class  Order{
  constructor(Id,Title,Quantity,Message,City){
    this.Id = Id;
    this.Title = Title;
    this.Quantity = Quantity;
    this.Message = Message;
    this.City = City;
  }
}

module.exports = Order;
Order class has properties that correspond to the Order table columns. After this, create a file called dboperations.js. This file contains functions to perform database operations. In this file, first import dbconfig and mssql modules. We are going to use mssql to connect to the SQL Server from Node.js
var  config = require('./dbconfig');
const  sql = require('mssql');
You can fetch all orders from Order table as shown below:
async  function  getOrders() {
  try {
    let  pool = await  sql.connect(config);
    let  products = await  pool.request().query("SELECT * from Orders");
    return  products.recordsets;
  }
  catch (error) {
    console.log(error);
  }
}
In the getOrders function:
- We are connecting to the database using the sql.connect method. This method accepts the database configuration object and returns a promise.
- On the response of the connect method, we execute the query.
- In the query, we are passing the SQL query to be executed.
- We are returning the recordsets of the query result, which contain the records from the table in an array.
In the same way, you can fetch a particular order as shown below:
async  function  getOrder(productId) {
  try {
    let  pool = await  sql.connect(config);
    let  product = await  pool.request()
    .input('input_parameter', sql.Int, productId)
    .query("SELECT * from Orders where Id = @input_parameter");
    return  product.recordsets;
  }
  catch (error) {
    console.log(error);
  }
}
Here you need to pass the input method to pass the input parameter. You can insert a record by either executing the insert query or calling a stored procedure, as shown in the below code listing.
async  function  addOrder(order) {
  try {
    let  pool = await  sql.connect(config);
    let  insertProduct = await  pool.request()
    .input('Id', sql.Int, order.Id)
    .input('Title', sql.NVarChar, order.Title)
    .input('Quantity', sql.Int, order.Quantity)
    .input('Message', sql.NVarChar, order.Message)
    .input('City', sql.NVarChar, order.City)
    .execute('InsertOrders');
    return  insertProduct.recordsets;
  }
  catch (err) {
    console.log(err);
  }
}
Here, InsertOrders is the name of the stored procedure. Also, we are passing all the parameters to the stored procedure using the input method.
Putting everything together, dboperations.js should have code as shown below:
var  config = require('./dbconfig');
const  sql = require('mssql');

async  function  getOrders() {
  try {
    let  pool = await  sql.connect(config);
    let  products = await  pool.request().query("SELECT * from Orders");
    return  products.recordsets;
  }
  catch (error) {
    console.log(error);
  }
}

async  function  getOrder(productId) {
  try {
    let  pool = await  sql.connect(config);
    let  product = await  pool.request()
    .input('input_parameter', sql.Int, productId)
    .query("SELECT * from Orders where Id = @input_parameter");
    return  product.recordsets;
  }
  catch (error) {
    console.log(error);
  }
}

async  function  addOrder(order) {
  try {
    let  pool = await  sql.connect(config);
    let  insertProduct = await  pool.request()
    .input('Id', sql.Int, order.Id)
    .input('Title', sql.NVarChar, order.Title)
    .input('Quantity', sql.Int, order.Quantity)
    .input('Message', sql.NVarChar, order.Message)
    .input('City', sql.NVarChar, order.City)
    .execute('InsertOrders');
    return  insertProduct.recordsets;
  }
  catch (err) {
    console.log(err);
  }
}

module.exports = {
  getOrders:  getOrders,
  getOrder:  getOrder,
  addOrder:  addOrder
}
Creating the API
We are going to use Express to create the REST API, and we have already installed it. Add a file called api.js in the project, and put the below code in it.
var  Db = require('./dboperations');
var  Order = require('./Order');
var  express = require('express');
var  bodyParser = require('body-parser');
var  cors = require('cors');
var  app = express();
var  router = express.Router();

app.use(bodyParser.urlencoded({ extended:  true }));
app.use(bodyParser.json());
app.use(cors());
app.use('/api', router);
We are just importing required modules such as express, CORS, body-parser. Besides them, we’re importing the dboperations module. Also, we are encoding the URL and configuring the API to use CORS.
Next, at the bottom of the api.js file, put the below code. This code is configuring the API to listen to a particular port.
var  port = process.env.PORT || 8090;
app.listen(port);
console.log('Order API is runnning at ' + port);
Now, we are all set to write API routes. First, configure the middleware as below:
router.use((request, response, next) => {
  console.log('middleware');
  next();
});
Right now, it is doing nothing. However, this route will be called before any other routes, and you can put authentication, authorization, logging operations here.
Next, to fetch all orders, you need to perform GET operation. To do so, add a get route to the API as shown below:
router.route('/orders').get((request, response) => {
  Db.getOrders().then((data) => {
    response.json(data[0]);
  })
})
In this route, we are calling getOrders() method of dboperations module to fetch all orders. Similarly, you can add an order by performing post operation as shown below.
router.route('/orders').post((request, response) => {
  let  order = { ...request.body }
  Db.addOrder(order).then(data  => {
    response.status(201).json(data);
  })
})
Above, we are reading order to be inserted from the request body and passing that to the addOrder function, and after successful insertion returning newly inserted record with status 201.
You can fetch a particular order as shown below:
router.route('/orders/:id').get((request, response) => {
  Db.getOrder(request.params.id).then((data) => {
    response.json(data[0]);
  })
})
Here orderId is passed in the query parameter. Putting everything together, api.js with read and write operations should look like below:
var  Db = require('./dboperations');
var  Order = require('./Order');
var  express = require('express');
var  bodyParser = require('body-parser');
var  cors = require('cors');
var  app = express();
var  router = express.Router();

app.use(bodyParser.urlencoded({ extended:  true }));
app.use(bodyParser.json());
app.use(cors());
app.use('/api', router);

router.use((request, response, next) => {
  console.log('middleware');
  next();
});


router.route('/orders').get((request, response) => {
  Db.getOrders().then((data) => {
    response.json(data[0]);
  })
})

router.route('/orders/:id').get((request, response) => {
  Db.getOrder(request.params.id).then((data) => {
    response.json(data[0]);
  })
})

router.route('/orders').post((request, response) => {
  let  order = { ...request.body }
  Db.addOrder(order).then(data  => {
    response.status(201).json(data);
  })
})


var  port = process.env.PORT || 8090;
app.listen(port);
console.log('Order API is runnning at ' + port);
Now run the API using the below command:
nodemon api.jsYou should get a message in the console that Order API is running at 8090. So, as of now, we have built the API and it’s running.
Test the API
Next, let us test the API using Fiddler Everywhere. To test the GET operations in Fiddler Everywhere, create a new request and pass the API URL as shown below:
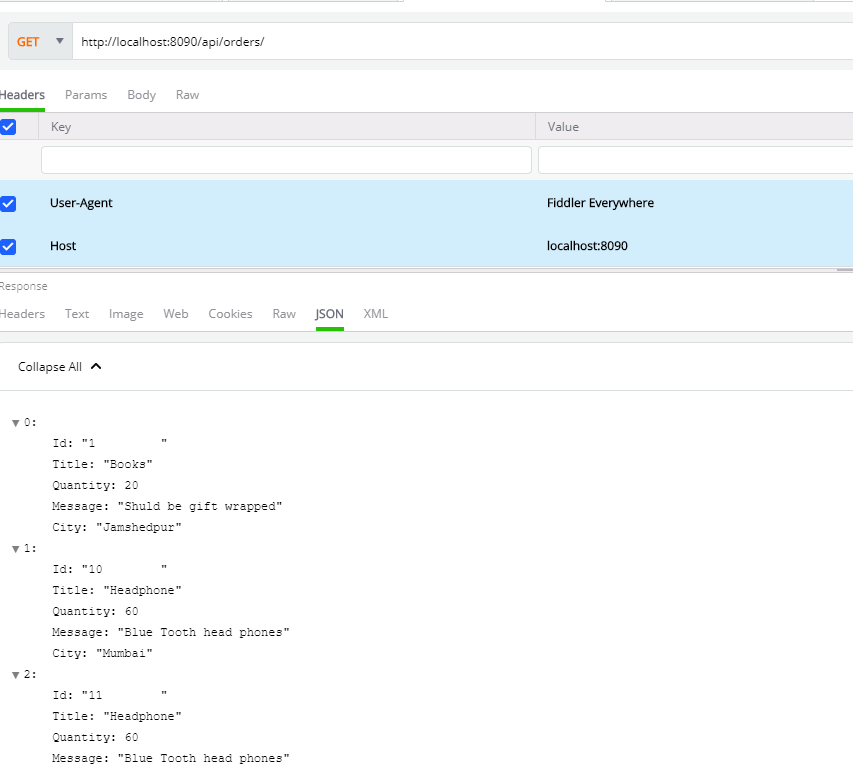
You should get the data returned as JSON. To test insert order operation, perform the POST operation, as shown below.
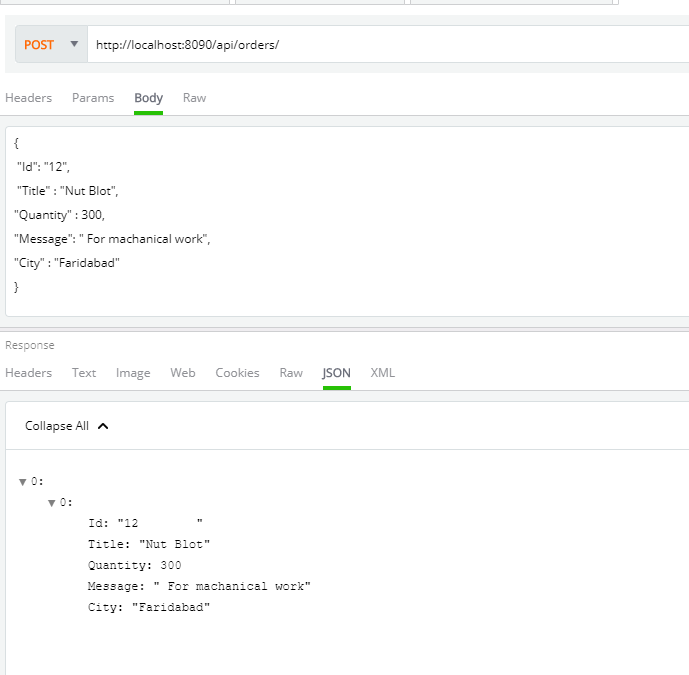
On successful insertion of record, you will find a newly inserted row is returned.
Summary
In this article, in a step-by-step manner, you learned to create a Node.js-based API, that performs Create and Read operations on a table in the SQL Server database. I hope you find it useful. Thanks for reading.

Dhananjay Kumar
Dhananjay Kumar is a well-known trainer and developer evangelist. He is the founder of NomadCoder, a company that focuses on creating job-ready developers through training in technologies such as Angular, Node.js, Python, .NET, Azure, GenAI and more. He is also the founder of ng-India, one of the world’s largest Angular communities. He lives in Gurgaon, India, and is currently writing his second book on Angular. You can reach out to him for training, evangelism and consulting opportunities.
