
.NET Aspire 6: Deployment Using Azure Container Apps

Summarize with AI:
The .NET Aspire series continues with deploying to Azure Container Apps. Using the Azure Developer CLI, we explore how to deploy to the cloud and also explore deployment considerations when pushing to production.
This is the final part of our six‑part deep dive into .NET Aspire.
- Part 1: What Is .NET Aspire?
- Part 2: Exploring the Developer Dashboard
- Part 3: Service Defaults
- Part 4: Integrations
- Part 5: Orchestration & Service Discovery
- This post (Part 6): Deployment Using Azure Container Apps
Welcome back. Time to ship this thing.
During this series, we’ve gone from learning what .NET Aspire is, to exploring the dashboard, and service defaults, integrations and service discovery.
If you’ve been coding along, you’ve probably enjoyed how Aspire makes local development approachable. We’ve spun up APIs, databases, a Blazor frontend and a Redis cache and watched them all come alive in a single “mission control” dashboard.
But production doesn’t run on localhost:5000 (trust me, I’ve tried). Today, we’re deploying Azure Container Apps using the Azure Developer CLI (azd), and I will show you how the proverbial sausage gets made.
The Evolving Deployment Story
Since the initial release of Aspire, the deployment story has significantly matured. With Aspire 9.2 and later, Microsoft introduced a new publishing model that gives you more flexibility in how and where you deploy your applications.
The original process generates a manifest file that the azd CLI consumes to provision infrastructure. This is great for Azure deployments but is very opaque.
Aspire 9.2 and later introduces the aspire publish and aspire deploy commands with extensible publishers. With this new process, you can now generate Docker Compose files, Kubernetes manifests, Bicep templates or even custom publishers. While the manifest format still exists, many are favoring this more flexible approach.
For Azure deployments specifically, azd remains the recommended path and is what we’ll use in this article. It has first-class Aspire support and handles the entire workflow from provisioning to deployment. If you need more extensibility, consider the publisher model.
Why Are We Deploying to Azure Container Apps?
If you’ve reached this point, you might be asking: why ACA? After all, we could throw our Aspire services on a VM, App Service, Azure Kubernetes Service (AKS) or even good old IIS.
Here’s why ACA and Aspire make sense for us:
- Serverless containers. With ACA, we don’t manage VMs or clusters. ACA scales your containers based on demand. Because Aspire apps are often microservice-y by nature, ACA fits us well.
- Built-in Dapr support. Aspire leans on Dapr for service-to-service communication and other benefits. ACA lets you enable Dapr sidecars with a single setting, which is less plumbing that we need to maintain.
Don’t worry, I’m not getting paid by Microsoft. It’s not all sunshine and rainbows. Aside from the obvious vendor lock-in, ACA also comes with:
- Opaque scaling rules. ACA’s autoscaling works well, but in many cases tuning it can feel like trial and error. You’ll need to experiment and test thoroughly to avoid cold starts or runaway costs.
- Debugging complexity. While the local Aspire dashboard is great to use, debugging distributed Aspire services running in ACA is less so. While logging and observability help, the gap is real.
ACA is definitely Azure’s fastest path to the cloud. You trade some control for simplicity. Depending on your goals, that may be a fair tradeoff.
The Database Question: To Containerize in the Cloud or Not?
For local development, Aspire apps typically run SQL Server in a container. This makes complete sense: you need a database to develop against, and containerized SQL spins up quickly alongside your APIs.
But when you move to production, you need to make a decision: containerize the database or use a managed service?
If you decide to containerize SQL server, you see:
- A familiar setup, just like locally
- Everything runs in containers, giving you symmetry between local development and your cloud environments
- That it’s fast to set up and tear down
However, you’ll see some drawbacks:
- Persistence becomes your problem. Unless you’ve carefully configured volumes, you risk losing data when you restart the container
- Congratulations, you are now responsible for patching, scaling, backups and high availability
- Databases are stateful; ACA is best for stateless workloads
If you decide to use an Azure SQL Database, you see:
- A fully managed database: backups, scaling and security patches are all managed by Microsoft
- High availability out of the box
- It integrates with managed identity, preventing manual management of passwords and tokens
Some drawbacks:
- It costs more than a containerized SQL instance
- It isn’t “free” to tear down and spin up like a container
- Some features differ from full SQL Server (though for most use cases, it’s a non-issue)
In my experience, most teams run containerized SQL for development and Azure SQL (or another managed cloud database) for production use cases. Aspire does make this easy; just point your connection string to Azure SQL instead of a container. With DefaultAzureCredential, your app can authenticate securely without storing a password.
A pragmatic path is usually best. When it comes to production, databases are too critical to treat as disposable containers.
Prepare Aspire Services for Deployment
Your Aspire solution likely has several components. For what we’ve developed in this series, we have:
- Inventory API: Tracks in-stock guitars
- Orders API: Places customer orders and validates stock against Inventory
- Blazor frontend: The user interface that calls the API behind the scenes
- Redis cache: A cache that speeds up reads in our Blazor app
- SQL database: Our database layer (we’ll be using Azure SQL for production)
Locally, Aspire’s AppHost orchestrates all these. But in ACA, each service becomes its own container with its own lifecycle.
This changes a few things:
- Networking. Locally, Aspire wires up services with simple hostnames. In ACA, we’ll learn on Dapr service IDs or ACA-managed DNS.
- Configuration. Locally,
appsettings.jsonorsecrets.jsoncarries secrets. In ACA, our secrets will come from Azure Key Vault or ACA environment variables. - Scaling. Locally, everything runs together. In ACA, each service can scale independently. For example, our Inventory API may need more replicas than our Blazor app.
While Aspire gives us the glue to hold our services together, we still need to think of each service as independently deployable.
Deploy with azd: The Happy Path
With our deployment, everything starts with azd init, which provides customized support for .NET Aspire projects. To get started, you’ll need to install the Azure Developer CLI.
This diagram, respectfully stolen from the Microsoft documentation, gives a great overview of how azd runs its deployments.
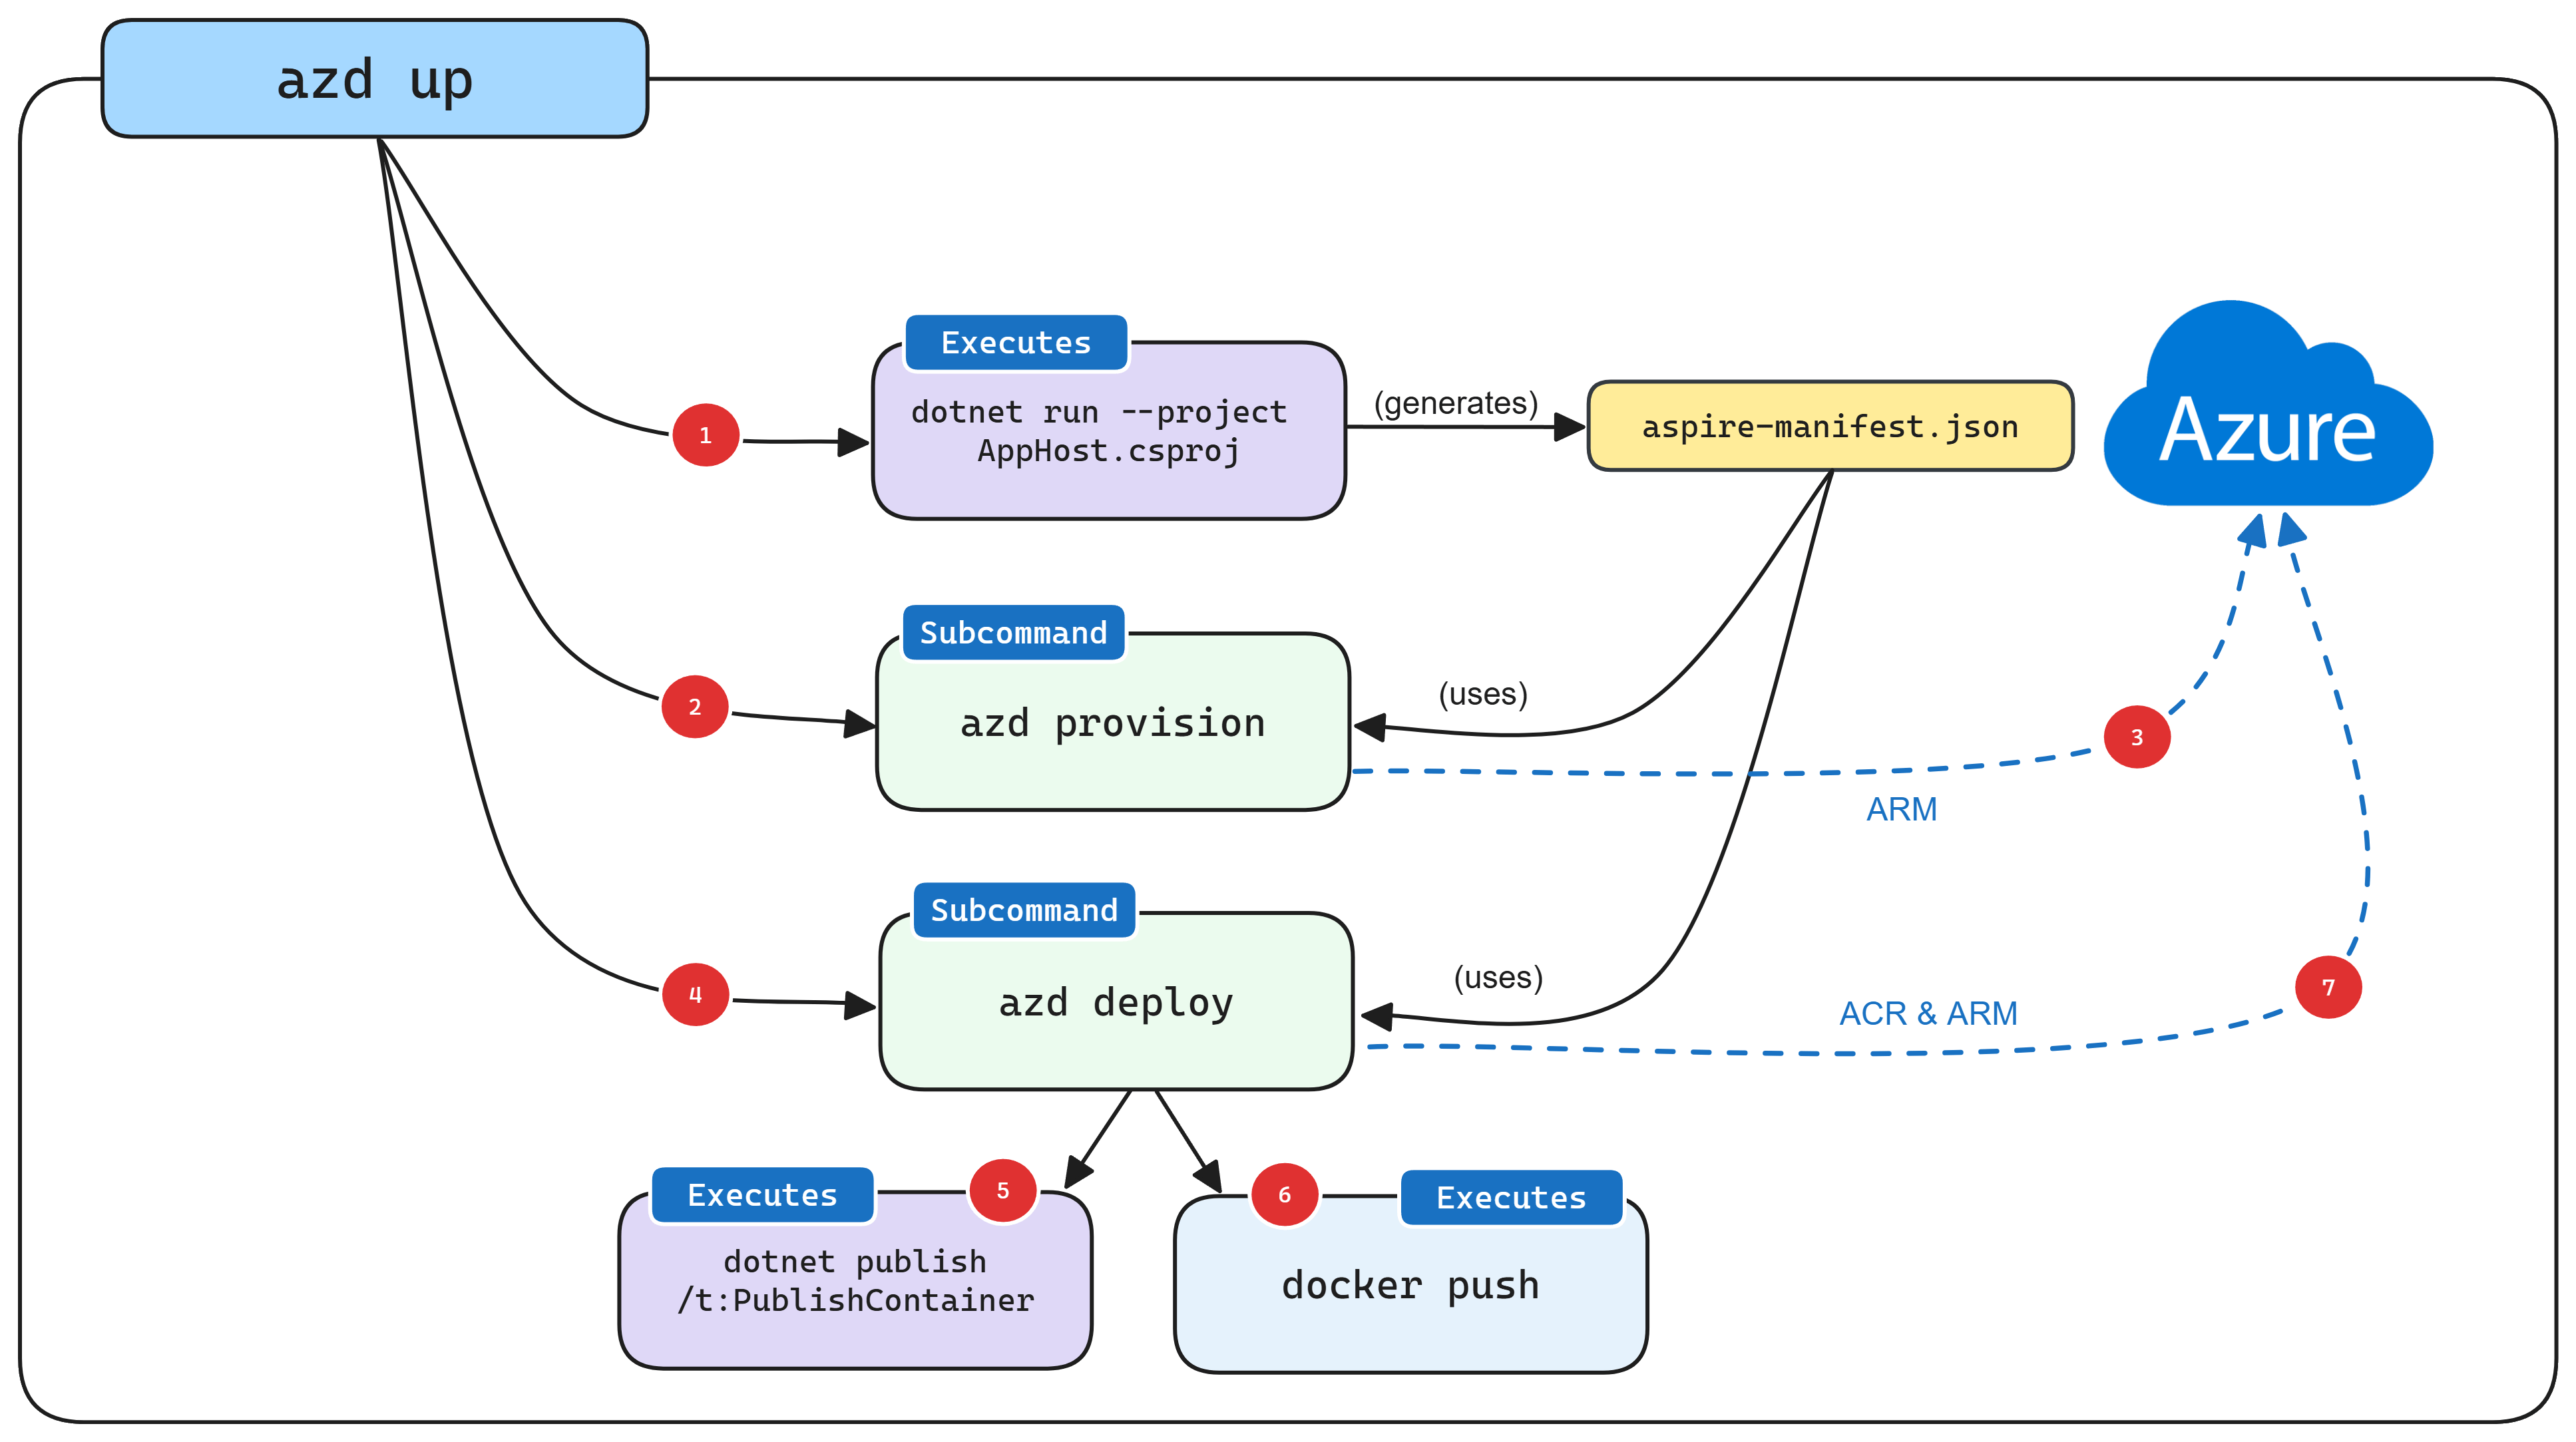
For more in-depth details, please check out the docs. To simplify: azd produces an Aspire manifest file, the azd provision call generates Bicep files, a deployment triggers using Azure Resource Manager (ARM) APIs, azd deploy executes with the same manifest file, azd makes a call to dotnet publish to generate container images, azd pushes images to an ACR registry, and, finally, azd uses the new version of the image.
Let’s walk through a successful deployment. I’ll walk through the commands and explain what’s happening at each step.
Step 1: Initialize the Project
From your root directory (where your .sln file lives):
azd init
You’ll see the following prompt:
? How do you want to initialize your app?
> Use code in the current directory
  Select a template
We’ll select Use code in the current directory. Next, azd scans your directory and detects your AppHost project:
Detected services:

  .NET (Aspire)
  Detected in: C:\code\AspireGuitarShop\AspireGuitarShop.AppHost\AspireGuitarShop.AppHost.csproj

azd will generate the files necessary to host your app on Azure using Azure Container Apps.

? Select an option
> Confirm and continue initializing my app
  Cancel and exit
Select Confirm and continue initializing my app. Then, enter an environment name (like dev or production).
? Enter a unique environment name: dev

Generating files to run your app on Azure:

  (✓) Done: Generating ./azure.yaml
  (✓) Done: Generating ./next-steps.md

SUCCESS: Your app is ready for the cloud!
You can provision and deploy your app to Azure by running the azd up command in this directory.
This creates several files:
azure.yamldescribes the services.azure/config.jsonstores the environment configuration.azure/dev/.envcontains environment-specific settings
Step 2: Deploy to Azure
Enter this simple command:
azd up
With this single command, azd:
- Authenticates you to Azure
- Prompts you for your subscription and location
- Provisions your Azure resources
- Builds and pushes your container images
- Deploys your services
You’ll see output like the following:
? Select an Azure Subscription to use:
> 1. Your Subscription (xxxxxxxx-xxxx-xxxx-xxxx-xxxxxxxxxxxx)

? Select an Azure location to use:
> 44. (US) East US 2 (eastus2)

? Select which services to expose to the Internet
> frontend

Packaging services (azd package)

Provisioning Azure resources (azd provision)
Provisioning Azure resources can take some time.

  Subscription: Your Subscription
  Location: East US 2

  (✓) Done: Resource group: rg-dev-xxxx
  (✓) Done: Container Registry: crdevxxxx
  (✓) Done: Log Analytics workspace: log-dev-xxxx
  (✓) Done: Container Apps Environment: cae-dev-xxxx

SUCCESS: Your application was provisioned in Azure in 1 minute 13 seconds.

Deploying services (azd deploy)

  (✓) Done: Deploying service inventoryapi
    - Endpoint: inventoryapi.xxxx.eastus2.azurecontainerapps.io/

  (✓) Done: Deploying service ordersapi
    - Endpoint: ordersapi.xxxx.eastus2.azurecontainerapps.io/

  (✓) Done: Deploying service frontend
    - Endpoint: frontend.xxxx.eastus2.azurecontainerapps.io/

  Aspire Dashboard: https://dashboard.xxxx.eastus2.azurecontainerapps.io/

SUCCESS: Your up workflow to provision and deploy to Azure completed in 3 minutes 50 seconds.
Do you see the link to the Aspire dashboard at the bottom? This is fully supported as of Aspire 9.2, giving you the same experience in production that you have in your local environment.
What azd Deployed
If we navigate to the Azure portal, we’ll see:
- Container registry: A repository for our container images. Each of our services (Inventory API, Orders API, Frontend) gets pushed here as a container image.
- Log analytics workspace: Collects logs and metrics from all our services. This feeds into Application Insights.
- Container apps environment: The logical boundary for our Container Apps (think of it as a cluster that the containers run in).
- Individual container apps: We have one for each service in our
AppHost. Because of this, each Container App scales independently. - Managed identities: With Aspire 9.2, each Container App gets its own managed identity by default.
The Bicep layer
Behind the scenes, azd generated Bicep templates to provision our infrastructure. We can generate them explicitly with the following command:
azd infra generate
This generates an infra folder with Bicep files. What’s inside?
First is a main.bicep file that orchestrates the entire deployment. It creates the resource group and calls other modules.
targetScope = 'subscription'

@minLength(1)
@maxLength(64)
@description('Name of the environment that can be used as part of naming resource convention, the name of the resource group for your application will use this name, prefixed with rg-')
param environmentName string

@minLength(1)
@description('The location used for all deployed resources')
param location string

@description('Id of the user or app to assign application roles')
param principalId string = ''

@metadata({azd: {
  type: 'generate'
  config: {length:22,noSpecial:true}
  }
})
@secure()
param cache_password string
@secure()
param password string

var tags = {
  'azd-env-name': environmentName
}

resource rg 'Microsoft.Resources/resourceGroups@2022-09-01' = {
  name: 'rg-${environmentName}'
  location: location
  tags: tags
}
module resources 'resources.bicep' = {
  scope: rg
  name: 'resources'
  params: {
    location: location
    tags: tags
    principalId: principalId
  }
}


output MANAGED_IDENTITY_CLIENT_ID string = resources.outputs.MANAGED_IDENTITY_CLIENT_ID
output MANAGED_IDENTITY_NAME string = resources.outputs.MANAGED_IDENTITY_NAME
output AZURE_LOG_ANALYTICS_WORKSPACE_NAME string = resources.outputs.AZURE_LOG_ANALYTICS_WORKSPACE_NAME
output AZURE_CONTAINER_REGISTRY_ENDPOINT string = resources.outputs.AZURE_CONTAINER_REGISTRY_ENDPOINT
output AZURE_CONTAINER_REGISTRY_MANAGED_IDENTITY_ID string = resources.outputs.AZURE_CONTAINER_REGISTRY_MANAGED_IDENTITY_ID
output AZURE_CONTAINER_REGISTRY_NAME string = resources.outputs.AZURE_CONTAINER_REGISTRY_NAME
output AZURE_CONTAINER_APPS_ENVIRONMENT_NAME string = resources.outputs.AZURE_CONTAINER_APPS_ENVIRONMENT_NAME
output AZURE_CONTAINER_APPS_ENVIRONMENT_ID string = resources.outputs.AZURE_CONTAINER_APPS_ENVIRONMENT_ID
output AZURE_CONTAINER_APPS_ENVIRONMENT_DEFAULT_DOMAIN string = resources.outputs.AZURE_CONTAINER_APPS_ENVIRONMENT_DEFAULT_DOMAIN
output SERVICE_SERVER_VOLUME_GUITARDATA_NAME string = resources.outputs.SERVICE_SERVER_VOLUME_GUITARDATA_NAME
output AZURE_VOLUMES_STORAGE_ACCOUNT string = resources.outputs.AZURE_VOLUMES_STORAGE_ACCOUNT
Next, we have resources.bicep. This file defines the actual Azure resources.
@description('The location used for all deployed resources')
param location string = resourceGroup().location
@description('Id of the user or app to assign application roles')
param principalId string = ''


@description('Tags that will be applied to all resources')
param tags object = {}

var resourceToken = uniqueString(resourceGroup().id)

resource managedIdentity 'Microsoft.ManagedIdentity/userAssignedIdentities@2023-01-31' = {
  name: 'mi-${resourceToken}'
  location: location
  tags: tags
}

resource containerRegistry 'Microsoft.ContainerRegistry/registries@2023-07-01' = {
  name: replace('acr-${resourceToken}', '-', '')
  location: location
  sku: {
    name: 'Basic'
  }
  tags: tags
}

resource caeMiRoleAssignment 'Microsoft.Authorization/roleAssignments@2022-04-01' = {
  name: guid(containerRegistry.id, managedIdentity.id, subscriptionResourceId('Microsoft.Authorization/roleDefinitions', '7f951dda-4ed3-4680-a7ca-43fe172d538d'))
  scope: containerRegistry
  properties: {
    principalId: managedIdentity.properties.principalId
    principalType: 'ServicePrincipal'
    roleDefinitionId:  subscriptionResourceId('Microsoft.Authorization/roleDefinitions', '7f951dda-4ed3-4680-a7ca-43fe172d538d')
  }
}

resource logAnalyticsWorkspace 'Microsoft.OperationalInsights/workspaces@2022-10-01' = {
  name: 'law-${resourceToken}'
  location: location
  properties: {
    sku: {
      name: 'PerGB2018'
    }
  }
  tags: tags
}

resource storageVolume 'Microsoft.Storage/storageAccounts@2022-05-01' = {
  name: 'vol${resourceToken}'
  location: location
  kind: 'StorageV2'
  sku: {
    name: 'Standard_LRS'
  }
  properties: {
    largeFileSharesState: 'Enabled'
  }
}

resource storageVolumeFileService 'Microsoft.Storage/storageAccounts/fileServices@2022-05-01' = {
  parent: storageVolume
  name: 'default'
}

resource serverGuitarDataFileShare 'Microsoft.Storage/storageAccounts/fileServices/shares@2022-05-01' = {
  parent: storageVolumeFileService
  name: take('${toLower('server')}-${toLower('guitardata')}', 60)
  properties: {
    shareQuota: 1024
    enabledProtocols: 'SMB'
  }
}

resource containerAppEnvironment 'Microsoft.App/managedEnvironments@2024-02-02-preview' = {
  name: 'cae-${resourceToken}'
  location: location
  properties: {
    workloadProfiles: [{
      workloadProfileType: 'Consumption'
      name: 'consumption'
    }]
    appLogsConfiguration: {
      destination: 'log-analytics'
      logAnalyticsConfiguration: {
        customerId: logAnalyticsWorkspace.properties.customerId
        sharedKey: logAnalyticsWorkspace.listKeys().primarySharedKey
      }
    }
  }
  tags: tags

  resource aspireDashboard 'dotNetComponents' = {
    name: 'aspire-dashboard'
    properties: {
      componentType: 'AspireDashboard'
    }
  }

}

resource serverGuitarDataStore 'Microsoft.App/managedEnvironments/storages@2023-05-01' = {
  parent: containerAppEnvironment
  name: take('${toLower('server')}-${toLower('guitardata')}', 32)
  properties: {
    azureFile: {
      shareName: serverGuitarDataFileShare.name
      accountName: storageVolume.name
      accountKey: storageVolume.listKeys().keys[0].value
      accessMode: 'ReadWrite'
    }
  }
}

output MANAGED_IDENTITY_CLIENT_ID string = managedIdentity.properties.clientId
output MANAGED_IDENTITY_NAME string = managedIdentity.name
output MANAGED_IDENTITY_PRINCIPAL_ID string = managedIdentity.properties.principalId
output AZURE_LOG_ANALYTICS_WORKSPACE_NAME string = logAnalyticsWorkspace.name
output AZURE_LOG_ANALYTICS_WORKSPACE_ID string = logAnalyticsWorkspace.id
output AZURE_CONTAINER_REGISTRY_ENDPOINT string = containerRegistry.properties.loginServer
output AZURE_CONTAINER_REGISTRY_MANAGED_IDENTITY_ID string = managedIdentity.id
output AZURE_CONTAINER_REGISTRY_NAME string = containerRegistry.name
output AZURE_CONTAINER_APPS_ENVIRONMENT_NAME string = containerAppEnvironment.name
output AZURE_CONTAINER_APPS_ENVIRONMENT_ID string = containerAppEnvironment.id
output AZURE_CONTAINER_APPS_ENVIRONMENT_DEFAULT_DOMAIN string = containerAppEnvironment.properties.defaultDomain
output SERVICE_SERVER_VOLUME_GUITARDATA_NAME string = serverGuitarDataStore.name
output AZURE_VOLUMES_STORAGE_ACCOUNT string = storageVolume.name
In a real-world environment, you’ll need to update these to accommodate dependencies, networking and security rules, and so on.
Finally, we have the main.parameters.json file, which stores our, well, parameters.
.json{
    "$schema": "https://schema.management.azure.com/schemas/2019-04-01/deploymentParameters.json#",
    "contentVersion": "1.0.0.0",
    "parameters": {
      "principalId": {
        "value": "${AZURE_PRINCIPAL_ID}"
      },
      "cache_password": {
        "value": "${AZURE_CACHE_PASSWORD}"
      },
      "password": {
        "value": "${AZURE_PASSWORD}"
      },
      "environmentName": {
        "value": "${AZURE_ENV_NAME}"
      },
      "location": {
        "value": "${AZURE_LOCATION}"
      }
    }
  }
So, why Bicep? Let’s talk about why Microsoft chose it for Aspire deployments.
For the uninitiated, Bicep is Azure’s domain-specific language (DSL) for deploying resources. Think of it as a friendly wrapper around ARM (Azure Resource Manager) templates. Where ARM templates are verbose JSON documents, Bicep is concise, readable and suited for your Azure cloud deployments.
You might also be wondering: why not Terraform? For me, I view Terraform as the Switzerland of the infrastructure-as-code landscape: neutral, reliable and works everywhere.
Here’s why we’re opting for Bicep over Terraform:
- Native Azure integration. Bicep has zero-day support for new Azure features—no waiting for provider updates.
- No state management. Bicep deployments are stateless; ARM is your state. No need to worry about state file corruption, backend configuration or state locks.
- Tighter IDE support. Visual Studio and VS Code give you IntelliSense for every Azure resource property.
- Azure-specific optimizations. Features like template specs and Azure blueprints only work with ARM/Bicep.
Of course, Terraform is an IaC leader for a reason. It shines when you need multi-cloud deployments, a massive ecosystem, mature tooling and explicit state. For Aspire specifically, Bicep makes more sense. The azd CLI generates Bicep automatically from our AppHost, and the integration is seamless.
Other Considerations
Before we finish discussing our Aspire deployment to Azure Container Apps, I’d like to walk through some final considerations.
Service-to-Service Communication with Dapr
One of Aspire’s biggest strengths is its embrace of Dapr. Without Dapr, service-to-service communication can be brittle—you hard-code hostnames, deal with manual retries and hope DNS resolves correctly.
With Dapr, services talk to each other using logical IDs. Dapr then handles retries, security and observability.
In our AppHost, we have:
var inventoryApi = builder.AddProject<Projects.Api>("inventoryapi")
    .WithReference(inventoryDb)
    .WithReference(cache);

var ordersApi = builder.AddProject<Projects.OrdersApi>("ordersapi")
    .WithReference(orderDb)
    .WithReference(inventoryApi);
When Orders API needs to call Inventory API, it doesn’t use http://inventoryapi:8080. Instead, it uses Dapr service invocation:
var response = await httpClient.GetAsync("http://inventoryapi/api/guitars");
Aspire’s service discovery wires this up automatically. In ACA, you enable Dapr in the Container App configuration, and it just works.
Managing Secrets with Azure Key Vault
Secrets are where cloud deployments often get messy. Many times, developers hard-code them locally then scramble to hide them in production. In ACA, the best practice is to use Azure Key Vault to store your secrets.
Here’s a typical flow:
- Store secrets in Key Vault, like database passwords and API keys
- Use managed identities so your ACA cotnainers can access Key Vault securely
- Reference secrets in your container’s environment variables
As we saw earlier in this series, our AppHost defines parameters:
var password = builder.AddParameter("password", secret: true);
var server = builder.AddSqlServer("server", password);
When we deploy with azd, we’re prompted for the password value and it gets stored in Key Vault automatically. Then, our Container Apps retrieve it at runtime using their managed identities. This way, we have no exposed passwords.
Observability in Production
The Aspire dashboard is great locally. When you deploy to ACA, you get the dashboard in production too (as of Aspire 9.2 and later), but you’ll also want to leverage Azure’s native observability tools.
As we’ve learned, Azure emits telemetry using OpenTelemetry by default. Configure your exporters to send data to Azure:
- Logs. Application Insights collects logs per service
- Metrics. Azure Monitor tracks CPU, memory and requests
- Traces. Distributed traces flow across services, letting us see request journeys end-to-end
The caveat? Azure’s tools are powerful but can be overwhelming. Application Insights can generate mountains of logs and KQL takes learning. Costs grow with data volume.
The tradeoff here is Aspire giving you easy local observability, and ACA giving us scalable but more complex observability.
Scaling and Cost Management
Scaling is ACA’s party trick: using Kubernetes Event-driven Autoscaling (KEDA) rules, you can scale services up or down based on CPU, memory or even custom events. To save some coin, services can scale to zero when idle.
Scaling isn’t truly free, though. Cold starts mean your first request might take seconds. If your users expect instant responses, scaling to zero might frustrate them.
Costs can quickly add up because of:
- Log ingestion fees from Application Insights
- Idle services that don’t quite scale to zero
- Over-provisioning because of cold start concerns
Start conservative, monitor and adjust. Aspire helps you design services to scale, but ACA billing enforces reality.
Honest Tradeoffs
Stepping back a bit, what’s the big picture?
With Aspire and ACA, we have an easy path from local development to cloud deployments, simple Dapr service discovery, strong Azure integration with its other resources, and serverless containers that can scale automatically.
It isn’t without drawbacks. We often experience cold starts and scaling quirks, debugging difficulties and no easy portability outside of Azure.
There is no free lunch. Aspire and ACA is excellent for Azure-first teams who want cloud-native deployments without the complexity of Kubernetes. If you need portability or fine-grained control, AKS might be a better choice.
Conclusion
And with that, we’ve reached the end of our Aspire journey. We explored Aspire’s dashboard, defaults, integration and service discovery. Now we’ve seen how to take it all the way to production.
While the Aspire deployment story is still evolving, it shows you that it isn’t just for local development and can also be a framework to help you succeed in the cloud. And while ACA comes with tradeoffs, it gives you a fast, integrated way to run Aspire services at scale.
As with any technology, there is much more to explore. Check out the Aspire docs, start building and let me know how it goes. Happy coding!

Dave Brock
Dave Brock is a software engineer, writer, speaker, open-source contributor and former Microsoft MVP. With a focus on Microsoft technologies, Dave enjoys advocating for modern and sustainable cloud-based solutions.
Related Posts
Comments
All articles
Topics
Web MobileMobile
Desktop
Design
Productivity
People
