Expand and Select Item with Load on Demand Enabled RadTreeView
This tutorial will demonstrate you how to expand and select an item when the RadTreeView is in load on demand mode (IsLoadOnDemandEnabled property is set to True).
For the purpose of this topic a RadTreeView which is data bound to a business object will be used. The next several code snippets show you the RadTreeView declaration and the business object structure.
	        <Grid>
	            <Grid.Resources>
	                <HierarchicalDataTemplate x:Key="treeViewTemplate" ItemsSource="{Binding Children}">
	                    <TextBlock Text="{Binding Title}" />
	                </HierarchicalDataTemplate>
	            </Grid.Resources>
	            <Grid.ColumnDefinitions>
	                <ColumnDefinition Width="Auto" />
	                <ColumnDefinition Width="300" />
	            </Grid.ColumnDefinitions>

	            <telerik:RadTreeView x:Name="treeView"
	                             Margin="8"
	                             HorizontalAlignment="Stretch"
	                             IsLoadOnDemandEnabled="True"
	                             IsVirtualizing="True"
	                             ItemTemplate="{StaticResource treeViewTemplate}"
	                             telerik:TextSearch.TextPath="Title" />

	            <StackPanel Grid.Column="1"
	                    Width="300"
	                    HorizontalAlignment="Right"
	                    VerticalAlignment="Top">
	                <Button Click="Button_Click_1" Content="Bring Item" />
	                <TextBox x:Name="userInput" />
	            </StackPanel>
	        </Grid>
The data source for the radtreeview will be consisted of DataItems, only.
	public class DataItem : ViewModelBase
	    {
	        private string title;
	        private List<DataItem> children;

	        public String Title
	        {
	            get
	            {
	                return this.title;
	            }
	            set
	            {
	                if (this.title != value)
	                {
	                    this.title = value;
	                    this.OnPropertyChanged("Title");
	                }
	            }
	        }

	        public List<DataItem> Children
	        {
	            get
	            {
	                return this.children;
	            }
	        }
}Set a DataItem instance to the ItemsSource property of the RadTreeView and create some simple data like in the code snippet below.
	this.treeView.ItemsSource = Enumerable.Range(1, 10).Select(i => new DataItem()
	{
	    Title = string.Format("Item {0}", i)
	}).ToList();
The actual loading on demand of the business items can be implemented in the getter of the Children property of the DataItem class. The LoadOnDemand feature of the RadTreeView control is used to visualize the expander icon in the front of each RadTreeViewItem. We do not use the built-in LoadOnDemand event to load the business items into the control. Instead, the HierarchicalDataTemplate will trigger the getter of its ItemsSource property on load. For demonstration purposes, we will load a fixed number of business data every time the getter is triggered and the children field is not yet instantiated.
	public List<DataItem> Children
	{
	    get
	    {
	        if (this.children == null)
	        {
	            this.children = new List<DataItem>();
	            for (int i = 0; i < 5; i++)
	            {
	                DataItem item = new DataItem() { Title = string.Format("{0}.{1}", this.Title, i) };
	                this.children.Add(item);
	            }
	        }
	        return this.children;
	    }
}The next step is to implement the custom logic for creating the path in order to use the BringPathIntoView() method.
	private void Button_Click_1(object sender, RoutedEventArgs e)
	{
	    string[] headerAndIndexes = this.userInput.Text.Split(' ');
	    string[] indexes = headerAndIndexes.LastOrDefault().Split('.');
	    bool areIndexesValid = false;
	    int i;

	    if (headerAndIndexes != null && indexes != null)
	    {
	        foreach (string index in indexes)
	        {
	            areIndexesValid = int.TryParse(index, out i);
	        }

	        if (headerAndIndexes.FirstOrDefault().Contains("Item") && areIndexesValid)
	        {
	            RadTreeViewItem item = this.treeView.GetItemByPath(this.GenetatePath(this.userInput.Text));
	            if (item != null)
	            {
	                item.IsSelected = true;
	                item.IsExpanded = true;
	            }
	        }
	    }
	}

	private string GenetatePath(string itemToExpand)
	{
	    string path = string.Empty;
	    string buffer;
	    string[] header = itemToExpand.Split(' ');
	    string[] indexes = header.LastOrDefault().Split('.');

	    header[0] = string.Format("{0} {1}", header[0], indexes[0]);
	    path = string.Format("{0}\\", header[0]);

	    for (int i = 1; i < indexes.Length; i++)
	    {
	        buffer = string.Format("{0}.{1}", header[0], indexes[i]);
	        header[0] = buffer;
	        path += string.Format("{0}\\", buffer);
	    }
	    return path.TrimEnd('\\');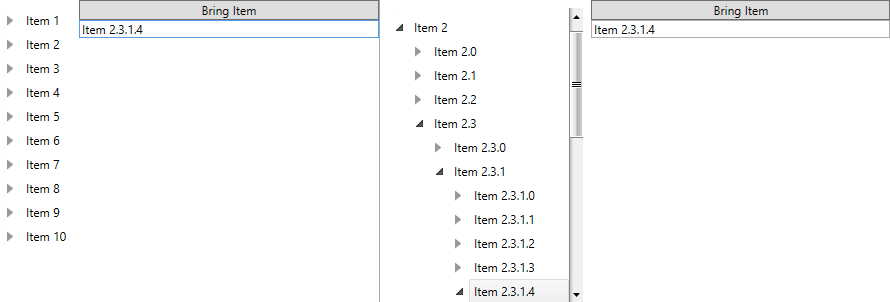
}The final result after bringing Item 2.3.1.4 should look like this