Customizing Items
There are two ways you can change the template for the RadTimeline items. You can either customize them with the use of ItemTemplateSelector, or with a TimelineItemTemplate / TimelineInstantItemTemplate property.
TimelineItemTemplate and TimelineInstantItemTemplate
The items with duration can be customized in the same manner as the instant items. To shed more light on the difference between these two items types, you may check the DataBinding topic.
The following example demonstrates how you can add custom Framework Element (Rectangle in this case) to present the instant and duration items. The customizations are made via DataTemplate and applied to the corresponding TimelineItemTemplate/TimelineInstantItemTemplate property in XAML. There is nothing special in code-behind, it is added for completeness of the sample.
	 <UserControl.Resources>
	        <DataTemplate x:Key="InstantItemTemplate">
	            <Border Width="10" Height="10" Margin="0,0,0,5">
	                <Rectangle Height="7"
	                    Width="7"
	                    HorizontalAlignment="Center"
	                    VerticalAlignment="Center"
	                    Fill="Red">
	                </Rectangle>
	            </Border>
	        </DataTemplate>

	        <DataTemplate x:Key="ItemWithDurationTemplate">
	            <Border Height="10" Margin="0, 0, 0, 5">
	                <Rectangle Height="7"
	                        VerticalAlignment="Center"
	                        Fill="Green"/>
	            </Border>
	        </DataTemplate>
	    </UserControl.Resources>

	     <Grid x:Name="LayoutRoot" Background="White" Height="250" Width="750">
	        <telerik:RadTimeline x:Name="RadTimeline1"
	                    Margin="6"
	                    VerticalAlignment="Top"
	                    PeriodStart="2011/01/01" PeriodEnd="2011/06/01"
	                    VisiblePeriodStart="2011/01/01" VisiblePeriodEnd="2011/03/22"
	                    StartPath="Date"
	                    DurationPath="Duration"
	                    TimelineItemTemplate="{StaticResource ItemWithDurationTemplate}"
	                    TimelineInstantItemTemplate="{StaticResource InstantItemTemplate}">
	            <telerik:RadTimeline.Intervals>
	                <telerik:DayInterval />
	                <telerik:WeekInterval />
	                <telerik:MonthInterval />
	                <telerik:YearInterval />
	            </telerik:RadTimeline.Intervals>
	        </telerik:RadTimeline>
</Grid> List<Item> dataSource = new List<Item>();
var startDate = new DateTime(2011, 1, 1);
var endDate = new DateTime(2011, 6, 1);
Random r = new Random();
for (DateTime i = startDate; i < endDate; i = i.AddMonths(1))
{
dataSource.Add(new Item() { Date = i, Duration = TimeSpan.FromDays(r.Next(50, 100)) });
}
for (int i = 0; i < 15; i++)
{
dataSource.Add(new Item() { Date = startDate.AddMonths(r.Next(0, 5)).AddDays(15)});
}
RadTimeline1.ItemsSource = dataSource;
public class Item
{
public TimeSpan Duration { get; set; }
public DateTime Date { get; set; }
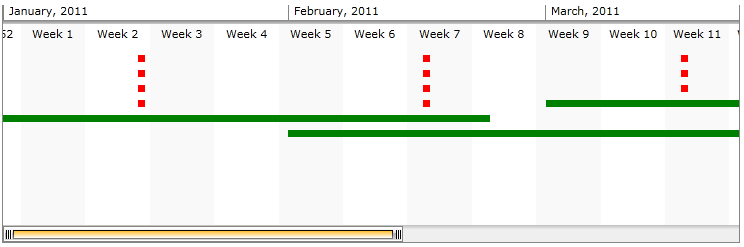
}You may see the result below:
ItemTemplateSelector
Using ItemTemplateSelector is another approach for customizing the RadTimeline items. Aside from the previous one - here a single property is used to change the appearance of both duration and instant item types. This example will demonstrate how you may set the DataTemplates we used in the previous section.
We'll get started with creating a CustomItemTemplateSelector class. It should inherit the DataTemplateSelector class and override its SelectTemplate method. We'll create two properties with type DataTemplate - these are the InstantItemTemplate and ItemWithDurationTemplate we used in the previous section of this article.
We are using the Product class from the previous section as datasource for our Timeline.
	 public class CustomItemTemplateSelector : DataTemplateSelector
	    {
	        public DataTemplate InstantItemTemplate { get; set; }
	        public DataTemplate ItemWithDurationTemplate { get; set; }

	        public override DataTemplate SelectTemplate(object item, DependencyObject container)
	        {
	            TimelineDataItem data = item as TimelineDataItem;
	            Product productItem;

	            if (data == null)
	                productItem = item as Product;
	            else
	                productItem = data.DataItem as Product;

	            if (productItem == null)
	                return base.SelectTemplate(item, container);

	            if (productItem.Duration.Days != 0)
	                return this.ItemWithDurationTemplate;
	            else
	                return this.InstantItemTemplate;
	        }
}We'll extend the View Model we previously created with CustomItemTemplateSelector property and field as shown below:
	private DataTemplateSelector customItemTemplateSelector;
	public DataTemplateSelector CustomItemTemplateSelector
	{
		get
		{
			return this.customItemTemplateSelector;
		}
		set
		{
			this.customItemTemplateSelector = value;
		}
}Now in XAML you may create an instance of the CustomItemTemplateSelector class, set the DataTemplates and provide it to the ItemTemplateSelector property:
	  <UserControl.Resources>
	        <DataTemplate x:Key="InstantItemTemplate">
	            <Border Width="10" Height="10" Margin="0,0,0,5">
	                <Rectangle Height="7"
	                   Width="7"
	                   HorizontalAlignment="Center"
	                   VerticalAlignment="Center"
	                   Fill="Red">
	                </Rectangle>
	            </Border>
	        </DataTemplate>

	        <DataTemplate x:Key="ItemWithDurationTemplate">
	            <Border Height="10" Margin="0, 0, 0, 5">
	                <Rectangle Height="7"
	                       VerticalAlignment="Center"
	                       Fill="Green"/>
	            </Border>
	        </DataTemplate>

	        <local:CustomItemTemplateSelector x:Key="ItemTemplateSelector"
	                                          InstantItemTemplate="{StaticResource InstantItemTemplate}"
	                                          ItemWithDurationTemplate="{StaticResource ItemWithDurationTemplate}"/>
	    </UserControl.Resources>

	    <UserControl.DataContext>
	        <local:ExampleViewModel CustomItemTemplateSelector="{StaticResource ItemTemplateSelector}"/>
	    </UserControl.DataContext>

	    <Grid x:Name="LayoutRoot" Background="White" Height="300" Width="750">
	        <telerik:RadTimeline Height="250" x:Name="RadTimeline1"
	                    VerticalAlignment="Top"
	                    Margin="6"
	                    PeriodStart="2011/01/01" PeriodEnd="2011/06/01"
	                    StartPath="Date"
	                    DurationPath="Duration"
	                    ItemTemplateSelector="{StaticResource ItemTemplateSelector}"
	                    ItemsSource="{Binding Data}">
	            <telerik:RadTimeline.Intervals>
	                <telerik:YearInterval />
	                <telerik:MonthInterval />
	                <telerik:WeekInterval />
	                <telerik:DayInterval />
	            </telerik:RadTimeline.Intervals>
	        </telerik:RadTimeline>
	    </Grid>
The result is the same as the one shown in the previous section image.