New to Telerik UI for WinForms? Start a free 30-day trial
Custom Time Scale in RadScheduler
Updated over 1 year ago
Environment
| Product Version | 2019.3.911 |
| Product | RadScheduler for WinForms |
Description
When set up in timeline view, RadScheduler can work with a time scale of predefined values: Setting the Default Time Scale. This KB article demonstrates how a custom MinutesScale class can be created working with at a scale of 5 minutes.
Solution
Create a custom scale inheriting the MinutesTimescale class and override its ScalingFactor property.
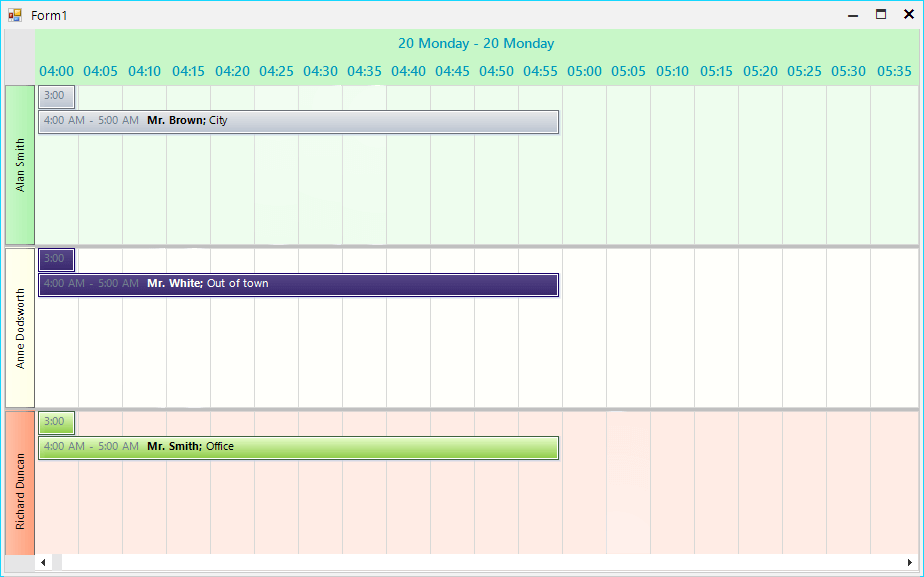
A small time scale will create more elements inside the header. In some cases the available space might not be enough and these elements may be squeezed. The DisplayedCellsCount property of the scale object determines how many elements will be simultaneously visible. The screen shot below shows 20 cells and the rest of cells can be seen using the scrollbar at the bottom.
Figure 1: Custom Time Scale
Custom Scale Class
C#
public class FiveMinutesTimescale : MinutesTimescale
{
    public override int ScalingFactor
    {
        get
        {
            return 5;
        }
    }
}
Form`s Class
C#
public partial class Form1 : Form
{
    public Form1()
    {
        InitializeComponent();

        //Set up the scheduler and add appointments
        //...

        this.radScheduler1.GroupType = GroupType.Resource;
        this.radScheduler1.ActiveViewType = Telerik.WinControls.UI.SchedulerViewType.Timeline;
        SchedulerTimelineView activeTimelineView = (SchedulerTimelineView)this.radScheduler1.ActiveView;
        activeTimelineView.ResourcesPerView = 3;

        FiveMinutesTimescale scale = new FiveMinutesTimescale();
        activeTimelineView.SchedulerTimescales.Add(scale);
        scale.Visible = true;

		this.radScheduler1.GetTimelineView().GetScaling().DisplayedCellsCount = 20;

    }
}