Technical FAQ for Developers
Find answers for the most frequently asked questions

How to Build and Manage Forms in React?
Forms play an important role in web applications as they serve as the main interface for gathering user data. In React, creating forms requires an understanding of traditional HTML form elements along with the React method for managing component state. In this FAQ guide, we'll walk through everything you need to know about creating forms in React applications.
Setting Up Your React Environment
If you're new to React and getting ready to dive into form development, it's helpful to set up a working development environment first.
Basic Setup Steps
The React documentation recommends several different frameworks for setting up a React project. While Next.js and Remix offer comprehensive frameworks with built-in routing and server-side rendering capabilities, Vite provides a fast, lean development environment to build client-side React applications. The following commands can be run to start a new Vite React project with npm:
# Create a new React app with Vite
npm create vite@latest react-forms -- --template react

# Navigate to project folder
cd react-forms

# Install dependencies
npm install

# Start development server
npm run dev
The above steps create a new React application with all the necessary dependencies and configuration files. When we run the development server, we'll see a default React page in our browser at http://localhost:5173.

We'll also install the KendoReact Form component, a component package designed for efficient form state management in React applications.
npm install --save @progress/kendo-react-form
For more comprehensive documentation on implementing KendoReact Form components, refer to the KendoReact Forms documentation.
KendoReact Form is part of KendoReact premium, an enterprise-grade UI library with 120+ free and premium components for building polished, performant apps. You can begin test-driving form features with a free 30-day trial.
You can also quickly get started with React using platforms like StackBlitz or CodeSandbox for an instant development environment.
Organizing Form Components
There are many approaches to organizing files and folders, but one effective way to structure form components can look something like this:
src/
├── components/
│   ├── forms/
│   │   ├── FormField.jsx           # Reusable input components
│   │   ├── ValidationError.jsx     # Error display component
│   │   └── FormButtons.jsx         # Submit/reset buttons
│   ├── UserForm.jsx                # Specific form implementation
│   └── ProductForm.jsx             # Another form implementation
├── hooks/
│   └── useForm.js                  # Custom form handling hook
└── utils/
    └── validation.js               # Form validation functions
This structure keeps form logic separate from UI components, making our code easier to maintain as our project grows. Each component has one job to do, which makes testing, maintenance, and reuse much simpler.
As a project expands, it could be a good idea to organize components based on specific domains or features. This helps in grouping related functionality together, making it easier to scale and maintain. For example:
src/
├── components/
│   ├── user/
│   │   ├── UserProfile.jsx       # User-related component
│   │   ├── UserForm.jsx          # User-specific form implementation
│   │   └── UserList.jsx          # User listing component
│   ├── product/
│   │   ├── ProductForm.jsx       # Product-specific form implementation
│   │   ├── ProductList.jsx       # Product listing component
│   │   └── ProductDetails.jsx    # Product details component
├── hooks/
│   ├── useUserForm.js            # Hook for handling user form logic
│   └── useProductForm.js         # Hook for handling product form logic
└── utils/
    ├── userValidation.js         # User form validation functions
    └── productValidation.js      # Product form validation functions
By grouping components and logic by domain (e.g., user, product), we make it easier to understand and manage the different parts of our application. This also allows teams to work more efficiently on specific areas of the project without interfering with other parts of the app. It encourages modularity and separation of concerns, making the app easier to scale.
Basic Form Concepts in React
Before implementing forms in React, it's essential to understand the fundamental concepts that distinguish the React approach from traditional HTML forms.
Controlled vs. Uncontrolled Components
React offers two common approaches to handling form inputs: controlled and uncontrolled components. These represent different ways of managing form data.
Controlled Components
In a controlled component, React state is the "single source of truth" for the input's value. The form element's value is controlled by React through state, and it changes only when the state is updated.
Here's a simple example of a controlled form component:
import React, { useState } from "react";

function ControlledForm() {
  // Initialize state with empty string
  const [email, setEmail] = useState("");

  const handleChange = (e) => {
    // Update state with new input value
    setEmail(e.target.value);
  };

  const handleSubmit = (e) => {
    e.preventDefault();
    console.log("Submitted email:", email);
  };

  return (
    <form onSubmit={handleSubmit}>
      <input type="email" value={email} onChange={handleChange} />
      <button type="submit">Submit</button>
    </form>
  );
}

export default ControlledForm;
In this example, React manages the input's value through the email state variable. Every keystroke triggers the handleChange function, updating the state and re-rendering the component with the new value. When the form is submitted, we log the email state value to the console.
Uncontrolled Components
Uncontrolled components let the DOM or a third-party library handle form data internally, while React accesses the values only when needed (e.g., on submission).
Here's an example using KendoReact Form, where form state is managed by the library rather than the component's state:
import React from "react";
import { Form, FormElement, Field } from "@progress/kendo-react-form";
import { Input } from "@progress/kendo-react-inputs";
import { Button } from "@progress/kendo-react-buttons";

function UncontrolledForm() {
  const handleSubmit = (data) => {
    console.log("Submitted email:", data.email);
  };

  return (
    <Form
      onSubmit={handleSubmit}
      render={(formRenderProps) => (
        <FormElement>
          <Field name="email" component={Input} label="Email" />
          <Button type="submit">Submit</Button>
        </FormElement>
      )}
    />
  );
}

export default UncontrolledForm;

In this approach, our React component doesn't track every keystroke. Instead, KendoReact Form internally manages the state, and the React component only accesses the submitted values when needed. The <Field /> component creates an uncontrolled input that manages its own state internally. The <Form /> component collects all field values when submitted, providing them to the handleSubmit function.
Another example of an uncontrolled component is to use a ref-based form, where the input values are stored in the DOM rather than in React state.
import React, { useRef } from "react";

function SimpleUncontrolledForm() {
  // Create a ref for the input field
  const emailRef = useRef();

  const handleSubmit = (e) => {
    e.preventDefault();

    // Access value from the DOM
    console.log("Submitted email:", emailRef.current.value);
  };

  return (
    <form onSubmit={handleSubmit}>
      <label>Email:</label>
      <input type="email" ref={emailRef} defaultValue="" />
      <button type="submit">Submit</button>
    </form>
  );
}

export default SimpleUncontrolledForm;
Each approach has its benefits: controlled components give us more direct control over form values and validation, while uncontrolled components can be simpler to implement for basic forms.
Understanding State in Forms
The useState hook is fundamental to managing form data in React. It allows functional components to maintain and update state, which is essential for controlled form inputs.
The useState hook takes a single argument, which is the initial value of the state property being created, and returns an array of two values:
- The state property we want to create (the current state value)
- A function used to update the state value
Similar to what we've seen in the controlled component example, here is how the useState hook can be used to manage a simple form:
import React, { useState } from "react";

function SimpleForm() {
   // Initialize form state with an object containing all form fields
  const [formData, setFormData] = useState({
    username: "",
    email: "",
    message: "",
  });

  // Handle changes to any input field
  const handleChange = (e) => {
    const { name, value } = e.target;
    setFormData((prevData) => ({
      ...prevData, // Maintain existing form data
      [name]: value, // Update only the changed field
    }));
  };

  const handleSubmit = (e) => {
    e.preventDefault();
    console.log("Form submitted:", formData);
  };

  return (
    <form onSubmit={handleSubmit}>
      <div>
        <label htmlFor="username">Username:</label>
        <input
          type="text"
          id="username"
          name="username"
          value={formData.username}
          onChange={handleChange}
        />
      </div>
      <div>
        <label htmlFor="email">Email:</label>
        <input
          type="email"
          id="email"
          name="email"
          value={formData.email}
          onChange={handleChange}
        />
      </div>
      <div>
        <label htmlFor="message">Message:</label>
        <textarea
          id="message"
          name="message"
          value={formData.message}
          onChange={handleChange}
        />
      </div>
      <button type="submit">Submit</button>
    </form>
  );
}

export default SimpleForm;

When a user interacts with this form, they type in an input field, the handleChange function captures the change event, updates only the specific field in the form state, and React re-renders the component with the updated values. Upon submission, all form data is available in a single object.
Managing React Form State
Managing form state effectively is crucial for creating responsive, user-friendly forms. We'll explore a few different approaches to handle state in React forms.
Handling User Input with onChange
The onChange event handler is the cornerstone of controlled inputs in React. It fires every time the input's value changes, allowing React to update state accordingly.
function InputExample() {
  const [value, setValue] = useState("");

  const handleChange = (e) => {
    setValue(e.target.value);

    // We can perform additional operations here
    // Like formatting or immediate validation
  };

  return <input type="text" value={value} onChange={handleChange} />;
}

export default InputExample;
When a user types in the input field of the above example, the onChange event fires with each keystroke, the handleChange function receives the event object, extracts the new value from e.target.value and updates the state with setValue. React then re-renders the component with the new value.
Using useState and useReducer for State Management
React provides two main hooks for managing state in form components: useState and useReducer. We've seen earlier in this guide how the useState hook allows us to manage simple form state by updating individual input fields directly. However, as forms grow in complexity, managing multiple fields with useState can become cumbersome and repetitive.
Let's explore how useReducer can help streamline form state management, especially when handling multiple fields, complex updates, or form validation.
Using useReducer for Complex Forms
The useReducer hook provides a more structured way to manage complex form state. It's particularly useful when the form has many fields, complex interactions between fields, or when state updates depend on the previous state.
The useReducer hook:
- Takes a reducer function as the first argument. This reducer function is a pure function that takes in the current state, an action, and returns a new state. It does not modify the original state but rather returns a new state based on the action passed to it.
- Takes an initial state value as the second argument.
- Takes an (optional) initializer function that can be used to initialize state as the third argument.
- Returns an array containing the current state value and a dispatch function that can be used to trigger state changes by dispatching actions to the reducer.
Here's an example of a form component that uses useReducer to manage its state.
import React, { useReducer } from "react";

const initialState = {
  username: "",
  email: "",
  message: "",
};

function formReducer(state, action) {
  switch (action.type) {
    case "CHANGE_FIELD":
      return {
        ...state,
        [action.field]: action.value,
      };
    default:
      return state;
  }
}

function SimpleFormWithReducer() {
  const [state, dispatch] = useReducer(formReducer, initialState);

  const handleChange = (e) => {
    const { name, value } = e.target;
    dispatch({ type: "CHANGE_FIELD", field: name, value });
  };

  const handleSubmit = (e) => {
    e.preventDefault();
    console.log("Form submitted:", state);
  };

  return (
    <form onSubmit={handleSubmit}>
      <div>
        <label htmlFor="username">Username:</label>
        <input
          type="text"
          id="username"
          name="username"
          value={state.username}
          onChange={handleChange}
        />
      </div>
      <div>
        <label htmlFor="email">Email:</label>
        <input
          type="email"
          id="email"
          name="email"
          value={state.email}
          onChange={handleChange}
        />
      </div>
      <div>
        <label htmlFor="message">Message:</label>
        <textarea
          id="message"
          name="message"
          value={state.message}
          onChange={handleChange}
        />
      </div>
      <button type="submit">Submit</button>
    </form>
  );
}

export default SimpleFormWithReducer;
In the above example, the formReducer function handles the "CHANGE_FIELD" action by creating a new state object that preserves all existing state properties while updating only the specific field mentioned in the action. This pattern demonstrates the immutability principle in React state management, so that state is never directly modified but instead replaced with a new object that reflects the desired changes.
Using useReducer centralizes state logic, making complex state transitions more predictable and easier to debug. It creates a clear separation between "what happened" (actions) and "how the state changes" (reducer logic).
Managing Multiple Inputs
When handling multiple inputs, it's helpful to apply an object-based approach like we've seen in our previous examples, whether using useState or useReducer.
// With useState (as shown in our SimpleForm example)
const handleChange = (e) => {
  const { name, value } = e.target;
  setFormData((prevData) => ({
    ...prevData,
    [name]: value,
  }));
};

// With useReducer (as shown in our SimpleFormWithReducer example)
const handleChange = (e) => {
  const { name, value } = e.target;
  dispatch({
    type: "CHANGE_FIELD",
    field: name,
    value,
  });
};
This approach handles both simple fields and nested objects, providing a flexible solution for forms of any complexity. The key advantage is the ability to handle any form structure while keeping all related data in a single state object, making submission and validation straightforward.
Advanced React Form Features
Once you're comfortable with basic form handling, it's time to dive into advanced techniques to manage more complex form scenarios. KendoReact offers a range of powerful features to help manage forms with dependencies, multiple input types, API calls and file uploads.
Handling Dependent Fields
In forms where the visibility or behavior of certain fields depends on the value of other fields, KendoReact makes conditional rendering a breeze. By utilizing the valueGetter function, we can easily access the current form values and determine which fields should be displayed or hidden based on other inputs.
For example, this shipping form dynamically adds extra fields when the user selects the "Express" shipping method. Fields such as shipping insurance and delivery time options appear only for express shipments.
import React from "react";
import { Form, Field, FormElement } from "@progress/kendo-react-form";
import { Button } from "@progress/kendo-react-buttons";
import { RadioGroup } from "@progress/kendo-react-inputs";
import { DropDownList } from "@progress/kendo-react-dropdowns";

function ShippingForm() {
  const shippingMethods = [
    { label: "Standard (3-5 days)", value: "standard" },
    { label: "Express (1-2 days)", value: "express" },
  ];

  return (
    <Form
      initialValues={{ shippingMethod: "standard" }}
      onSubmit={(data) => console.log("Form submitted:", data)}
      render={(formRenderProps) => {
        const shippingMethod = formRenderProps.valueGetter("shippingMethod");

        return (
          <FormElement>
            <Field
              name="shippingMethod"
              component={RadioGroup}
              label="Shipping Method"
              data={shippingMethods}
            />

            {/* Conditional fields based on shipping method */}
            {shippingMethod === "express" && (
              <div className="express-options">
                <Field
                  name="expressInsurance"
                  component="checkbox"
                  label="Add Shipping Insurance ($4.99)"
                />
                <Field
                  name="expressTime"
                  component={DropDownList}
                  label="Delivery Time"
                  data={["Morning (8am-12pm)", "Afternoon (12pm-5pm)"]}
                />
              </div>
            )}

            <Button type="submit">Continue to Payment</Button>
          </FormElement>
        );
      }}
    />
  );
}

export default ShippingForm;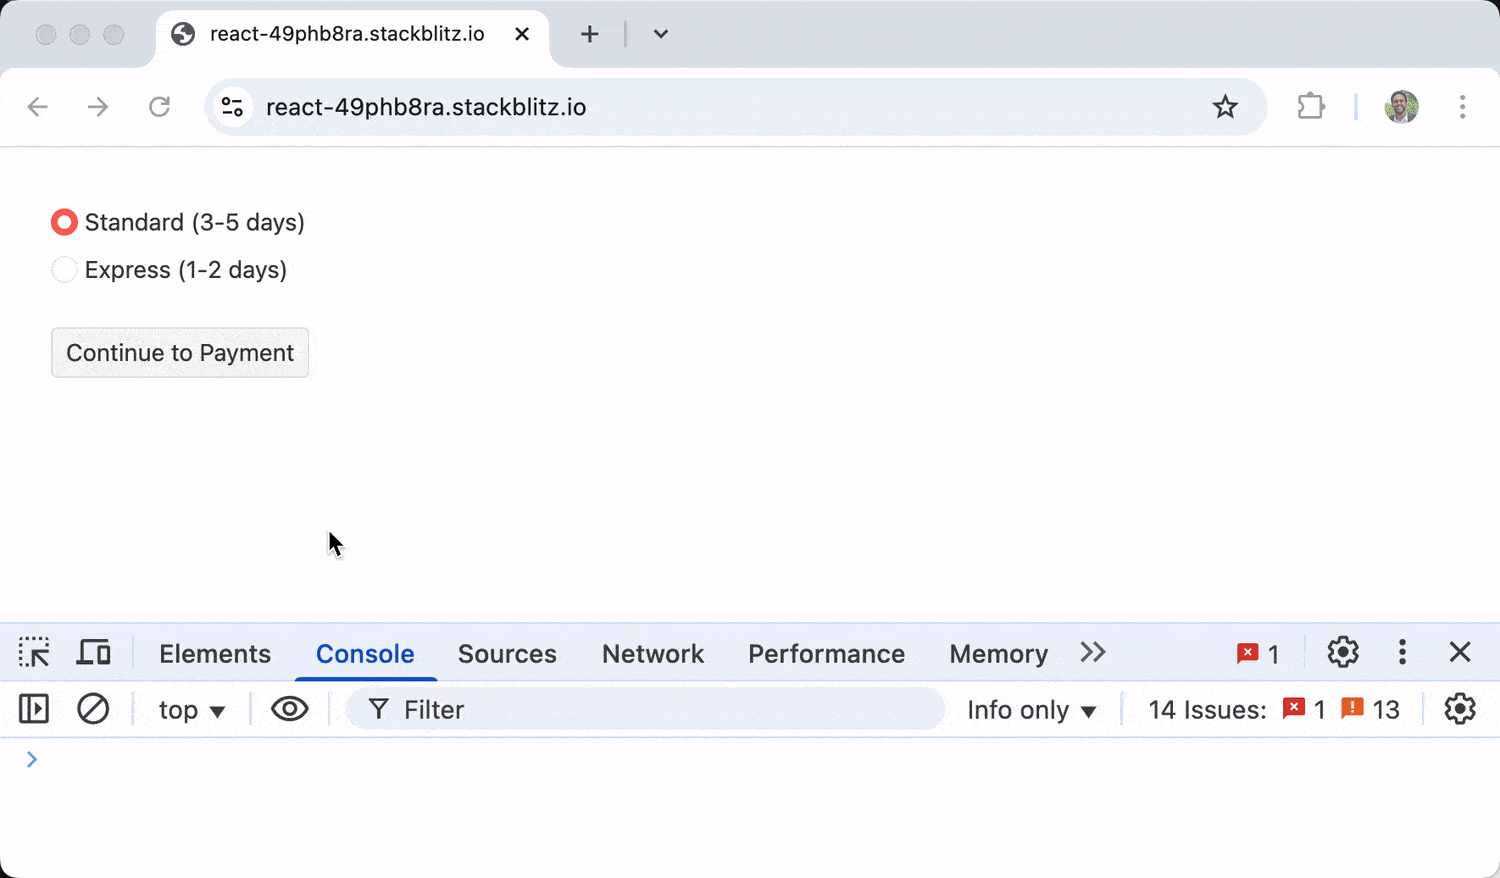
In the example above, the form checks if the selected shipping method is "express" and, if so, conditionally renders the insurance checkbox and delivery time dropdown.
Working with Dropdowns, Radio Buttons and Checkboxes
KendoReact provides specialized components for handling different input types like React Dropdown, React Radio Button and React Checkbox. These components can be easily integrated with form validation, capturing user preferences efficiently.
import React from "react";
import { Form, Field, FormElement } from "@progress/kendo-react-form";
import { RadioGroup, Checkbox } from "@progress/kendo-react-inputs";
import { DropDownList } from "@progress/kendo-react-dropdowns";
import { Button } from "@progress/kendo-react-buttons";

function PreferencesForm() {
  const themes = [
    { label: "Light", value: "light" },
    { label: "Dark", value: "dark" },
    { label: "System Default", value: "system" },
  ];

  const countries = [
    { text: "United States", id: "us" },
    { text: "Canada", id: "ca" },
    { text: "Mexico", id: "mx" },
  ];

  return (
    <Form
      initialValues={{ theme: "light", notifications: false, country: null }}
      onSubmit={(data) => console.log("Preferences saved:", data)}
      render={(formRenderProps) => (
        <FormElement>
          <Field
            name="theme"
            component={RadioGroup}
            label="Theme"
            data={themes}
          />

          <Field
            name="notifications"
            type="checkbox"
            component={Checkbox}
            label="Notifications"
            value="notifications"
          />

          <Field
            name="country"
            component={DropDownList}
            label="Country"
            data={countries}
            textField="text"
            dataItemKey="id"
            placeholder="Select a country..."
          />

          <Button type="submit">Save Preferences</Button>
        </FormElement>
      )}
    />
  );
}

export default PreferencesForm;
The above example uses KendoReact components to create a form with a radio group for theme selection, a checkbox for notifications, and a dropdown list for country selection. The React Form component manages state and submission, logging user preferences to the console.
Using Form Data to Trigger API Calls
Forms are essential for collecting user input and triggering API calls to communicate with a server. We can structure a form to capture user data and submit it via an API request while handling validation, submission states and server responses efficiently.
import React, { useState } from "react";
import { Form, Field, FormElement } from "@progress/kendo-react-form";
import { Input } from "@progress/kendo-react-inputs";
import { Button } from "@progress/kendo-react-buttons";
import { Error } from "@progress/kendo-react-labels";

function ApiSubmissionForm() {
  const [submitStatus, setSubmitStatus] = useState({
    submitting: false,
    success: null,
    error: null,
  });

  const handleSubmit = async (data) => {
    setSubmitStatus({
      submitting: true,
      success: null,
      error: null,
    });

    try {
      const response = await fetch("/api/contact", {
        method: "POST",
        headers: {
          "Content-Type": "application/json",
        },
        body: JSON.stringify(data),
      });

      if (!response.ok) {
        throw new Error("Server responded with an error");
      }

      setSubmitStatus({
        submitting: false,
        success: "Your message has been sent successfully!",
        error: null,
      });
    } catch (error) {
      setSubmitStatus({
        submitting: false,
        success: null,
        error: error.message || "An error occurred. Please try again.",
      });
    }
  };

  return (
    <Form
      onSubmit={handleSubmit}
      render={(formRenderProps) => (
        <FormElement>
          {submitStatus.success && (
            <div className="k-messagebox k-messagebox-success">
              {submitStatus.success}
            </div>
          )}

          {submitStatus.error && (
            <div className="k-messagebox k-messagebox-error">
              {submitStatus.error}
            </div>
          )}

          <Field
            name="name"
            component={Input}
            label="Name"
            validator={(value) => (!value ? "Name is required" : "")}
          />

          <Field
            name="email"
            component={Input}
            label="Email"
            type="email"
            validator={(value) => (!value ? "Email is required" : "")}
          />

          <Field
            name="message"
            component={Input}
            label="Message"
            type="textarea"
            validator={(value) => (!value ? "Message is required" : "")}
          />

          <Button
            type="submit"
            themeColor="primary"
            disabled={submitStatus.submitting || !formRenderProps.allowSubmit}
          >
            {submitStatus.submitting ? "Sending..." : "Send Message"}
          </Button>
        </FormElement>
      )}
    />
  );
}

export default ApiSubmissionForm;
The above example demonstrates how to trigger an API call when a form is submitted. The handleSubmit function sends form data to a specified API endpoint, manages the request state and provides feedback based on the server response.
File Uploads
Uploading files is a common requirement when working with forms. (e.g., allowing users to submit resumes in a job application form). Progress KendoReact provides the React Upload component to handle file uploads efficiently:
import React, { useState } from "react";
import { Form, Field, FormElement } from "@progress/kendo-react-form";
import { Input } from "@progress/kendo-react-inputs";
import { Upload } from "@progress/kendo-react-upload";
import { Button } from "@progress/kendo-react-buttons";

function FileUploadForm() {
  const [files, setFiles] = useState([]);

  const handleSubmit = (data) => {
    // Combine form data with files
    const formData = new FormData();

    // Add form fields
    Object.keys(data).forEach((key) => {
      if (key !== "documents") {
        formData.append(key, data[key]);
      }
    });

    // Add files
    files.forEach((file) => {
      formData.append("files", file.getRawFile());
    });

    // Now formData can be sent to an API
    console.log("Ready to submit:", formData);
  };

  return (
    <Form
      onSubmit={handleSubmit}
      render={(formRenderProps) => (
        <FormElement>
          <Field name="name" component={Input} label="Your Name" />

          <div className="k-form-field">
            <label className="k-label">Upload Documents</label>
            <Upload
              batch={false}
              multiple={true}
              files={files}
              onAdd={(e) => setFiles(e.newState)}
              onRemove={(e) => setFiles(e.newState)}
              saveUrl={""}
              autoUpload={false}
              withCredentials={false}
            />
          </div>

          <Button type="submit">Submit</Button>
        </FormElement>
      )}
    />
  );
}

export default FileUploadForm;
In the above example, the handleSubmit function constructs an FormData object to bundle text inputs and uploaded files together before sending them to an API. The Upload component from KendoReact allows users to select multiple files, and the state is updated whenever a file is added or removed. This way, all necessary data is properly formatted and ready for submission.
Managing Complex Forms in React
As forms grow in complexity, they can sometimes require special techniques to maintain usability and performance. Below we'll explore how to handle more complex forms like multi-step forms and dynamic field arrays with the help of KendoReact.
Multi-Step Forms
For a multi-step form (i.e., React Form Wizard), the KendoReact library provides the React Form and React Stepper components. A typical use case for this is breaking down a long form (e.g., payment account details) into several steps. Below is a concise example of this:
import * as React from "react";
import { Form, FormElement } from "@progress/kendo-react-form";
import { Button } from "@progress/kendo-react-buttons";
import { Stepper } from "@progress/kendo-react-layout";
import {
  AccountDetails,
  PersonalDetails,
  PaymentDetails,
} from "./shared-steps";

const stepPages = [AccountDetails, PersonalDetails, PaymentDetails];

export const App = () => {
  const [step, setStep] = React.useState(0);
  const [formState, setFormState] = React.useState({});
  const [steps, setSteps] = React.useState([
    { label: "Account Details", isValid: undefined },
    { label: "Personal Details", isValid: undefined },
    { label: "Payment Details", isValid: undefined },
  ]);

  const lastStepIndex = steps.length - 1;
  const isLastStep = lastStepIndex === step;
  const isPreviousStepsValid =
    steps
      .slice(0, step)
      .findIndex((currentStep) => currentStep.isValid === false) === -1;

  const onStepSubmit = React.useCallback(
    (event) => {
      const { isValid, values } = event;

      const currentSteps = steps.map((currentStep, index) => ({
        ...currentStep,
        isValid: index === step ? isValid : currentStep.isValid,
      }));

      setSteps(currentSteps);
      setStep(() => Math.min(step + 1, lastStepIndex));
      setFormState(values);

      if (isLastStep && isPreviousStepsValid && isValid) {
        alert(JSON.stringify(values));
      }
    },
    [steps, isLastStep, isPreviousStepsValid, step, lastStepIndex]
  );

  const onPrevClick = React.useCallback(
    (event) => {
      event.preventDefault();
      setStep(() => Math.max(step - 1, 0));
    },
    [step, setStep]
  );

  return (
    <div
      style={{
        display: "flex",
        flexDirection: "column",
        justifyContent: "center",
      }}
    >
      {/* Ensure the Stepper component is rendered with the step details */}
      <Stepper
        value={step}
        items={steps.map((step) => ({ label: step.label }))}
      />

      <Form
        initialValues={formState}
        onSubmitClick={onStepSubmit}
        render={(formRenderProps) => (
          <div style={{ alignSelf: "center" }}>
            <FormElement style={{ width: 480 }}>
              {/* Render the current step's form component */}
              {stepPages[step]()}

              <span
                style={{ marginTop: "40px" }}
                className={"k-form-separator"}
              />
              <div
                style={{
                  display: "flex",
                  justifyContent: "space-between",
                  alignContent: "center",
                }}
              >
                <span style={{ alignSelf: "center" }}>
                  Step {step + 1} of 3
                </span>
                <div>
                  {step !== 0 ? (
                    <Button
                      style={{ marginRight: "16px" }}
                      onClick={onPrevClick}
                    >
                      Previous
                    </Button>
                  ) : undefined}
                  <Button
                    themeColor={"primary"}
                    disabled={isLastStep ? !isPreviousStepsValid : false}
                    onClick={formRenderProps.onSubmit}
                  >
                    {isLastStep ? "Submit" : "Next"}
                  </Button>
                </div>
              </div>
            </FormElement>
          </div>
        )}
      />
    </div>
  );
};

export default App;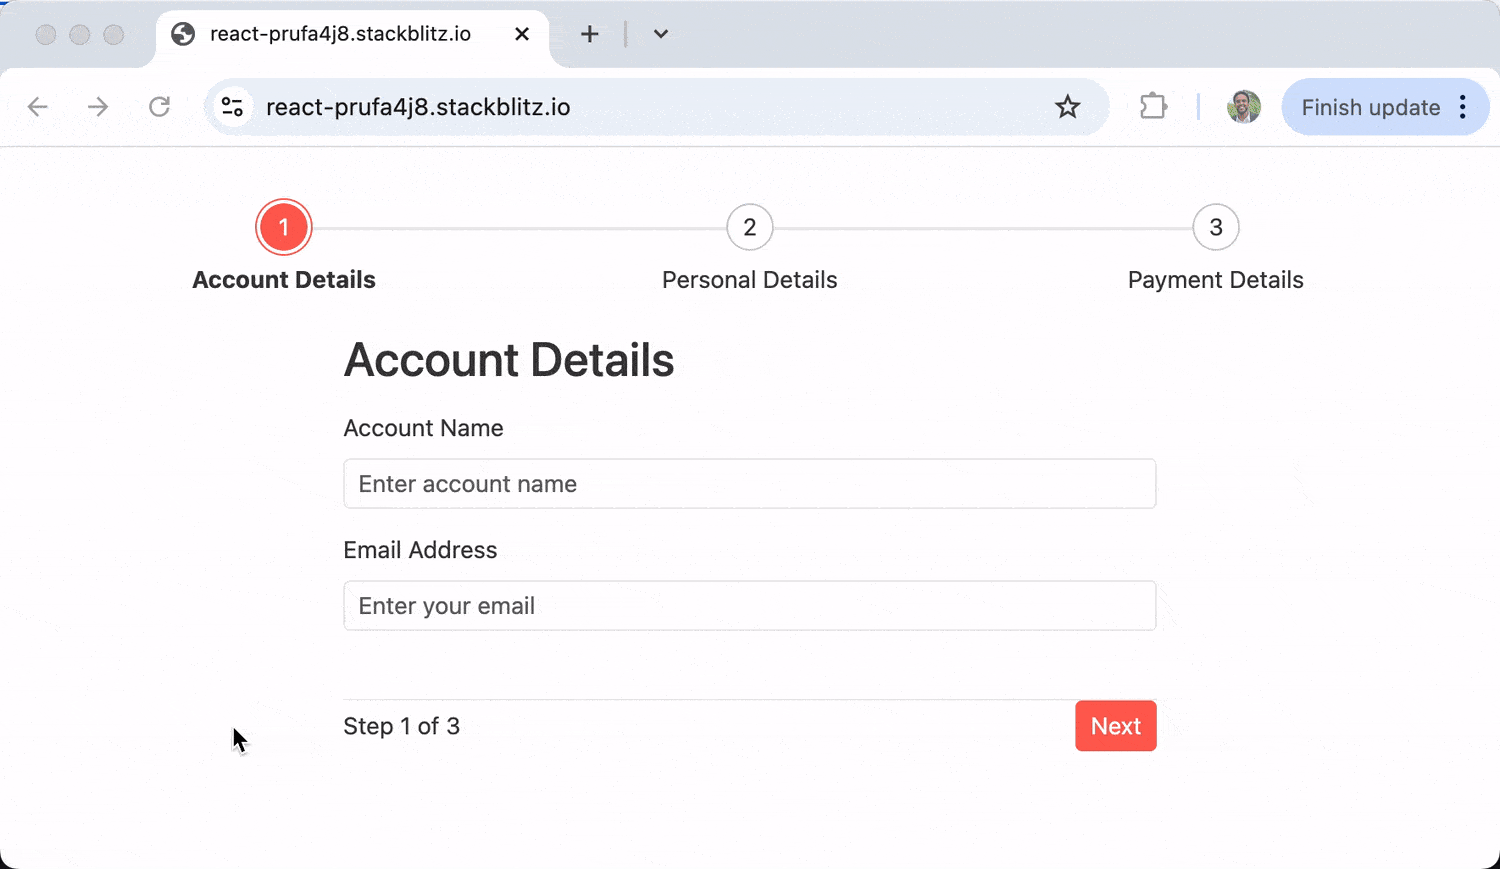
The above example demonstrates how to use <Form /> for submitting data across multiple steps with <Stepper /> to display the current step. The form data is stored in formData and validation is checked before moving to the next step.
An array of steps is rendered inside the form wizard. Each step has a title and a component, and the components (<AccountDetails />, <PersonalDetails />, and <PaymentDetails />) are created and set up in a separate shared-steps file.
Dynamic Field Arrays
KendoReact provides an elegant solution for managing dynamic form fields using the React FieldArray component, which is useful for cases like collecting multiple phone numbers or addresses. Below is an example of how to manage dynamic fields with the <FieldArray /> component.
import * as React from "react";
import { Form, FieldArray, FormElement } from "@progress/kendo-react-form";
import { Button } from "@progress/kendo-react-buttons";
import { Grid, GridColumn, GridToolbar } from "@progress/kendo-react-grid";
import { Error } from "@progress/kendo-react-labels";

// Create context to share form actions across components
const FormGridContext = React.createContext({});

// Validate that array has items
const arrayValidator = (value) =>
  value && value.length ? "" : "Please add at least one item.";

// Grid for managing dynamic items
const FormGrid = (fieldArrayProps) => {
  const {
    validationMessage,
    visited,
    value,
    name,
    onUnshift,
    onRemove,
    onReplace,
  } = fieldArrayProps;
  const [editIndex, setEditIndex] = React.useState();

  // Add a new item to the beginning of the array
  const handleAdd = (e) => {
    e.preventDefault();
    onUnshift({
      value: { id: "", name: "", units: 0 },
    });
    setEditIndex(0);
  };

  // Remove an item from the array
  const handleRemove = (dataItem) => {
    onRemove({ index: dataItem.formIndex });
    setEditIndex(undefined);
  };

  // Start editing an item
  const handleEdit = (dataItem) => {
    setEditIndex(dataItem.formIndex);
  };

  // Save changes and exit edit mode
  const handleSave = () => {
    setEditIndex(undefined);
  };

  // Add index to each item for tracking
  const dataWithIndexes = value.map((item, index) => ({
    ...item,
    formIndex: index,
  }));

  return (
    <FormGridContext.Provider
      value={{
        onRemove: handleRemove,
        onEdit: handleEdit,
        onSave: handleSave,
        editIndex,
      }}
    >
      {visited && validationMessage && <Error>{validationMessage}</Error>}

      <Grid data={dataWithIndexes} dataItemKey="id">
        <GridToolbar>
          <Button onClick={handleAdd}>Add New Item</Button>
        </GridToolbar>
        <GridColumn field="name" title="Name" />
        <GridColumn field="units" title="Units" />
        <GridColumn cell={CommandCell} width="200px" />
      </Grid>
    </FormGridContext.Provider>
  );
};

// Command cell for edit/delete actions
const CommandCell = (props) => {
  const { onRemove, onEdit, onSave, editIndex } =
    React.useContext(FormGridContext);
  const isEditing = props.dataItem.formIndex === editIndex;

  return isEditing ? (
    <td>
      <Button onClick={onSave}>Save</Button>
      <Button onClick={() => onRemove(props.dataItem)}>Cancel</Button>
    </td>
  ) : (
    <td>
      <Button onClick={() => onEdit(props.dataItem)}>Edit</Button>
      <Button onClick={() => onRemove(props.dataItem)}>Remove</Button>
    </td>
  );
};

// Main form component
function DynamicFieldsForm() {
  const handleSubmit = (data) => console.log("Form data:", data);

  return (
    <Form
      initialValues={{ items: [{ id: "1", name: "Sample Item", units: 5 }] }}
      onSubmit={handleSubmit}
      render={(formProps) => (
        <FormElement>
          <FieldArray
            name="items"
            component={FormGrid}
            validator={arrayValidator}
          />
          <Button type="submit" disabled={!formProps.allowSubmit}>
            Submit
          </Button>
        </FormElement>
      )}
    />
  );
}

export default DynamicFieldsForm;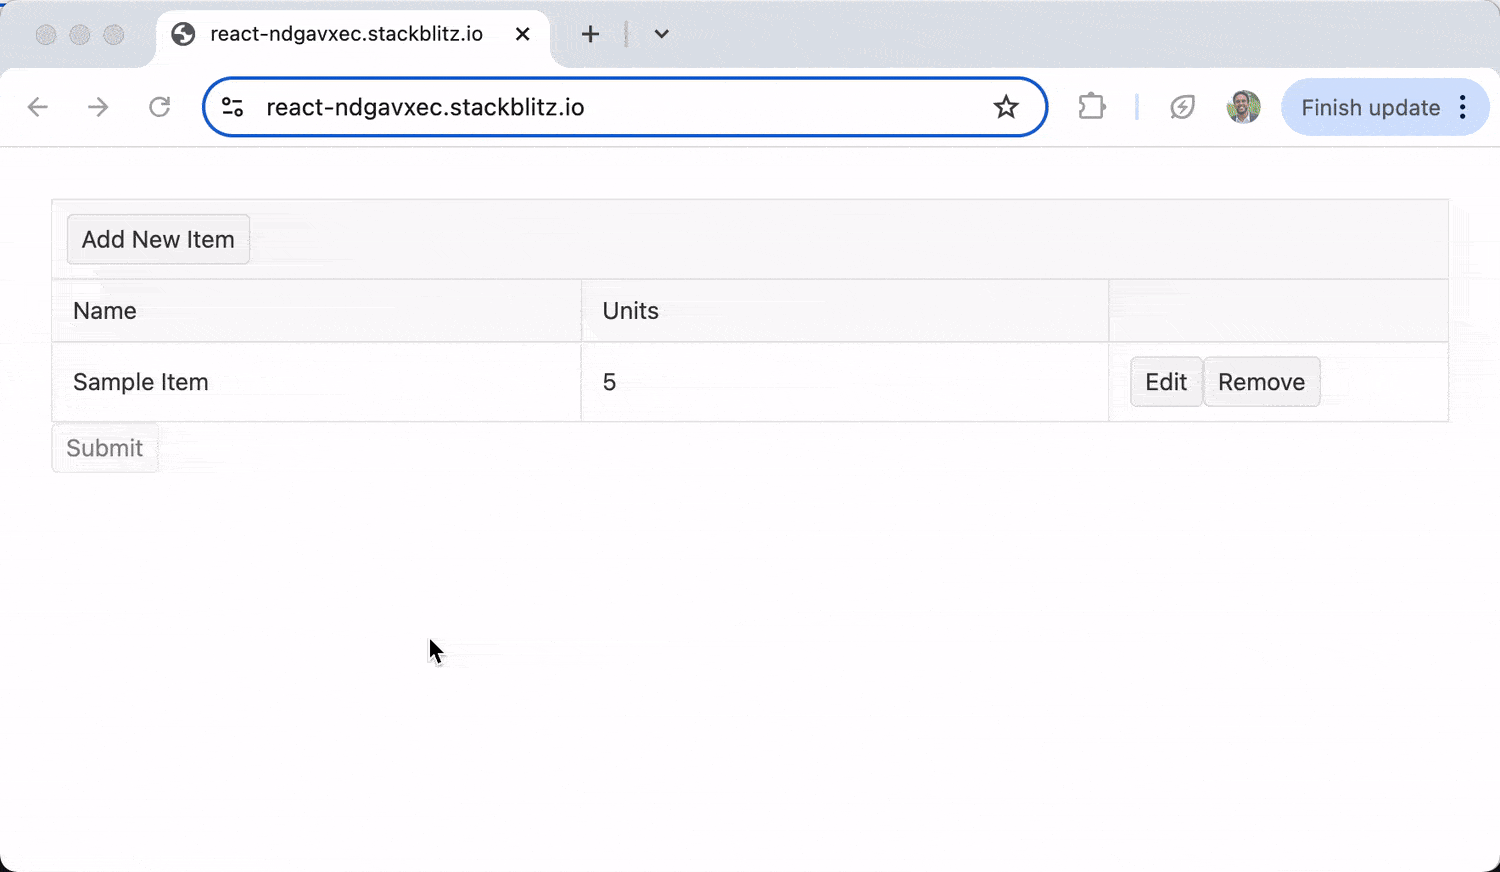
In the above example, KendoReact's <FieldArray /> component integrates form validation with grid functionality (with the help of the library's React Data Grid), providing a complete CRUD interface for managing collections of data while maintaining proper form state throughout the editing lifecycle.
Optimizing Performance
Large forms can cause performance issues because each keystroke of a form input can potentially trigger re-renders of many components, creating noticeable lag for users. The more form fields involved, the more computation required, impacting responsiveness and user experience.
Component memorization and selective rendering form the foundation of optimization strategies. By breaking forms into smaller memoized components, only the actively changing field re-renders, leaving the rest untouched. Complementing this approach, memoized event handlers with useCallback prevent unnecessary function recreations, while debouncing validation reduces computational strain during rapid typing sequences.
For forms with dozens or hundreds of fields, virtualization techniques become essential (e.g., with a tool like react-virtualized). These methods render only the elements currently visible in the viewport, substantially reducing DOM size and memory usage. Before implementing any optimizations, use React DevTools Profiler to establish baseline metrics and identify the specific bottlenecks requiring attention.
Accessibility Best Practices
Accessibility in forms isn't merely about compliance—it's about providing equal access for all users regardless of ability. Inaccessible forms create barriers that prevent significant portions of an audience from completing essential tasks, impacting both user satisfaction and business outcomes.
Start with semantic HTML structure using proper form, fieldset and legend elements as the foundation. These elements provide the necessary context for assistive technologies, enabling users to understand form organization and purpose. Check that every input has a properly associated label, with supplementary context provided through aria-describedby attributes for complex fields that require additional explanation.
Error management also requires consideration from an accessibility perspective:
- Messages should be visually distinct without relying solely on color.
- Errors should be positioned logically near their relevant fields.
- Error states must be programmatically announced to screen readers.
- Focus should move to or near the error when it occurs.
- Language should clearly explain the issue and how to resolve it.
Lastly, keyboard navigation should allow completion of all form operations without requiring mouse input, with visible focus indicators and logical tabbing sequence.
Testing React Forms
Testing forms is essential since they’re a key interaction point between users and applications, directly affecting conversions, data collection and user trust. A solid testing approach should include unit, integration and end-to-end tests. Unit tests verify individual components, integration tests check how elements interact, and end-to-end tests verify the entire submission flow works as expected.
For accessibility, use a combination of automated tools and manual checks like screen readers and keyboard navigation.
Conclusion
Building effective forms in React requires understanding a variety of concepts and techniques. From basic state management to complex validation and accessibility considerations, well-designed forms enhance user experience and streamline data collection.
Forms are often the primary way users interact with your application. Investing time in creating robust, accessible and user-friendly forms pays dividends in user satisfaction and data quality.
For more advanced form implementations, explore specialized component libraries like KendoReact Forms, which provide pre-built, accessible and feature-rich form components that can significantly accelerate your development process.
Remember that the best forms balance functionality with user experience. By focusing on both the technical implementation and the user's journey, you can create forms that collect data effectively while providing a smooth, accessible experience for all users.
Continue Learning: React Form Validation
Check out the React Forms Validation FAQ to learn all about form validation using custom functions, specialized libraries or KendoReact!

Discover More About
KendoReact
Visit the KendoReact page to discover detailed information, features, and benefits
View Details