Install Telerik Document Processing with NuGet Packages
This article explains how to install Telerik Document Processing with NuGet packages, choose the correct package source, and add the package references that your application needs. For the full package list, see Available NuGet Packages.
Use one of the following installation paths:
- How to install from NuGet.org
- How to install from a local NuGet feed
- How to install from the Telerik NuGet server
How to Choose the Right NuGet Installation Path
For current Telerik Document Processing releases, use NuGet.org. NuGet.org is the default package source in Visual Studio and the .NET CLI, so it requires the least configuration and avoids unnecessary package-source ambiguity.
Use a local NuGet feed when you need offline installation, reproducible restores inside a controlled network, or a mirrored package source for build agents.
Use the Telerik NuGet server only when you need older package versions that predate the NuGet.org release or when your organization already standardizes on the Telerik private feed.
Use Explicit PackageReference Entries
Add the package references in the application project that generates, imports, or exports documents. Install Telerik.Licensing in the same project, keep all Telerik Document Processing packages on the same release version, and do not mix Telerik.Documents.* with Telerik.Windows.Documents.* in the same application. For the full package inventory, see Available NuGet Packages, and for package-family guidance, see Telerik.Windows.Documents.* vs Telerik.Documents.*.
Cross-Platform PackageReference Example
Use the following PackageReference entries for ASP.NET Core, Blazor, console apps, services, and other modern .NET workloads that rely on the Telerik.Documents.* package family.
<Project Sdk="Microsoft.NET.Sdk">
    <PropertyGroup>
        <TargetFramework>net8.0</TargetFramework>
        <TelerikDocumentProcessingVersion>2026.1.210</TelerikDocumentProcessingVersion>
    </PropertyGroup>

    <ItemGroup>
        <PackageReference Include="Telerik.Licensing" Version="1.*" />
        <PackageReference Include="Telerik.Documents.Core" Version="$(TelerikDocumentProcessingVersion)" />
        <PackageReference Include="Telerik.Documents.Flow" Version="$(TelerikDocumentProcessingVersion)" />
        <PackageReference Include="Telerik.Documents.Flow.FormatProviders.Pdf" Version="$(TelerikDocumentProcessingVersion)" />
    </ItemGroup>
</Project>
Windows-Only PackageReference Example
Use the following PackageReference entries for .NET Framework or other Windows-only applications that rely on the Telerik.Windows.Documents.* package family.
<Project>
    <PropertyGroup>
        <TelerikDocumentProcessingVersion>2026.1.210</TelerikDocumentProcessingVersion>
    </PropertyGroup>

    <ItemGroup>
        <PackageReference Include="Telerik.Licensing" Version="1.*" />
        <PackageReference Include="Telerik.Windows.Documents.Core" Version="$(TelerikDocumentProcessingVersion)" />
        <PackageReference Include="Telerik.Windows.Documents.Flow" Version="$(TelerikDocumentProcessingVersion)" />
        <PackageReference Include="Telerik.Windows.Documents.Flow.FormatProviders.Pdf" Version="$(TelerikDocumentProcessingVersion)" />
    </ItemGroup>
</Project>
If you prefer command-line installation, use package names from the same package family throughout the project and keep all versions aligned.
Avoid Package-Source Confusion and Restore Issues
Package restore issues often come from mixed package families, stale private-feed credentials, or multiple package sources that resolve different versions of the same dependency. Use the following rules to avoid those failures:
- Prefer NuGet.org for current Telerik Document Processing releases.
- Keep all Telerik Document Processing packages on the same release version.
- Use only one Telerik package family per application:
Telerik.Documents.*orTelerik.Windows.Documents.*. - When a project uses multiple feeds, configure
NuGet.Configso restore uses the intended source order and mappings. - Store feed credentials as secrets in CI/CD systems instead of committing them to source control.
If your build uses more than one package source, start from a minimal NuGet.Config file similar to the following example and then adjust it for your environment:
<?xml version="1.0" encoding="utf-8"?>
<configuration>
    <packageSources>
        <clear />
        <add key="nuget.org" value="https://api.nuget.org/v3/index.json" />
    </packageSources>
</configuration>
If an agent or build script installs packages automatically, verify the package family and package source before restore. Most dependency-confusion issues come from automated restores that resolve a similarly named package from the wrong feed or from mixed Telerik.Documents.* and Telerik.Windows.Documents.* references.
How to Install Telerik Document Processing from NuGet.org
As of Q2 2026, Telerik Document Processing packages are available on NuGet.org. This is the recommended installation path for new development because both Visual Studio and the .NET CLI use NuGet.org by default.
How to Install from NuGet.org in Visual Studio
- In Solution Explorer, right-click the project and select Manage NuGet Packages....
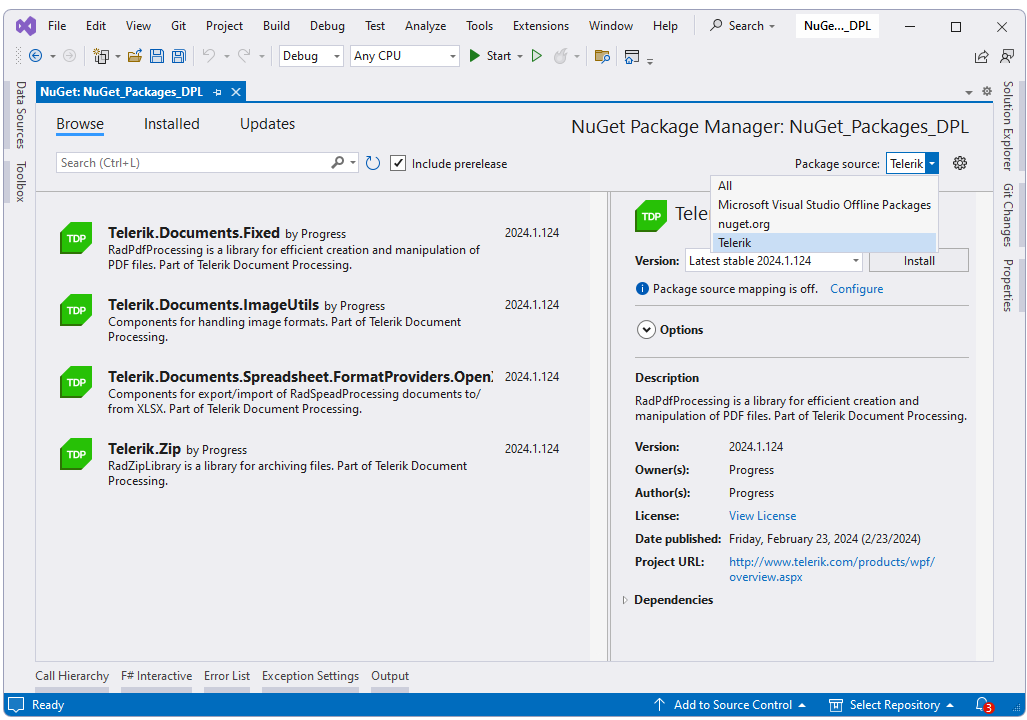
- In Package source, verify that nuget.org is selected.
- In the Browse tab, search for the package you need, for example
Telerik.Documents.Fixed. - Select the package and then select Install.
How to Install from NuGet.org with the .NET CLI
Use the .NET CLI when you want repeatable setup steps for local development, containers, or automation scripts.
dotnet add package Telerik.Licensing
dotnet add package Telerik.Documents.Core --version 2026.1.210
dotnet add package Telerik.Documents.Fixed --version 2026.1.210
To install a different library, replace Telerik.Documents.Fixed with the package that matches your document type.
For example, use Telerik.Documents.Flow for Word processing, Telerik.Documents.Spreadsheet for spreadsheet processing, and Telerik.Documents.SpreadsheetStreaming for large spreadsheet generation.
How to Install from NuGet.org with Package Manager Console
Use the Visual Studio Package Manager Console when you manage packages inside Visual Studio and want PowerShell-based commands.
Install-Package Telerik.Licensing
Install-Package Telerik.Documents.Core -Version 2026.1.210
Install-Package Telerik.Documents.Fixed -Version 2026.1.210
You can find the exact package names and supported combinations in Available NuGet Packages.
How to Choose NuGet Setup for Your Environment
The package source is only one part of setup. Use the following guidance to choose the correct package family and restore approach for your environment.
How to Configure Blazor Web App, Blazor Server, and ASP.NET Core
Use the cross-platform Telerik.Documents.* package family. Add Telerik.Licensing, Telerik.Documents.Core, and the library packages that match the document formats you work with.
For example, a Blazor Web App that creates DOCX files and exports them to PDF typically uses the following packages:
<ItemGroup>
    <PackageReference Include="Telerik.Licensing" Version="1.*" />
    <PackageReference Include="Telerik.Documents.Core" Version="2026.1.210" />
    <PackageReference Include="Telerik.Documents.Flow" Version="2026.1.210" />
    <PackageReference Include="Telerik.Documents.Flow.FormatProviders.Pdf" Version="2026.1.210" />
</ItemGroup>
How to Configure Blazor WebAssembly
Use the Telerik.Documents.* package family in Blazor WebAssembly projects. Do not use Telerik.Windows.Documents.* packages in WebAssembly applications.
For PDF processing in Blazor WebAssembly, start with the following package references:
<ItemGroup>
    <PackageReference Include="Telerik.Licensing" Version="1.*" />
    <PackageReference Include="Telerik.Documents.Core" Version="2026.1.210" />
    <PackageReference Include="Telerik.Documents.Fixed" Version="2026.1.210" />
</ItemGroup>
If the application exports PDF content that contains non-JPEG images or uses image quality settings other than High, also add the image-processing dependencies described in Images.
How to Configure CI/CD and Build Agents
For CI/CD pipelines and self-hosted build agents, prefer NuGet.org for current releases because it removes the need to configure private-feed credentials. Commit package references and, when needed, a repository-level NuGet.Config file, but keep any secrets outside source control.
If your pipeline must restore from the Telerik NuGet server or another authenticated feed, store the API key or credentials in the pipeline secret store and inject them during restore. For CI-specific guidance, see Restoring NuGet Packages in Your CI Workflow.
When you automate restores, add one validation step that checks package-family consistency before build. For example, fail the build if the project file contains both Telerik.Documents. and Telerik.Windows.Documents. package references.
How to Install from a Local NuGet Feed
Use a local feed when you need offline development, an internal mirror, or controlled package availability inside a secured network.
-
Download the
.nupkgfiles for the Telerik suite or distribution that includes Telerik Document Processing from your Telerik account.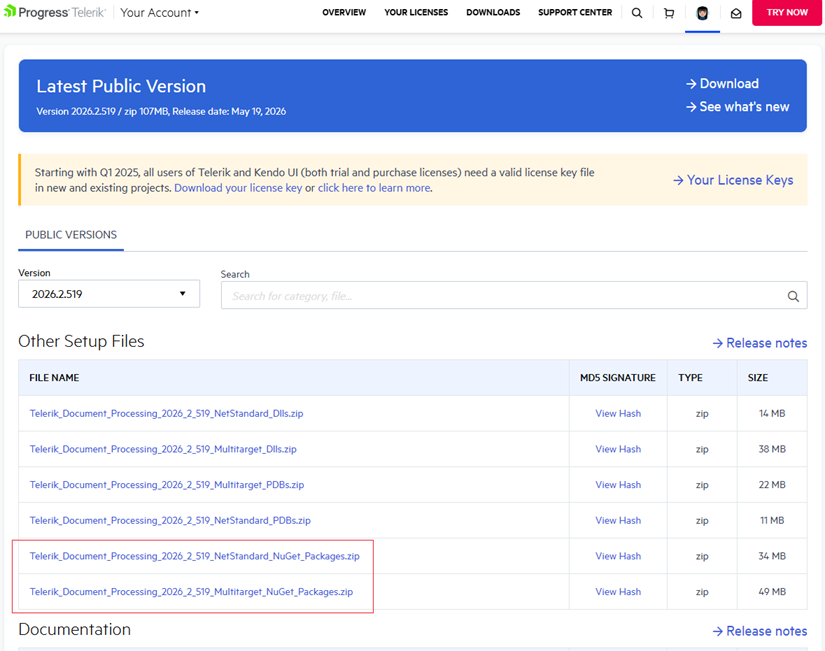
-
Copy the
.nupkgfiles to a local or network folder that will act as the package source. -
In Visual Studio, open Manage NuGet Packages... and then select the Settings icon.
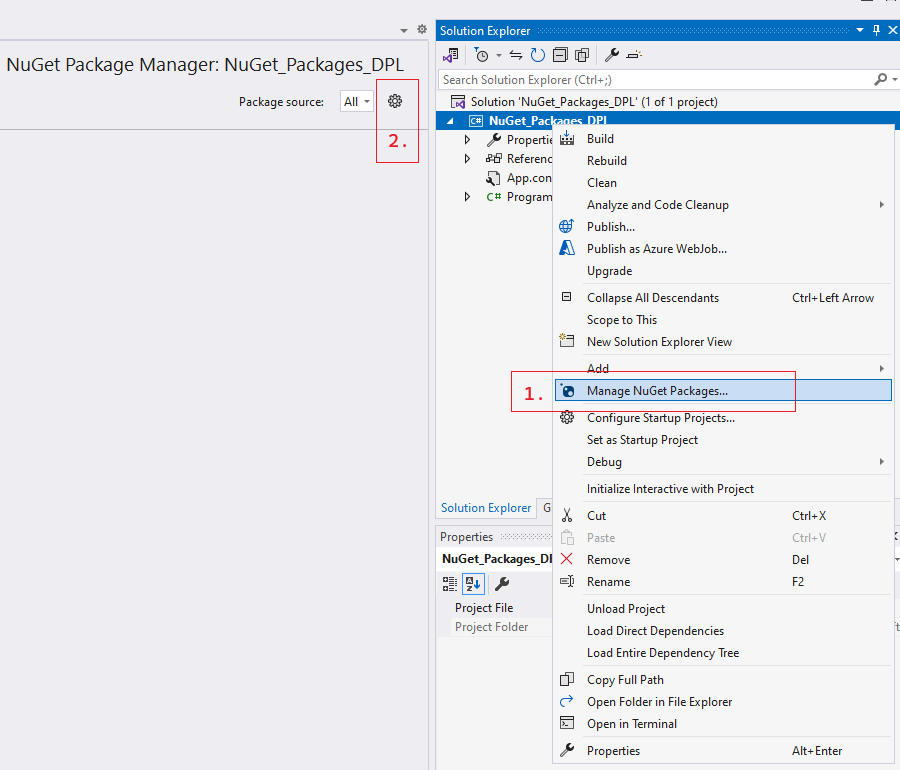
-
Add a new package source. Set Source to the folder that contains the
.nupkgfiles.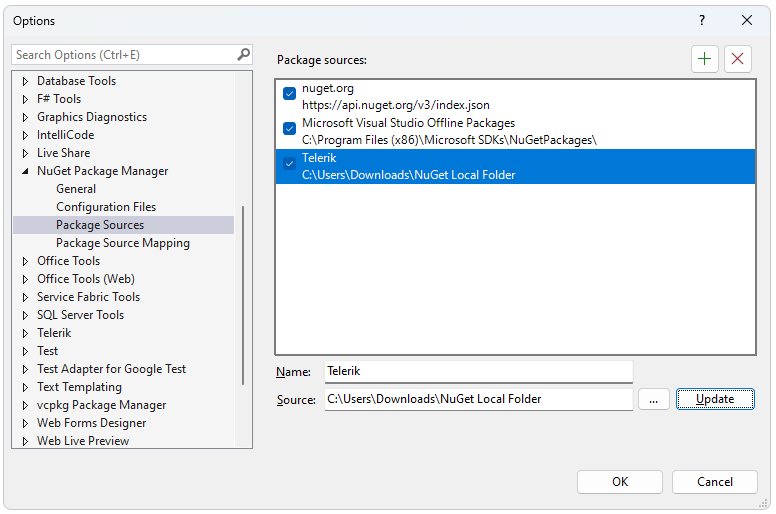
-
Select the local package source and install the required Telerik Document Processing packages.
If you also restore from NuGet.org or another feed, configure NuGet.Config so your local feed is used intentionally rather than accidentally.
How to Install from the Telerik NuGet Server
As of Q2 2026, NuGet.org is the recommended source for current Telerik Document Processing packages. Use the Telerik NuGet server for backward compatibility, for older releases, or when your organization requires the Telerik private feed.
The Telerik NuGet server provides authenticated access to Telerik packages and older versions that may not be part of your standard NuGet.org-based workflow.
Before you add the Telerik NuGet server, make sure that you have:
- A commercial or trial license that includes Telerik Document Processing.
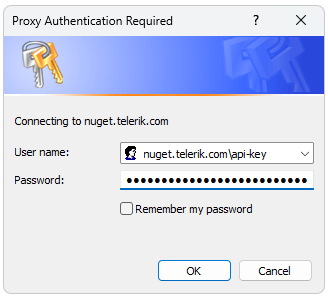
- An API key for package restore and automated environments.
How to Generate a Telerik NuGet API Key
Create an API key as described in Generate API Keys. Use the API key instead of a password when you configure the Telerik feed in automation, in NuGet.Config, or in command-line restore steps.
How to Add the Telerik NuGet Server to Visual Studio
Configure the Telerik NuGet server as a package source in Visual Studio with the following feed URL:
https://nuget.telerik.com/v3/index.json-
In Solution Explorer, right-click the project, select Manage NuGet Packages..., and then select the Settings icon.
-
Select + to add a new package source. Enter
https://nuget.telerik.com/v3/index.jsonin Source and use a descriptive name such as Telerik NuGet Server.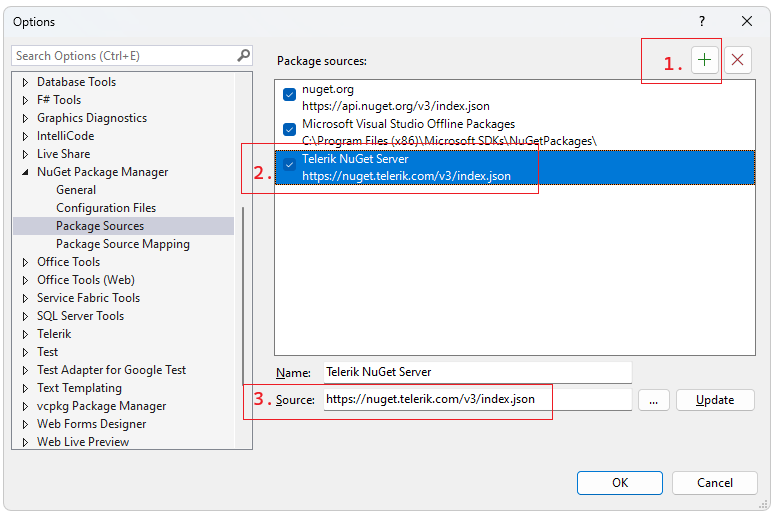
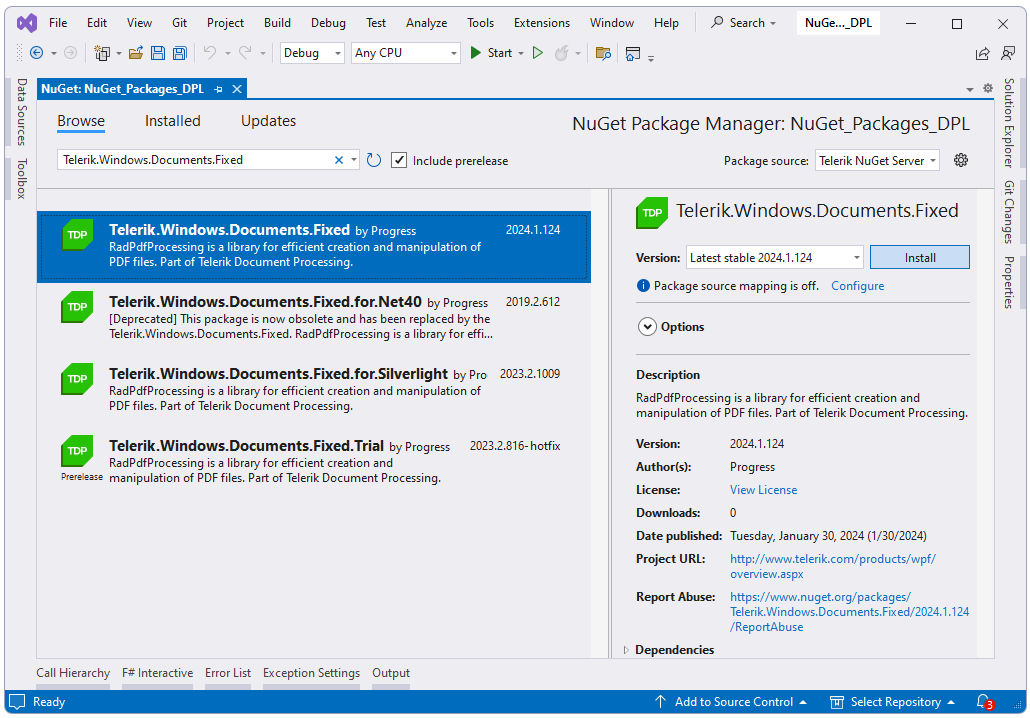
-
Select Telerik NuGet Server from Package source and authenticate with your Telerik account or API-key-based configuration.
-
Select and install the required NuGet packages.
How to Reset Stored Telerik Feed Credentials
If restore fails because Visual Studio or NuGet is using outdated Telerik feed credentials, reset the stored credentials and add the feed again.
- Remove the saved credentials in Windows Credential Manager. Look for entries such as
nuget.telerik.comorVSCredentials_nuget.telerik.com. - Remove the Telerik package source from Visual Studio.
- If you added the Telerik package source with the .NET CLI, remove it with the following commands:
dotnet nuget list source
dotnet nuget remove source "Telerik NuGet Server"- Check
%AppData%\NuGet\NuGet.Configfor persisted Telerik credentials and remove them if they are no longer valid. - If Visual Studio still does not prompt for new credentials, follow the steps in Force NuGet to ask for authentication again.
- Restart Visual Studio.
- Add the Telerik NuGet package source again. If you use the Telerik feed in automated restore or .NET applications, configure the API key in NuGet.Config.