Telerik DPL MCP Server (NuGet)
The Telerik Document Processing MCP (Model Context Protocol) server is also available as a NuGet package. This NuGet distribution exposes the same AI Coding Assistant functionality as the npm package.
Starting with .NET 10, you can execute it directly through the dnx command. For .NET 8 and .NET 9 (where dnx is not available), you can install it as a global dotnet tool and invoke its executable.
Prerequisites
| Target Runtime | Required SDK | Invocation Method | Notes |
|---|---|---|---|
| .NET 8 / .NET 9 | .NET 8 or .NET 9 SDK | dotnet tool | dnx not supported. Install tool manually. |
| .NET 10 | .NET 10 SDK (Preview 6 or later) | dnx dynamic execution | Simplest approach. No prior install step. |
Additional requirements:
- A Telerik user account.
- An active Telerik license that includes Telerik Document Processing.
- An application that uses the Telerik Document Processing Libraries.
Summary of Installation Approaches
| Aspect | .NET 8 / 9 | .NET 10 |
|---|---|---|
Availability of dnx | Not available | Available |
| Install Command | dotnet tool install Telerik.DPL.MCP | None (resolved on demand) |
| .mcp.json Command | dotnet | dnx |
| .mcp.json Args | telerik-dpl-assistant | Telerik.DPL.MCP, --yes |
| Update Version | Re-run tool install with --version or tool update | Handled by latest package resolved by dnx |
| Offline Use | Requires prior tool install | Requires prior NuGet cache warm-up |
Server Installation
.NET 8 / .NET 9
- Global installation
Install the MCP server as a global tool in your solution root (or another chosen path):
dotnet tool install -g Telerik.DPL.MCPIf updating:
dotnet tool update -g Telerik.DPL.MCPThese commands install/update the Telerik DPL MCP dotnet tool globally. Global tools are installed in the following directories by default when you specify the -g or --global option:
-
Windows -
%USERPROFILE%\.dotnet\tools -
Linux/MacOS -
$HOME/.dotnet/tools-
Local installation
- Navigate to the solution folder.
- Run
dotnet tool new-manifestin the Terminal. - Run
dotnet tool install Telerik.DPL.MCPin the Terminal.
-
.NET 10
No manual install step is needed. The dnx command will download and execute the NuGet package on demand.
Server Configuration
.NET 8 / .NET 9 Configuration (.mcp.json)
Add .mcp.json file to your solution root (or to %USERPROFILE% for global usage):
    {
      "servers": {
        "telerik-dpl-assistant": {
          "type": "stdio",
          "command": "dotnet",
          "args": ["tool", "run", "telerik-dpl-assistant"],
          "env": {
            "TELERIK_LICENSE_PATH": "THE_PATH_TO_YOUR_LICENSE_FILE",
            // or
            "TELERIK_LICENSE": "YOUR_LICENSE_KEY"
          }
        }
      },
      "inputs": []
    }
For the local installation use the following .mcp.json:
    {
      "servers": {
        "telerik-dpl-assistant": {
         "type": "stdio",
         "command": "telerik-dpl-assistant",
          "env": {
            "TELERIK_LICENSE_PATH": "THE_PATH_TO_YOUR_LICENSE_FILE",
            // or
            "TELERIK_LICENSE": "YOUR_LICENSE_KEY"
          }
        }
      },
      "inputs": []
    }
.NET 10 Configuration (.mcp.json)
Use these settings when configuring the server in your MCP client:
    {
      "servers": {
        "telerik-dpl-assistant": {
          "type": "stdio",
          "command": "dnx",
          "args": ["Telerik.DPL.MCP", "--yes"],
          "env": {
            "TELERIK_LICENSE_PATH": "THE_PATH_TO_YOUR_LICENSE_FILE",
            // or
            "TELERIK_LICENSE": "YOUR_LICENSE_KEY"
          }
        }
      },
      "inputs": []
    }
You can substitute TELERIK_LICENSE instead of TELERIK_LICENSE_PATH (see License Configuration section below for details and recommendations). The inputs array is optional and not required for the current functionality.
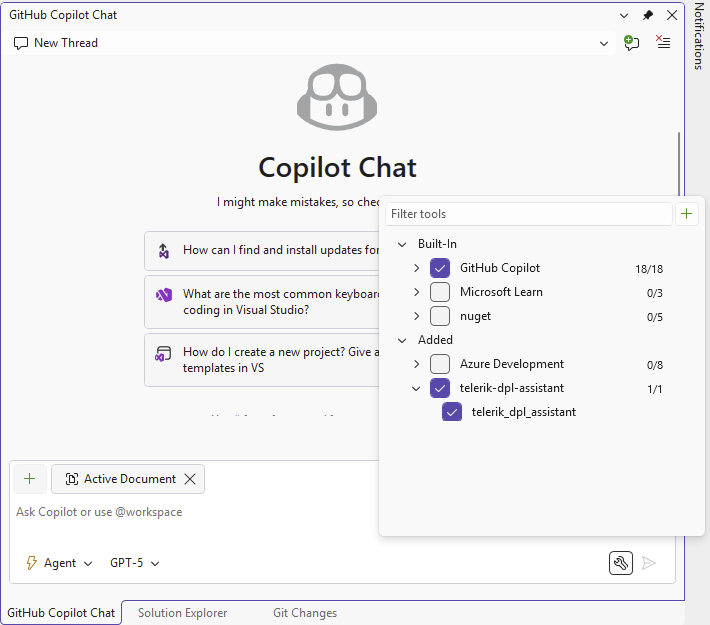
After saving the file, restart Visual Studio and enable the telerik-dpl-assistant tool in the Copilot Chat window's tool selection dropdown.
Global Setup
To enable the server globally for all projects, add the .mcp.json file to your user directory (%USERPROFILE%, e.g., C:\Users\{YourName}\.mcp.json).
License Configuration
Add your Telerik license key using one of these options in the env section.
Option 1: License File Path (Recommended)
"env": {
	"TELERIK_LICENSE_PATH": "THE_PATH_TO_YOUR_LICENSE_FILE"
}
The THE_PATH_TO_YOUR_LICENSE_FILE should point to the telerik-license.txt file, usually in the AppData folder. Often it will look like:
"TELERIK_LICENSE_PATH": "%appdata%/Telerik/telerik-license.txt"
Option 2: Direct License Key
"env": {
	"TELERIK_LICENSE": "YOUR_LICENSE_KEY_HERE"
}
Option 1 is recommended unless you share settings across different systems. Remember to update your license key when necessary.
Visual Studio Usage
After configuration and restart:
- Open Copilot Chat.
- Enable the
telerik-dpl-assistanttool. - Grant permissions when prompted (per session, workspace, or always).
- Start fresh sessions for unrelated prompts to avoid context pollution. You can check the Output pane of Visual Studio for diagnostics (select output from GitHub Copilot).