Getting Started with the Chat
This tutorial explains how to set up a basic Telerik UI for ASP.NET MVC Chat and highlights the major steps in the configuration of the component.
You will learn how to initialize a Chat component, load messages from a data collection, define quick actions, configure commands and elements in the header, and handle context menu actions.
Prerequisites
To successfully complete the tutorial, you need a project that is already configured to use the Telerik UI for ASP.NET MVC components:
-
To create a new pre-configured project for the Telerik UI for ASP.NET MVC components, you can use a project template.
-
To manually configure an existing project by using NuGet, see the Adding Telerik UI through NuGet.
1. Prepare the CSHTML File
The first step is to add the required directives at the top of the .cshtml document:
-
To use the Telerik UI for ASP.NET MVC HtmlHelpers:
cshtml@using Kendo.Mvc.UI
2. Initialize the Chat
Use the Chat HtmlHelper to add the component to a page:
- The
Name()configuration method is mandatory as its value is used for theidand thenameattributes of the Chat element. - The
AuthorId()specifies the unique identifier of the current user. If not set, a GUID is generated automatically. - Set the
Height()andWidth()options based on your layout requirements.
@(Html.Kendo().Chat()
    .Name("chat")
    .AuthorId("customer")
    .Height("600px")
    .Width("500px")
)
3. Load Conversation from a Data Collection
The next step is to load messages from a local data collection. As a result, the Chat will display message history on load.
-
Create a data collection of type
ChatMessagein the controller action and pass it to the View that contains the Chat definition.C#using Kendo.Mvc.UI; public ActionResult Index() { var chatHistory = new List<ChatMessage>() { new ChatMessage { Id = "1", AuthorId = "support_agent", AuthorName = "Sarah Johnson", AuthorImageUrl = "https://demos.telerik.com/aspnet-core/shared/web/Customers/LONEP.jpg", AuthorImageAltText = "Sarah's profile picture", Text = "Welcome to our support chat! How can I help you today?", TimeStamp = new DateTime(2025,8,1).AddHours(10), IsPinned = true }, new ChatMessage { Id = "2", AuthorId = "customer", AuthorName = "John Doe", AuthorImageUrl = "https://demos.telerik.com/aspnet-core/shared/web/Customers/RICSU.jpg", Text = "Hi! I have a question about your products.", TimeStamp = new DateTime(2025,8,1).AddHours(10).AddMinutes(5), }, new ChatMessage { Id = "3", AuthorId = "support_agent", AuthorName = "Sarah Johnson", AuthorImageUrl = "https://demos.telerik.com/aspnet-core/shared/web/Customers/LONEP.jpg", AuthorImageAltText = "Sarah's profile picture", Text = "I'd be happy to help! What specific product information do you need?", TimeStamp = new DateTime(2025,8,1).AddHours(10).AddMinutes(6), } }; return View(chatHistory); } -
Pass the data to the Chat using the
BindTo()option.Razor@model List<ChatMessage> @(Html.Kendo().Chat() .Name("chat") .AuthorId("customer") .Height("600px") .Width("500px") .BindTo(Model) )
4. Add Message Suggestions
Configure predefined suggestions that serve as quick-select options for common responses or phrases. The specified suggestions appear as clickable items above the message box, allowing users to instantly insert the text into their message or send it directly.
Define the desired suggestions by using the Suggestions() configuration:
@model List<ChatMessage>

@(Html.Kendo().Chat()
    .Name("chat")
    .AuthorId("customer")
    .Height("600px")
    .Width("500px")
    .BindTo(Model)
    .Suggestions(suggestions => {
        suggestions.Add().Text("Product Information");
        suggestions.Add().Text("Pricing Details");
        suggestions.Add().Text("Technical Support");
        suggestions.Add().Text("Contact Sales");
        suggestions.Add().Text("Thank you");
    })
)
5. Configure Header Items
Define items in the Chat's header to customize the default header appearance and include additional functionalities, such as a Settings button.
Specify the desired header items through the HeaderItems() configuration.
@model List<ChatMessage>
@(Html.Kendo().Chat()
.Name("chat")
.AuthorId("customer")
.Height("600px")
.Width("500px")
.BindTo(Model)
.HeaderItems(items =>
{
items.Add().Type(AppBarItemType.ContentItem).Template("<strong>Customer Support Chat</strong>");
items.Add().Type(AppBarItemType.Spacer);
items.Add().Type(AppBarItemType.ContentItem).Template(Html.Kendo().Template().AddComponent(btn => btn
.Button()
.Name("settingsBtn")
.Icon("gear")
.FillMode(ButtonFillMode.Flat)
.Events(ev => ev.Click("onSettingsClick"))
));
})
)
<script>
function onSettingsClick() {
// Handle button's click event.
}
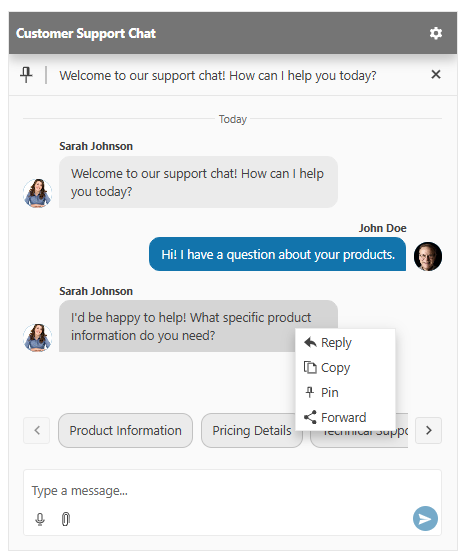
</script>6. Set up Context Menu Actions
The Chat component provides an option to customize its default context menu actions of the messages. Right-click on a specified message to review the available built-in context menu.
Utilize the MessageActions() configuration to define the actions that will appear in the messages context menu. Also, handle the ContextMenuAction event that fires when a context menu action is executed.
@model List<ChatMessage>

@(Html.Kendo().Chat()
    .Name("chat")
    .AuthorId("customer")
    ... // Additional configuration.
    .MessageActions(actions => {
        actions.Add().Name("reply").Text("Reply").Icon("undo");
        actions.Add().Name("copy").Text("Copy").Icon("copy");
        actions.Add().Name("pin").Text("Pin").Icon("pin");
        actions.Add().Name("forward").Text("Forward").Icon("share");
        actions.Add().Name("delete").Text("Delete").Icon("trash");
    })
    .Events(ev =>
    {
        ev.ContextMenuAction("onContextMenuAction");
    })
)7. Handle Message Events
Handle the SendMessage event and implement custom logic that checks if the submitted message contains any of the predefined quick-actions and posts the respective reply using the postMessage() client-side method.
@model List<ChatMessage>

@(Html.Kendo().Chat()
    .Name("chat")
    .AuthorId("customer")
    ... // Additional configuration.
    .Events(ev =>
    {
        ev.SendMessage("onSendMessage");
    })
)8. (Optional) Reference Existing Chat Instances
Referencing existing component instances allows you to build on top of their configuration. To reference an existing Chat instance, use the jQuery.data() method.
-
Use the
Name()option of the component to establish a reference.JS<script> $(document).ready(function() { var chatReference = $("#chat").data("kendoChat"); // chatReference is a reference to the existing Chat instance of the helper. }); </script> -
Use the Chat client-side API to control the behavior of the component. In this example, you will clear the message history of the Chat (for example, when a button is clicked).
Razor@(Html.Kendo().Button() .Name("btn") .Content("Clear History") .Events(ev => ev.Click("onBtnClick"))) <script> function onBtnClick() { var chatReference = $("#chat").data("kendoChat"); chatReference.clearMessages(); } </script>
For more information on referencing specific helper instances, see the Methods and Events article.
Next Steps
- Integrating AI services with the Chat
- Using templates in the Chat
- Handling JavaScript Events of User Interactions