
Your First Steps with SkiaSharp in .NET MAUI

Summarize with AI:
In this article, you will learn what SkiaSharp is and how to get started with it to create interfaces in .NET MAUI that you might not be able to create so easily otherwise.
Important note: By the end of this article, you will know how to create a custom control using SkiaSharp, although my personal recommendation is that as much as possible, you use tested, robust controls that also provide support for any eventuality, such as the Progress Telerik controls for .NET MAUI.
What Is SkiaSharp?
SkiaSharp is a multi-platform 2D graphics API based on Google’s Skia graphics library. It can be used in mobile, desktop and server .NET projects to render images. In the case of .NET MAUI, it is very useful for creating onscreen objects that would be very complicated otherwise, such as custom controls, backgrounds with non-symmetrical shapes, graphic effects, etc.
Using SkiaSharp in .NET MAUI Projects
To integrate the SkiaSharp package into an existing .NET MAUI project, you need to do the following:
- Add the nuget package
SkiaSharp.Views.Maui.Controls, which will install the package and its dependencies. - In
MauiProgram.cs, add theUseSkiaSharpmethod as follows:
public static class MauiProgram
{
    public static MauiApp CreateMauiApp()
    {
        var builder = MauiApp.CreateBuilder();
        builder
            .UseMauiApp<App>()
            .UseSkiaSharp()
            ...
    }
}
With the above configured, we can start experimenting with SkiaSharp in the application’s UI.
Defining an SKCanvasView to Use SkiaSharp
When you want to render elements using SkiaSharp, something you should know is that you need to use an object of type SKCanvas. This is the container on which we can draw lines, shapes, text, images, etc. The easiest way to use it in .NET MAUI is by adding a control of type SKCanvasView directly to a ContentPage as in the following example:
<ContentPage
    xmlns:skia="clr-namespace:SkiaSharp.Views.Maui.Controls;assembly=SkiaSharp.Views.Maui.Controls"
    ...>

    <Grid>
        <skia:SKCanvasView
            x:Name="canvas"
            BackgroundColor="DarkRed"
            HeightRequest="500"
            WidthRequest="500" />
    </Grid>

</ContentPage>
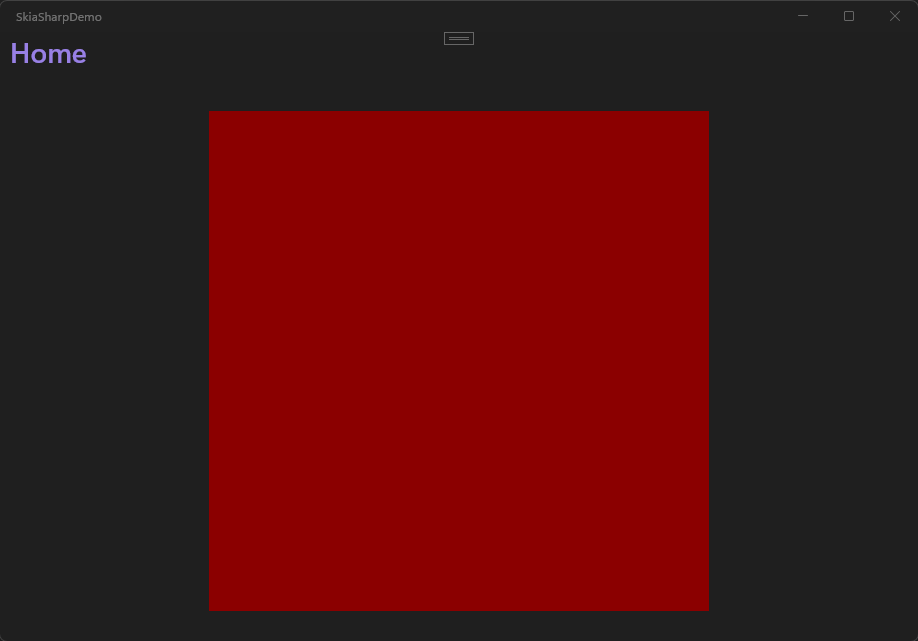
The above code generates a space of 500px by 500px to draw elements on it:
The next step to draw elements on the canvas is to add an event handler for the PaintSurface event. This event fires every time it is necessary to redraw the control, such as when it initializes, resizes or we force a refresh:
<skia:SKCanvasView
    x:Name="canvas"
    BackgroundColor="DarkRed"
    HeightRequest="500"
    PaintSurface="canvas_PaintSurface"
    WidthRequest="500" />
The PaintSurface event contains a parameter of type SKPaintSurfaceEventArgs, which provides a reference to the SKCanvas through the e.Surface.Canvas property, as well as the Info property of type SKPaintSurfaceEventArgs, which contains information about the canvas, such as its size:
private void canvas_PaintSurface(object sender, SkiaSharp.Views.Maui.SKPaintSurfaceEventArgs e)
{
    var canvas = e.Surface.Canvas;

    var info = e.Info;

    Debug.WriteLine($"Canvas size: {info.Width} x {info.Height}");
}
Common Methods of the SKCanvas Object
Once we know how to retrieve the SKCanvas object from the code behind, it is time to talk about some available methods on it. These methods allow drawing on the canvas surface and typically have quite descriptive names:
DrawColor: Fills the canvas with a solid colorDrawLine: Allows drawing linesDrawRect: Allows drawing rectanglesDrawCircle: Allows drawing circlesDrawText: Allows drawing textDrawPath: Allows drawing vectorsDrawBitmap: Allows drawing imagesClear: Clears the canvas allowing a new background color to be assignedClipRect/ClipPath: Limits drawing areasMoveTo: Moves the drawing cursor to certain coordinates, but without drawing anything
The above methods are just a part of all the methods available in the API. Now, let’s suppose we wanted to change the color of the canvas every second with a random color; to achieve this, we could use the DrawColor method as follows:
public partial class MainPage : ContentPage
{

    public MainPage()
    {
        InitializeComponent();
        Loaded += MainPage_Loaded;
    }

    private void MainPage_Loaded(object? sender, EventArgs e)
    {
        var timer = new System.Timers.Timer(1000);
        timer.Elapsed += (s, args) =>
        {
            canvas.Dispatcher.Dispatch(() => canvas.InvalidateSurface());
        };
        timer.Start();
    }

    private void canvas_PaintSurface(object sender, SkiaSharp.Views.Maui.SKPaintSurfaceEventArgs e)
    {
        var random = new Random();
        var color = new SKColor((byte)random.Next(256), (byte)random.Next(256), (byte)random.Next(256));

        var canvas = e.Surface.Canvas;
        canvas.DrawColor(color);
    }
}
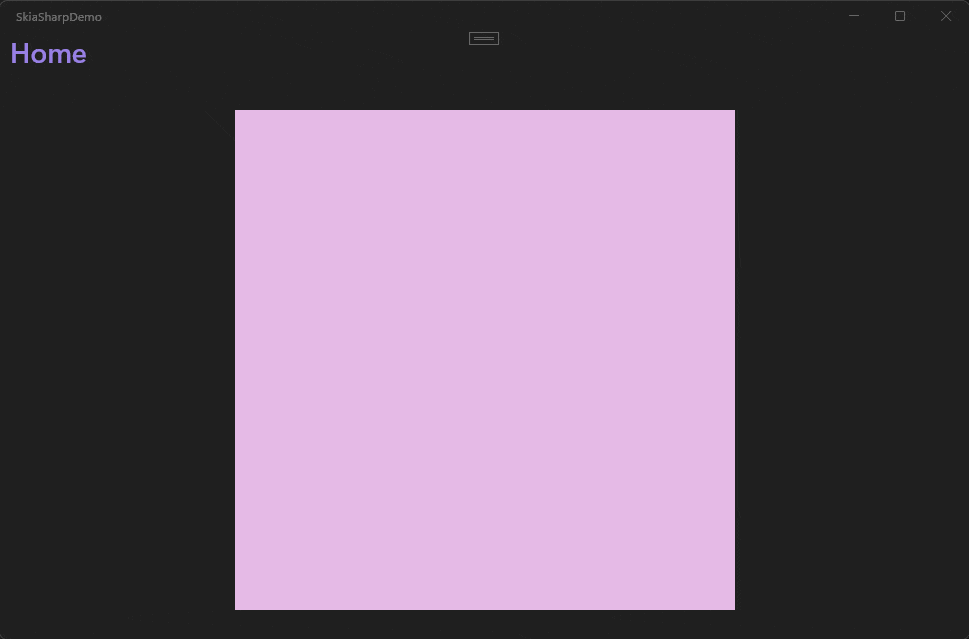
The above code causes the background of the canvas to be filled with a different color every second:
Now, each method we have mentioned in the previous list takes a different type to execute its function. For example, in the previous code, we can see that the DrawColor method expects a type SKColor. Let’s talk more about the types of objects we can use to draw using SkiaSharp.
Common Types for Drawing on an SKCanvas Object
In the SkiaSharp API, we can find a set of classes that allow drawing various objects on an SKCanvas object. Among the most commonly used are:
SKPaint: Defines how a rendered element will look, specifying characteristics such as color, line thickness, font size, etc.SKColor: Represents an RGBA colorSKRect: Represents a rectangleSKBitmapandSKImage: Define an image in memorySKTypeface: Represents a typefaceSKPath: Defines vector pathsSKMatrix: Allows applying transformationsSKRoundRect: Allows drawing a rounded rectangle
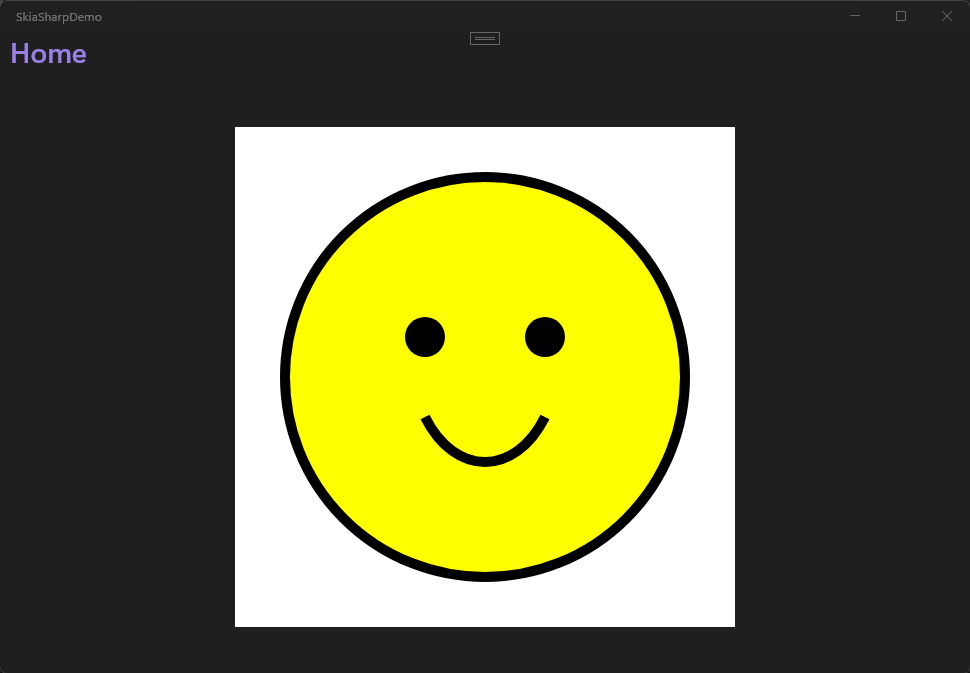
Typically, we define these objects according to the method we want to use. The following example demonstrates how to draw a face using SkiaSharp:
private void canvas_PaintSurface(object sender, SkiaSharp.Views.Maui.SKPaintSurfaceEventArgs e)
{
    var canvas = e.Surface.Canvas;
    var info = e.Info;

    float width = info.Width;
    float height = info.Height;

    canvas.Clear(SKColors.White);

    float cx = width / 2f;
    float cy = height / 2f;
    float radius = Math.Min(width, height) * 0.4f;

    //Background
    using (var paintFill = new SKPaint
    {
        Color = SKColors.Yellow,
        Style = SKPaintStyle.Fill,
        IsAntialias = true
    })
    {
        canvas.DrawCircle(cx, cy, radius, paintFill);
    }

    //Face outline
    using (var paintStroke = new SKPaint
    {
        Color = SKColors.Black,
        Style = SKPaintStyle.Stroke,
        StrokeWidth = radius * 0.05f,
        IsAntialias = true
    })
    {
        canvas.DrawCircle(cx, cy, radius, paintStroke);
    }

    //Eyes
    float eyeOffsetX = radius * 0.3f;
    float eyeOffsetY = radius * 0.2f;
    float eyeRadius = radius * 0.1f;
    using (var paintEye = new SKPaint
    {
        Color = SKColors.Black,
        Style = SKPaintStyle.Fill,
        IsAntialias = true
    })
    {
        canvas.DrawCircle(cx - eyeOffsetX, cy - eyeOffsetY, eyeRadius, paintEye);
        canvas.DrawCircle(cx + eyeOffsetX, cy - eyeOffsetY, eyeRadius, paintEye);
    }

    //Mouth
    using (var paintMouth = new SKPaint
    {
        Color = SKColors.Black,
        Style = SKPaintStyle.Stroke,
        StrokeWidth = radius * 0.05f,
        IsAntialias = true
    })
    {
        var path = new SKPath();
        float mouthW = radius * 0.6f;
        float mouthH = radius * 0.3f;
        float yMouth = cy + radius * 0.2f;

        path.MoveTo(cx - mouthW / 2f, yMouth);
        path.CubicTo(
            cx - mouthW / 4f, yMouth + mouthH,
            cx + mouthW / 4f, yMouth + mouthH,
            cx + mouthW / 2f, yMouth);

        canvas.DrawPath(path, paintMouth);
    }
}
In the above code, you can see how a combination of types and methods in SkiaSharp is used to draw sections of the face. It is also possible to notice a common pattern: for each section, a SKPaint type is defined first, indicating how the drawn object will look, and then the corresponding method is used to draw the shape with the characteristics defined in SKPaint. The result of the previous execution is the following:
Creating a Control Using SkiaSharp
Now that we have the fundamentals of using SkiaSharp in .NET MAUI, let’s create a small reusable control that allows toggling between light and dark mode in the application. So far, we have used the SKCanvasView control to define the location of the SKCanvas on a ContentPage. Ideally, we would be able to reuse the control across multiple pages, so we can create a class that inherits from SKCanvasView, as follows:
public class ToggleSwitch : SKCanvasView
{
    protected override void OnPaintSurface(SKPaintSurfaceEventArgs e)
    {
        var canvas = e.Surface.Canvas;
        canvas.Clear();
    }
}
Next, we can use this new component in a ContentPage as follows:
<ContentPage
    xmlns:controls="clr-namespace:SkiaSharpDemo"
    xmlns:skia="clr-namespace:SkiaSharp.Views.Maui.Controls;assembly=SkiaSharp.Views.Maui.Controls"
    ...>

    <Grid>
        <VerticalStackLayout Padding="30" Spacing="20">
            <controls:ToggleSwitch HeightRequest="50" WidthRequest="100" />
        </VerticalStackLayout>
    </Grid>

</ContentPage>
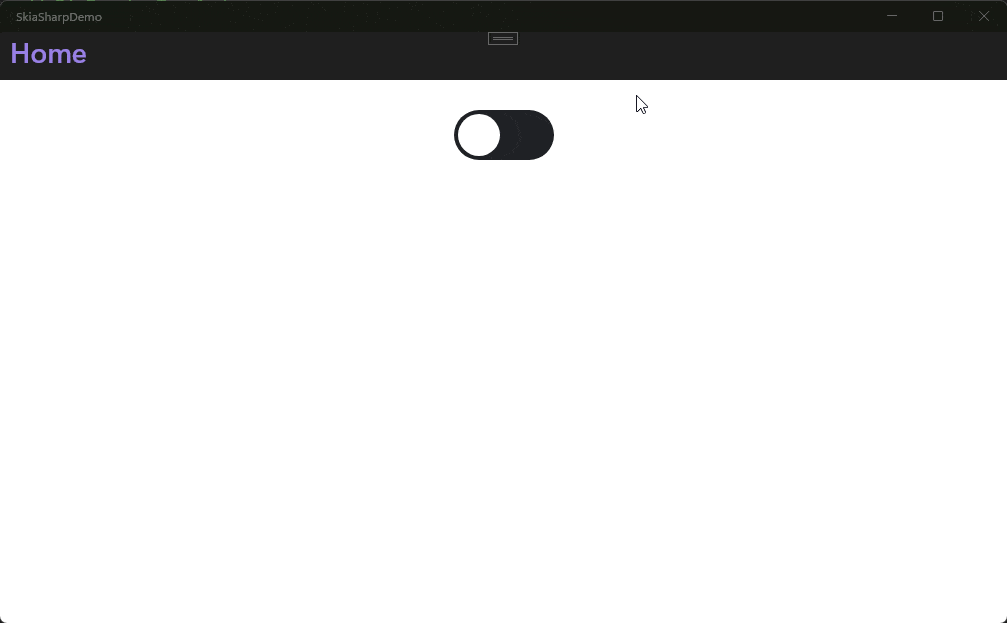
Once we have the space ready to start drawing shapes on the canvas, we will use the DrawRoundRect method to draw the container of the control and DrawCircle to draw the knob that will control the selected mode:
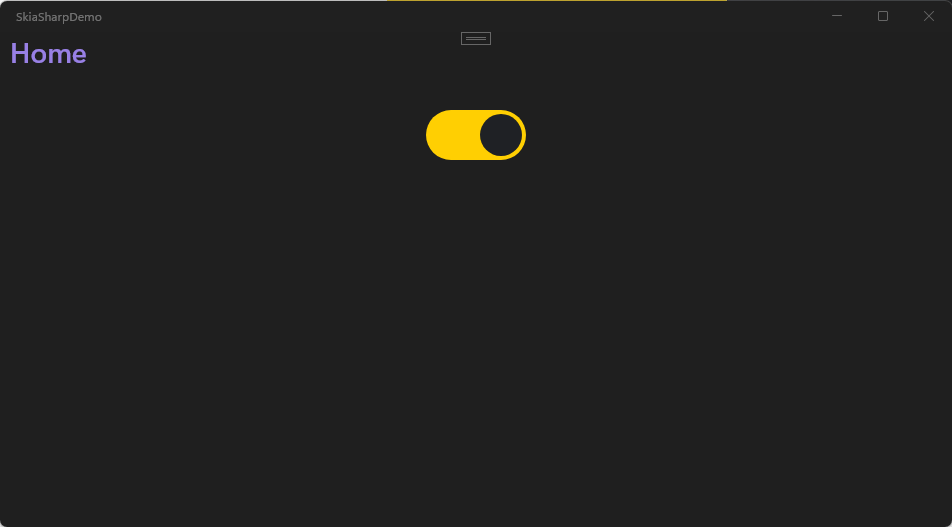
You can see that we already have a canvas with two shapes representing the state of the switch. The next step is to add interactivity to the control, allowing the user to customize how the control looks and acts. To do this, we will add some bindable properties to the control:
public class ToggleSwitch : SKCanvasView
{

        public static readonly BindableProperty IsToggledProperty =
            BindableProperty.Create(
                nameof(IsToggled),
                typeof(bool),
                typeof(ToggleSwitch),
                false,
                propertyChanged: OnToggledChanged);

        public bool IsToggled
        {
            get => (bool)GetValue(IsToggledProperty);
            set => SetValue(IsToggledProperty, value);
        }

        public static readonly BindableProperty OnBackgroundColorProperty =
             BindableProperty.Create(
                 nameof(OnBackgroundColor),
                 typeof(Color),
                 typeof(ToggleSwitch),
                 Colors.DarkSlateGray,
                 propertyChanged: (BindableObject bindable, object oldValue, object newValue) =>
                 {
                     ((ToggleSwitch)bindable).InvalidateSurface();
                 });

        public Color OnBackgroundColor
        {
            get => (Color)GetValue(OnBackgroundColorProperty);
            set => SetValue(OnBackgroundColorProperty, value);
        }

        public static readonly BindableProperty OffBackgroundColorProperty =
            BindableProperty.Create(
                nameof(OffBackgroundColor),
                typeof(Color),
                typeof(ToggleSwitch),
                Colors.LightGray,
                propertyChanged: (BindableObject bindable, object oldValue, object newValue) =>
                {
                    ((ToggleSwitch)bindable).InvalidateSurface();
                });

        public Color OffBackgroundColor
        {
            get => (Color)GetValue(OffBackgroundColorProperty);
            set => SetValue(OffBackgroundColorProperty, value);
        }

        public static readonly BindableProperty KnobOnColorProperty =
             BindableProperty.Create(
                 nameof(KnobOnColor),
                 typeof(Color),
                 typeof(ToggleSwitch),
                 Colors.White,
                 propertyChanged: (BindableObject bindable, object oldValue, object newValue) =>
                 {
                     ((ToggleSwitch)bindable).InvalidateSurface();
                 });

        public Color KnobOnColor
        {
            get => (Color)GetValue(KnobOnColorProperty);
            set => SetValue(KnobOnColorProperty, value);
        }

        public static readonly BindableProperty KnobOffColorProperty =
             BindableProperty.Create(
                 nameof(KnobOffColor),
                 typeof(Color),
                 typeof(ToggleSwitch),
                 Colors.White,
                 propertyChanged: (BindableObject bindable, object oldValue, object newValue) =>
                 {
                     ((ToggleSwitch)bindable).InvalidateSurface();
                 });

        public Color KnobOffColor
        {
            get => (Color)GetValue(KnobOffColorProperty);
            set => SetValue(KnobOffColorProperty, value);
        }

        public event EventHandler<ToggledEventArgs> Toggled;

        static void OnToggledChanged(BindableObject bindable, object oldValue, object newValue)
        {
            var control = (ToggleSwitch)bindable;
            control.InvalidateSurface();
            control.Toggled?.Invoke(control, new ToggledEventArgs((bool)newValue));
        }

    ...
}
In the code above, a series of bindable properties are defined that allow us to know whether the toggle control is on or off, the on and off colors and, finally, the knob colors in their different states. You can also notice that a method called InvalidateSurface is frequently used, which serves to indicate that the content of the control has changed and needs to be repainted.
With the new properties added, we can modify the OnPaintSurface method to use them and control how the graphical interface will be displayed at all times as follows:
protected override void OnPaintSurface(SKPaintSurfaceEventArgs e)
{
    var canvas = e.Surface.Canvas;
    canvas.Clear();

    float width = e.Info.Width;
    float height = e.Info.Height;
    float radius = height / 2f;

    using (var paint = new SKPaint
    {
        Color = (IsToggled
                    ? OnBackgroundColor.ToSKColor()
                    : OffBackgroundColor.ToSKColor()),
        IsAntialias = true
    })
    {
        var rect = new SKRoundRect(
            new SKRect(0, 0, width, height),
            radius, radius);
        canvas.DrawRoundRect(rect, paint);
    }

    float knobRadius = radius - 4;
    float knobX = IsToggled ? width - radius : radius;
    float knobY = radius;

    using (var paint = new SKPaint
    {
        Color = (IsToggled
                    ? KnobOffColor.ToSKColor()
                    : KnobOnColor.ToSKColor()),
        IsAntialias = true
    })
    {
        canvas.DrawCircle(knobX, knobY, knobRadius, paint);
    }
}
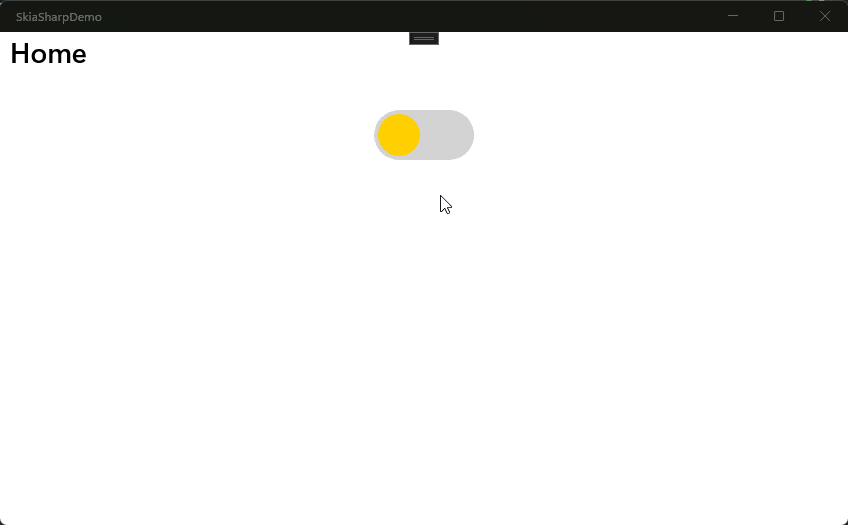
If you run the app at this moment, you will notice that the control does not react to being pressed. This is because we need to add the OnTouch event, which allows it to react to user interactions:
 public class ToggleSwitch2 : SKCanvasView
 {
        public ToggleSwitch()
        {
            EnableTouchEvents = true;
            Touch += OnTouch;
        }

        private void OnTouch(object? sender, SKTouchEventArgs e)
        {
            if (e.ActionType == SKTouchAction.Released)
            {
                IsToggled = !IsToggled;
                e.Handled = true;
            }
        }
        ...
 }
After this change, you will see that the control is now usable:
The final step is to modify the code behind or ViewModel of the page so that there is a property to know the state of the control, allowing for some action to be performed in the application. In our example, we will use the new property to change the application theme as follows:
public partial class MainPage : ContentPage
{
    public static readonly BindableProperty IsDarkModeProperty =
        BindableProperty.Create(
            nameof(IsDarkMode),
            typeof(bool),
            typeof(MainPage),
            false,
            propertyChanged: OnIsDarkModeChanged);

    public bool IsDarkMode
    {
        get => (bool)GetValue(IsDarkModeProperty);
        set => SetValue(IsDarkModeProperty, value);
    }

    static void OnIsDarkModeChanged(BindableObject bindable, object oldValue, object newValue)
    {
        var page = (MainPage)bindable;
        bool isDark = (bool)newValue;
        Application.Current.UserAppTheme = isDark ? AppTheme.Dark : AppTheme.Light;
    }

    public MainPage()
    {
        InitializeComponent();
        BindingContext = this;
    }
}
Finally, we will bind the new property to the IsToggled property of the control, configuring it in its final form:
<controls:ToggleSwitch
    HeightRequest="50"
    IsToggled="{Binding IsDarkMode, Mode=TwoWay}"
    KnobOffColor="#1F2125"
    KnobOnColor="#FFCF00"
    OffBackgroundColor="LightGray"
    OnBackgroundColor="#FFCF00"
    WidthRequest="100" />
With these changes, you can see how the application theme changes dynamically, thanks to the use of the control created in SkiaSharp:
And that’s it! We’ve created a custom control from scratch using SkiaSharp.
Conclusion
Throughout this article, you learned what SkiaSharp is and how to integrate it into a .NET MAUI application. Similarly, you became familiar with the most commonly used SKCanvas methods as well as the common types used to create shapes within the canvas. Lastly, you saw how to create a custom control that we can use thanks to a set of bindable properties that we have added.
Using SkiaSharp can be ideal if you want to create a control that does not exist or draw a special shape on the screen that you cannot achieve in any other way. Now it’s your turn to experiment with this fabulous framework and see how to integrate it into your own applications.

Héctor Pérez
Héctor Pérez is a Microsoft MVP with more than 10 years of experience in software development. He is an independent consultant, working with business and government clients to achieve their goals. Additionally, he is an author of books and an instructor at El Camino Dev and Devs School.
Related Posts
Comments
All articles
Topics
Web MobileMobile
Desktop
Design
Productivity
People
