
Blazor Basics: Exploring Blazor’s Enhanced Navigation

Summarize with AI:
Enhanced navigation provides SPA-like functionality for Static Server-Side Rendered (SSR) Blazor web apps.
Enhanced navigation is a complex feature introduced in .NET 8 that helps provide a single-page application (SPA)–like user experience when navigating from one page to another.
In this article, we will learn how enhanced navigation helps with Blazor development and what pitfalls we need to know.
Since .NET 8 and the new Blazor Web App project template, enhanced navigation is enabled by default. We will look at how to disable it if you don’t need it—or if it even causes problems in your application.
We will use the Blazor Web App project template as a basis throughout this article.
You can access the code used in this example on GitHub.
Two Types of Navigation in Blazor
With the new Blazor Web App project template introduced in .NET 8, we have a reference to the blazor.web.js file in the App.razor file.
Blazor web applications using the blazor.web.js file offer two navigation types:
- Normal cross-page navigation: A full page reload is triggered, and the browser requests a document from the server located at the requested URL.
- Same-page navigation (enhanced navigation): Instead of performing a full page load, Blazor intercepts the request on the client and performs a fetch request instead. The response of the fetch request is patched into the current page.
It doesn’t matter whether you programmatically use the NavigationManager class to navigate from one page to another or place <a> elements in your markup. Blazor will intercept all those navigations and treat them as one of the types mentioned above.
Benefits of Enhanced Navigation
The benefits of enhanced navigation are a perceived faster page load and retaining more of the page state, such as keeping the scroll position or the values of page-specific variables.
It allows HTML forms to be submitted and handled without using Blazor Server or Blazor WebAssembly interactivity.
Exploring the Blazor Web App
Let’s explore a Blazor web application generated by the Blazor Web App project template. During creation, I selected Blazor Server as the interactivity mode and per-page as the interactivity location.
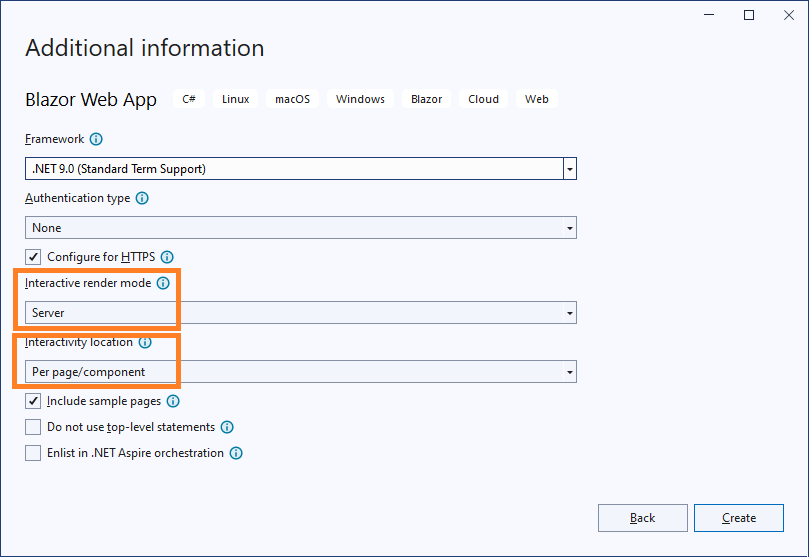
It results in a Blazor Web App with the Home and the Weather page using Static Server-Side Rendering (SSR) and the Counter page using Blazor Server interactivity.
Let’s build and run the application.
Now, I want you to navigate the application using the menu on the left. What happens when you click on the different menu items?
Yes, new content is loaded on the main area of the web page. However, did you also notice what didn’t happen? The page didn’t fully load.
Let’s open the developer tools (F12) and see what happens when we navigate from one page to another.
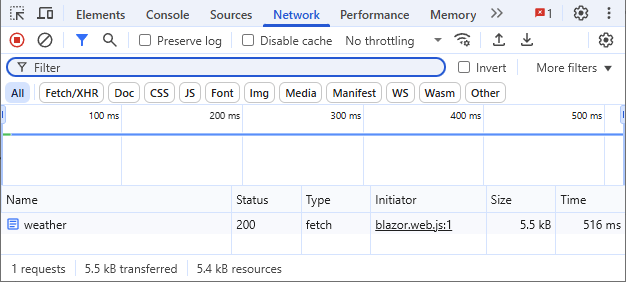
We see that the browser creates a fetch request initiated by the blazor.web.js file. A full HTML page is returned from the server to the client. However, the browser only replaces (patches) the content of the main area that changes with the navigation.
In this application, we haven’t implemented any server-side/client-side interactivity logic to make this happen. It is all part of the blazor.web.js file that we load when loading the Blazor web application.
Note: If you want to quickly disable enhanced navigation and see how a full page load works and is shown in the developer tools, you can comment out the line that adds the blazor.web.js file inside the App.razor file and test it again.
Form Handling Using Enhanced Navigation
With .NET 8 and the Blazor Web App project template, Static Server Side Rendering (SSR) is the default. If the user submits an HTML form, a POST request will be sent to the server.
Once again, enhanced navigation improves the user experience. It intercepts the submission of a form and handles it as a fetch request instead, which provides a more user-friendly SPA-like user experience.
In contrast to regular enhanced navigation, we need to opt-in to use it for form handling.
There are two options. We add the Enhance property when using the EditForm component, or we use the data-enhance attribute when working with a plain <form> element.
In this example, we implement a Search page:
@page "/search"

<h3>Search (Enhanced Form)</h3>

<EditForm Enhance FormName="SearchForm" Model="@Model" OnSubmit="@HandleSubmit">
    <InputText @bind-Value="Model.Search" placeholder="Enter search term..." />
    <button type="submit">Search</button>
</EditForm>

@if( _submitted)
{
    <div>You are looking for: @_searchText</div>
}
We use the EditForm component and add the Enhance property to enable enhanced navigation for this form. We also provide values for the FormName, Model and OnSubmit properties. We use the InputText component and bind the value to the Search property of the Model class.
If you are completely new to form handling in Blazor, consider learning the fundamentals of form handling in Blazor.
When using Static Server-Side Rendering for forms (no interactivity modes), providing a value for the FormName property is required.
Now, let’s implement the code section of the component:
@code {
    [SupplyParameterFromForm]
    public SearchModel Model { get; set; } = new SearchModel();

    private bool _submitted = false;
    private string? _searchText = "";

    private void HandleSubmit()
    {
        _submitted = true;
        _searchText = Model.Search;
    }

    public class SearchModel
    {
        public string Search { get; set; }
    }
}
We define the SearchModel consisting of a single string property named Search that will hold the value provided by the user.
When creating the instance of the model, we need to apply the SupplyParameterFromForm attribute. Otherwise, no values will be provided to the model when submitting the form using SSR.
In the HandleSubmit method, I set the _submitted field to true and provide the value from the model to the _searchText field. As a result, after submitting the form, the user will see a text below the form.
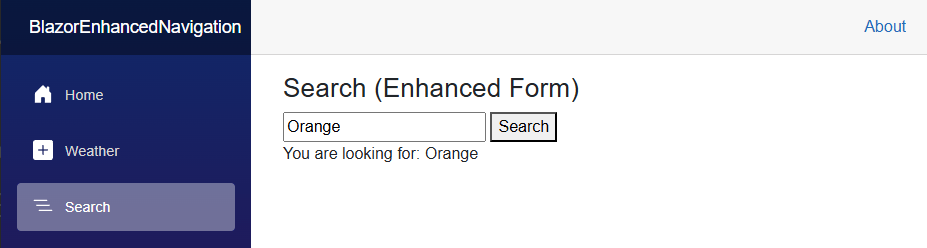
When the user enters text into the search field and presses the submit button, the request is handled, and the confirmation text appears on the screen.
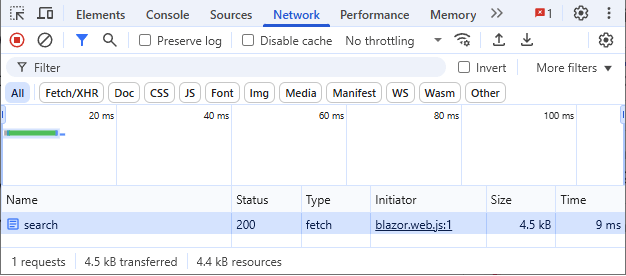
Similar to regular page navigation, forms with enhanced navigation use a fetch request to send the data to the server, and Blazor patches the result into the current page. The scroll position stays the same.
How to Disable Enhanced Navigation
If you want to disable enhanced navigation for a single navigation, you can add the data-enhance-nav="false" attribute like this:
<a href="customer" data-enhance-nav="false">
    GET a customer with a full page load (without enhanced navigation)
</a>
If you want to disable enhanced navigation for a whole application, you can add the following script to the App.razor file:
<script>
  Blazor.start({
    ssr: { disableDomPreservation: true }
  });
</script>
The disableDomPreservation property controls whether enhanced navigation is on or off.
Reminder: Forms are non-enhanced by default.
Conclusion
Enhanced navigation was introduced in .NET 8 with the Blazor Web App project template. It provides an improved user experience for applications using Static Server-Side Rendering (SSR).
Enhanced navigation is especially valuable in scenarios, as shown in this article, where you have a mostly static website but also components with forms, such as a contact form on a company website.
You can access the code used in this example on GitHub.
If you want to learn more about Blazor development, you can watch my free Blazor Crash Course on YouTube. And stay tuned to the Telerik blog for more Blazor Basics.

Claudio Bernasconi
Claudio Bernasconi is a passionate software engineer and content creator writing articles and running a .NET developer YouTube channel. He has more than 10 years of experience as a .NET developer and loves sharing his knowledge about Blazor and other .NET topics with the community.
Related Posts
Comments
All articles
Topics
Web MobileMobile
Desktop
Design
Productivity
People
