UI Testing with Xcode 7 and Telerik UI for iOS
At Telerik, we know how important is for our customers to have stable and reliable product. That is why we take testing seriously.
We know that automated tests allow us to verify that the whole product is functioning correctly. Until now, we used UIAutomation for unit tests to ensure that our API is functioning properly. Regarding UI tests, we tried different tools and products. However, no one was able to handle our requirements.
Therefore, based on our own experience and our customers' experience, we built our own tool,Telerik Test Studio, which already implements and is going to implement a bunch of the features we were not able to find anywhere else. For more information about it, refer to the end of the article. Soon, we will make a deep dive into how to test UI for iOS with Telerik Test Studio.
The main topic of the blog today, however, is the UI testing tool included in Xcode 7 which came as a nice surprise and complements Telerik Test Studio nicely
We tested the new testing tool, and it turned out to be easy to test our components with the new Xcode feature. Let's see how this can be done.
How it works
The new UI testing tool is based on the existing XCTest framework. All assertion methods are available and it just adds some new APIs. Most important are the following ones:
If you are to create a new project, make sure that the "Include UI Tests" option is checked. Set the language to Swift. We use Swift in this example, but you can achieve the same by using Objective-C.
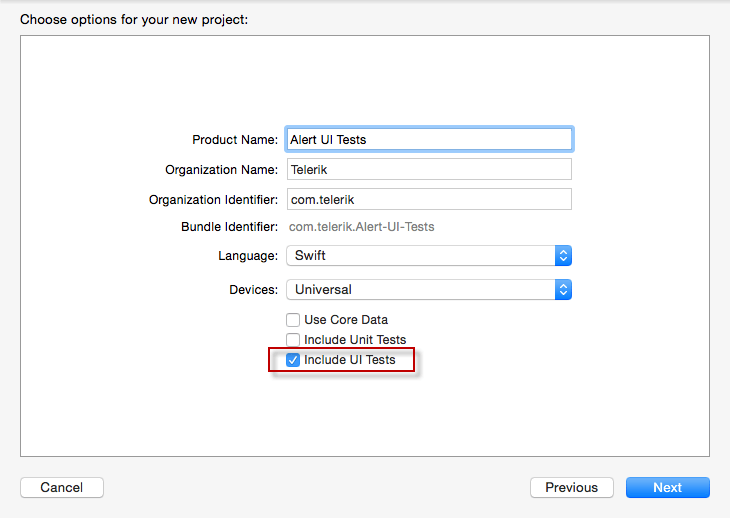
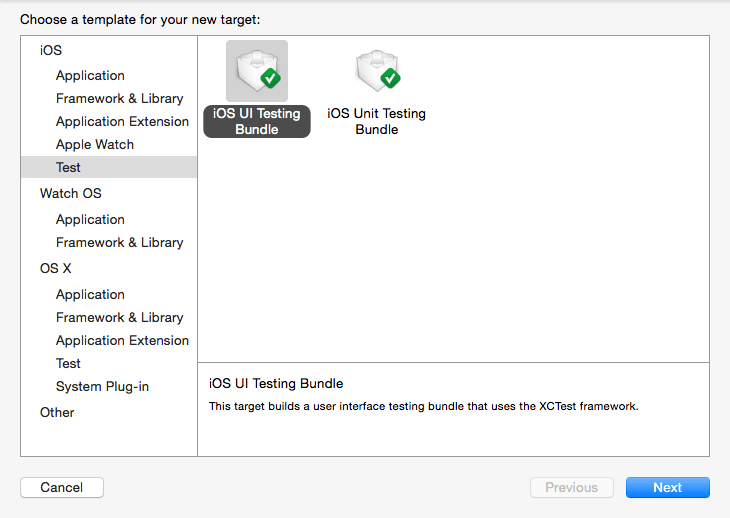
When using an existing project, you can add a new test target by using the "iOS UI Testing Bundle" template. Just choose a name, and Xcode will automatically create a new target and the corresponding folder in your project.
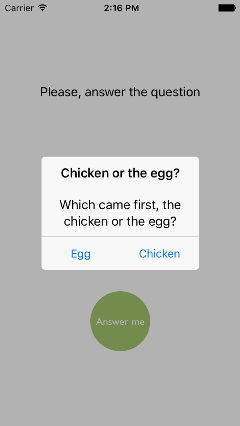
Our first test will use TKAlert. It will ensure that TKAlert opens correctly and that its buttons contain the required texts.
You should follow the steps described in our documentation to reference the TelerikUI.framework in your project.
Next, place the following code in your ViewController class to create a new TKAlert that starts with a tap of a button:
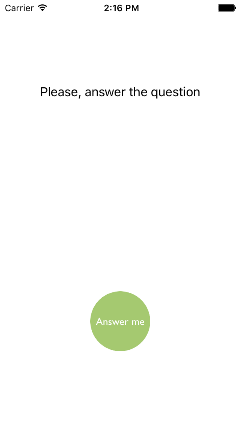
Here is how the application should look when started:
Now open the Alert_UI_TestsUITests.swift file, whcih should contain a method called setUp. This method is called when the application is launched.
In the same file you will see an empty method called testExample. This is where your testing code should go. Now, move the cursor and click on the red record button on the bottom. This will launch the application and you will be able to tap and interact with it. When you are ready, touch the red button again. This stops the recording.
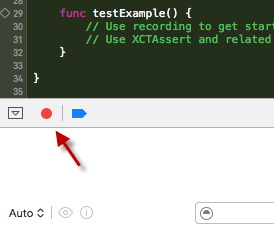
Something similar to the following code will be generated in testExample method:
Now, let's customize this code by adding some assertions. This is made by using the XCTAssert method:
You can run the test by using the Command + U key combination.
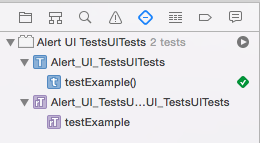
After running the test, which of course in this case will be successful (fingers-crossed for always successful tests), you would see this picture:
The source code of this sample application is available at our GitHub repository.
I recommend watching the WWDC lecture introducing the new UI testing feature.
Telerik Test Studio gives enables you to record a test via device or emulator and execute it across multiple devices. Beyond the added velocity for testers in the creation of tests, there are tools that assist in test maintenance such as Test Studio's Element Repository. This repository gives you the power to easily update the find logic of your objects, when a change in the application under test occurs. You can find more information about the tool here.
Stay tuned for more information about how UI for iOS and Telerik Test Studio work together.
Happy testing!

We know that automated tests allow us to verify that the whole product is functioning correctly. Until now, we used UIAutomation for unit tests to ensure that our API is functioning properly. Regarding UI tests, we tried different tools and products. However, no one was able to handle our requirements.
Therefore, based on our own experience and our customers' experience, we built our own tool,Telerik Test Studio, which already implements and is going to implement a bunch of the features we were not able to find anywhere else. For more information about it, refer to the end of the article. Soon, we will make a deep dive into how to test UI for iOS with Telerik Test Studio.
The main topic of the blog today, however, is the UI testing tool included in Xcode 7 which came as a nice surprise and complements Telerik Test Studio nicely
Xcode 7 UI Testing
The UI testing tool of Xcode 7 would enable us to replace our current JavaScript and picture-based tests with ones written in Swift, and we will be able to debug issues directly from Xcode.We tested the new testing tool, and it turned out to be easy to test our components with the new Xcode feature. Let's see how this can be done.
How it works
The new UI testing tool is based on the existing XCTest framework. All assertion methods are available and it just adds some new APIs. Most important are the following ones:
- XCUIApplication: This object represents your application and allows starting it.
- XCUIElement: This object represents a single UI element. Those are your UIViews.
- XCUIElementQuery: This one allows searching for specific element in the UI hierarchy.
If you are to create a new project, make sure that the "Include UI Tests" option is checked. Set the language to Swift. We use Swift in this example, but you can achieve the same by using Objective-C.

When using an existing project, you can add a new test target by using the "iOS UI Testing Bundle" template. Just choose a name, and Xcode will automatically create a new target and the corresponding folder in your project.

Our first test will use TKAlert. It will ensure that TKAlert opens correctly and that its buttons contain the required texts.
You should follow the steps described in our documentation to reference the TelerikUI.framework in your project.
Next, place the following code in your ViewController class to create a new TKAlert that starts with a tap of a button:
let textLabel = UILabel() override func viewDidLoad() { super.viewDidLoad() let button = UIButton(type: UIButtonType.Custom) button.addTarget(self, action: "show:", forControlEvents: UIControlEvents.TouchUpInside) button.backgroundColor = UIColor(red: 0.5, green: 0.7, blue: 0.2, alpha: 0.7) button.setTitleColor(UIColor.whiteColor(), forState: UIControlState.Normal) button.setTitle("Answer me", forState: UIControlState.Normal) button.titleLabel!.font = UIFont(name: "GillSans", size: 14) button.layer.cornerRadius = 40 button.clipsToBounds = true button.frame = CGRectMake((CGRectGetWidth(self.view.frame) - 80)/2.0 , CGRectGetHeight(self.view.frame)-180, 80, 80) self.view.addSubview(button) textLabel.frame = CGRectMake(0, 100, self.view.frame.size.width, 44) textLabel.textAlignment = NSTextAlignment.Center textLabel.text = "Please, answer the question?" self.view.addSubview(textLabel) } func show(sender: AnyObject) { let alert = TKAlert() alert.title = "Chicken or the egg?" alert.message = "Which came first, the chicken or the egg?" alert.style.maxWidth = 210 alert.dismissMode = TKAlertDismissMode.Swipe alert.addActionWithTitle("Egg") { (TKAlert, TKAlertAction) -> Bool in self.textLabel.text = "It was the egg" return true } alert.addActionWithTitle("Chicken") { (TKAlert, TKAlertAction) -> Bool in self.textLabel.text = "It was the chiken" return true } alert.show(true) }Here is how the application should look when started:
 |
 |
Now open the Alert_UI_TestsUITests.swift file, whcih should contain a method called setUp. This method is called when the application is launched.
override func setUp() { super.setUp() // Put setup code here. This method is called before the invocation of each test method in the class. // In UI tests it is usually best to stop immediately when a failure occurs. continueAfterFailure = false // UI tests must launch the application that they test. Doing this in setup will make sure it happens for each test method. XCUIApplication().launch() }In the same file you will see an empty method called testExample. This is where your testing code should go. Now, move the cursor and click on the red record button on the bottom. This will launch the application and you will be able to tap and interact with it. When you are ready, touch the red button again. This stops the recording.

Something similar to the following code will be generated in testExample method:
func testExample() { // Use recording to get started writing UI tests. // Use XCTAssert and related functions to verify your tests produce the correct results. let app = XCUIApplication() let answerMeButton = app.buttons["Answer me"] answerMeButton.tap() app.buttons["Chicken"].tap() answerMeButton.tap() app.buttons["Egg"].tap() }Now, let's customize this code by adding some assertions. This is made by using the XCTAssert method:
func testExample() { // Use recording to get started writing UI tests. // Use XCTAssert and related functions to verify your tests produce the correct results. let app = XCUIApplication() let answerMeButton = app.buttons["Answer me"] answerMeButton.tap() XCTAssert(app.staticTexts["Chicken or the egg?"].exists) XCTAssert(app.staticTexts["Which came first, the chicken or the egg?"].exists) app.buttons["Chicken"].tap() XCTAssert(app.staticTexts["It was the chicken"].exists) answerMeButton.tap() app.buttons["Egg"].tap() XCTAssert(app.staticTexts["It was the egg"].exists) }You can run the test by using the Command + U key combination.
After running the test, which of course in this case will be successful (fingers-crossed for always successful tests), you would see this picture:

The source code of this sample application is available at our GitHub repository.
I recommend watching the WWDC lecture introducing the new UI testing feature.
Telerik Test Studio
When choosing the right tool for UI testing your mobile apps, it’s important to consider the team that will be maintaining the test suite, both short- and long-term. For technical quality teams, the code-centric approach found in Xcode may be all you need, however for teams that do not have "developers in test," there are some great options, one of which is offered by Telerik.Telerik Test Studio gives enables you to record a test via device or emulator and execute it across multiple devices. Beyond the added velocity for testers in the creation of tests, there are tools that assist in test maintenance such as Test Studio's Element Repository. This repository gives you the power to easily update the find logic of your objects, when a change in the application under test occurs. You can find more information about the tool here.
Stay tuned for more information about how UI for iOS and Telerik Test Studio work together.
Happy testing!


About the Author
Miroslava Ivanova
Miroslava Ivanova is a Senior QA Engineer at Telerik. She's been with the company for seven years, working with various technologies, starting with WinForms and maturing to take on the bleeding-edge mobile technology, iOS. Her passion to make a product better and better is what drives her forward.
Related Posts
Comments
Comments are disabled in preview mode.
