
Power Up Your UI Tests with 'API Test as Step' in Telerik Test Studio

Summarize with AI:
Learn how to improve your UI tests with API calls and simulate scenarios that would be difficult with UI tests alone, with API Test as Step in Telerik Test Studio.
When building a UI test, we sometimes need the ability to make an additional API call to a web service to assist the UI steps. API testing could be turned into a great leverage for functional testing, especially considering the following scenarios:
- Manage the initial state of a web application or create some initial data via a web service (create users, data items, upload test files, delete old test data, start or kill processes, etc.) as a prerequisite for the UI test.
- Simulate concurrent user actions and test how the UI handles conflicts
- Generate messages or other events on the web service and validate that they are properly pushed to the UI of your web or desktop application
In some cases those actions can be performed via the UI test itself, but that bloats the UI test with additional steps that might be slow, fragile or just not the main focus of the particular test scenario. "Outsourcing" such interactions to API calls would make the UI test quicker, more reliable and allows us to focus the test on performing the particular actions that are the essence of the test scenario.
Telerik Test Studio's built-in integration with Test Studio for APIs allows you to run an API test as a step in a web or WPF test. This unlocks great potential for improving your UI tests. In this blog post, I would like to walk you through its features.
Quick Reference
- Sample Scenario
- Setup Test Project
- Creating Test Data
- Adding The First API Test
- Adding the API Test to the Web Test
- Passing Variables to the API Tests
- Validating the End Result
- Summary
Sample Scenario
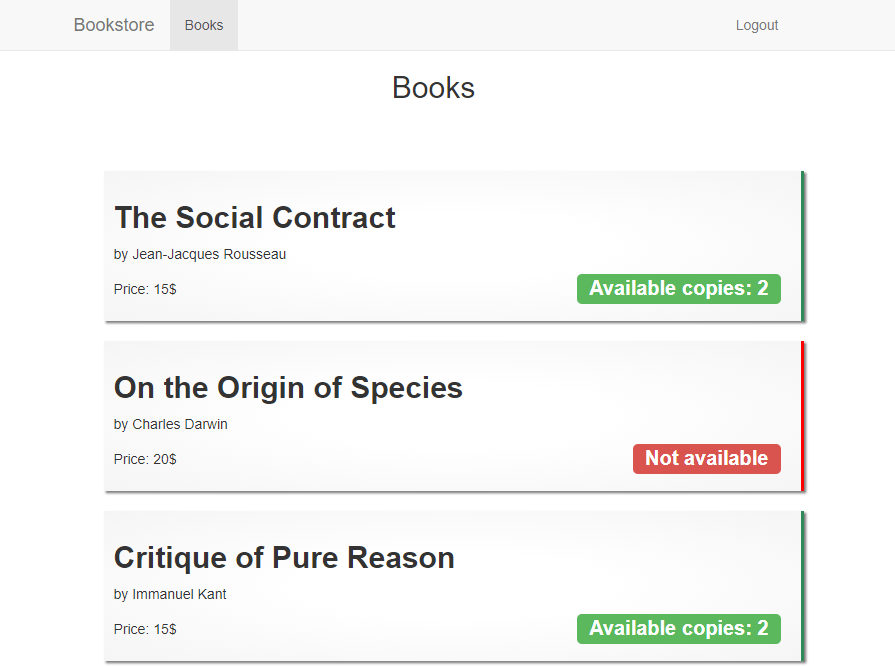
In order to show off the new API integration in Test Studio, let's build a test case against a very simple demo web application. The demo application is a bookstore that allows registered users to order books. To keep it simple, users can only purchase one book per order and there is no need to enter address or payment details. Even users that are not logged in can view the available books, but only logged in users can place an order. (See the end of the blog post for more information on how you can download the test and the sample app in order to try them yourself.)
We will make a test case that tests the following scenario:
- Create a new user via an API call - one that we would use to make the order in the UI
- Add a new book to the store via an API call with just one copy available
- Login with the new user in the UI
- Open the details page of the book that we just created
- Use an API call to simulate that the last copy of the book have just been purchased from the store
- While still having the book details open in the browser, try to place a new order
- Validate that an error message is properly displayed in the UI, noting that the book is no longer availabe in the store
This edge case perfectly demonstrates the key techniques that could be used for a broad variety of other scenarios that involve environment setup, test data generation, user management, testing concurrent user actions, etc. We will show how we can create an API test project as part of a Web/WPF Test Studio project, how to add an API Test as a Step to a Web/WPF test and how we can transfer data (variables) from the UI test to the API test steps and vice-versa.
Setup Test Project
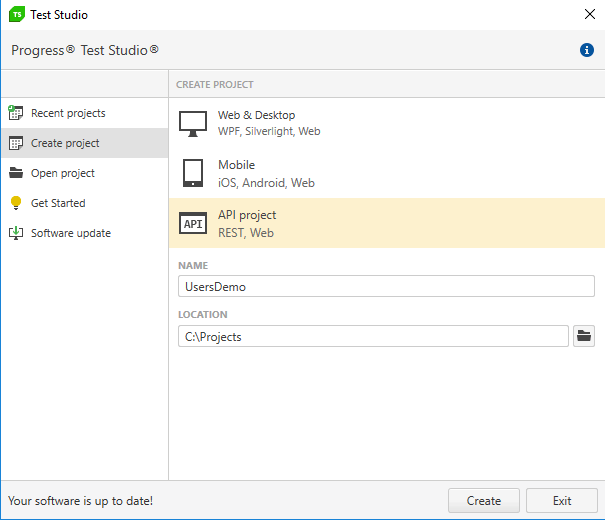
To begin with, we will open Test Studio and create a new "Web & Desktop" project called "Bookstore."
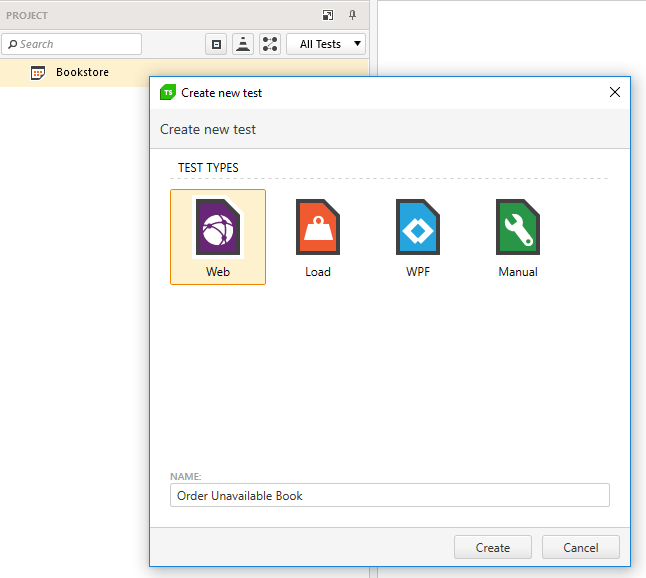
Next, right-click on the project, select "Add New Test," create a new Web test and name it "Order Unavailable Book."
Creating Test Data
To execute our test, we need a test user that will perform the book purchases and a test book to be ordered. To avoid any conflicts with other tests that we could possibly execute against the same application, we'll create a new unique user and a new book especially for the purpose of the test.
When testing similar applications, we could possibly create our test users and test items using UI interaction steps, but that usually takes more time to execute and clutters the test. Instead, we will create separate dedicated UI test suites that focus specifically on the "register user" or "create book" processes. Those test suites will give us confidence that the UI functionality works as expected and all corner cases are covered. For all other test scenarios that depend on having a registered user or created books, we can quickly create them via API calls and focus our tests on executing the rest of the test steps.
Generate Random Username
To be sure that the username we're using for our test is not already taken by existing users, we will generate random unique username by appending a guid string to the username. The best way to do that in Test Studio is via a coded step.
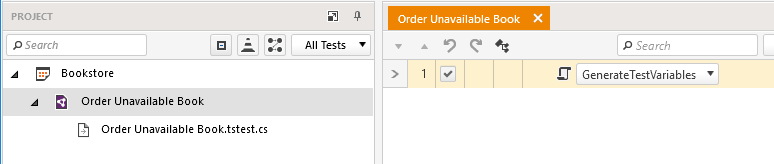
Open the "Order Unavailable Book" test that we just created, and select "Coded Step" from the Step Builder. You will be prompted to choose a scripting language for this project, so we will select "C#." This will generate a code-behind file for our test and will create a default test method in it. We can rename the method "GenerateTestVariables."
We can use that step to extract the main variables that we will need later during the test. This way we can keep all of our constants in a single place and can easily change any of them later, instead of having to change every place in the test where it is used. The method of the coded step is as follows:
    [CodedStep(@"Generate Test Variables")]
    public void GenerateTestVariables()
    {
        this.SetExtractedValue("username", "User-" + Guid.NewGuid());

        this.SetExtractedValue("password", "Password");

        this.SetExtractedValue("apiBaseUrl", "http://localhost:5000");
    }
Each variable that we extract using the this.SetExtractedValue() method can be passed later to an API test or used by a UI step via data-binding.
Adding the First API Test
We can add an API test to our Web test by importing an existing one, or by creating it from scratch. In our case we will create a new test. To do that, right-click on the project and select "Edit Embedded Api Project."
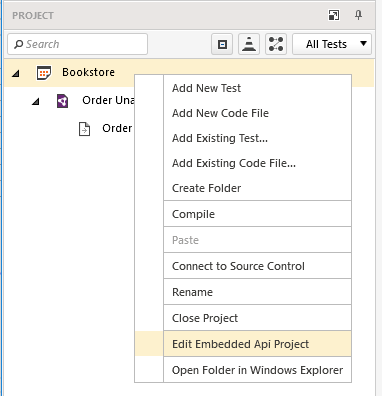
This will open a new instance of Test Studio for APIs. The project loaded is a new API project ("ApiTests") that was automatically created inside the root folder of the main Test Studio project.
That API project will contain all API test cases that we use in our entire Test Studio project (each API test can be used by more than one Test Studio test).
From here, using the Test Studio for APIs application, we can manage our API tests as a normal API project. Later, we'll show how to add those tests as steps into a Web test.
We will create an API test case "Create User and Get Token" and add the following steps to it:
- Create User

- Get Access Token
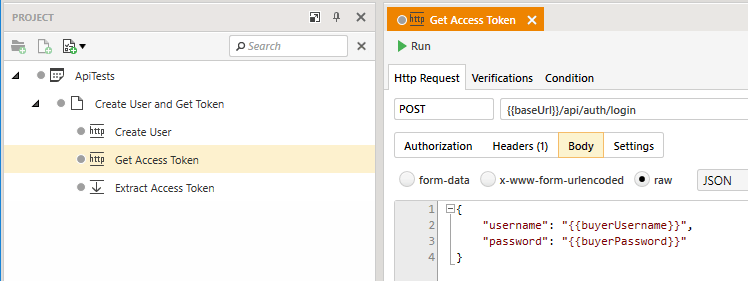
- Extract Access Token
Notice the {{baseUrl}}, {{buyerUsername}}, and {{buyerPassword}} variable references. Those variables will not be defined in the API project. Instead, our Web test will pass them to the API test as command-line parameters when executing the API test. We will see how to do that a bit later.
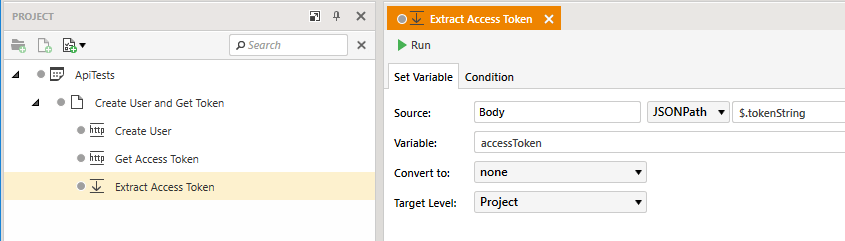
Notice also the "Extract Access Token" step. In the next step, which we'll build in a moment, we need to add a new book to the Bookstore using an API test. The API of the Bookstore application requires authentication, so we will need that token to authenticate any further API calls. This is why, after we get the access token from the service with the "Get Access Token" step, we use a Set Variable step, to "export" the id of the user. Any variable extracted via a Set Variable step in the API test will be available in the context of the Web test.
The response body of the "Get Access Token" step will look like this:
{
    "tokenString": "eyJhbGciOiJIUzUxMiIsInR5cCI6IkpXVCJ9.eyJuYW1laWQiOiIyIiwidW5pcXVlX25hbWUiOiJib2IiLCJuYmYiOjE1MzE4NDEzNTQsImV4cCI6MTUzMTkyNzc1NCwiaWF0IjoxNTMxODQxMzU0fQ.lorfPvrDJCUxfV6MqQkjTtVuILYP58hzc0RM35TFAACpScjbmWqM37NXINDtqvGR_ECsP10F8oQ6sIOfJLZ9LA"
}
This is why we are using the "$.tokenString" JSONPath expression in the Extract Access Token step to extract the token value out of the response body. You can read more about this in the Set Variable Steps section of the Test Studio for APIs documentation.
We can also create the next API test that we are going to need - the one that creates a new test book. Here are the steps for this API test:
- Create Book
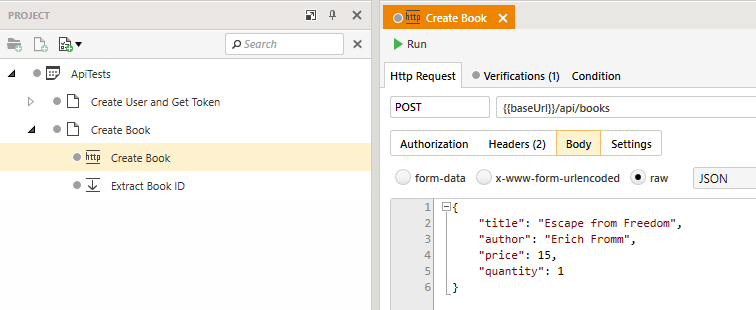
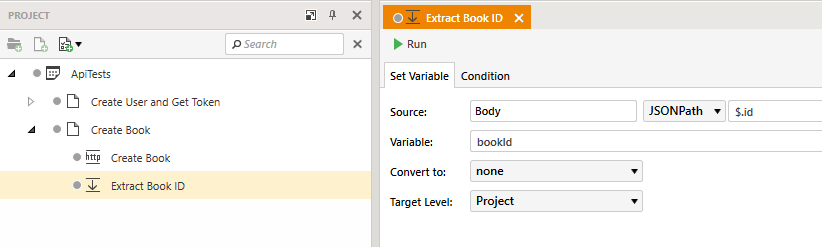
- Extract Book ID
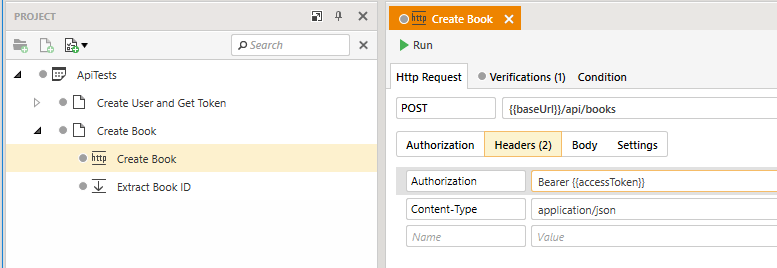
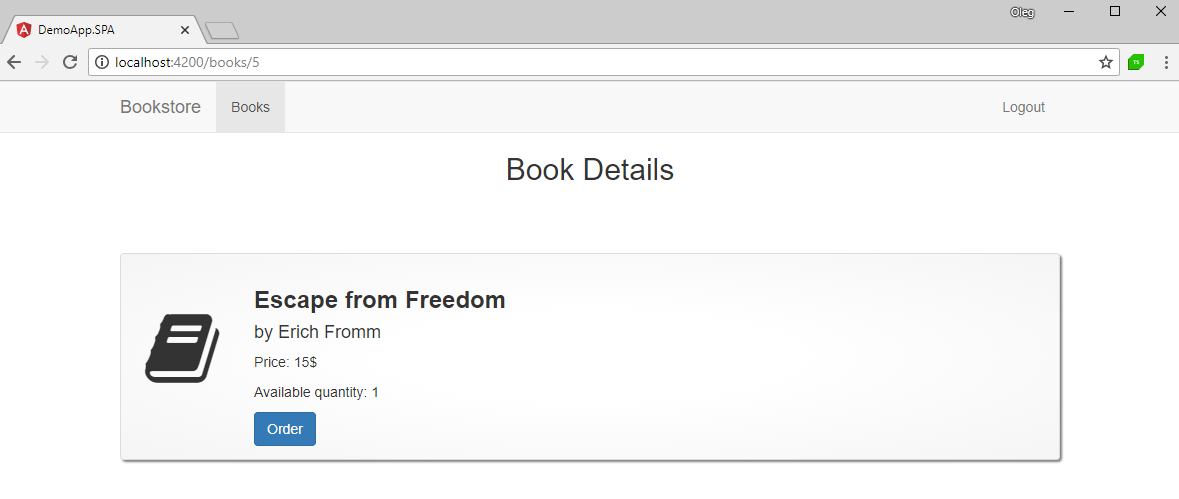
Notice here the Authorization header of the Create Book step: this is where we use the accessToken variable that we extracted in the previous API test. The response body of this request will look like this (notice the "id" property that the server returns):
{
    "id": 5,
    "title": "Escape from Freedom",
    "author": "Erich Fromm",
    "price": 15.0,
    "quantity": 1
}
Just like with the accessToken, we need to extract the ID of the book that we will create, so that we can use it in the UI test to navigate to that book's details page, which is why we added the Extract Book ID step.
Adding the API Test to the Web Test
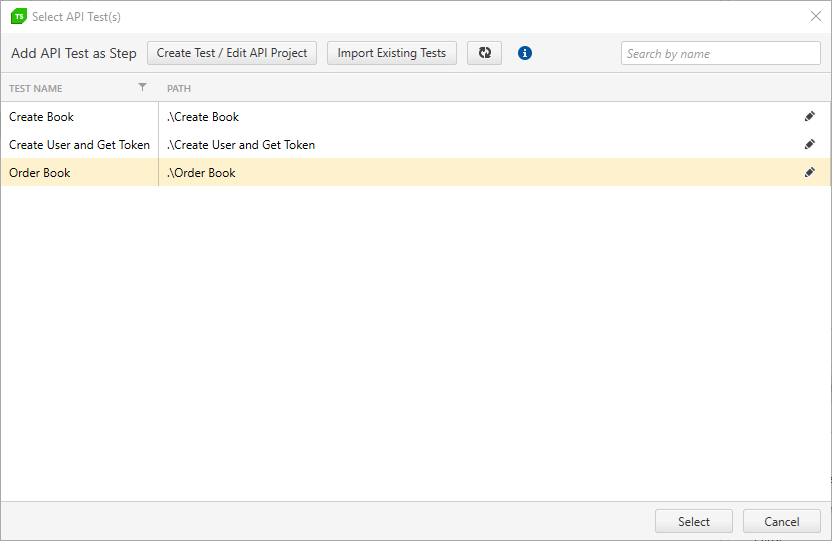
Now that we have created the API tests, we can go back to Test Studio and add them as steps to our Web test. To do that, click on Common > API Test As Step in the Step Builder and first select the "Create User and Get Token" test, followed by the "Create Book" test.
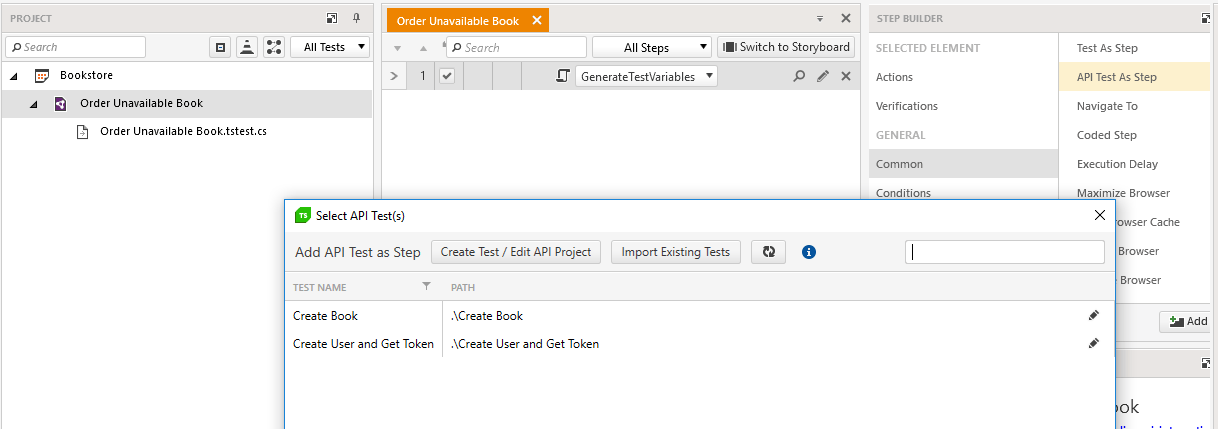
This will add the two tests as steps in the Web test.
Passing Variables to the API Tests
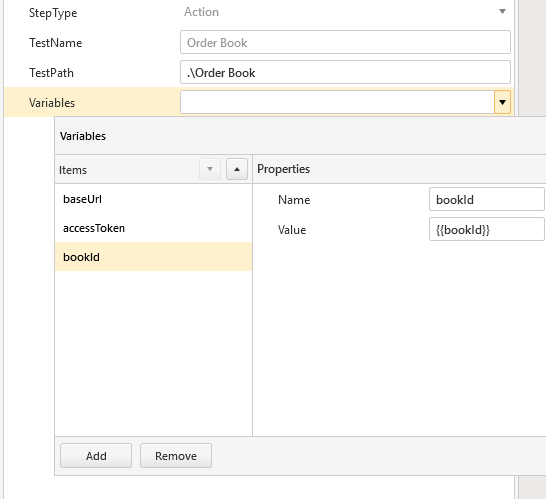
In order to pass the variables that we defined in the first coded step to the "Create User and Get Token" API test, we need to click on the "Variables" drop-down in the Properties panel of the API step and add a key-value pair for each of the variables.
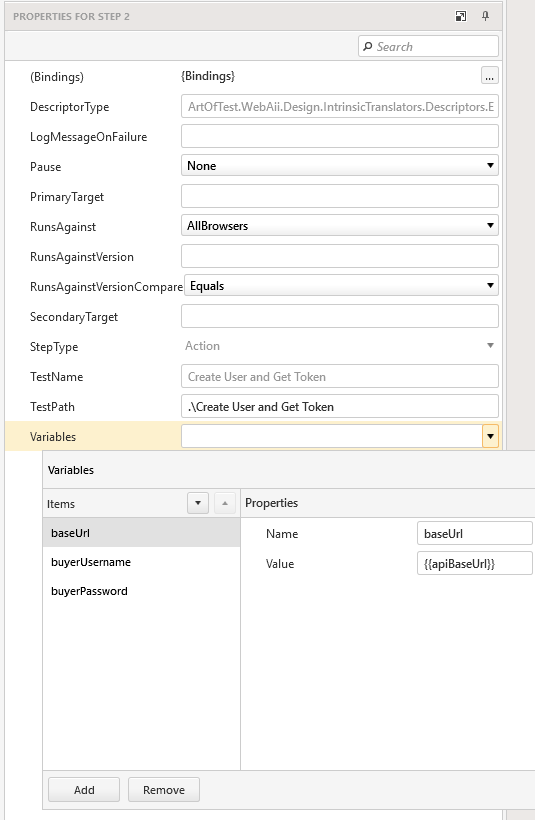
To pass a variable to the API test, add the name of the variable in the "Name" field, and you will be able to reference it by that name in the API test itself. In the "Value" field you can either directly type the value that you need to be used (e.g.: "http://localhost:5000" for the "baseUrl" variable) or you can reference an existing variable in the Test Studio variable store. Since we already extracted the needed variables to the variable store in the first coded step, we will use curly-braces to add references to them.

All variable names and values that we will add to the Create User and Get Token test as steps are:
- baseUrl: {{apiBaseUrl}}
- buyerUsername: {{username}}
- buyerPassword: {{password}}
In the same way, we will add the following variables to the "Create Book" API test as steps:
- baseUrl: {{apiBaseUrl}}
- accessToken: {{accessToken}}
Now that we already have the API tests as steps, that will create our test user and the test book, we can add several more steps to perform the following actions:
- Navigate in the browser to the URL of our web application ("http://localhost:4200/home")
- Wait for the "Bookstore" home link to be visible, to make sure the page is loaded
- If a user is already logged in - log them out
- Log in, using the credentials for the test user, that we extracted in the first coded step
- Wait for the "See our list of books" link to be visible, to make sure the user is logged in
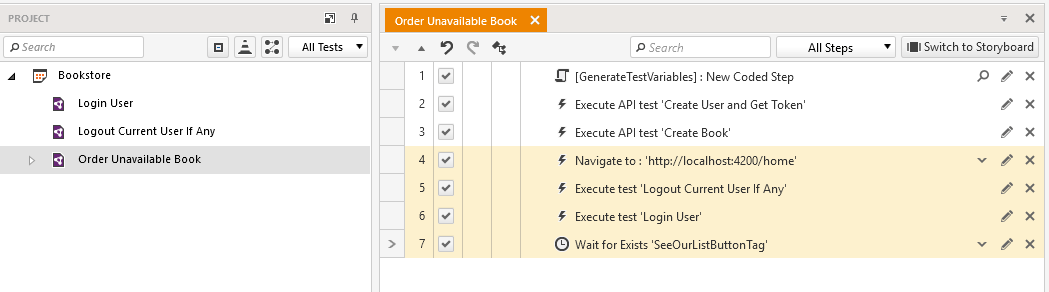
Notice that I have extracted the steps needed to logout any current user and login the test user to separate tests. This is a good practice for better maintainability and reusability of steps that will be needed in other tests too.

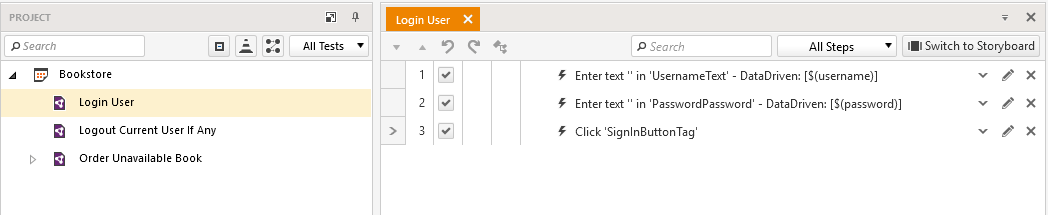
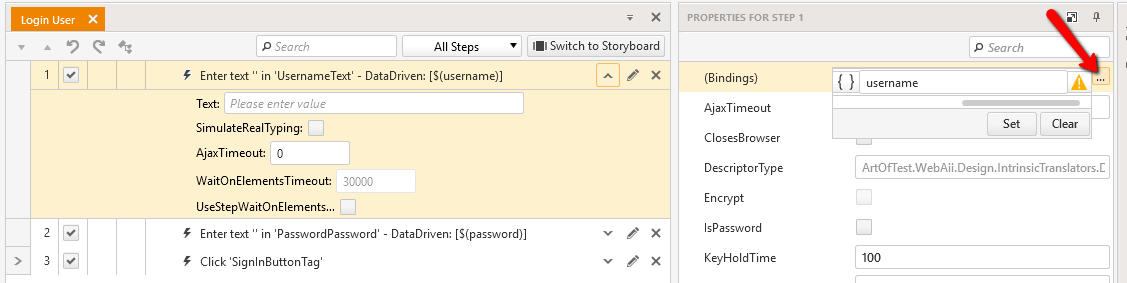
For the Login User test as step, we can use the same 'username' and 'password' variables that we extracted in the first coded step and set them as a binding to the steps that enter text in the username and password fields.
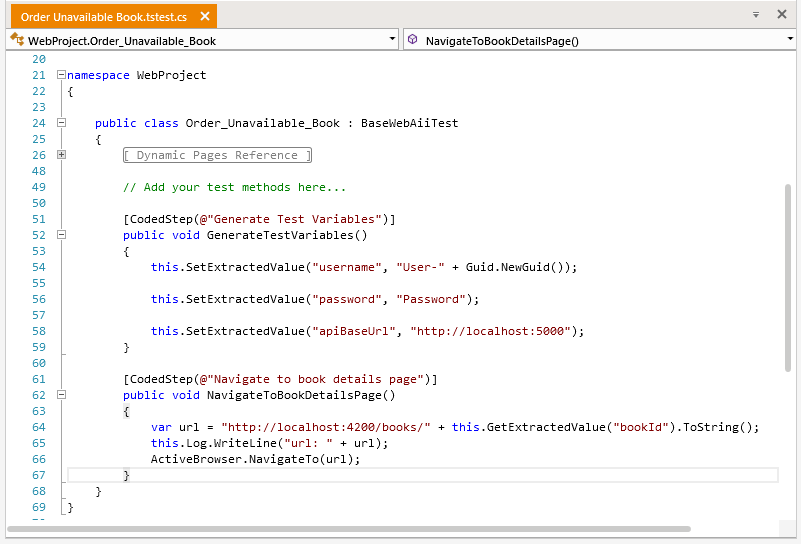
Next, we need to open the details page of the test book. To do that we need its id, which we extracted earlier from the API test. We will create a "Navigate To" step in Test Studio and transform it to a coded step to be able to concatenate the baseUrl of the web application and the id of the user.
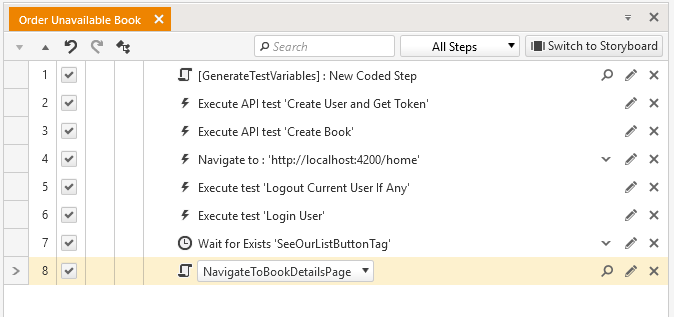
[CodedStep(@"Navigate to book details page")]
    public void NavigateToBookDetailsPage()
    {
        var url = "http://localhost:4200/books/" + this.GetExtractedValue("bookId").ToString();
        this.Log.WriteLine("url: " + url);
        ActiveBrowser.NavigateTo(url);
    }
Once we have opened the book details page, we can use another API step to simulate that its last copy has just been ordered by another user. We need the book to have initially had at least one available copy when we opened its details page, otherwise the order button would not have been enabled.
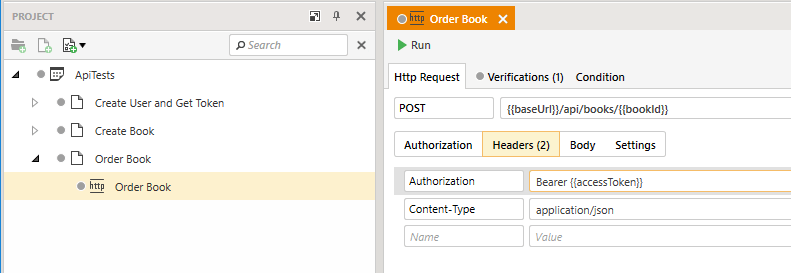
Note that we are using the same accessToken to authenticate this request, which means we are using the same user for the API requests and the UI steps. The demo application is as simple as possible - it does not save any state for the user's purchases, so we can use the same user for all operations. In other scenarios though, you might need to create multiple users to execute their concurrent actions.
Now we can add that test as an API Test as Step in the Test Studio test. Click on the step builder in Test Studio, select API Test as Step and select the Order Book test.
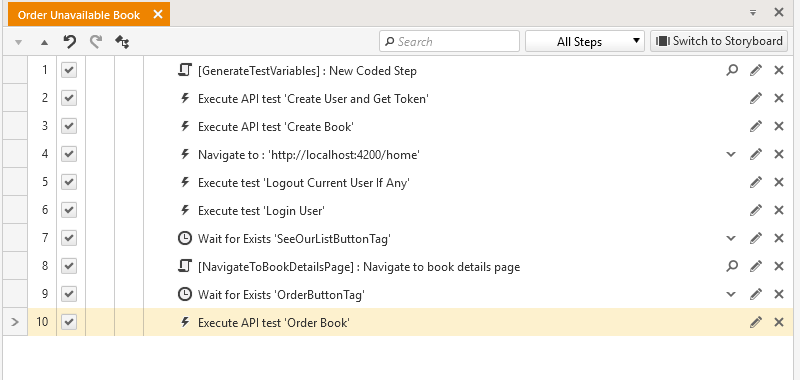
As with the previous API step, we need to pass variables to the API test that will be executed:
- baseUrl: {{apiBaseUrl}}
- accessToken: {{accessToken}}
- bookId: {{bookId}}
Validating the End Result
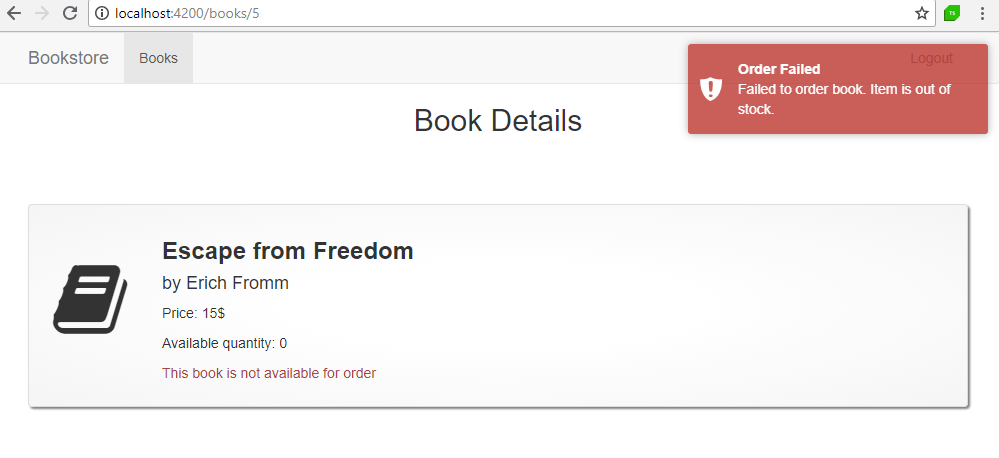
Once we have ordered the last copy of the book via the API test, we can still see the Order button in the UI, because the page is not yet refreshed.
All we have left to do is to add several steps that perform the following:
- Click on the "Order" button
- Verify that an error message appears, stating that the book is no longer available
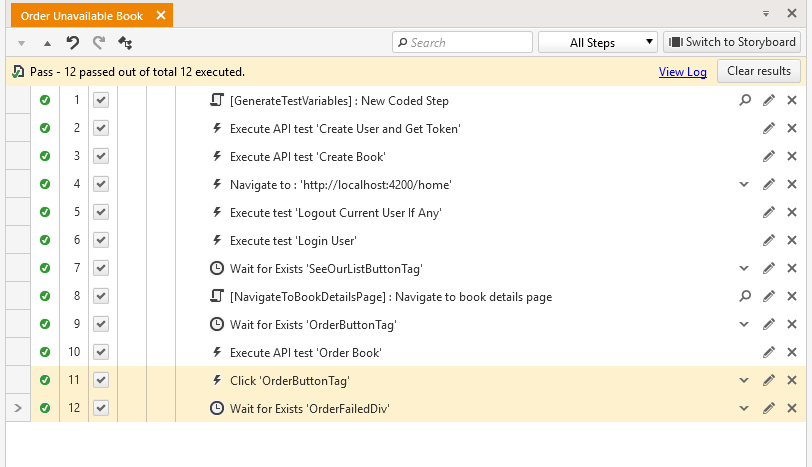
With that our test is finished. According to your case, you might prefer to add additional API steps that remove any test data that was generated during this test.
Summary
In this blog post we discussed how we can utilize API calls to improve our UI tests. We saw how to create test users and test items and how to simulate concurrent user actions to achieve scenarios that would otherwise be difficult or impossible to automate with UI tests alone. We dug deeper into the specifics of the API Test As Step and showed how to transfer data between the UI test and the API tests.
If you want to try the above demo yourself, you can download the full test project from here and the demo application from its GitHub repository. In the Readme.md file, there are instructions on how to run the application.
If you're new to Test Studio, you can download a free trial and get started with this example today - just click the link below.
Happy testing!

Oleg Georgiev
Oleg is a Software Developer in the Progress Testing Division. He joined the company in the beginning of 2011 as one of the first QA trainers in Telerik Academy. Since then he has been through several teams and technologies as a QA Engineer and Software Developer, working on products like TeamPulse, Progress Telerik Platform and Test Studio.