
Integrate Biometric Authentication in a Next.js App Using the SimpleWebAuthn Package—Part 2

Integrate biometric authentication in a TypeScript-powered Next.js application using the SimpleWebAuthn package. Part 2 demonstrates adding biometric authentication to our app.
Welcome to the second part of the series “Integrating Biometric Authentication in a Next.js App Using the SimpleWebAuthn Package.” The topic we are exploring is too vast to cover in just one piece, and thus, the content is divided into two parts to provide a more thorough and detailed examination of the subject. Part 1 covered connecting the dots between FIDO2, WebAuthn and CTAP. We also touched on why we used the SimpleWebAuthn package and finally concluded with implementing user registration using email and password. Now, let’s get started with Part 2!
This second part of the series will extend the functionality of the Next.js application demo by adding biometric authentication, which is the main goal of the series. Part 2 of the series will cover the following:
- The WebAuthn Registration and Authentication Ceremony
» Registration
» Authentication - Improving User Experience in WebAuthn
- Best Practices When Implementing WebAuthn
Without further ado, let’s dive in.
The WebAuthn Registration and Authentication Ceremony
Here, we will look at the two core ceremonies involved in the WebAuthn dance, which are Registration (signup in WebAuthn terms) and Authentication (login in WebAuthn terms). For each one, we will briefly describe the basic building blocks involved and then do a deep dive into each one and write all the necessary logic that accompanies how it will be integrated into our app.
At this point, before we proceed, it is noteworthy to emphasize that these two ceremonies are similar in the sense that they involve the three key entities we outlined earlier: the client (i.e., our Next.js frontend), the authenticator (hardware that authenticates) and the relying party (our server, represented by our Next.js API routes).
During registration, the relying party provides the browser with the options necessary to create a credential for some user. These options are then passed to the authenticator, which creates the public key credential, holds the private key, and sends
the public key (along with other data, which we will go over later) back to the relying party. The public key is then verified, stored and associated with the user by the relying party. During registration, we will heavily make use of two functions,
generateRegistrationOptions and startRegistration on the “@simplewebauth” server and client packages, respectively.
During authentication, the relying party may provide one or more public key credential IDs that have been registered for a user, and the authenticator hardware, after authenticating the user, verifies whether one or more of the credential IDs provided
by the relying party is included in its mini-database of credential IDs in its possession. If it exists, it sends an assertion to the server verifying possession of this data, and the user gets authenticated. Likewise, during authentication, we will
make use of the generateAuthenticationOptions and startAuthentication functions on the “@simplewebauth” server and client packages, respectively.
At this point, we will now take a closer look at the registration and authentication ceremonies and outline the steps involved, and where necessary, we will create all the files we need.
To keep things organized, all the API routes dedicated to WebAuthn will be kept in a folder called webauthn within our pages/api folder. Run the following command to create this folder.
cd ./pages/api
mkdir webauthn
Registration Process
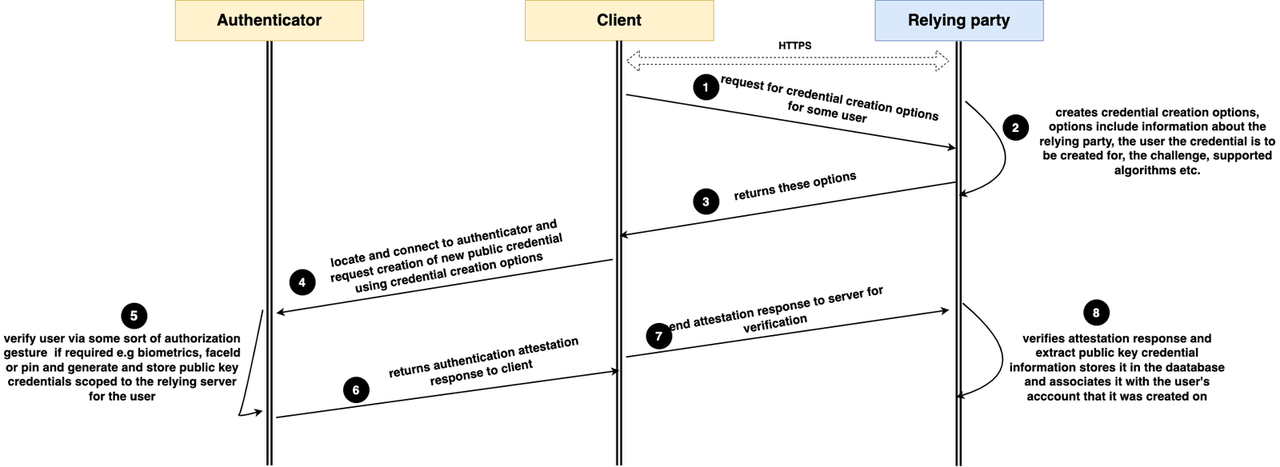
The above diagram shows a more precise flow of the registration process. The whole process will start at the pages/register-device.tsx file, when the user clicks the button. Let’s create the necessary file.
cd pages
touch register-device.tsx
Update the file with the code below:
import { useAuth } from "@/AuthProvider";
import { useRouter } from "next/router";
export default function App() {
const { handleDeviceRegistration, user } = useAuth();
const router = useRouter();
const handleWebauthnRegistration = async () => {
const isSuccessful = await handleDeviceRegistration();
isSuccessful && router.push("login");
};
return (
<div className='App grid_txt_1'>
<h1>
Register device for <span className='col-gold'> < {user.email}> </span>{" "}
</h1>
<div className='u-center'>
<button className='btn br' onClick={handleWebauthnRegistration}>
register device
</button>
</div>
</div>
);
}
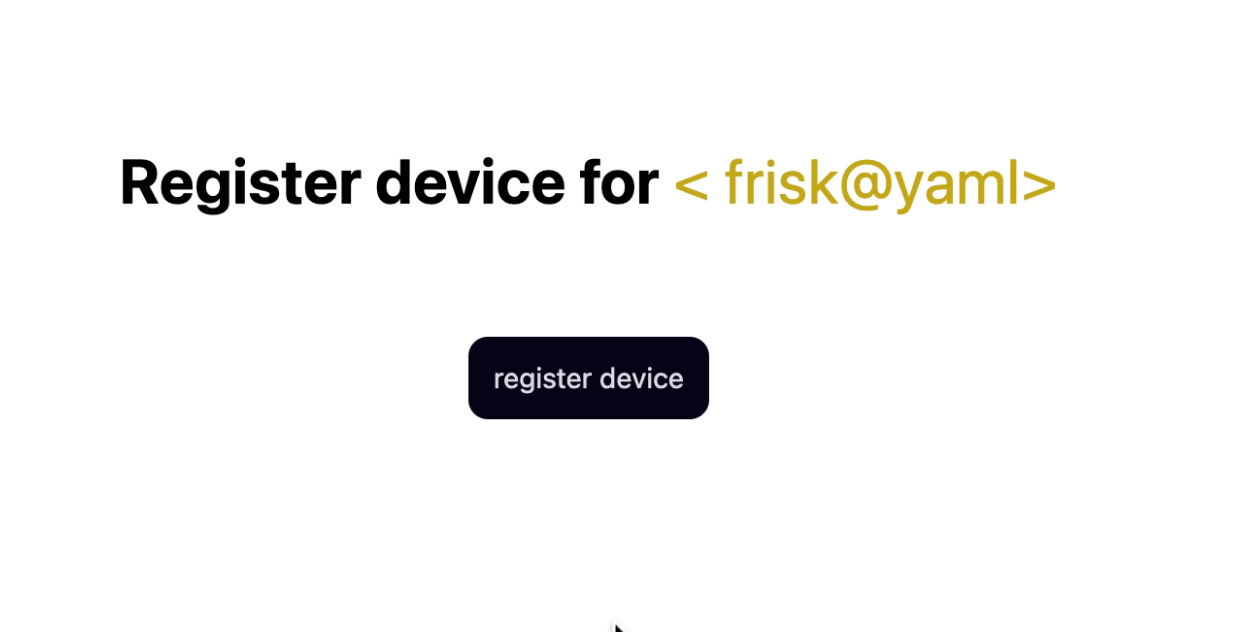
This page simply displays a message informing the user that they should register their device via the email with which they created an account previously. It provides them with a button to do so. When the button is clicked, it triggers a function called
handleWebauthnRegistration. This function, in turn, invokes the handleDeviceRegistration function on our authentication context.
If it succeeds, the user is redirected to the /login page. At the point when handleDeviceRegistration is triggered, the whole WebAuthn registration process begins. We will list each step
in our registration activity diagram above and explain what goes on at each point with the necessary logic that needs to be written at each stage. Note that we will be writing code on our client or server-side to match each step.
Step 1: The client requests the credential creation options for the user. Update the handleDeviceRegistration function in the AuthProvider.tsx file with the code below:
const handleDeviceRegistration = async () => {
  const email = localStorage.getItem("email") || "";
  try {
    const { data: credentialCreationOptions } = await axios.post(`/api/webauthn/get-reg-device-options`, {
      email,
    });

  } catch (error) {
    alert("oopsie!! an error occured during registration");
  }
};
An HTTP request is made to the relying party (the /api/webauthn/get-reg-device-options route) with the user’s email as the payload to get a public key or passkey credential creation options/registration options.
Let’s now create this API route by running the following command:
touch ./pages/api/webauthn/get-reg-device-options.ts
Step 2: The server creates credential creation options; the server now needs to respond to this request to create and return the credential creation options. Update the get-reg-device-options.ts file with the following code:
import { AuthenticatorsService } from "@/services/authenticator.service";
import type { NextApiRequest, NextApiResponse } from "next";
import { generateRegistrationOptions } from "@simplewebauthn/server";
import { User } from "@/index";
import { UserService } from "@/services/users.service";
import crypto from "node:crypto";
// Human-readable title for your website
export const rpName = "my-special-site";
// A unique identifier for your website
export const rpID = "localhost";
// The URL at which registrations and authentications should occur
export const origin = `http://${rpID}:3000`;
const getPublicKeyCredentialCreationOptions = (user: User) => {
  const userAuthenticators = AuthenticatorsService.getUserAuthenticators(user.id);
  const challenge = crypto.randomBytes(20).toString("base64url");
  console.log(challenge);
  const options = generateRegistrationOptions({
    rpName,
    rpID,
    userID: user.id,
    userName: user.email,
    challenge,
    excludeCredentials: !userAuthenticators
      ? []
      : (userAuthenticators.authenticators.map((a) => ({
          id: a.credentialID,
          type: "public-key",
       })) as PublicKeyCredentialDescriptor[]),
    timeout: 1000 * 60 * 2,
    attestationType: "none",
  });
  user.currentChallenge = challenge;
  options.challenge = challenge;
  UserService.updateUser(user);
  return options;
};
export default function handler(req: NextApiRequest, res: NextApiResponse) {
  const user: User | undefined = UserService.findByEmail(req.body.email);
  if (!user) {
    return res.status(400).send({ message: "internal server error" });
  }
  const opt = getPublicKeyCredentialCreationOptions(user);
  return res.send(opt);
}
The main handler function, called handler, starts by extracting the user’s email from the request payload and ensuring that the user exists. If the user does not exist, it sends a 400 error. Otherwise, it invokes
the getPublicKeyCredentialCreationOptions function with the existing user’s data. This function internally invokes the generateRegistrationOptions function imported from the
"@simplewebauthn/server" package, which returns an object that has many properties.
Let’s go over what the properties passed to this object mean:
The ones called rpName (relying party name) and rpID (relying party id) are the names and ID of our server. The rpName is just a human-readable name assigned to the relying party. Here, we called ours “my-special-site,” while the rpID is the host or domain name of the server, excluding the
scheme (i.e., the http:// to https:// part).
To understand the importance of these two fields, remember that the browser is home to different websites, and the user can register a public key credential on one or more of these sites as they please. These fields inform the browser that the credentials to be generated should be scoped to this relying party (our server).
userId (also called user handle) is a unique ID assigned to the user from your database. This field can have a maximum size of 64 bytes. The userName is
just a string that can be used to distinguish users, like their phone number, their username or, as in our case, the user’s email.
Again, like the rpName and rpID, the userId and userName ensure that the credentials are created and bound to only this
user.
Next is the challenge field. Here we will talk about the importance of this field and then describe what we did in the code. The challenge field is very important in guaranteeing
the integrity and security of FIDO protocols. This nonce field is intended for one-time use only, and it ensures that the credential creation options are used once and only once to register a user’s device, which prevents an attacker from conducting
any replay attacks to create a public key credential multiple times using the credential options.
The challenge key is just a byte string, and the WebAuthn docs recommend a minimum of 12 random bytes to make it unguessable. In our code, we created the challenge using the crypto module and invoking its randomBytes() method. Here, we made the length of the challenge 20 bytes.
Next, to make our server remember this challenge, we stored it in the user’s data currentChallenge property.
user.currentChallenge = challenge;
And then, store the updated users’ data in users.json file using the updateUser method from the userService.
export const UserService = {
  //......other methods
  updateUser(user: User) {
    const users = this.getUsers();
    const res = users.splice(Number(user.id) - 1, 1, user);
    this.saveUsers(users);
  },
  //...other methods
}
After setting the challenge for a sample user, their data should look like this:
[
  {
    "email": "frisk@yaml",
    "password": "1234",
    "id": "1",
    "currentChallenge": "EzJj_WZDFDj9TlIDVv39_f39"
  }
]
Note: Even though we didn’t explicitly create a challenge in our
generateRegistrationOptionscall above, it will be done for us automatically; we did it here ourselves to clearly state the importance of this field and how it is created. It is important to know that if an implementation of the WebAuthn protocol trivially creates or tolerates inconsistent challenges, this sole attempt completely compromises the security and integrity of this protocol.
excludeCredentials is an array of credential IDs that the user had previously; this ensures that a user does not register a device twice. To get the list of the user’s registered authenticators,
we invoke the getUserAuthenticators function from the AuthenticatorService.
getUserAuthenticators(userId: string) {
  const userAuthenticator = this.getCollectionOfUserAuthenticators().find((e) => e.userId === userId);
  if (!userAuthenticator) {
    return null;
  }
  userAuthenticator.authenticators = userAuthenticator.authenticators.map((a) => ({
    ...a,
    credentialID: Uint8Array.from(a.credentialID),
  }));
  return userAuthenticator;
},
getUserAuthenticators gets the contents of the user-authenticators.json file and checks if a user has one or more authenticators registered under their name. If nothing exists, it returns
null, else it returns the array of authenticators to its caller. Observe that it parses the credentialD field to a Uint8Array; this is the form our client-side code expects.
excludeCredentials: !userAuthenticators
? []
: (userAuthenticators.authenticators.map((a) => ({
  id: a.credentialID,
  type: "public-key",
})) as PublicKeyCredentialDescriptor[]),
If the call to getUserAuthenticators returns null, as it should be expected for now since the user-authenticators.json file is currently just holding an empty array [],
the excludeCredentials field is set to an empty array. Else, if it is nonempty, it loops over the returned array and returns another new array of objects, each with two fields: id,
which holds the credentialID as a Uint8Array, and the type property, which is set to a constant string called "public-key", indicating it’s
a public key credential.
The last two fields are optional. Timeout specifies the maximum duration of the registration session on the client. Here we set it to two minutes. The last is the attestation type property, which can be set to a string
that could be one of
"none" or "direct". Attestation may be desirable in applications that need to know some information about the authenticator hardware that created the credential. This is not required
most of the time and not here in our mini app, so we set it to "none", meaning we don’t need attestation.
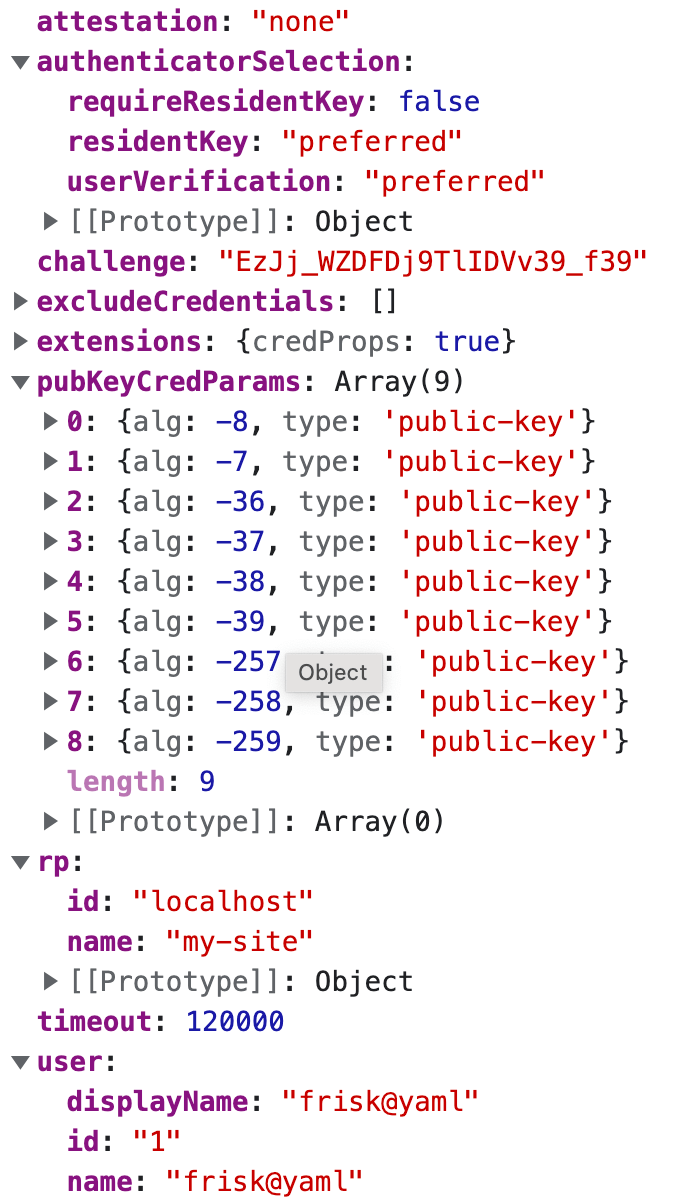
Step 3: After the call to getPublicKeyCredentialCreationOptions is successful, the server (relying party) returns the credential creation options to the client. If we log the options on our browser,
we get a better view of the credential creation options, like the one below:
Yes, we didn’t go over all the options earlier, but we will do that now for the ones we didn’t describe.
publicKeyCredParamsholds an array of encryption algorithms that the relying party supports. These algorithms are COSE (CBOR Object Signing and Encryption) algorithms created and maintained by IANA (Internet Assigned Number Authority). The algorithms in the object above are ordered from the most preferred to the least preferred. It is quite intuitive that our server prefers the algorithm with the identifier of -8, which is Ed25519 based on EdDSA (Edwards curve cryptography), a highly secure and popular algorithm used heavily in the blockchain industry due to its relatively small key size and dogged security. As of the time of writing this article, the WebAuthn spec only supports three of these COSE algorithm identifiers: -8, -7 and -257—i.e., EdDsa, ES256 and RS256.

- Finally, we have the
authenticationSelectionobject, which contains the instructions the relying party wants to give to the authenticator on how it should go about authenticating the user and generating the credential. It has several properties; let’s go over all of them.
The first property, requireResidentKey, needs some explanation. To understand why it is set to false, we need to be aware of what resident keys are. Resident keys, also called client-side
discoverable keys, allow the browser and authenticator to discover the keys registered for the user without the need for the server to provide any credential IDs. If a public key credential is client-side discoverable, the relying party does not
need to provide the browser with any credential IDs registered for the user and stored on its database for the browser to authenticate the user.
False here means that we are not keen that the public key credential generated by the authenticator must be one that can be discoverable, but we prefer that if it’s possible by the authenticator as specified by the “preferred” value
on the residentKey property. Additionally, if possible, we want the authenticator to firstly perform a user verification, i.e., request an authorization gesture from the user, such as their biometrics, Touch ID
or PIN, before it proceeds to create any credential. This is why userVerification is set to “preferred.”
Note that there are a plethora of options that we didn’t discuss here, such as choosing the type of authenticators you want to support. By the way, our own implementation supports both platform and roaming authenticators, and you can always refer to the docs to learn more.
Step 4: The client needs to request the creation of the public key credentials based on the options provided. Let’s continue updating our handleRegistration function in our AuthProvider.tsx file.
import * as SimpleWebAuthnBrowser from "@simplewebauthn/browser";

const handleDeviceRegistration = async () => {
  const email = localStorage.getItem("email") || "";
  try {
    const { data: credentialCreationOptions } = await axios.post(`/api/webauthn/get-reg-device-options`, {
      email,
    });
    console.log(credentialCreationOptions);
    const attestationResponse = await SimpleWebAuthnBrowser.startRegistration(credentialCreationOptions);

  } catch (error) {
    alert("oopsie!! an error occurred during registration");
  }
};
Using the @simplewebauthn/browser package, we see its startRegistartion method, which is fed the credential creation options to return the attestation response. Internally it does several
things, and we will go over the main points. Firstly, it checks if the user’s browser supports WebAuthn, and, if so, internally it invokes the navigator.credential.create() function and feeds the public key
credential options to it via the publickey property.
const credential = await navigator .credentials.create({
  publicKey: {//...credential creation options}
})
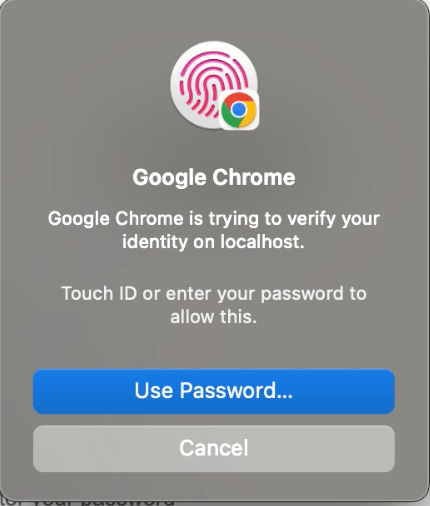
The call to this function verifies the options passed first then the client displays a notification like the one shown in the image below requesting if the user wants to create a passkey for the user name and relying party id contained in the credential creation options.

Here we are testing on a MacBook that has a platform authenticator (Touch ID). By clicking on the continue button, the client connects to the Authenticator, then requests it to create credentials at Step 4. The Authenticator then displays a UI, as shown below.
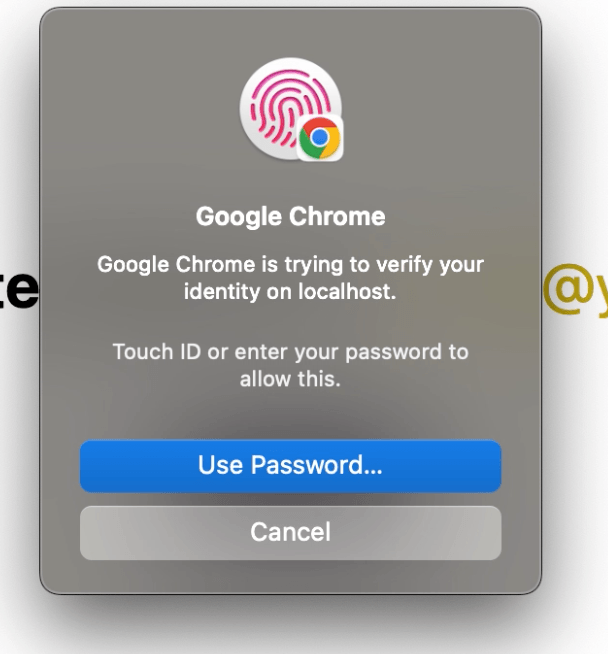
This UI is meant to verify the user via an authorization gesture. In our case, as shown above, it can be the password on the MacBook or their Touch ID.
Step 5: The authenticator now proceeds to create the public key credential. To create a public key credential, it generates a public and private key pair together with an ID called the credential ID, and the relying party to which it is scoped. It then stores it in its list of credentials. The authenticator maintains something like its own mini database.
The authenticator doesn’t directly return the whole credential to the client at Step 5. Rather, the authenticator returns a much more complex structure to the client at Step 6, referred to as the attestation response.
Step 6: The attestation response is the client’s response from the authenticator after creating the credential. This structure looks like so:
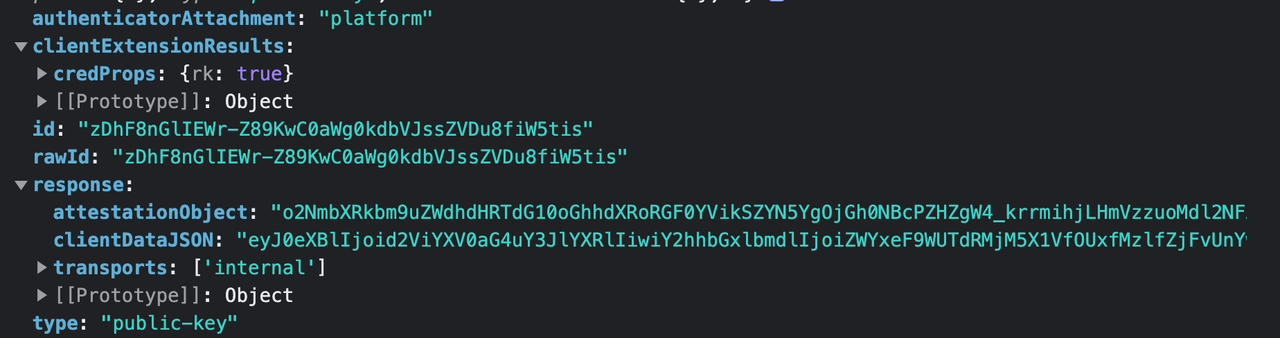
Thanks to the @simplewebauthn package, most of the properties in this object, which are array buffers, have been encoded to appear as plain strings. We will briefly go over the properties in this object.
Note: The generated private key is not returned by the authenticator in this attestation response but rather lives only on the user’s device that created it in a special hardware chip called a TPM (trusted platform module). The TPM is responsible for handling device authentication and has been proven to be resistant to tampering by malicious software.
Since we used the Touch ID of a MacBook in our demo, which is a platform authenticator, the authenticatorAttachment property is set to “platform”. If you tested with a roaming
authenticator, you would get “cross-platform.”
Next, the credProps.rk property, where “rk” means resident key, is set to true, indicating that the generated credential is client-side discoverable. The id property is
a base64 representation of the credential ID, while rawId is the id represented as an array buffer. Again, it is displayed as a string in the image above thanks to the @simplewebauthn package.
The type property is set to “public-key” because it’s a public key credential.
Finally, we have the response object. The response.transport is an array showing how the authenticator communicated with the client. Since we used a platform authenticator, ours is
set to “internal.” Other options include USB, BLE, etc.
The response.clientDataJSON is an object that was generated from the credential creation options when navigator.credentials.create() was called. It looks like so:
{
  type: "webauthn.create",
  challenge: "EzJj_WZDFDj9TlIDVv39_f39",
  origin: "http://localhost:3000",
  crossOrigin: false,
};
Information about the operation that was performed is shown by the type property, which is set to "webauthn,create" because it was a create operation. It also contains the challenge,
the origin as seen in the browser URL, and a boolean to indicate if the creation process was triggered by another origin. In this case, it is set to false because it was the same origin, "http://localhost:3000" (our Next.js app), that invoked the call.
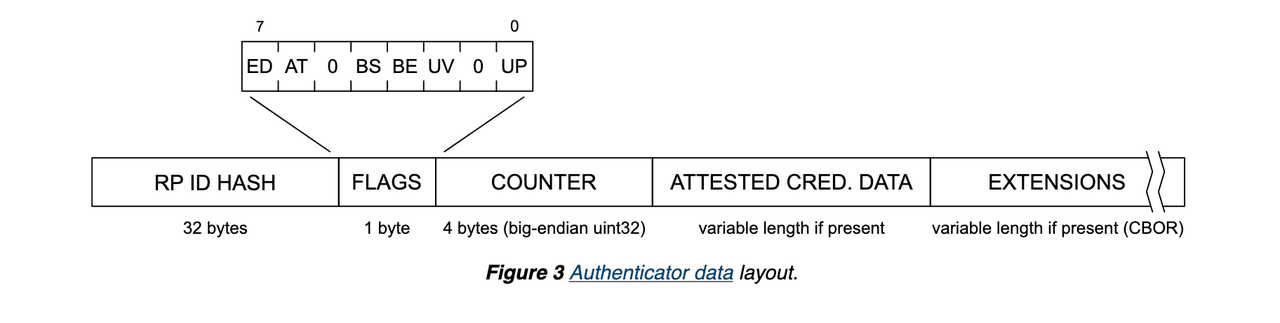
We saved the best for last, which is the most vital part of this structure: the attestationObject. This object is created by the authenticator hardware, CBOR encoded, and has the following structure.
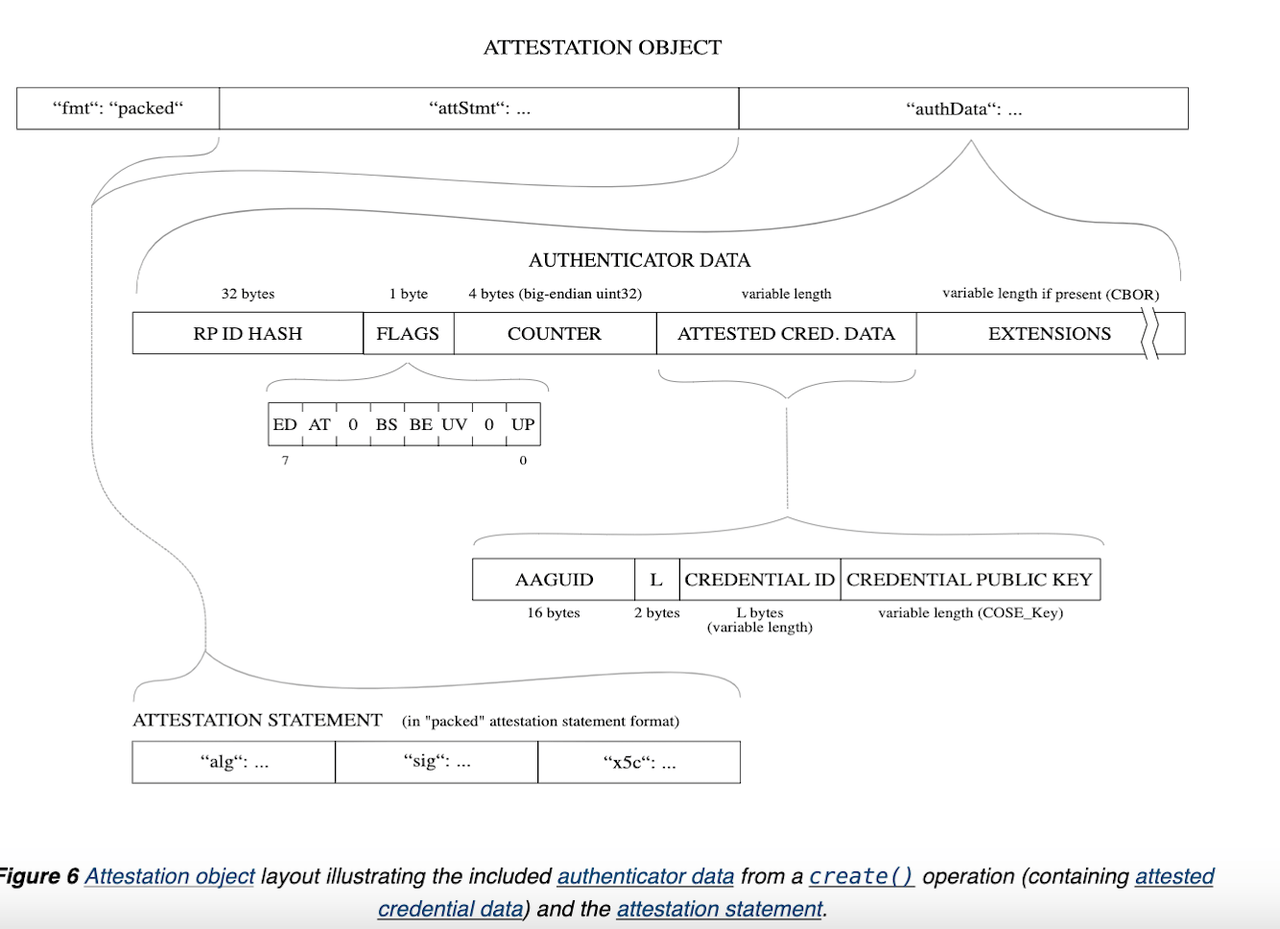
The way the authenticator goes about generating this object is quite complex, so we won’t be diving into all the details. The most important thing to know about the attestation object is that it has three main parts: fmt,
attStmt and authData. fmt is the format of the attestation statement, attStmt is the attestation statement.
Remember, when we generated credential creation options, we said we didn’t need any attestation. So in our case, fmt will be set to “none,” and the attStmt part will
be empty.
Our interest will be in the authData part of this structure. We will be interested in extracting the credential ID and the public key on our server, as well as the counter.
It is important to know that, to ensure the integrity of the whole attestation object, some parts of it are hashed or signed by the authenticator using the private key, such as the authenticator data, the relying party ID, the attestation statement, and so on.
Step 7: At this point, the client needs to send the whole attestation response to the relying party via HTTP. Let’s update the handleDeviceRegistration function:
const handleDeviceRegistration = async () => {
  const email = localStorage.getItem("email") || "";
  try {
    const { data: credentialCreationOptions } = await axios.post(`/api/webauthn/get-reg-device-options`, {
      email,
    });
    console.log(credentialCreationOptions);
    const attestationResponse = await SimpleWebAuthnBrowser.startRegistration(credentialCreationOptions);
    console.log(attestationResponse);
    await axios.post(`/api/webauthn/verify-reg-device`, {
      email,
      data: attestationResponse,
    });
  } catch (error) {
    alert("oopsie!! an error occured during registration");
  }
  return true;
};
And finally, let’s create the endpoint /api/webauthn/verify-reg-device to receive the attestation response and the email attached to the request payload. Assuming you are in your project root, run the following
command:
touch ./pages/api/webauthn/verify-reg-device.ts
Now update the created file with the following code:
import type { NextApiRequest, NextApiResponse } from "next";
import { verifyRegistrationResponse, VerifiedRegistrationResponse } from "@simplewebauthn/server";
import { AuthenticatorsService } from "@/services/authenticator.service";
import { rpID, rpName, origin } from "./get-reg-device-options";
import { UserService } from "@/services/users.service";
import { verificationPayload } from "@/index";
import { RegistrationResponseJSON } from "@simplewebauthn/typescript-types";

export default async function handler(req: NextApiRequest, res: NextApiResponse) {
  const { data, email }: verificationPayload = req.body;
  if (!email) {
    return res.status(400).json({ message: "invalid email" });
  }
  const user = UserService.findByEmail(email);
  if (!user) {
    return res.status(404).json({ message: "user not found" });
  }
  try {
    const verificationResult: VerifiedRegistrationResponse = await verifyRegistrationResponse({
      response: data as unknown as RegistrationResponseJSON,
      expectedChallenge: user.currentChallenge,
      expectedOrigin: origin,
      expectedRPID: rpID,
    });
    if (!verificationResult.verified) {
      return res.status(403).end();
    }
    if (verificationResult?.registrationInfo) {
      const { credentialPublicKey, credentialID, counter } = verificationResult.registrationInfo;
      const newAuthenticator = {
        credentialPublicKey,
        credentialID,
        counter,
      };
      AuthenticatorsService.storeUserAuthenticator(user.id, newAuthenticator);
    }
    res.status(200).json({ message: "verified" });
  } catch (error) {
    console.log(error);
    res.status(500).end();
  }
}
Step 8: The handler function is meant to verify the attestation response and then proceed to store the authenticator credential and associate it with the user’s data that triggered the call. This completes our registration process. Let’s now discuss how our server goes about doing this.
The main handler function starts by extracting the attestation response and the user’s email from the request payload. The email is validated and then used to fetch the user’s data using the findByEmail function on the userService.
With the user’s data, it then proceeds to perform a verification of the attestation response by calling verifyRegistrationResponse(), which gets fed an object with several properties. The attestation response
is fed via the response property.
expectedChallenge is the challenge generated in the public key credential creation options that we stored on the user’s data earlier. We also pass the origin and relying party ID of our server in the expectedOrigin and expectedRPID. The verifyRegistrationResponse() now proceeds to verify the attestation response. In no particular order, we will briefly describe what it does for us internally.
It uses the clientDataJSON and verifies the challenge by comparing it with the one we passed in the expectedChallenge property, our relying party ID, and that it is a creation operation,
i.e., “webauthn.create”. It decodes the CBOR-encoded attestation object and verifies all the hashed and signed parts of it and ensures that the public key of the credential was created by one of the algorithms it supports.
The verification process is quite complex. The WebAuthn spec defines a 19-step process to do this, but we just stated some of the main things done here. You can always refer to the docs to see more.
The call to the verifyRegistrationResponse() function returns an object that looks like so:
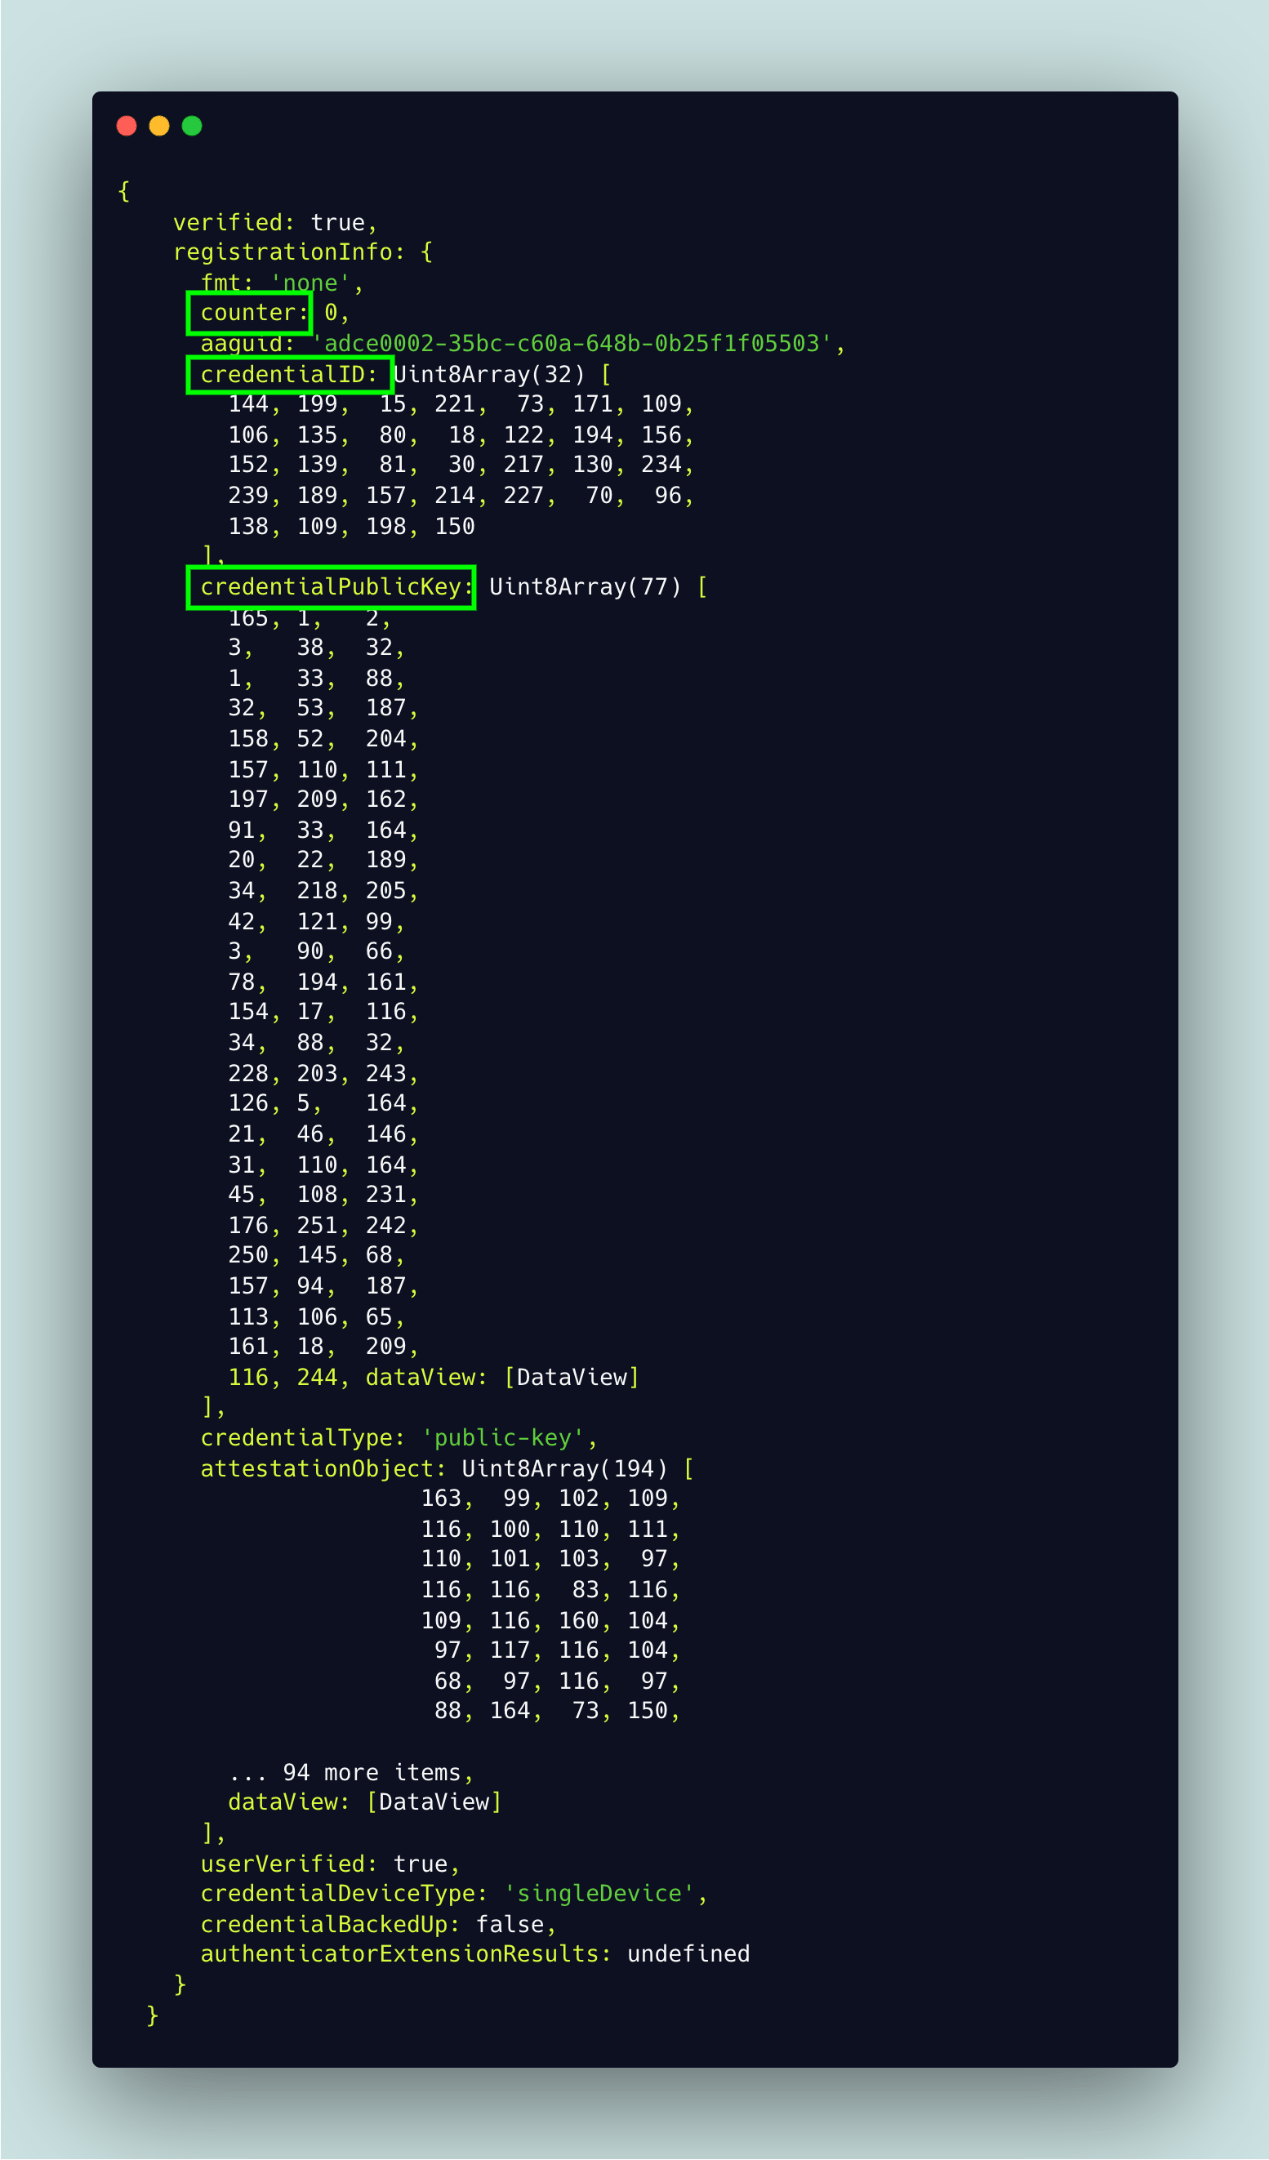
If the verification fails, i.e., the verified boolean is false, the server responds with a 403 error. Else if it succeeds, from the contents of the attestation object above, we extract the credentialID, the public key and the counter. These three
fields are the minimum data we need to extract so that our server can remember an authenticator. This data is then associated with the user and stored on their behalf using AuthenticatorsService.storeUserAuthenticator function, which gets passed the users id and our extracted authenticator data.
Here’s the code for the function storeUserAuthenticator:
async storeUserAuthenticator(userId: string, newAuthenticator: AuthenticatorType) {
  const CollectionOfUserAuthenticators = this.getCollectionOfUserAuthenticators();
  let index = this.getUserAuthenticatorsIndex(userId);
  let userAuthenticators: singleUserAuthenticator;
  if (index === -1) {
    userAuthenticators = {
      userId: userId,
      authenticators: [],
    };
  } else userAuthenticators = CollectionOfUserAuthenticators[index];
  newAuthenticator.credentialID = Array.from(newAuthenticator.credentialID);
  newAuthenticator.credentialPublicKey = Array.from(newAuthenticator.credentialPublicKey);
  userAuthenticators.authenticators.push(newAuthenticator);
  if (index === -1) {
    CollectionOfUserAuthenticators.push(userAuthenticators);
  } else CollectionOfUserAuthenticators[index] = userAuthenticators;
  writeFileSync("users-authenticators.json", JSON.stringify(CollectionOfUserAuthenticators));
},
The function above extracts the contents of the user-authenticators.json file, which is an array, and stores it in a variable called CollectionOfUserAuthenticators. It then checks if
the user already has some authenticators in this array and obtains that index by the call to getUserAuthenticatorsIndex.
getUserAuthenticatorsIndex(userId: string) {
  return this.getCollectionOfUserAuthenticators().findIndex((e) => e.userId === userId);
},
If the user does not have any authenticators, an object with userId and authenticators properties is created for the user, and the authenticators empty
array is updated with the new authenticator data. Otherwise, for a user that had some already existing authenticators, a new entry is added to the authenticators array.
Notice that the authenticator passed to the storeUserAuthenticator call had its credential ID and credentialPublicKey serialized to plain arrays. This is just to ensure that they can
be stored properly. Some other implementations can even parse their UInt8Array representation to URL-safe base64 strings.
Finally, the CollectionOfUserAuthenticators is updated with the new authenticators and is then persisted to the user-authenticators.json file. After this operation is complete, for
our sample user with the email frisk@yaml, there will be an entry in the user-authenticators.json file like the one below:

At this point, our registration cycle is complete. The server now sends back a successful response to the browser, and they get redirected to the login page as seen in the register-device.tsx page.
import { useAuth } from "@/AuthProvider";
import { useRouter } from "next/router";
import { FormEventHandler } from "react";
export default function RegisterDevice() {
  const { handleDeviceRegistration, user } = useAuth();
  const router = useRouter();
  const handleWebauthnRegistration = async () => {
    const isSuccessful = await handleDeviceRegistration();
    isSuccessful && router.push("login");
  };
  return (
    //...JSX
  );
}
Also, even though in our implementation we only retrieved credential ID, credentialPublicKey, and counter to represent the user’s authenticator data, when saving the user’s authenticator credential, you
may want the user to be able to see familiar names for each device they registered on your platform as shown in the image below.
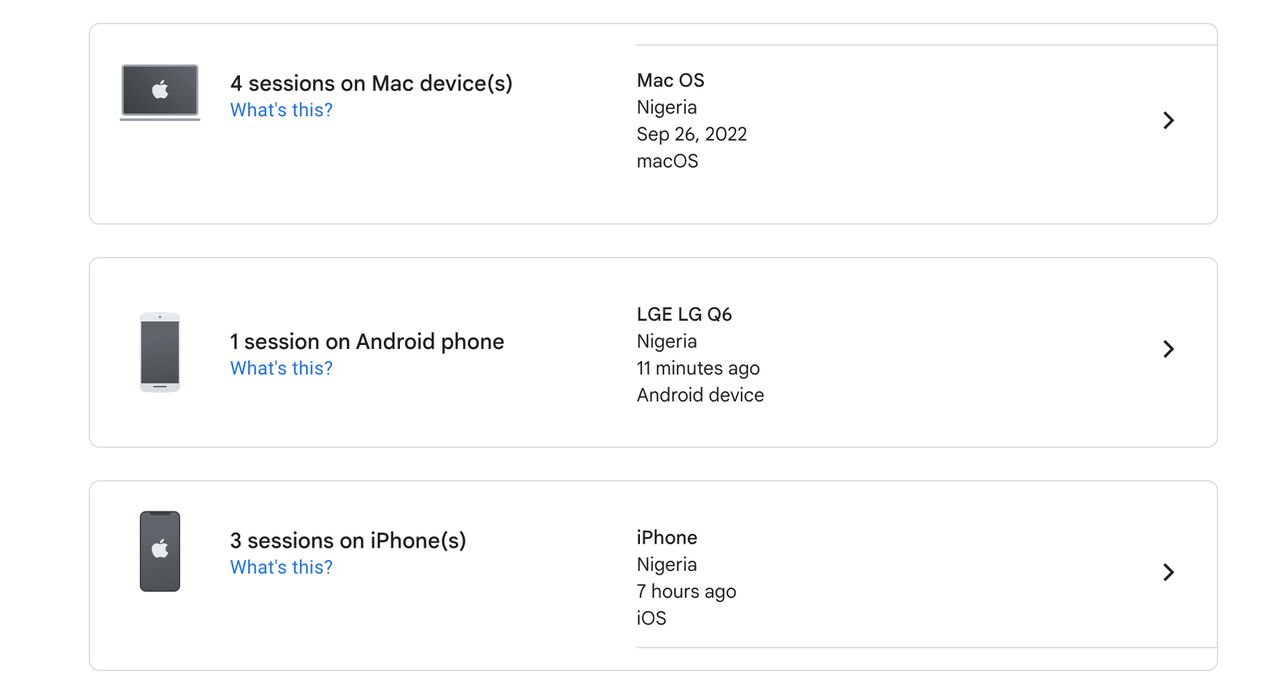
One solution is to inspect the request headers. On the User-Agent header, you can get information about the user’s device and associate it with each credential to provide a more elegant experiment when a user wants information about a registered device.
Authentication Process
The device registration process is now complete. Now how does the user log in to our app? Well, an obvious option is for them to enter their email and password, which is easy enough, but we are more interested in how we can allow them to do that with their public key credential.
Like registration, the authentication flow is shown in the image below.
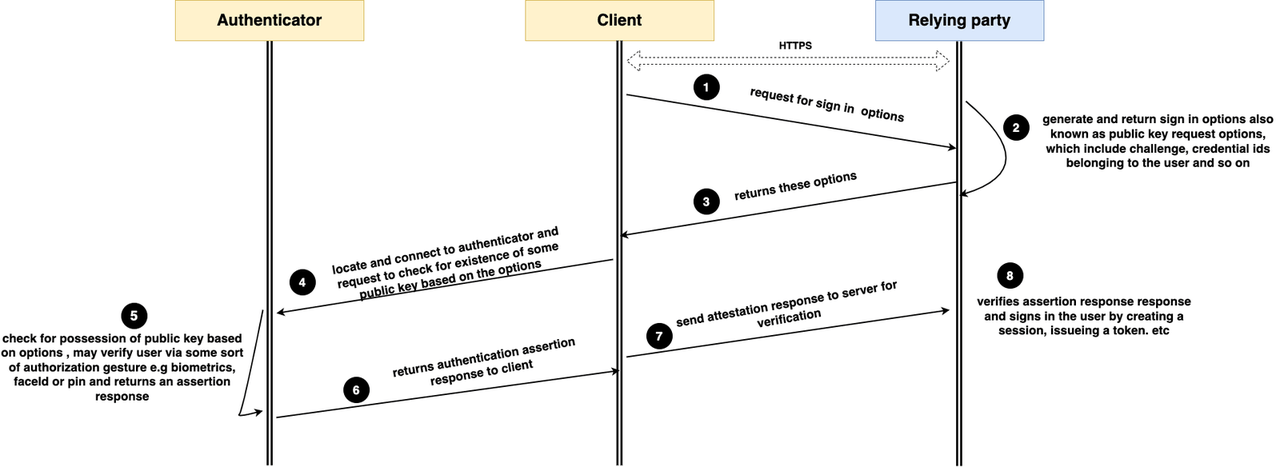
We will review each authentication step and write the necessary code.
Step 1: The entire login process would begin from our login page. Update the logic in the pages/login.tsx file with the code below:
import React, { FormEvent, FormEventHandler, useEffect, useRef, useState } from "react";
import * as SimpleWebAuthnBrowser from "@simplewebauthn/browser";
import { useAuth } from "@/AuthProvider";
import { useRouter } from "next/router";
function Login() {
const { handleDeviceAuthentication, login, user } = useAuth();
const [email, setEmail] = useState("");
const router = useRouter();
const passwordRef = useRef<HTMLInputElement>(null);
const [browserSupportsWebAuthn, setBrowserSupportsWebAuthn] = useState(false);
const e = email;
useEffect(() => {
if (SimpleWebAuthnBrowser.browserSupportsWebAuthn()) {
setBrowserSupportsWebAuthn(true);
handleDeviceAuthentication(email as string, true).then(
(isSuccessful) => isSuccessful && router.replace("profile"),
);
}
}, []);
const goToProfilePage = (isSuccessful: boolean) => isSuccessful && router.replace("profile");
const handleLoginPasskey: FormEventHandler<HTMLFormElement> = (e: FormEvent) => {
if (!email) return;
return handleDeviceAuthentication(email).then(goToProfilePage);
};
const handleLoginBasic: FormEventHandler<HTMLFormElement> = (e: FormEvent) => {
e.preventDefault();
if (passwordRef?.current && email) {
const password = passwordRef.current?.value || "";
return login(email, password).then(goToProfilePage);
}
};
return (
<form onSubmit={browserSupportsWebAuthn ? handleLoginPasskey : handleLoginBasic}>
<div className='grid_txt_1'>
<h1 className='u-center'><Login></h1>
<div className='grid_txt'>
<label htmlFor=''>email</label>
<input
value={email}
// name='email'
placeholder='enter your email'
onChange={({ target: { value } }) => setEmail(value)}
/>
</div>
{browserSupportsWebAuthn && false ? (
<></>
) : (
<>
<div className='grid_txt'>
<label htmlFor=''>password</label>
<input
ref={passwordRef}
type='password'
placeholder='enter your password'
/>
</div>
</>
)}
<button className='btn'>login</button>
</div>
</form>
);
}
export default Login;
The login page renders a form that can display in one of two modes depending on if the users browser supports the WebAuthn protocol using the browserSupportsWebAuthn() method on the @simplewebauthn/browser package, as shown below.

The form, when submitted, triggers handlebasicLogin for unsupported browsers of the WebAuthn protocol or handlePasskeyLogin for supported browsers. Since we are more interested in the
latter, our discussion will be based on it. When the user feeds in their email and submits the form, this triggers the handlePasskeyLogin function.
Firstly, it validates the user’s email and then triggers the handleDeviceAuthentication function, which is extracted from our auth context, and feeds the user’s email as a parameter. If user authentication
is successful, the user gets redirected to the profile page, which we are yet to create.
The handleDeviceAuthentication function in our AuthProvider.tsx file will begin the authentication process from Step 1. Like when we handled registration, we will be updating this function
incrementally and moving back and forth between our client and server code in each step. Let’s now proceed to update this function as follows:
const handleDeviceAuthentication = async (email: string) => {
  try {
    const { data } = await axios.post(`/api/webauthn/get-authentication-options`, {
      email,
    });
       } catch (error) {
    console.log(error);
    return false;
  }
};
handleDeviceAuthentication accepts an email internally; it starts at Step 1 by requesting the authentication options/public key credential request options from the server at the /api/wealth/get-authentication-options route and sends the email as the only payload.
Step 2: Create the /api/webauthn/get-authentication-options route to enable our server to respond to this request for the authentication options. In your terminal, run this command to create this file:
touch ./pages/api/webauthn/get-authentication-options.tsx
Update the file with the following code:
import { AuthenticatorsService } from "@/services/authenticator.service";
import { UserService } from "@/services/users.service";
import { generateAuthenticationOptions } from "@simplewebauthn/server";
import type { NextApiRequest, NextApiResponse } from "next";

export default function handler(req: NextApiRequest, res: NextApiResponse) {
  const user = UserService.findByEmail(req.body.email);
  if (!user) {
    return res.status(404).end();
  }
  const userAuthenticators = AuthenticatorsService.getUserAuthenticators(user.id);
  if (!userAuthenticators) {
    return res.status(404).end();
  }
  const options = generateAuthenticationOptions({
    allowCredentials: userAuthenticators.authenticators.map((a) => ({
      id: a.credentialID,
      type: "public-key",
    })),
    userVerification: "preferred",
    timeout: 60 * 1000 * 5,
  });
  user.currentChallenge = options.challenge;
  UserService.updateUser(user);
  res.send({ data: options });
}
This function first checks for an existing user based on their email and then obtains the public key credentials associated with the user by calling the getUserAuthenticators function.
Next, it proceeds to create the public key credential request options using the generateAuthenticationOptions function from the @simplewebauthn/server package. This function takes several
options, some of which we are already familiar with. It sets a timeout of 5 minutes for the maximum duration of authentication on the browser.
The option userVerification: "preferred" indicates that we want the authenticator to preferentially verify the user before checking if it has any of the user’s public key credential IDs.
We feed the user’s public key credentials to the allowCredentials option. Note that when credential IDs are passed from our server in the allowCredentials option, they are referred
to as server-side discoverable credential IDs. This enables the authenticator on our client-side to choose and authenticate the user.
Note that the allowCredentials option is optional when creating the public key request options. Earlier, we said that the browser can automatically detect a public key credential if it is client-side
discoverable, which allows the user to authenticate without the server having to provide this array in the public key credential request options.
The generateAuthenticationOptions function also generates a mandatory challenge property, which is again persisted on the user’s data.
user.currentChallenge = options.challenge;
UserService.updateUser(user);
Step 3: Finally, the authentication options are then sent to the browser. When viewed in the browser, the authentication options look like the image below.
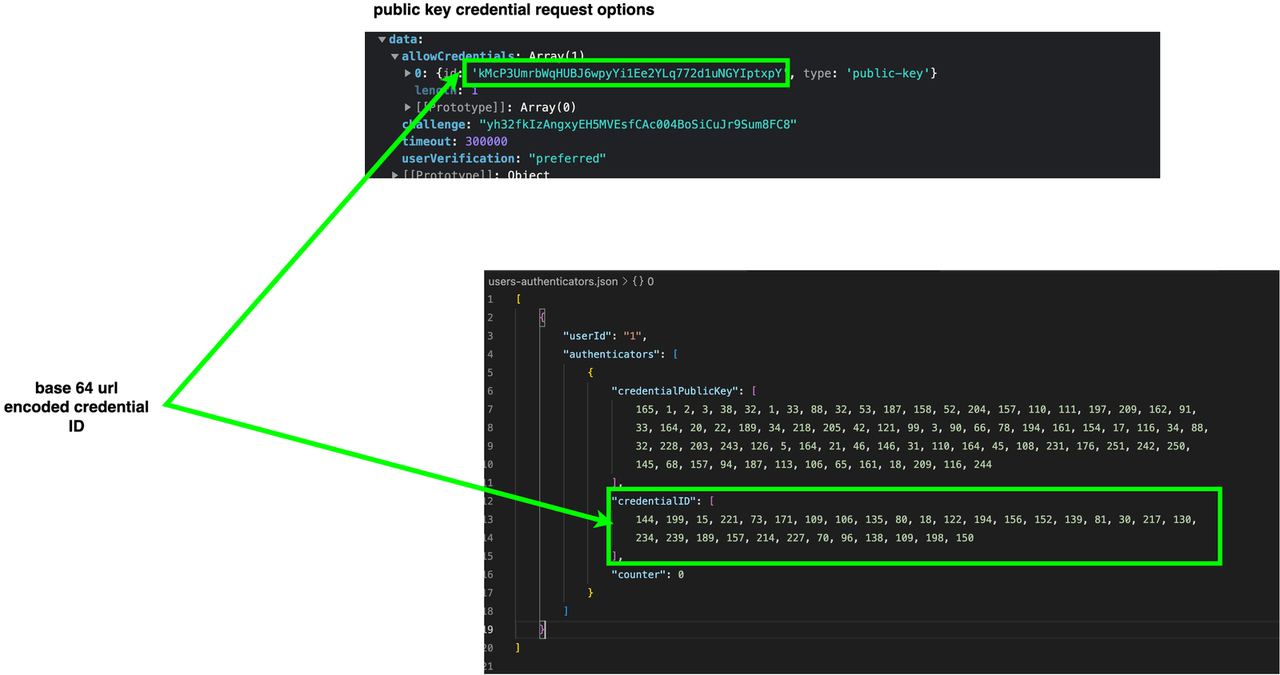
Note: The credential ID(s) are base64 encoded.
Step 4: On the browser, let’s update the handleDeviceAuthentication function to connect to the authenticator and get an assertion at Step 5.
const handleDeviceAuthentication = async (email: string, useBrowserAutofill = false) => {
  if (!email) {
    email = localStorage.getItem("email") || "";
  }
  try {
    const { data } = await axios.post(`/api/webauthn/get-authentication-options`, {
      email,
    });
    const assertionResponse = await SimpleWebAuthnBrowser.startAuthentication(data.data, useBrowserAutofill);

  } catch (error) {
    console.log(error);
    return false;
  }
};
This handleDeviceAuthentication function, having received the authentication options, feeds it to the startAuthentication function imported from the “@simplewebauthn/browser”
package. This function internally invokes the navigator.credentials.get() method and feeds the authentication options as shown in the code below.
await navigator.credentials.get({
  publicKey: publicKeyCredentialRequestOptions
});
Internally it connects to the authenticator, which then again displays a UI to verify the user via an authorization gesture. In our case, it will request the user’s biometric or password.
Step 5: And then, it checks its list of credential IDs for whether it has the private key for any of the credentials provided in the allowCredentials options.
Step 6: If so, it returns an assertion response to the client. The assertion response is an object that looks like this:
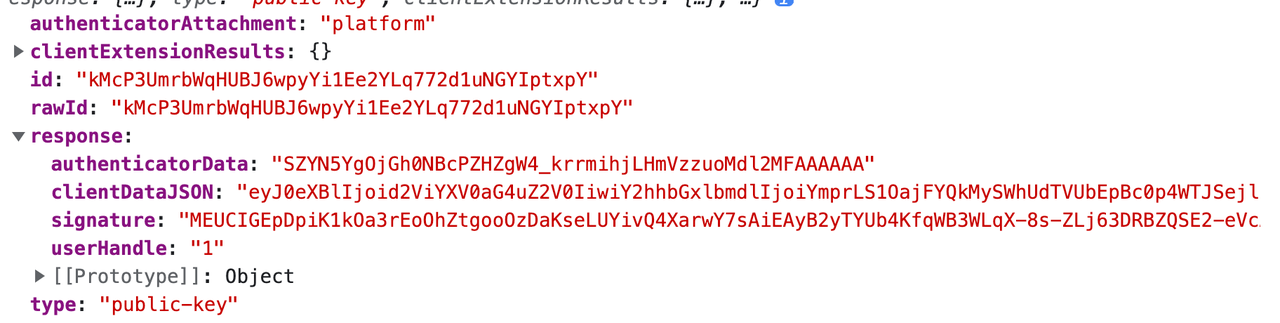
id refers to the identified credential ID for which the authenticator possesses a private key.
At this point, you might be wondering if the authenticator can identify more than one ID for a user. Well, when implemented correctly, an authenticator hardware will only detect possession of one credential belonging to the user. This is also why,
during registration, we included the excludeCredentials option to prevent an authenticator from creating multiple credentials for a single user.
Now let’s look at the response object. The userHandle refers to the ID of the user on our server’s database to which the identified credential belongs. The clientDataJSON,
again, is a base64URL of the client data issued to the authenticator internally when the navigator.credentials.get() was called, and it appears as follows.
{
  type: "webauthn.get",
  challenge: "bjk--Nj1XBC2IhTu5TlJAsJxY2Rz9OxTJIa7ppvVi08",
  origin: "http://localhost:3000",
  crossOrigin: false,
};
We are already familiar with this object; it holds the challenge, the URL where our server runs, and information about the type of operation performed in the type property “webauthn.get”.
authenticatorData holds information generated by the authenticator hardware after the user is verified, as shown in the image below. It is similar to the one we got during registration; one difference is that it doesn’t
include the public key in the authenticatorData, which is expected.
Then finally, the signature is a combination of authenticatorData and a sha 256 of the serialized clientDataJSON object.
Step 7: Let’s now update the handleDeviceAuthentication function again. We now need to ship the whole assertion object to our server.
const handleDeviceAuthentication = async (email: string, useBrowserAutofill = false) => {
  if (!email) {
    email = localStorage.getItem("email") || "";
  }
  try {
    const { data } = await axios.post(`/api/webauthn/get-authentication-options`, {
      email,
    });
    const assertionResponse = await SimpleWebAuthnBrowser.startAuthentication(data.data, useBrowserAutofill);
    const verificationRes = await axios.post(`/api/webauthn/verify-login-auth`, {
      data: assertionResponse,
    });

  } catch (error) {
    console.log(error);
    return false;
  }
};
Let’s now respond to the request on the /api/webauthn/verify-login-auth route to verify the assertion response. Again let’s create this file first:
touch /api/webauthn/verify-login-auth.tsx
Let’s update the created file with the code below:
import { AuthenticationAssertionPayload } from "@/index";
import { AuthenticatorsService } from "@/services/authenticator.service";
import { UserService } from "@/services/users.service";
import { verifyAuthenticationResponse } from "@simplewebauthn/server";
import { AuthenticationResponseJSON } from "@simplewebauthn/typescript-types";
import type { NextApiRequest, NextApiResponse } from "next";
import { rpID, origin } from "./get-reg-device-options";

export default async function handler(req: NextApiRequest, res: NextApiResponse) {
  const { data }: AuthenticationAssertionPayload = req.body;
  const user = UserService.findById(data.response.userHandle || "");
  if (!user) {
    return res.status(403).end();
  }
  const userAuthenticators = AuthenticatorsService.getUserAuthenticators(user.id);
  if (!userAuthenticators) {
    return res.status(403).end();
  }
  const authenticator = AuthenticatorsService.getAuthenticatorByCredentialId(
    userAuthenticators.authenticators,
    data.rawId,
  );
  if (!authenticator) {
    return res.status(400).end();
  }
  try {
    authenticator.credentialPublicKey = Uint8Array.from(authenticator.credentialPublicKey);
    const verificationRes = await verifyAuthenticationResponse({
      response: data as unknown as AuthenticationResponseJSON,
      expectedChallenge: user.currentChallenge,
      expectedOrigin: origin,
      expectedRPID: rpID,
      authenticator,
    });

    // use verification response to do something
    // send seession id or token or send otp

    res.send({
      verified: verificationRes.verified,
      user: {
        email: user.email,
        id: user.id,
      },
    });
  } catch (error) {
    console.log(error);
    res.status(500).end();
  }
}
Our server first checks for the existence of the user based on their user handle. If the user exists, it retrieves the authenticator credentials belonging to them by calling the function AuthenticatorsService.getUserAuthenticators(user.id),
which takes the user’s ID as input. Then, the server checks whether the user has a credential ID that matches the one included in the attestation response. It does this by calling the function AuthenticatorsService.getAuthenticatorByCredentialId(userAuthenticators.authenticators, data.rawId),
which takes the user’s credentials and the ID of the credential in the assertion response as parameters. This function appears as follows:
getAuthenticatorByCredentialId(userAuthenticators: AuthenticatorType[], autheticatorCredentialIdB64URL: string) {
  return userAuthenticators.find(
    (a) => Buffer.from(a.credentialID).toString("base64url") === autheticatorCredentialIdB64URL,
  );
},
Notice that for each credential, its ID is parsed to a base64 URL to be in the same form as the authenticatorCredentialIdB64URL before they are compared.
Step 8: Now, let’s go back to our server’s handle function. If getAuthenticatorByCredentialId resolves with an existing public key credential, it then proceeds to convert the public key
of that credential to a Uint8Array. Using the verifyAuthenticationResponse function from the "@simplewebauthn/server package, we perform verification on the attestation response.
Basically, it gets fed an object with the attestation response and properties we are already familiar with, like our relying party ID, the expected challenge, etc.
The verifyAuthenticationResponse function does a lot internally to verify the attestation response. The WebAuthn docs define a 23-step procedure. Here, we will just go over a few points as to what it does internally.
It verifies the clientDataJSON, which includes the challenge and confirms that the operation was “webauthn.create”. It also verifies the generated signature and ensures that the private key used to generate it matches the public key
in its possession
After the verification process is successful, it returns an object that looks like this.
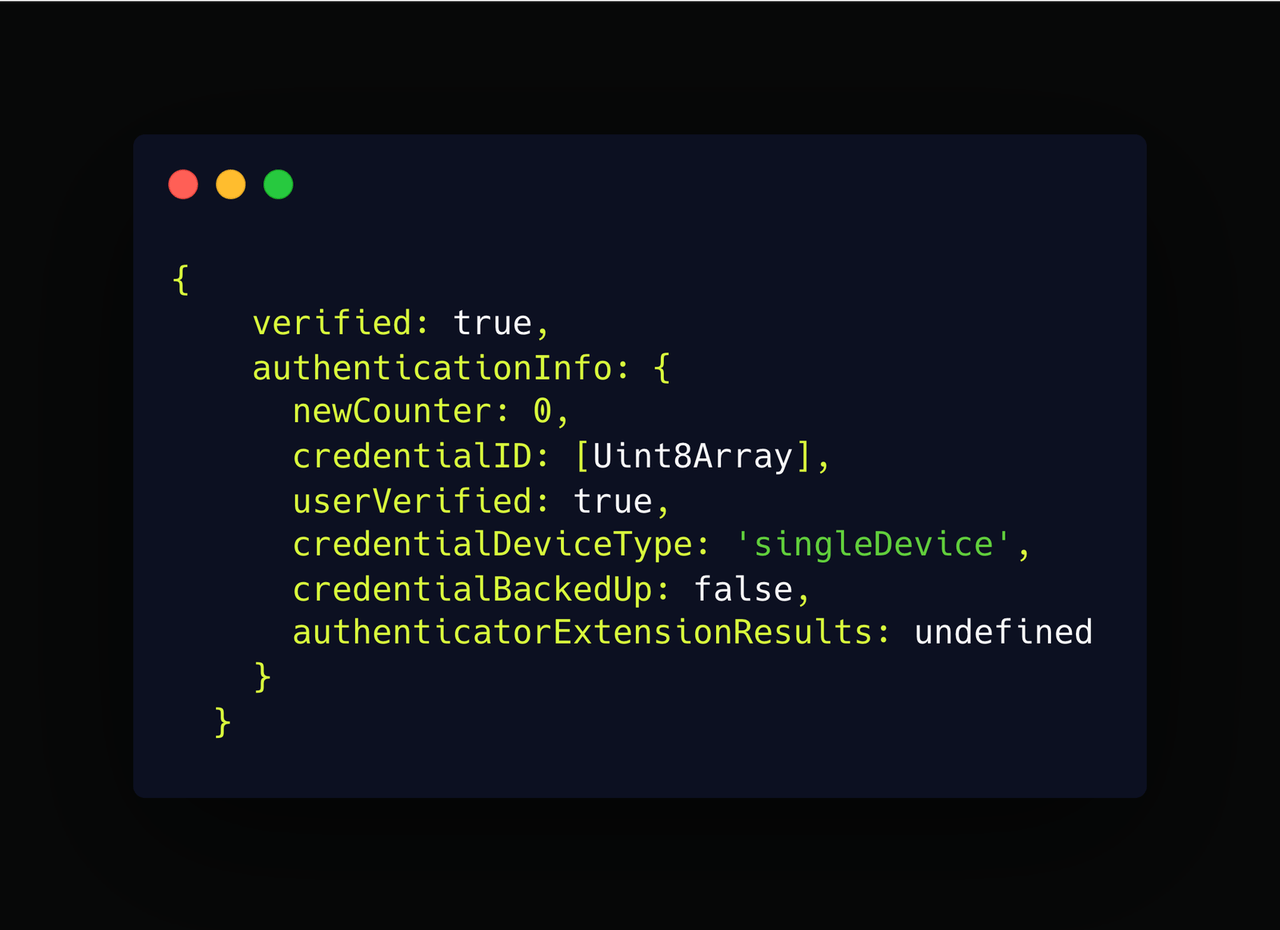
At this point, you may need to store some information, such as the newCounter property in the diagram above, to keep track of the number of times a particular authenticator was used to authenticate a user.
This ensures that if an attacker manages to clone an authenticator and attempts to authenticate a user, the count will not be consistent, and you can easily detect foul play from the authenticator. For example, if the user had a counter of 1 previously, when they authenticate again, your server should expect 2. We didn’t do that in our case because several high-end authenticators, such as the MacBook used for testing, would always issue a count of 0, no matter how many times it was used.
After successful authentication, the server may proceed to issue a token or create a session for the user. In our case, our server just responds with the authenticated user’s data.
res.send({
  verified: verificationRes.verified,
  user: {
    email: user.email,
    id: user.id,
  },
});
On our client-side, let’s update the handleDeviceAuthentication to use this response.
const handleDeviceAuthentication = async (email: string, useBrowserAutofill = false) => {
  if (!email) {
    email = localStorage.getItem("email") || "";
  }
  try {
    const { data } = await axios.post(`/api/webauthn/get-authentication-options`, {
      email,
    });

    const assertionResponse = await SimpleWebAuthnBrowser.startAuthentication(data.data, useBrowserAutofill);
    const verificationRes = await axios.post(`/api/webauthn/verify-login-auth`, {
      data: assertionResponse,
    });
    if(verificationRes.data.verified){
    setStatus("authenticated");
    setUser(verificationRes.data.user as AuthContextType["user"]);
    return true;
}
    } catch (error) {
      console.log(error);
      return false;
    }
};
On our frontend, we check if the user was verified, update the user’s status to “authenticated,” store the user’s data in state and return true in our login page, i.e., pages/login.tsx file.
The user is now redirected to the profile page, i.e., pages/profile.tsx. Let’s now create this page and update its contents.
import { useAuth } from "@/AuthProvider";
import React from "react";
function Profile() {
const { user, signOut } = useAuth();
return (
<div className='App grid_txt_1'>
<h1>
congrats!! logged in as <span className='col-gold'> < {user.email}> </span>{" "}
</h1>
<div className='u-center'>
<button className='btn br ' onClick={signOut}>
sign out
</button>
</div>
</div>
);
}
export default Profile;
This page renders text about the authenticated user and a button to allow them to sign out by invoking the signOut function from our auth context. The signOut function is shown below.
const signOut = async () => {
  setStatus("unauthenticated");
  setUser(initialState.user);
};
To see the running application run the following command in the terminal.
npm run dev
Improving User Experience in WebAuthn
During device registration and authentication, several measures and techniques can be taken advantage of to allow for a better user experience.
During device registration, it is recommended to create client-side discoverable keys when possible, as this helps to provide a more seamless login experience for users. This can be achieved by adding browser auto-fill with public key credentials on forms, as shown below. It is now immediately obvious that the WebAuth API is compatible with the browser’s credential management API, which allows users to autofill their email and password on most websites.
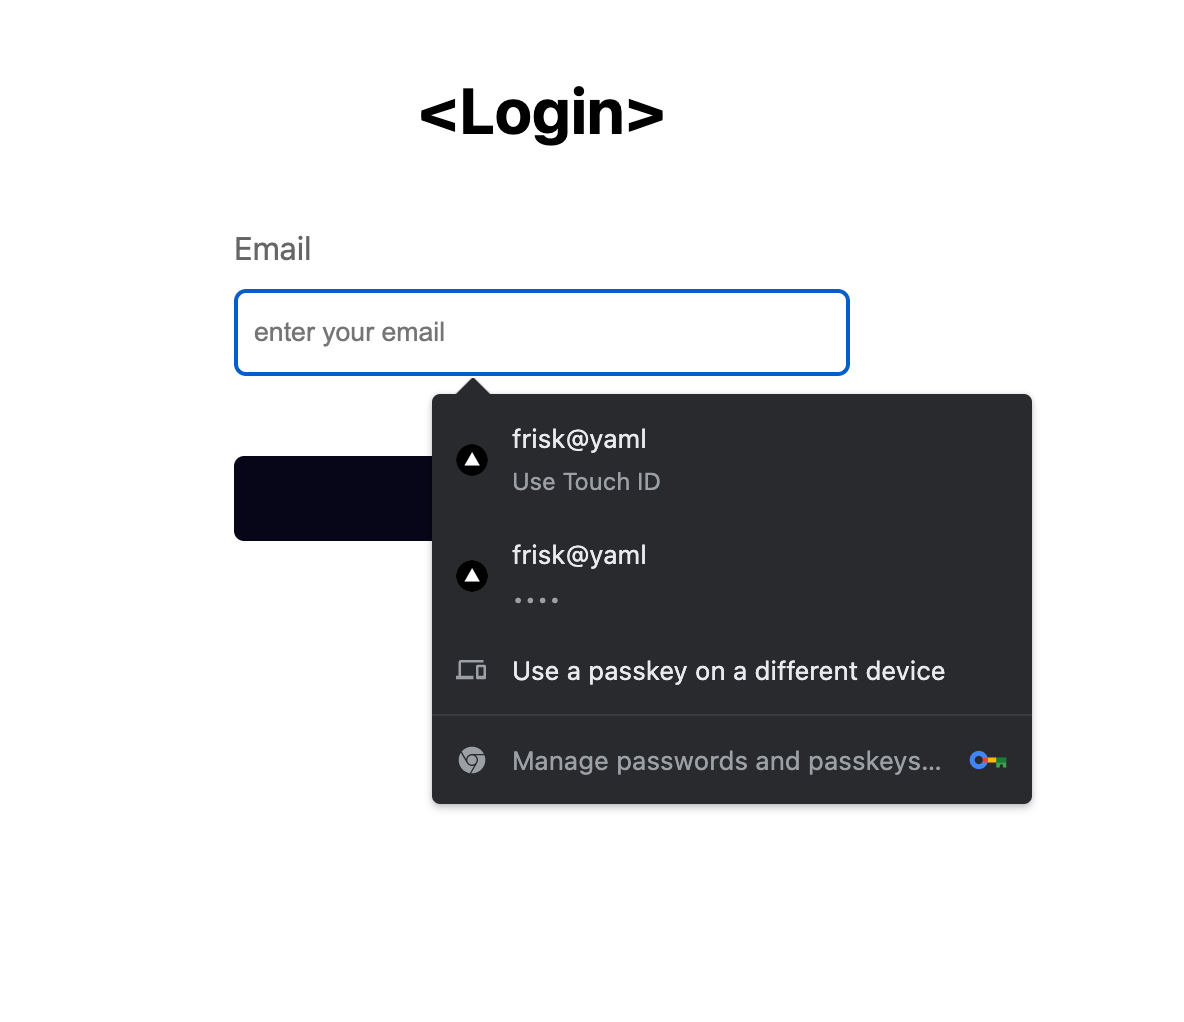
Client-side discoverable credentials also allow you to take the entire login experience to a whole new level. Initially, it seemed like we needed at least a username or email to log the user into our app. However, with client-side discoverable credentials, logins can be triggered by just clicking a button, as shown below (elegant).

Passkeys generated by certain vendors such as Apple, Google and Microsoft devices with platform authenticators after the WebAuthn registration ceremony provide secure distribution and synchronization of passkeys to the user’s device(s) out of the box, with the aid of the user’s cloud account on the generating vendor.
So, if a user has an iPhone, a MacBook and an iPad with their Apple ID configured on each device, when they register on a website from their MacBook Touch ID, it generates the necessary public key credentials (i.e., the passkey) and securely shares it with the user’s iPhone and iPad, so that the user can automatically use any of them to log in to that website without having to register again. If the user loses or trades their devices, they can still recover passkeys and log in to the website.
Best Practices When Implementing WebAuthn
When implementing WebAuthn into your app, here is a list of good practices and some security concerns to take note of:
- Always ensure you have a fallback authentication option apart from WebAuthn, such as SSO or traditional email and password. This will allow everyone to be able to log in to your app since WebAuthn is still not fully supported on all platforms.
- Always allow users to register multiple authenticators on your platform to easily support account recovery.
- Ensure that you do not leak any sensitive data to malicious attackers during login or signup.
Conclusion
The FIDO (Fast Identity Online) Alliance has developed protocols to provide secured, uniform, passwordless Authentication (using public key credentials) across most web browsers on different platforms. These protocols are faster, easily manageable and highly secure compared to existing cognitive-based authentication systems using passwords or 2FA systems using email or SMS OTPs.
In this final part of the series, we covered the two core WebAuthn cermonies: registration (signup) and authentication (login). We also covered measures and techniques you can incorporate for a better user experience. Finally, we ended with best practices and some security concerns to note when implementing webAuthn.

Chinedu Imoh
Chinedu is a tech enthusiast focused on full-stack JavaScript and Infrastructure engineering.
Related Posts
Comments
All articles
Topics

Latest Stories
in Your Inbox
Subscribe to be the first to get our expert-written articles and tutorials for developers!
All fields are required