
Beyond the Basics: Best Practices for UI Handling in .NET MAUI

Summarize with AI:
Making the move from Xamarin Forms to .NET MAUI? These tips are for you!
👋 Hello there! Are you ready to learn some exciting tips for best practices in .NET MAUI? Whether you’re experienced with developing applications using Xamarin Forms or just starting out in .NET MAUI, the following content will be useful to you.
In this article, I’ll provide you with tips to improve your .NET MAUI app development practices. These insights are based on updates from the official documentation, which includes interesting improvements. 🚀 The goal is for our apps to maintain their quality while enhancing performance and simplifying our work as developers. 🛠️ I’m here to share tips that will keep you ahead in the .NET MAUI field. Ready to explore? 💪
1. Want to Add a Border? Don’t Use Frame—Use Border
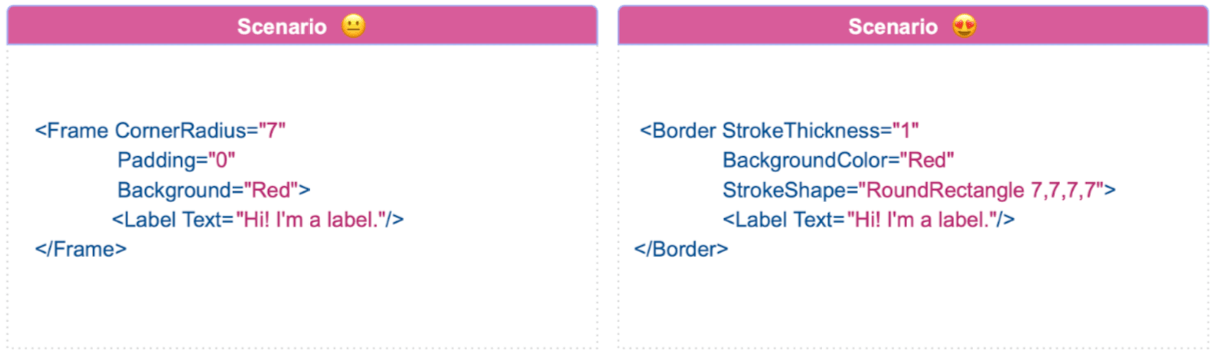
In Xamarin Forms, the Frame is mainly used to add borders. However, in .NET MAUI, a new control named Border has been introduced specifically for this purpose.
So, when is it appropriate to use Border, and when should you use Frame? 🤔 The official documentation indicates that Frame is maintained for users transitioning their applications from Xamarin.Forms to .NET MAUI. For new developments, it’s recommended to use the Border control.
Here are a few reasons why I prefer using Border over Frame:
- Flexibility in rounding: If you want to set a value to round each edge separately, you have the ability to do so.
- Freedom in the border shape: You have control over the edge’s shape. For example, you can use shapes like RoundRectangle (as shown in the explanatory image), or experiment with others such as Polyline, among other shapes you can see here.
As shown in the main image of this tip, the Border is quite straightforward to use. To gain a more in-depth understanding of the Border, I recommend reading the article Border in .NET MAUI.
2. Use Horizontal/VerticalStackLayout Instead of StackLayout
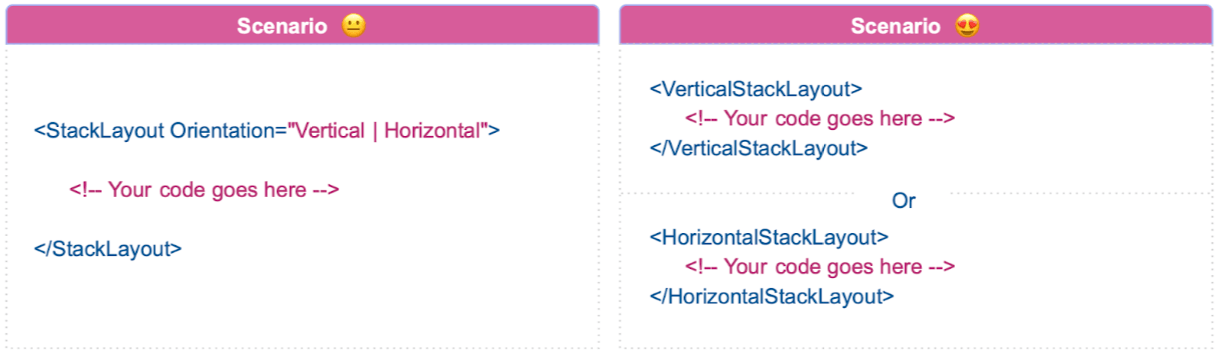
If you’re familiar with Xamarin Forms, then you already know how the StackLayout works. By default, the orientation is vertical, but you can set it to horizontal using the Orientation property. In .NET MAUI, the same concept applies to StackLayout.
In addition to the existing layout, there are new ones where you don’t need to use the Orientation property. You can directly use VerticalStackLayout or HorizontalStackLayout instead. Depending on your preferred orientation, I recommend considering one of these new layouts!
I encourage you to learn more about these layouts by reading the article Exploring Layout Options in .NET MAUI.
3. Avoid Using AndExpand in the Horizontal/VerticalStackLayout
In Xamarin Forms, we use expansion properties such as Horizontal/VerticalOptions. These properties define alignment preferences and contain a set of values, some of which end with the “AndExpand” suffix. For instance, we have CenterAndExpand, Start and StartEndExpand, among others.
However, in .NET MAUI, the “AndExpand” suffix no longer exists. It will only respond to values without the suffix, like Center or Start.
What happens if you use a value with an “AndExpand” suffix? 🤔 .NET MAUI simply ignores the suffix and considers the root word. For instance, if you write:
<VerticalStackLayout HorizontalOptions="CenterAndExpand">
      ...
</VerticalStackLayout>
.NET MAUI will interpret it as Center.
4. Don’t Use RelativeLayout
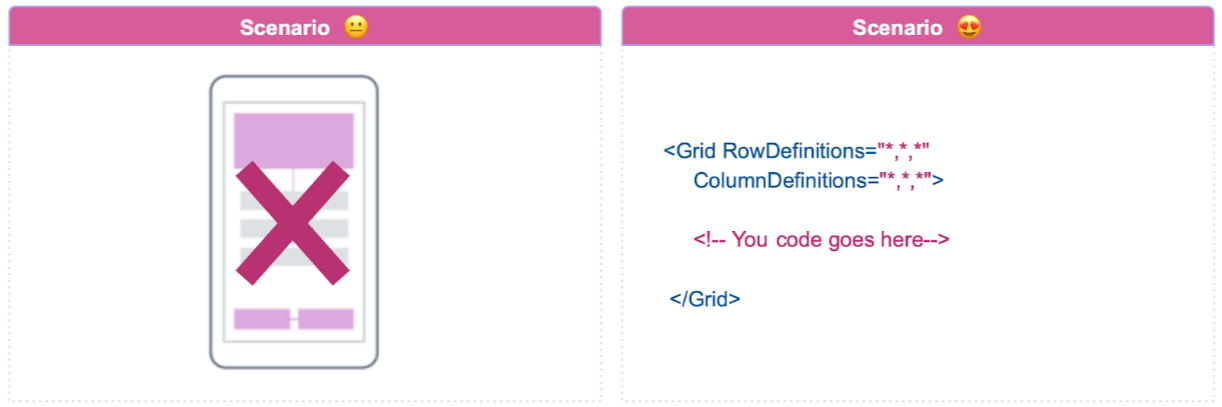
If you’ve been using RelativeLayout in Xamarin Forms, prepare for a change. RelativeLayout does not exist in .NET MAUI. Say goodbye. 👋
You might wonder what to do if you’re migrating your app from Xamarin Forms to .NET MAUI and you use RelativeLayout. 🤔 Microsoft has provided a solution with a compatibility namespace that can be found in the Microsoft.Maui.Controls.Compatibility namespace. For more information, you can refer to the article Xamarin.Forms to .NET MAUI: How Layout Behavior Has Evolved.
However, I personally recommend refactoring your code as soon as you complete the migration. The Grid layout is an ideal replacement, achieving the same behavior as the RelativeLayout.
5. Desktop Apps: Need More Info? Enhance with Tooltips

Consider a registration form that requires additional information. Typically, placeholders are used for this purpose. But what if more detailed information is needed? 👀 This is where tooltips come in handy. Tooltips allow you to add detailed information without affecting your UI design, as they only appear when the user directly interacts with the visual element (the Entry, for this example).
This is just one example. You can add tooltips to many other controls, not just entry! This is one of the new features of .NET MAUI that doesn’t exist in Xamarin Forms.
For more information about Tooltips, I invite you to read the article Improving Your Desktop Applications With ToolTips in .NET MAUI.
6. Using the Same Hex Colors in Various Places? Add Them to Color.xaml
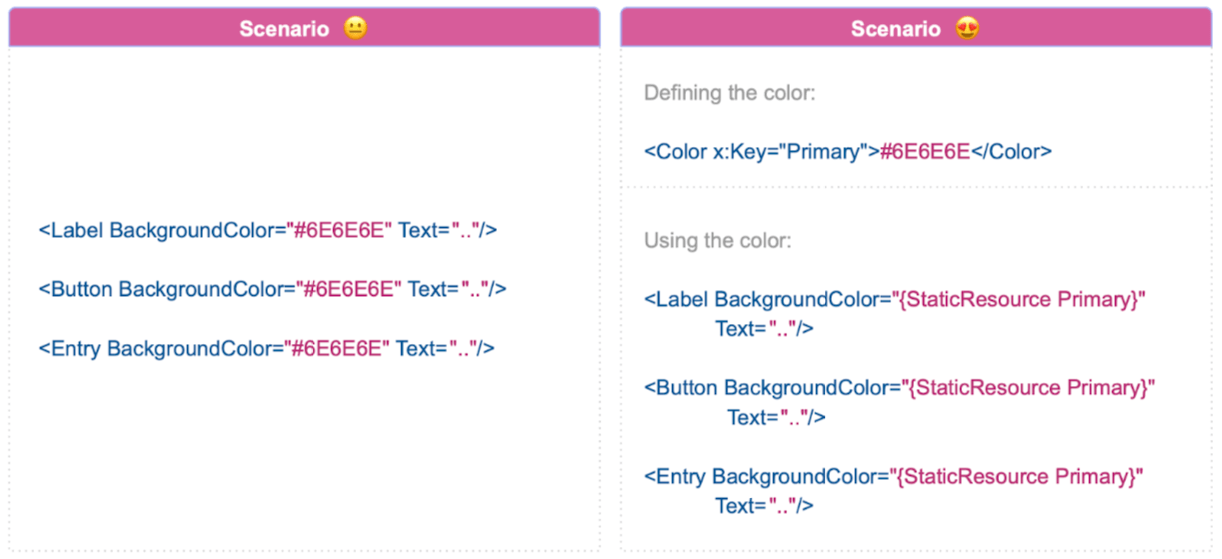
Branding colors are an integral part of app development. Suppose your branding has three colors, and you need to use them across 10 pages. A common approach might be to simply repeat the same hexadecimal codes as needed on each screen. This works, but it can complicate the maintenance of our app and increase the risk of errors when changing a color. It also makes our app less scalable.
Creating a color palette in a single file is a more efficient method. This allows us to reference these colors with an alias in other files. If the branding colors change, we only need to update one file rather than the whole codebase. (In fact, the app’s default predefined colors are already set up this way).
Here are the steps to accomplish this:
1. Identify the colors to use and navigate to Your Project ➡️ Resources ➡️ Styles ➡️ Colors.xaml.
Add as many color lines as needed in the following format:
<Color x:Key="GrayPrimaryColor">#6E6E6E</Color>
In this context, GrayPrimaryColor is the alias of the color, and #6E6E6E is its hexadecimal representation.
2. Use the StaticResource to refer to the color.
<Label BackgroundColor="{StaticResource GrayPrimaryColor}" Text=".."/>
Future color updates will be much easier to implement!
Conclusion
👩💻 And that’s all for today! I hope the tips in this article will help you uphold best practices in .NET MAUI. Remember, great code originates from small and intelligent modifications! 🛠️ Thank you for taking the time to read! 📚 See you in the next article!
Happy coding! 💚💕

Leomaris Reyes
Leomaris Reyes is a software engineer from the Dominican Republic specializing in mobile development. She is a 7-time Microsoft MVP and actively builds mobile applications while sharing practical knowledge through technical articles and developer-focused content.
Through her work, she explains programming concepts, developer tools and real-world development practices to help developers grow in their careers.
You can follow her on Instagram and TikTok at @leomarisreyes.dev, read her articles on AskXammy, and connect with her on LinkedIn, where she shares tutorials, insights and resources for developers.