Microsoft Build Recap: Upgrading from Xamarin to .NET MAUI

Discover what you missed at Microsoft Build 2023 regarding the migration to .NET MAUI.
Since Microsoft Build 2023 has already occurred, it is important to stay informed of the latest news. This will help you learn about and implement new features in your applications.
This article provides an overview of Microsoft Build, with a focus on summarizing Maddy Montaquilla’s session titled “Upgrading Xamarin to .NET MAUI.” Together, we will develop step by step with Maddy’s plan for migration, so that you can start your own migration with ease!
First, let’s get a quick understanding of Microsoft Build and .NET MAUI.
What is Microsoft Build?
Microsoft Build is a great annual event created by Microsoft, where new tools and updates are presented, and we learn about services that developers can use now and in the future and other super valuable information for developers.
It took place on May 23, 24 and 25, 2023. You can explore the Microsoft Build portal here. Also, if you did not have the opportunity to attend, either virtually or in person, you can see all the recorded sessions about .NET accessing the .NET at Microsoft Build 2023 video playlist.
What is .NET MAUI?
Before starting the migration, Maddy, who is a Senior Product Manager at Microsoft, gave a brief overview of what .NET MAUI is. This is for people who are hearing of Xamarin or .NET MAUI for the first time.
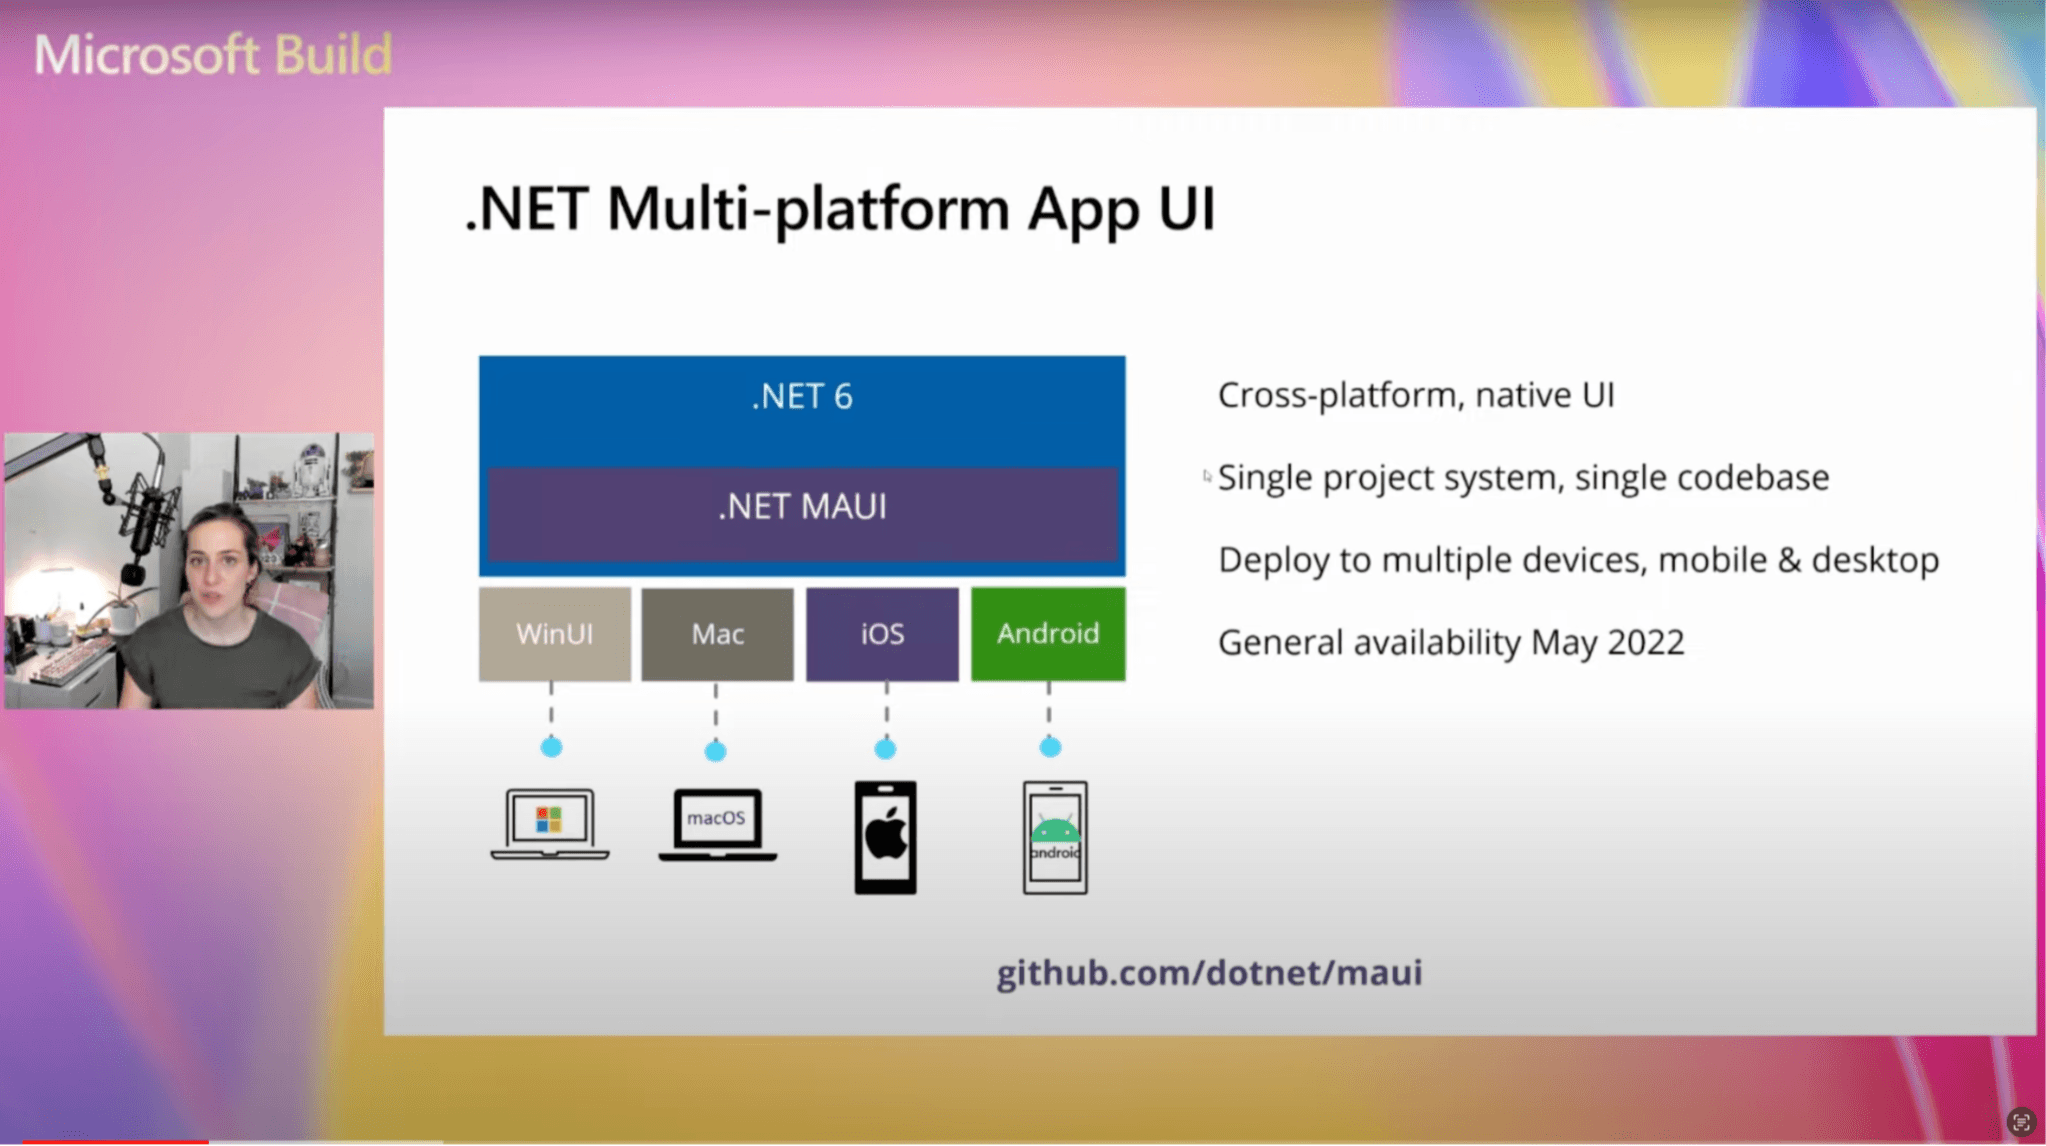
.NET Multi-platform App UI (.NET MAUI) is an evolution of Xamarin designed to be a cross-platform native UI. It features a single-project architecture that allows for a single codebase instead of separate ones for each platform. With this architecture, you can deploy to all the different platforms, including Windows and macOS, in addition to Android and iOS.
A great definition that Maddy gave us for .NET MAUI is:
“.NET MAUI is the most productive way to develop native apps that perform great on any device that runs Android, iOS, macOS or Windows from a single codebase.”
Upgrading Xamarin to .NET MAUI
In this session, Maddy gives us some tips and tricks to keep in mind before migrating our applications made in Xamarin. She also teaches us to use the Upgrade Assistant tool available in Visual Studio to finally migrate from Xamarin to .NET MAUI.
Why Should You Upgrade?
To get into real situations, you may find yourself in one of these two scenarios: you have a stable Xamarin app that does not require updates, or you have an app that needs to receive updates. Let’s explore how to handle both of these scenarios:
➖ You have a stable Xamarin app that does not require updates: If you are not planning to add updates to your app, you do not have to take any additional steps immediately. However, at some point, the app may stop being compatible with iOS or Android, and you will need to compile it on the latest operating systems, requiring a migration. It may be a long time before this becomes a problem, but it is still important to be aware of it.
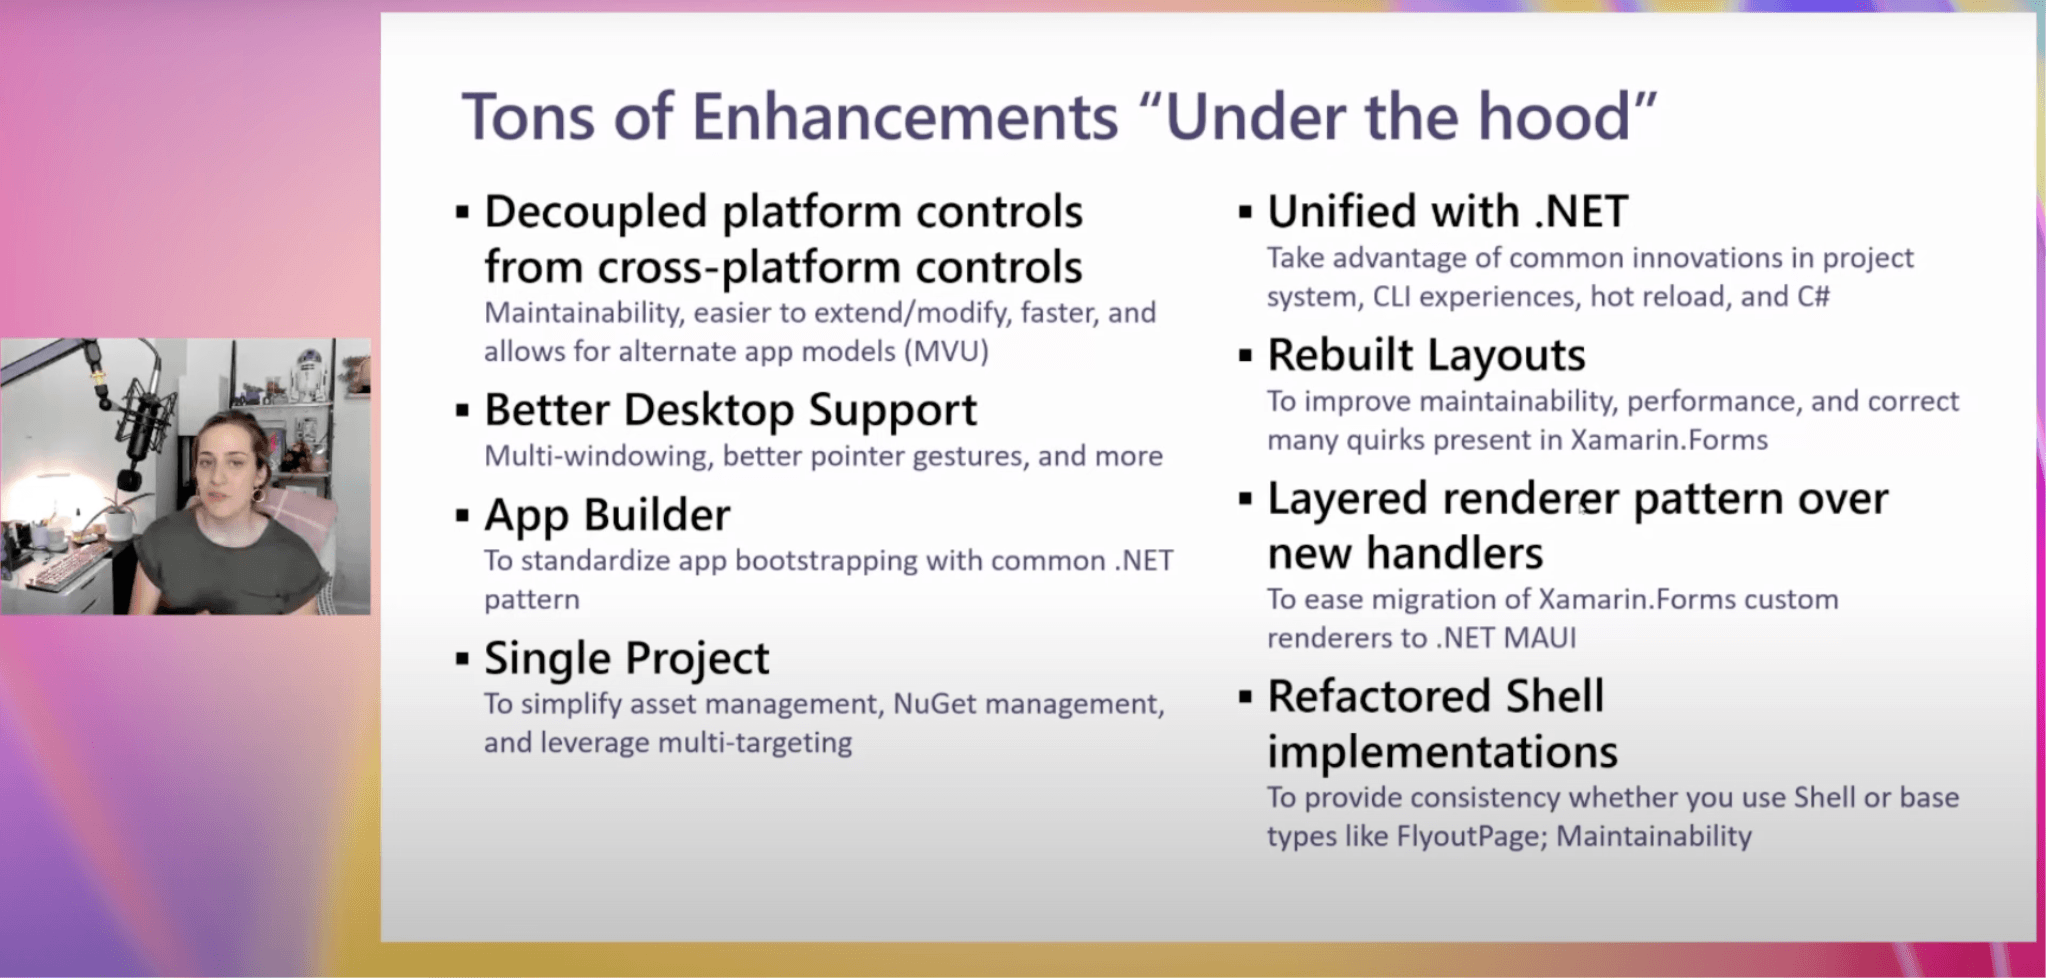
➖ You have an app that needs to receive updates: Migrating to .NET MAUI will help your project benefit from the features of the new framework. For example, the one that stands out the most is the improvement in performance, and a lot of that comes from decoupling the platform controls with cross-platform controls. This means that instead of every function being tightly coupled to platform-specific controls (like Android buttons, iOS buttons or Windows buttons), we can use the more flexible .NET MAUI controls (assigning one button control).
There is also better support for desktop applications, with many super cool features such as multi-window, pointer, click and gestures.
In addition to the improvements mentioned above, there are many others, as shown in the image below:
Progress on Performance
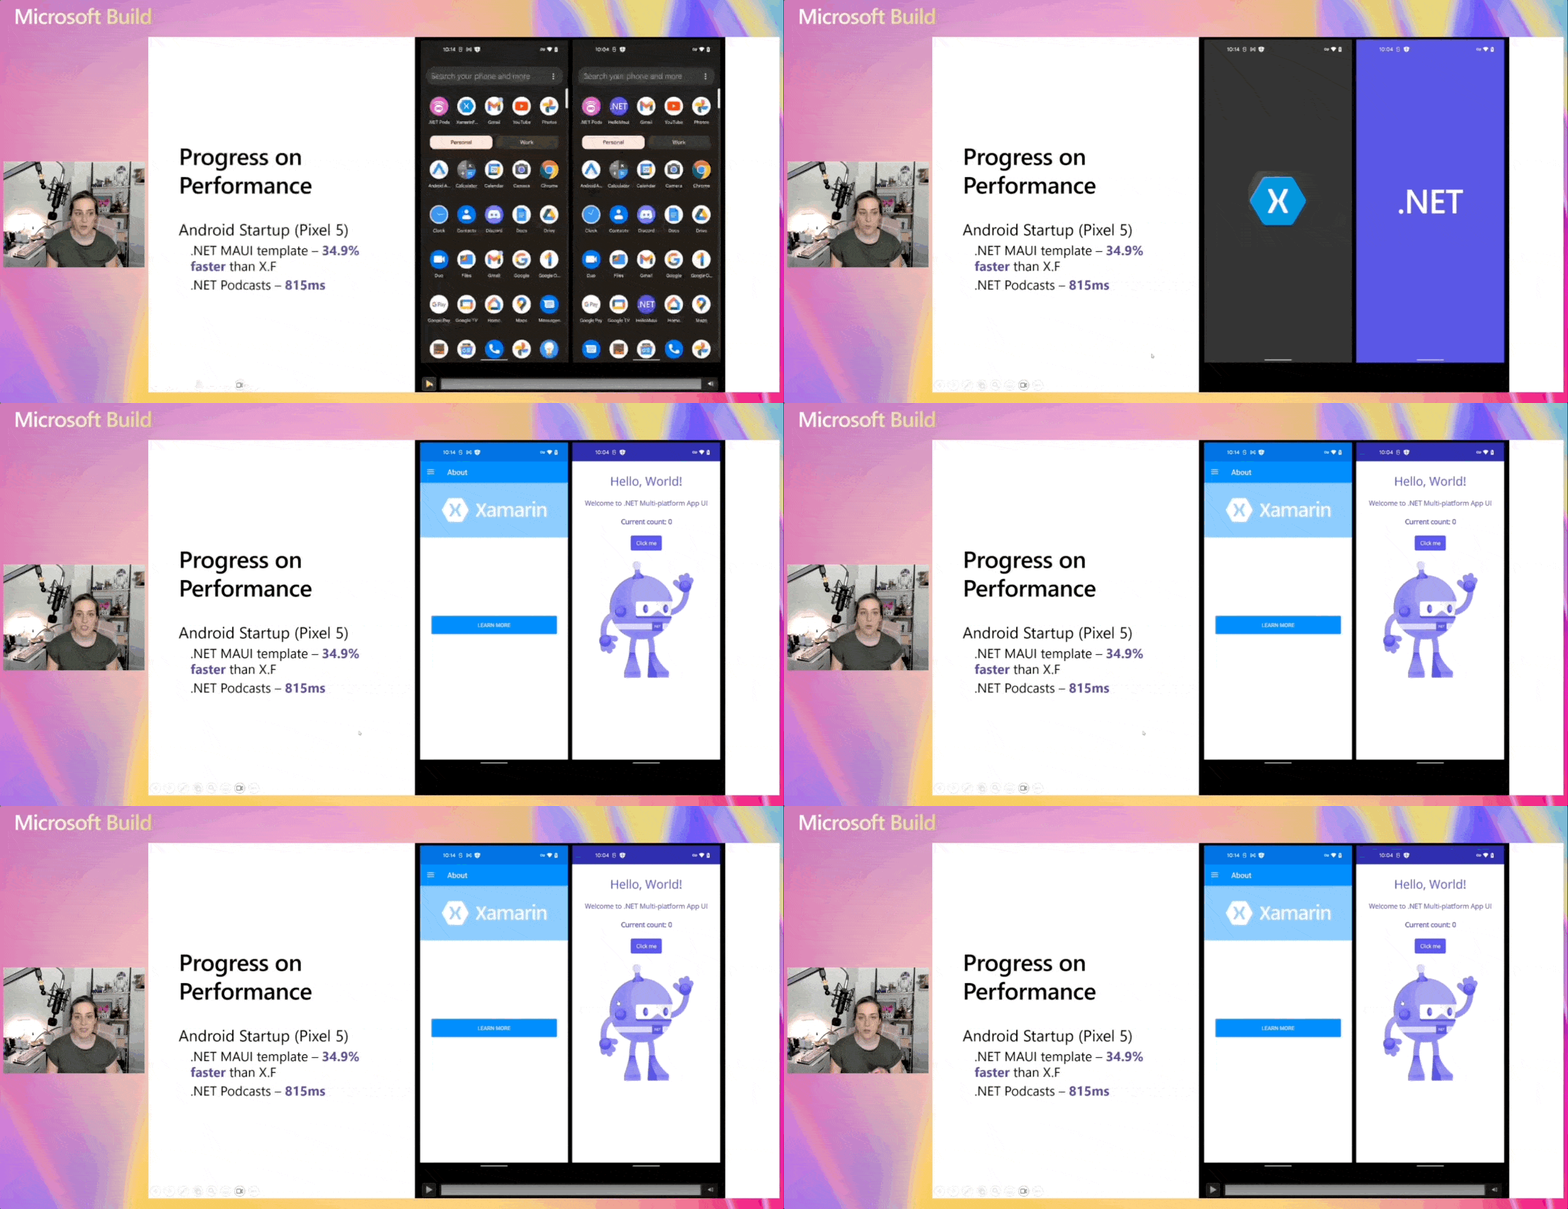
We can see big changes in startup time between MAUI and Xamarin. Maddy shows us an example in which these great changes can be perceived. It’s almost 35% faster on startup, which is pretty significant. In a heavy real-world application, the startup time is still estimated to be less than a second, which is an amazing startup time.
Frequently Asked Questions
Maddy made a summary of the most common questions in this transition, which are the following:
- Do I need to rewrite my apps? No! You can make the migration with your existing code, using the tools that you will see below.
- What happens to Xamarin.Android and Xamarin.iOS? If you wrote something that doesn’t use Xamarin Forms, then you might not want a cross-platform UI with MAUI. That’s okay. We have .NET for Android and .NET for iOS. .NET can target those platforms. So, those things will upgrade and work perfectly fine.
- When do I start trying to upgrade? Get up to date and start evaluating now. The Xamarin end of life is May 2024, which is a year out from Microsoft Build 2023.
Tips and Tricks
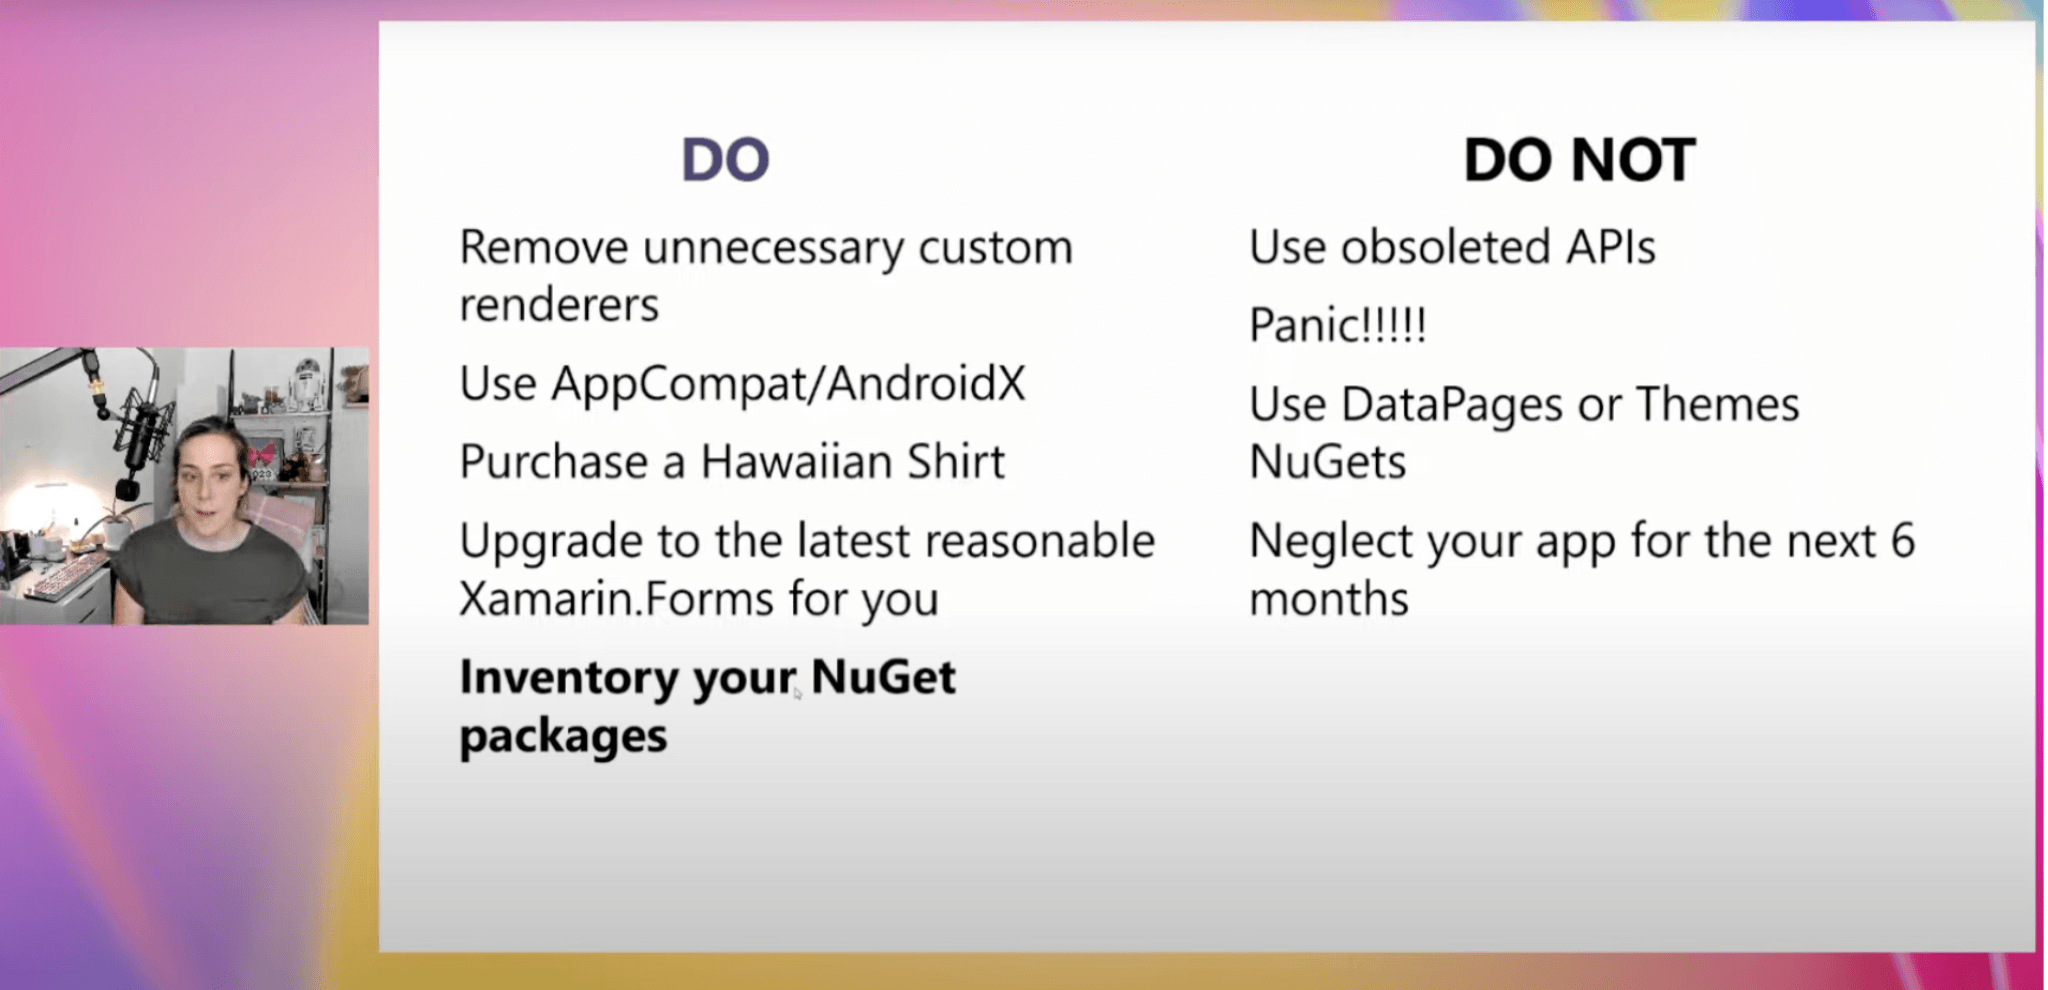
The most important things for you to do are to get rid of anything unnecessary. There are a lot of new controls and properties in both Xamarin and MAUI, so some of the custom renderers you wrote back in the day might not even be needed anymore.
Also, take inventory of your NuGet packages. If there are packages that you really depend on, that are core to your app, you should check if they have a MAUI-compatible version. You should also check if they will need to be recompiled for MAUI. If there are alternatives, you can switch them out.
In the image below, you can see in more detail other tips and tricks that Maddy shared with us:
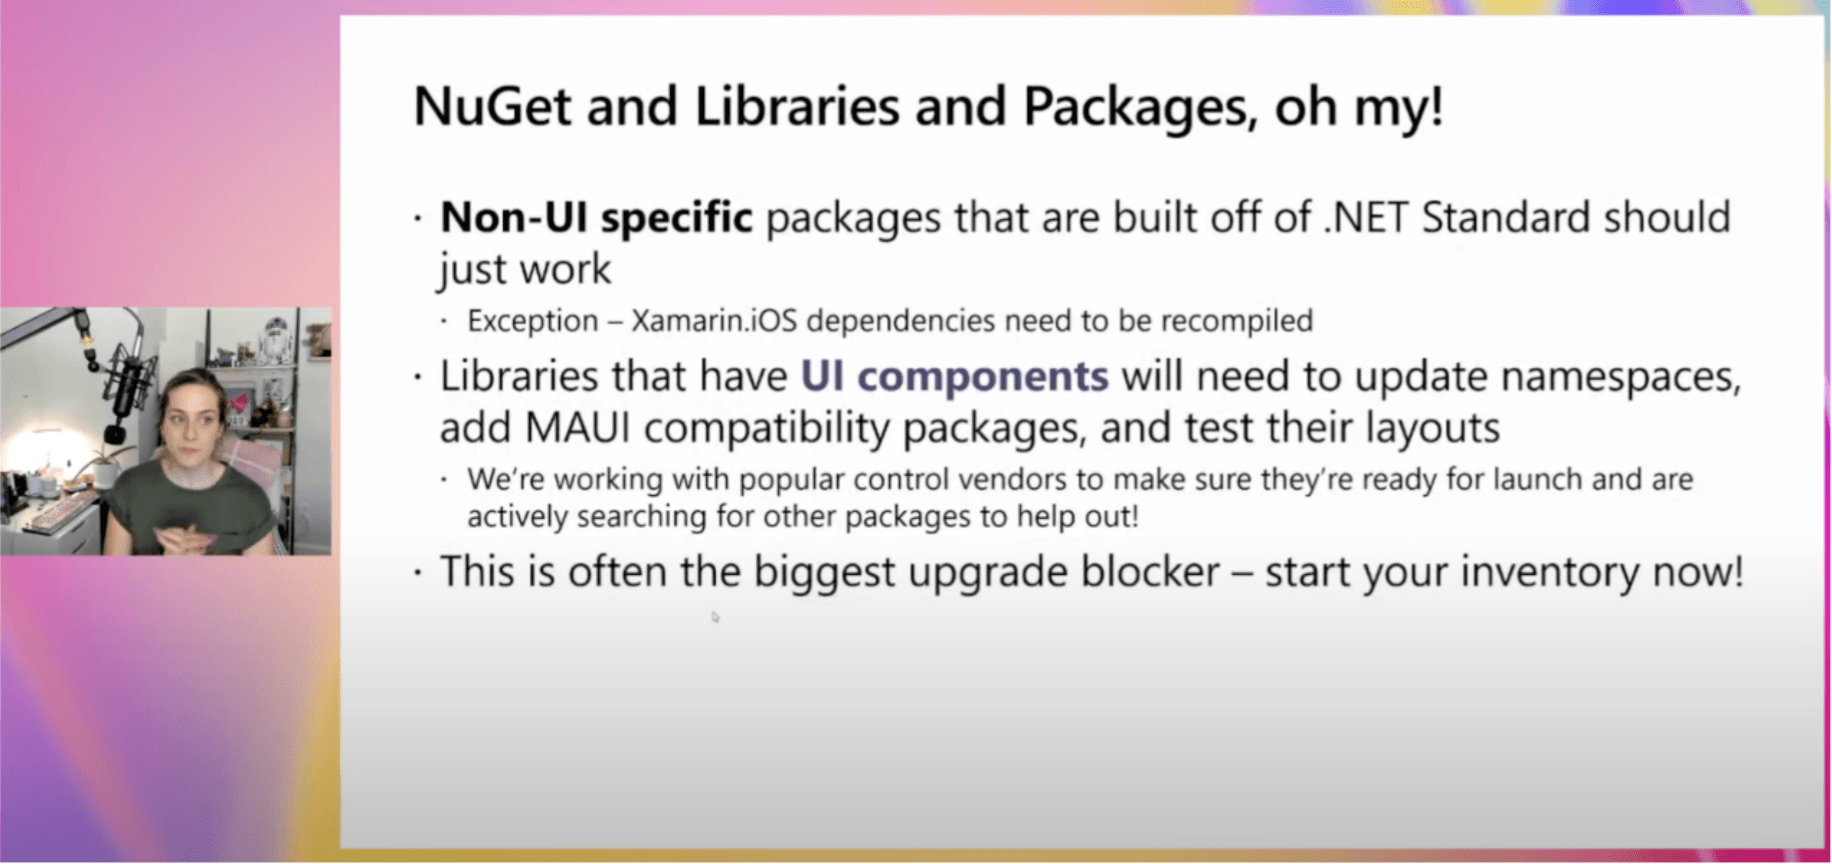
And here’s a little bit more about NuGet, libraries and packages:
Let’s See the Demo
Visual Studio Upgrade Assistant
This Visual Studio Upgrade Assistant allows you to migrate your Xamarin applications to .NET MAUI. This supports Windows and iOS migrations.
To help you learn how to use this demo, we will use an example Xamarin Forms application. Your app may have different features, and that’s OK. This is just a general guide to assist you with the migration process.
Availability
- Windows: We have the Upgrade Assistant as a Visual Studio extension. (We will focus on this explanation.)
- Mac: Although it is not currently available in Visual Studio for Mac, you can still use an existing version for the command line. The source code is available on GitHub, so feel free to download it and follow the instructions provided. 🔗 You can take a look at the repository here.
Let’s Start Using the Upgrade Assistant
Step 1: Add the Upgrade Assistant extension.
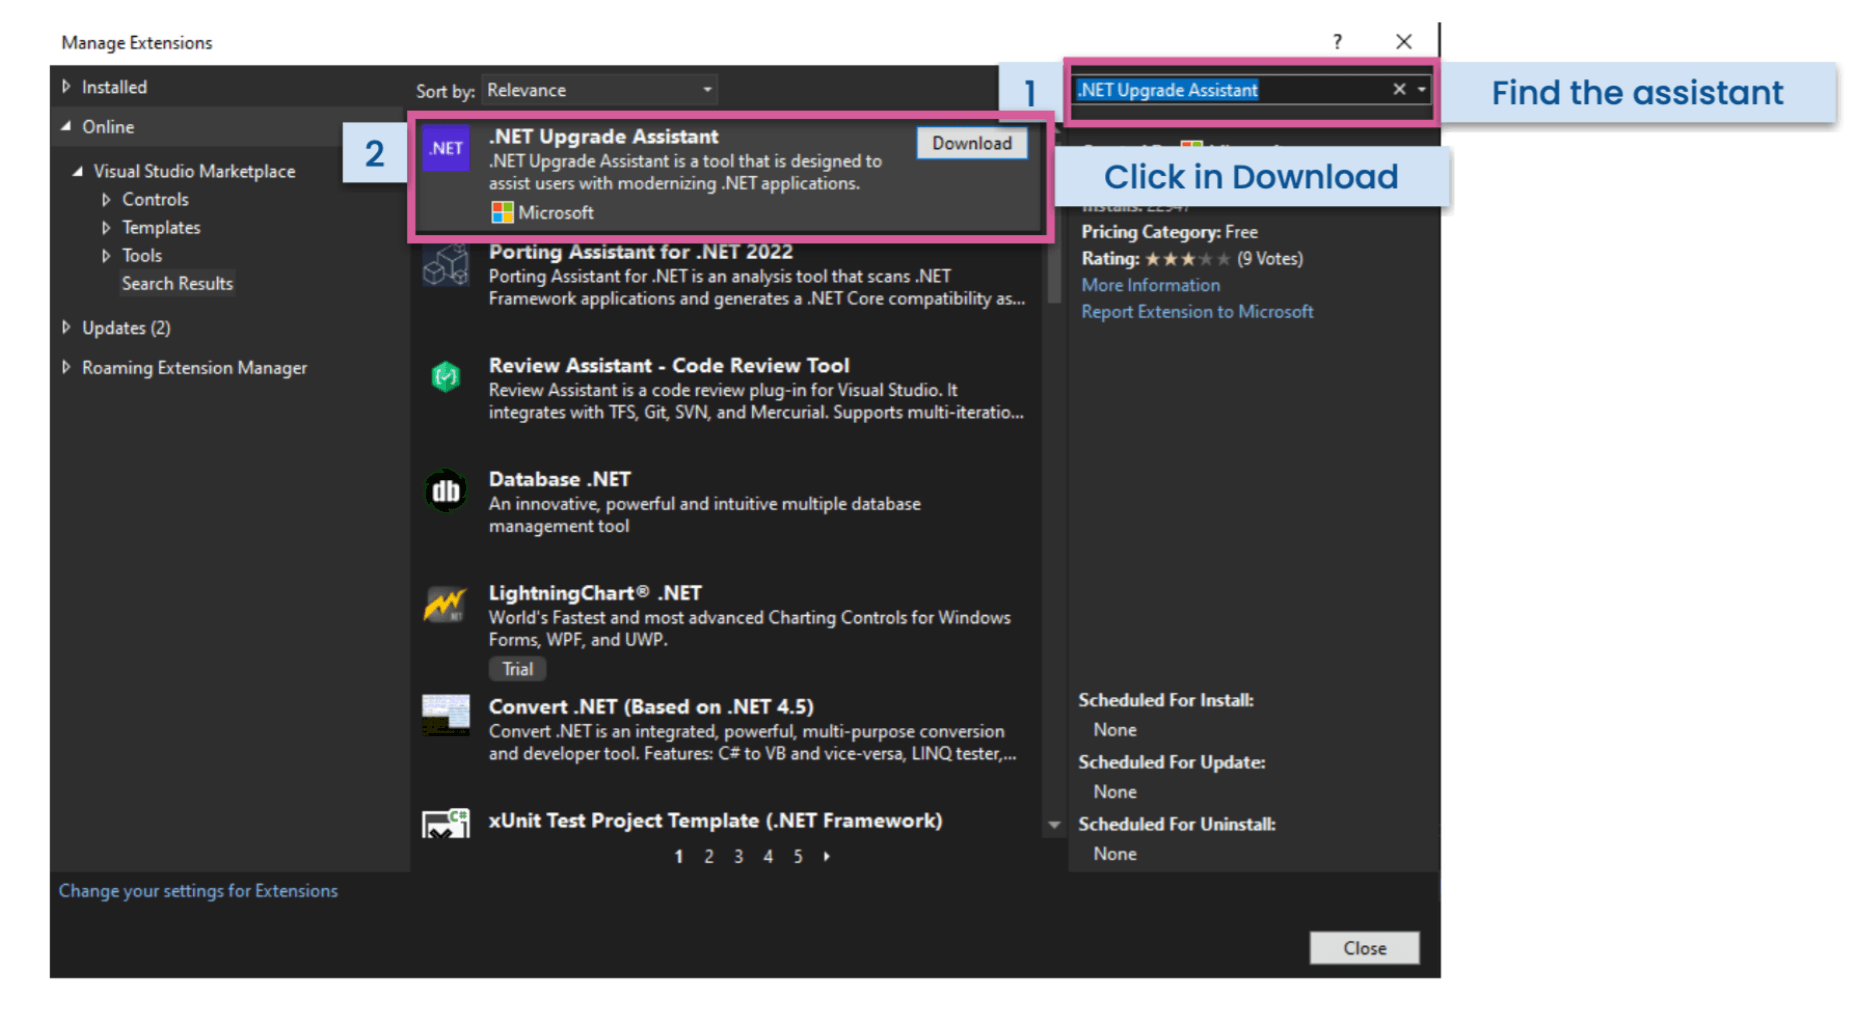
It’s a separate extension, so you can add it in Visual Studio like this:
- Go to the top menu bar, click on Extensions ➡ Manage extension.
- Download the extension: Find the .NET Upgrade Assistant and download it.
When you start the download you will see a scenario like the one in the following image:
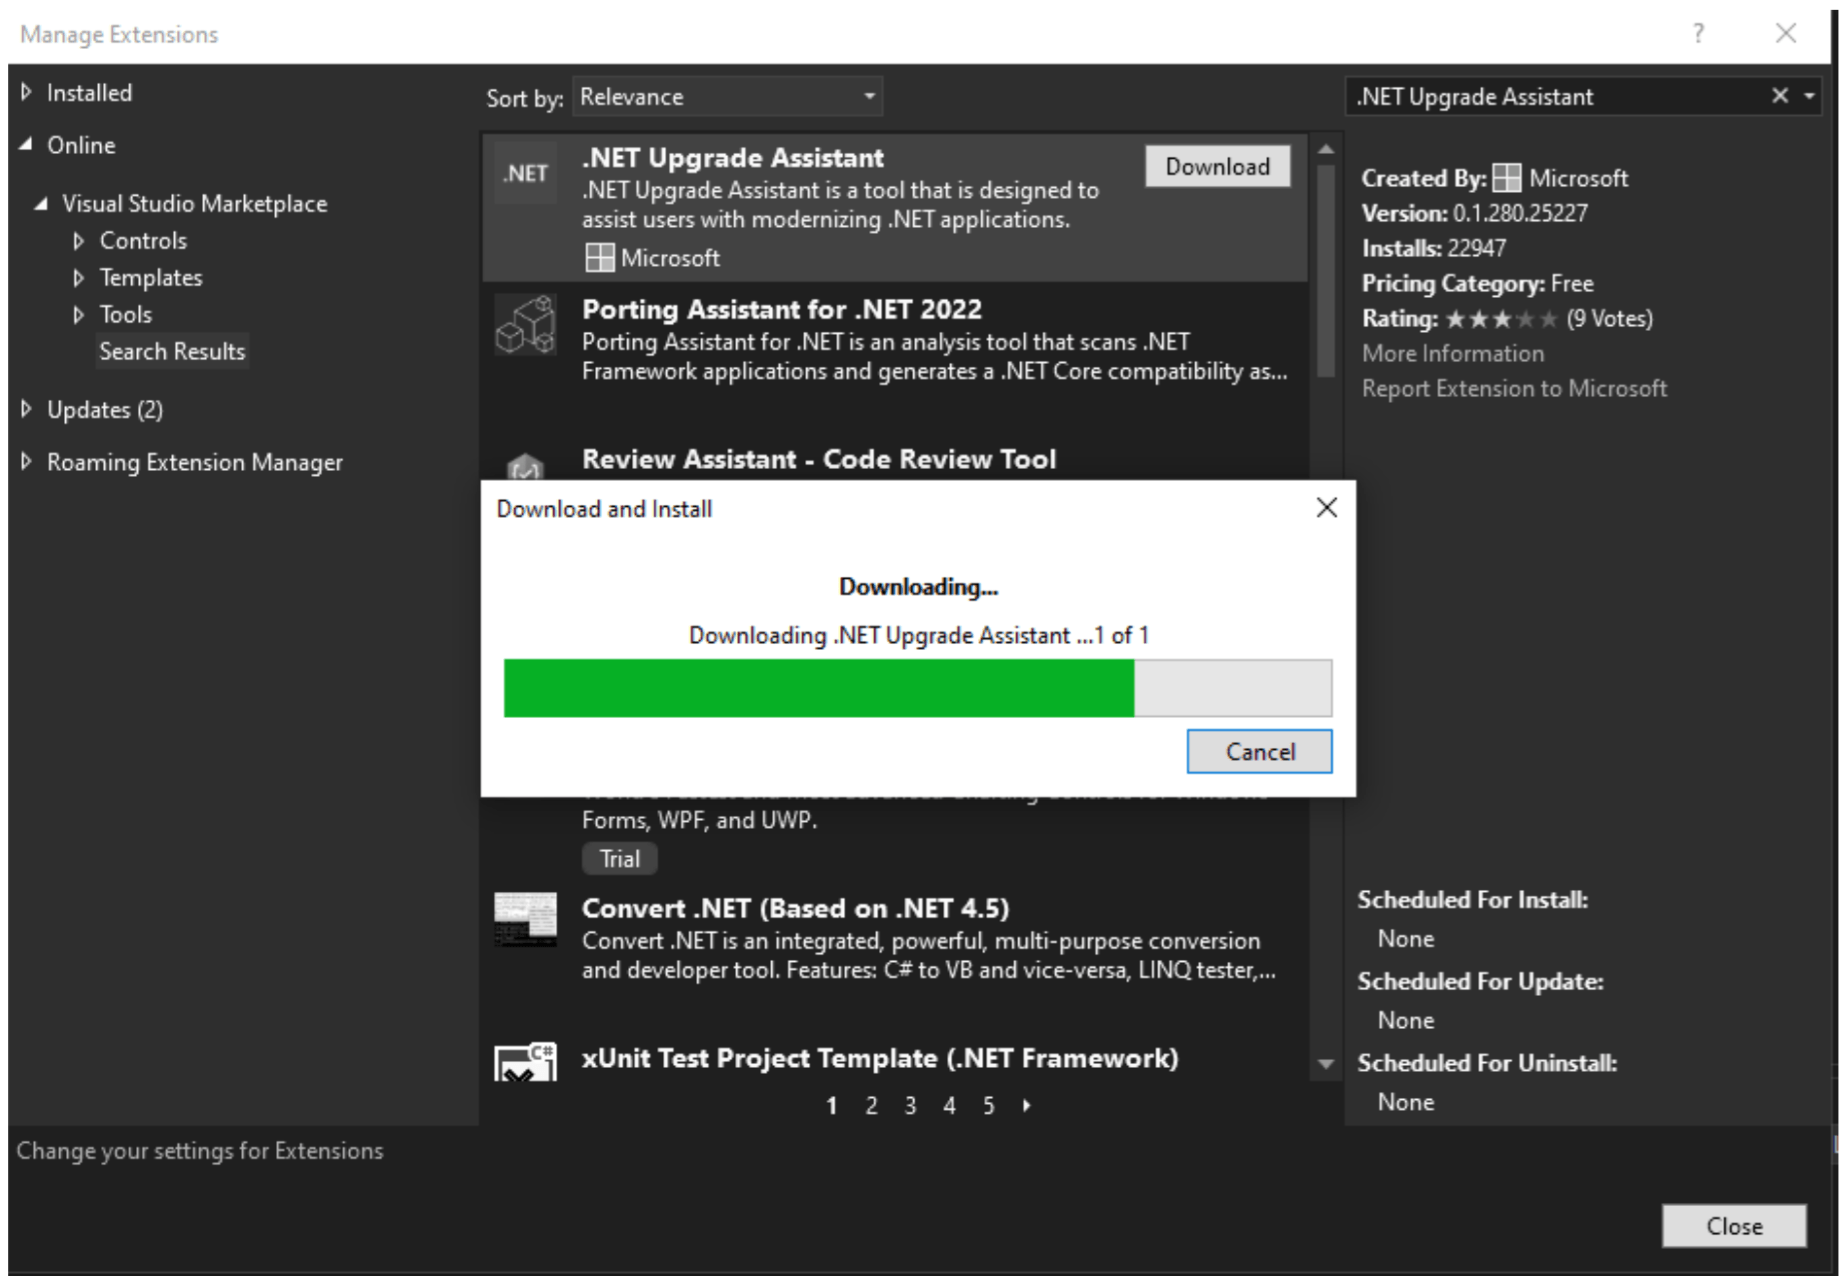
Once installed, you will see a message that says: “Your changes will be scheduled. The modifications will begin when all Microsoft Visual Studio windows are closed.” ⚠ This is why you should close and start your Visual Studio again.
Step 2: How to use the assistant?
To use the Upgrade Assistant, you just have to right-click on your project, and an option that says “Upgrade” will appear. Please click it.
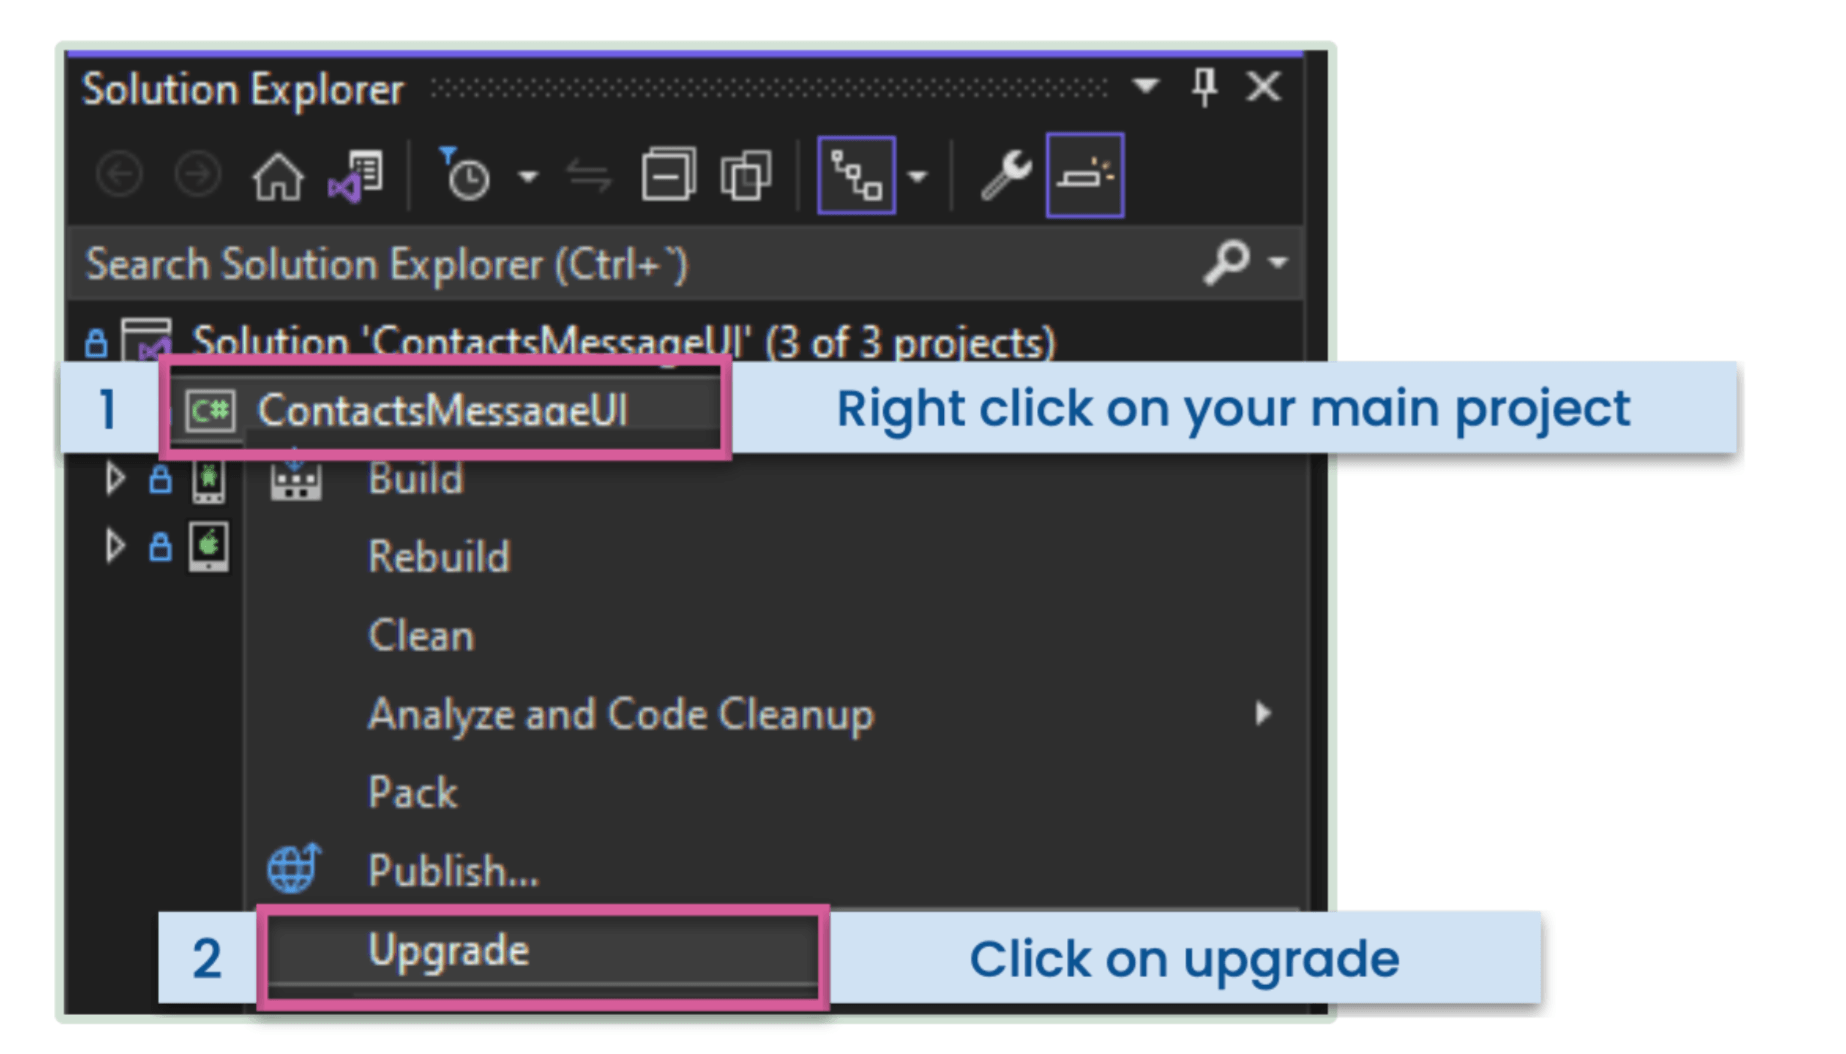
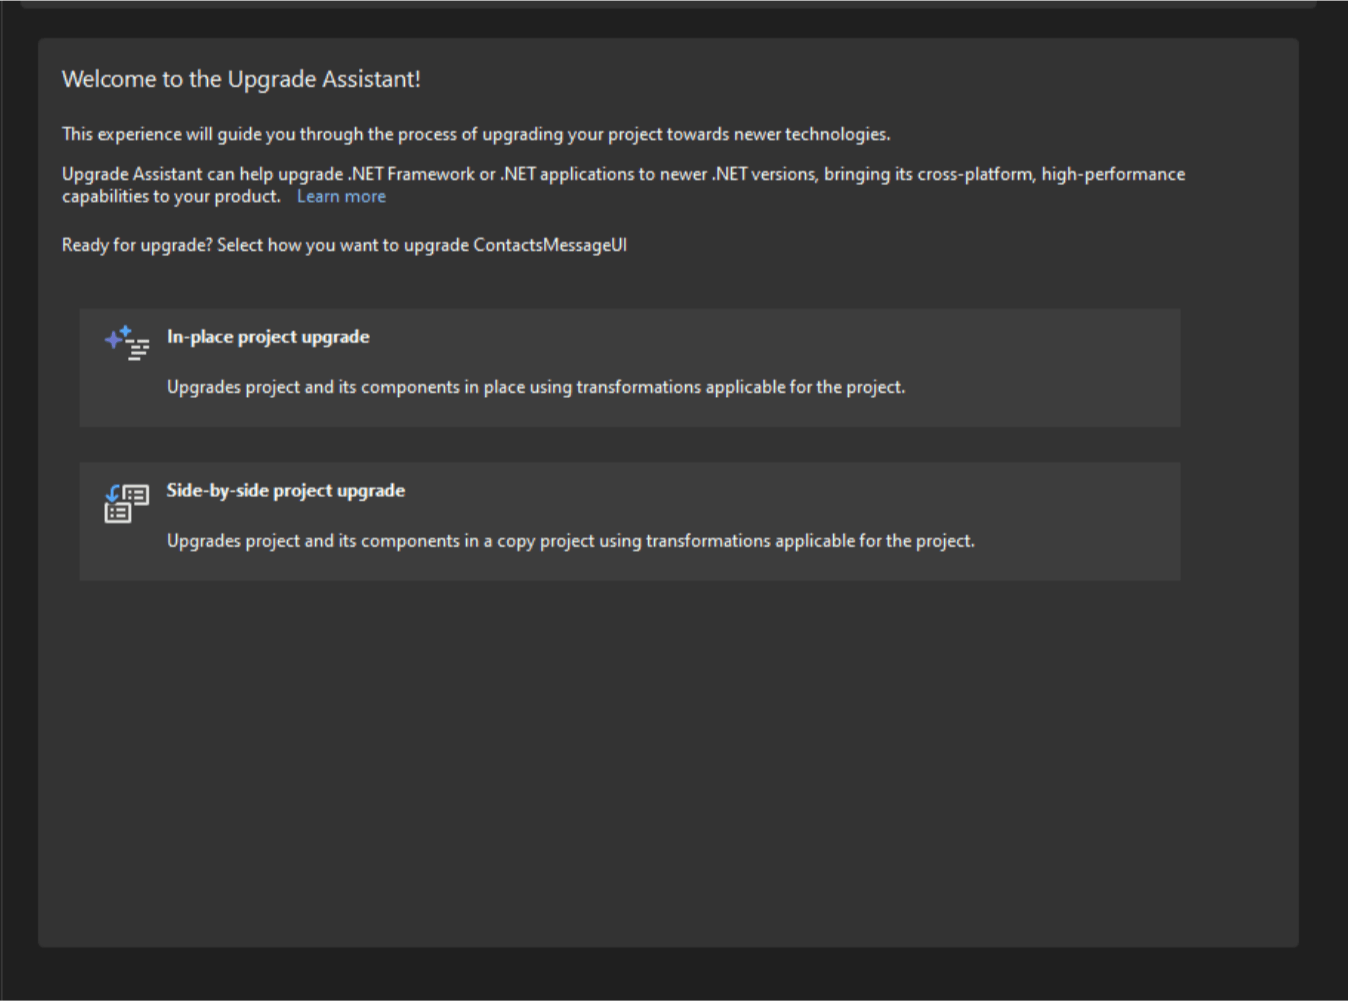
You will see a user interface like this:
As you can see, we have two migration options available:
- In-place project upgrade: In order to upgrade the project and its components, apply transformations that are suitable for the project while keeping everything in place. If you want to keep the main project, this option is recommended.
- Side-by-side project up: Utilize transformations that are relevant to the project to upgrade the project and its components in a copy.
There are different ways to do the migration. In this case, we will start by migrating the Android and iOS projects and then the main project. Let’s start by right-clicking on Android to start the migration.
The demonstration will be using the “In-place” option, so you must click on that option. An interface, like the one pictured below, will appear, asking you for your preferred target framework for the migration. I will click on .NET 7 and then click on “Next.”
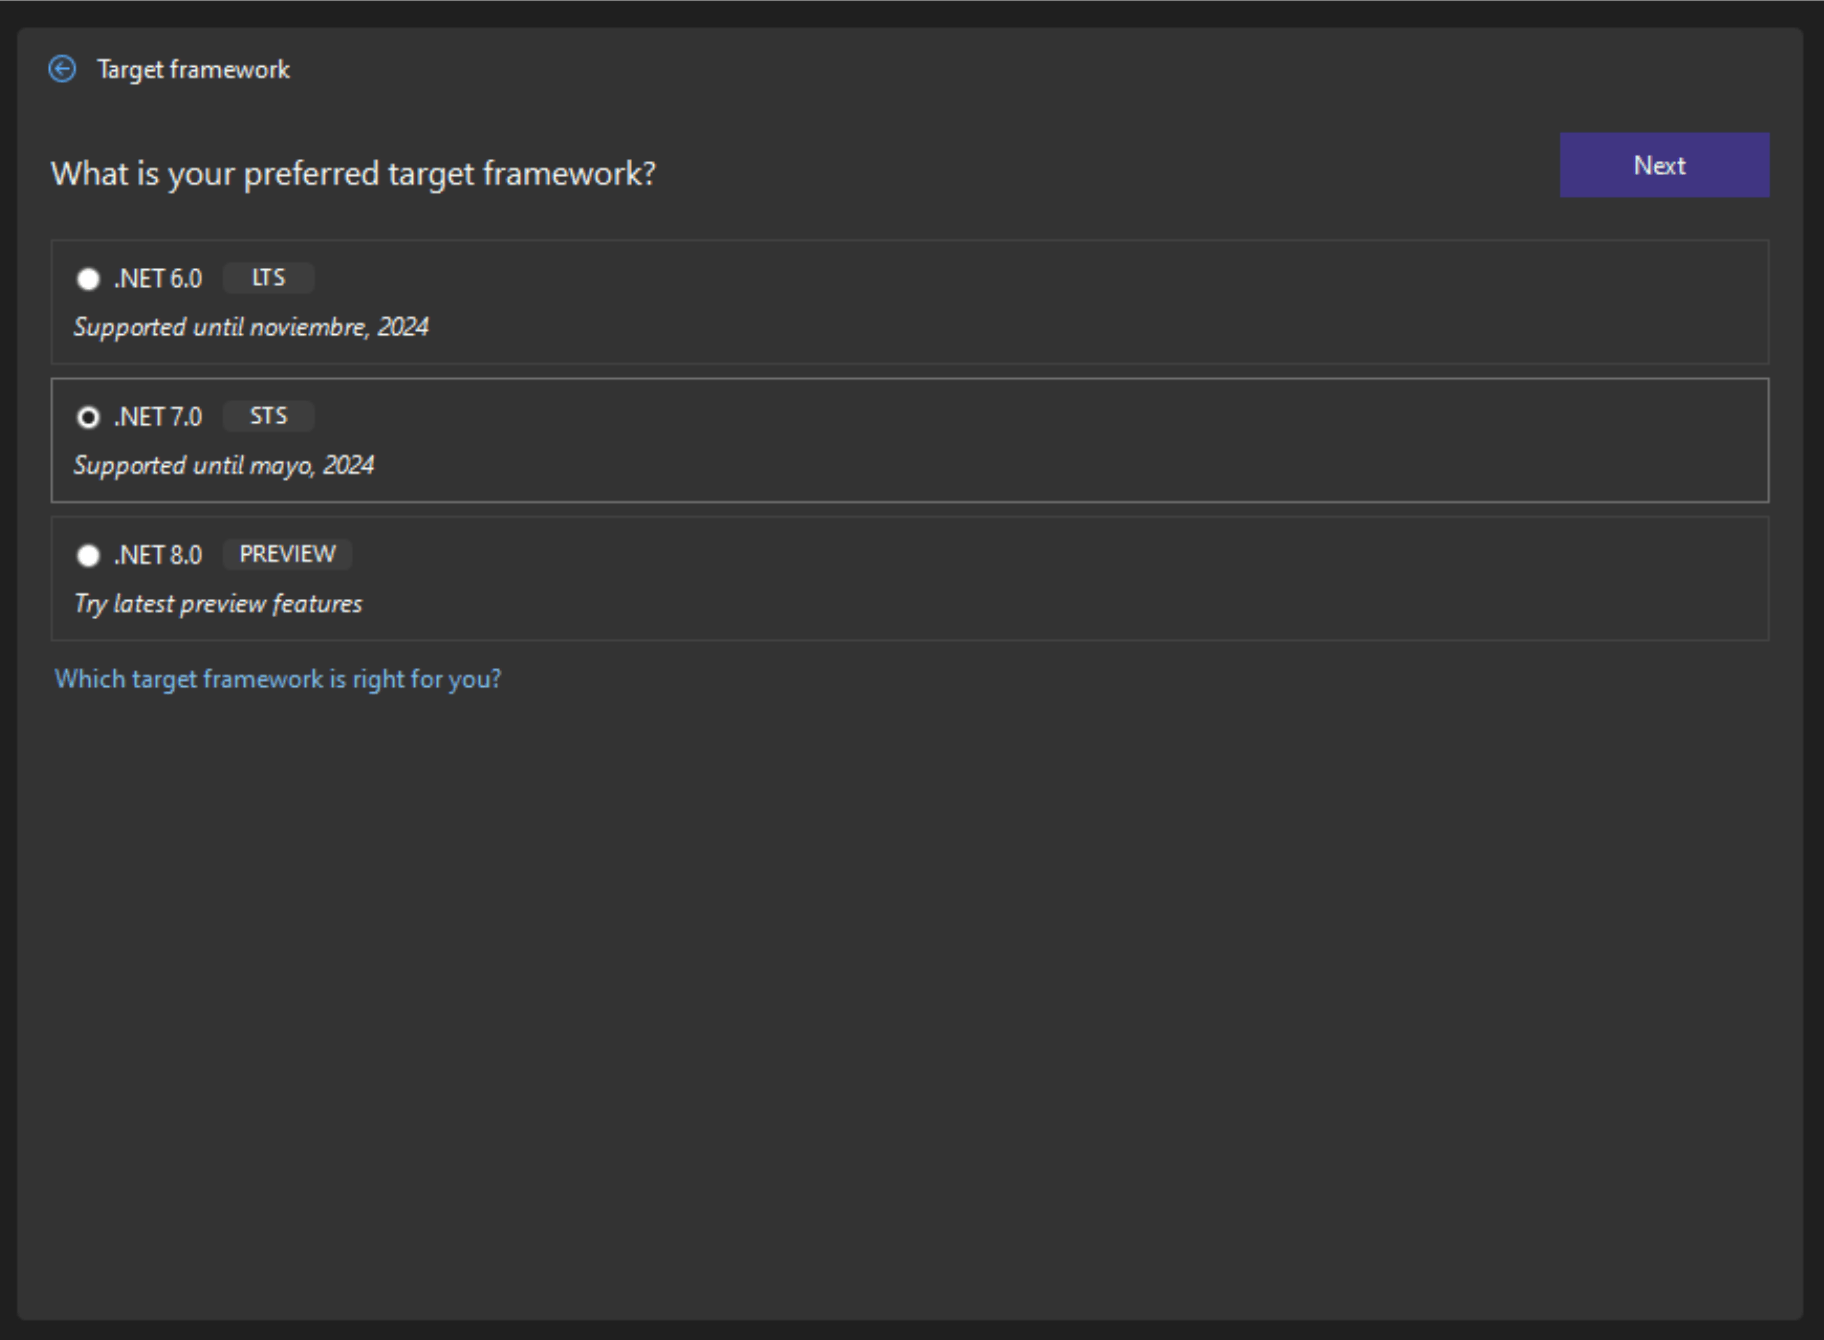
Once you have clicked “Next,” you will be able to select the individual components that you wish to update (if necessary). Then, click on “Upgrade selection.”
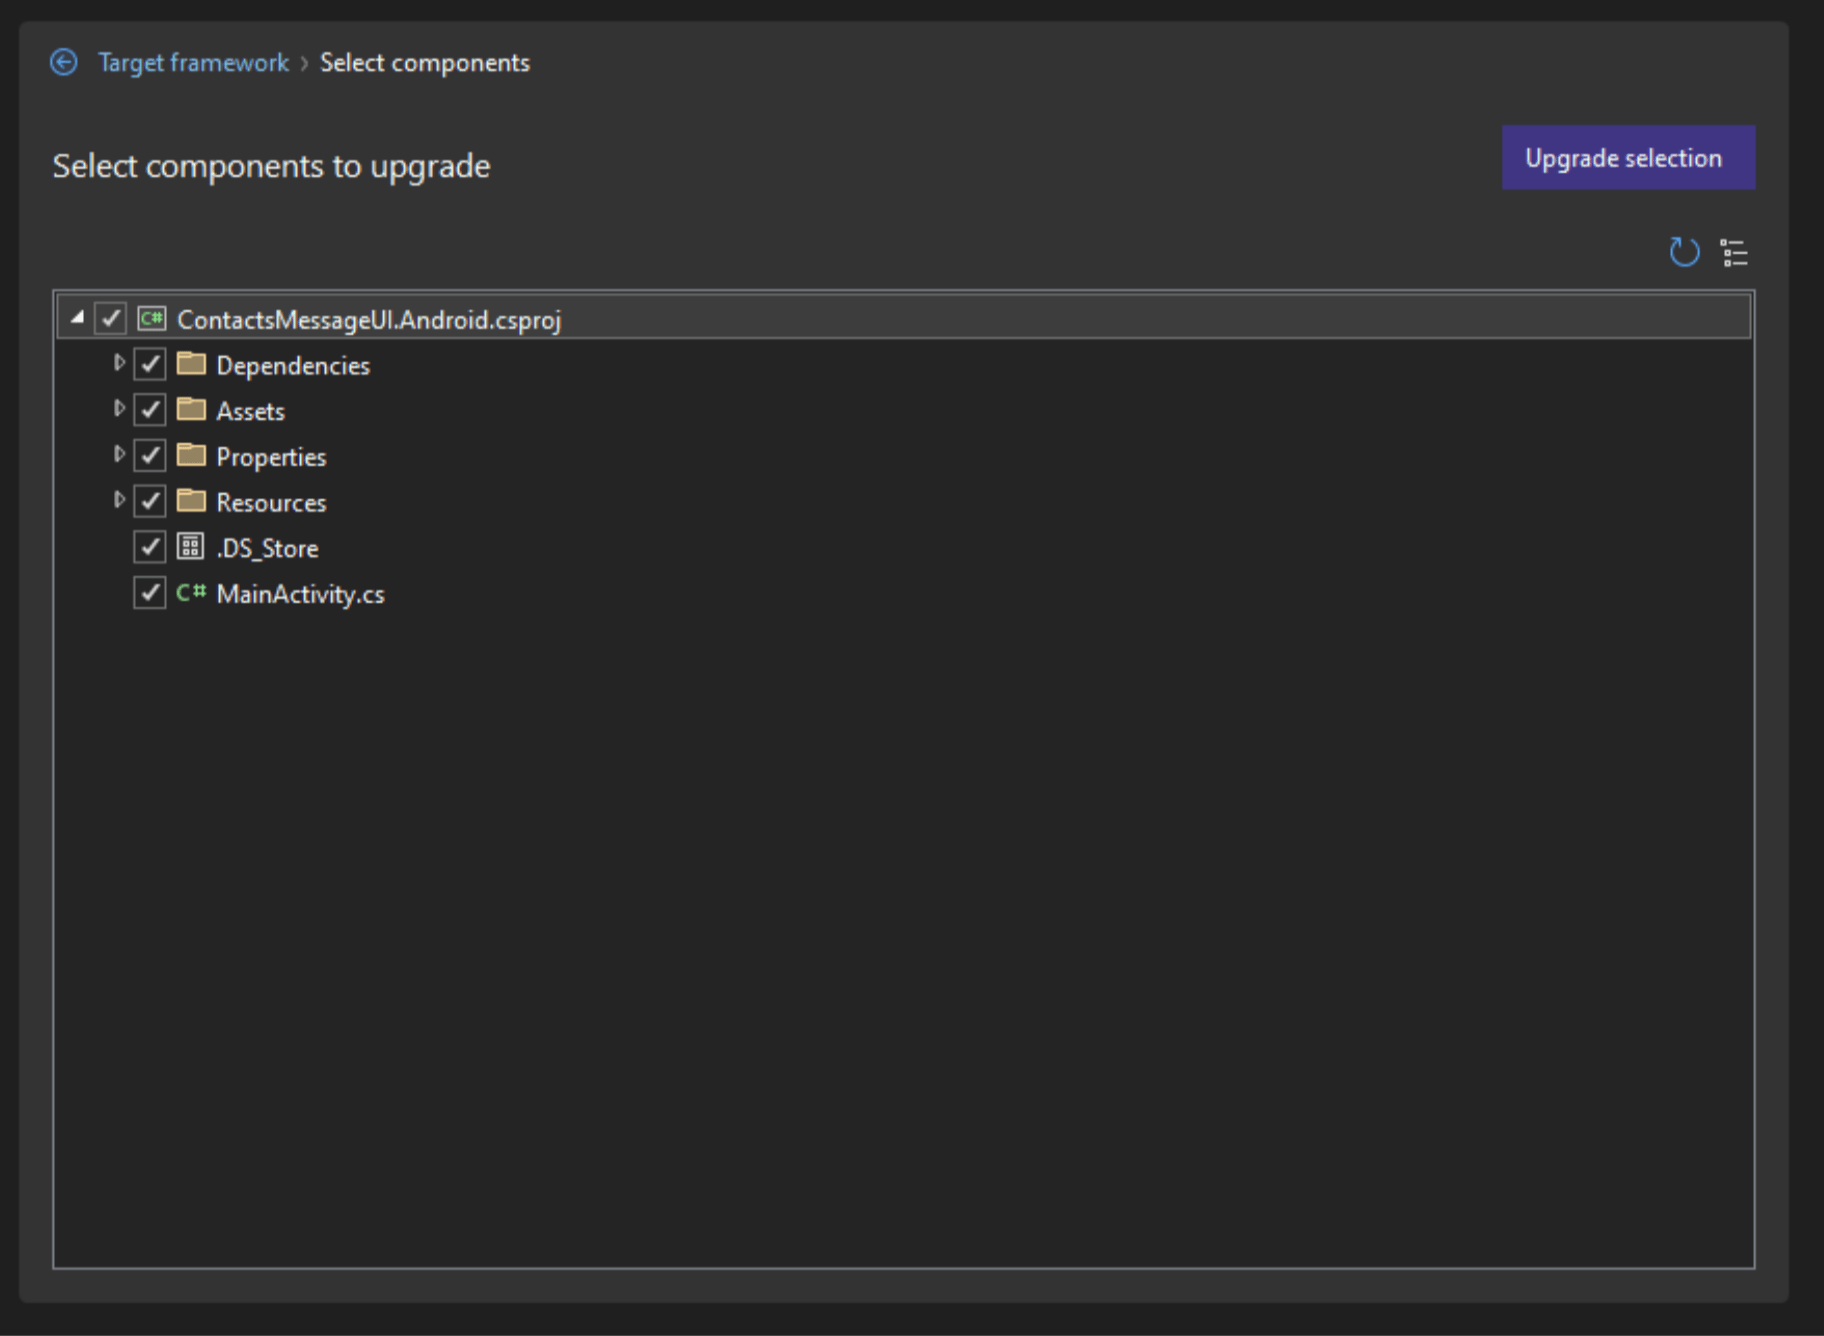
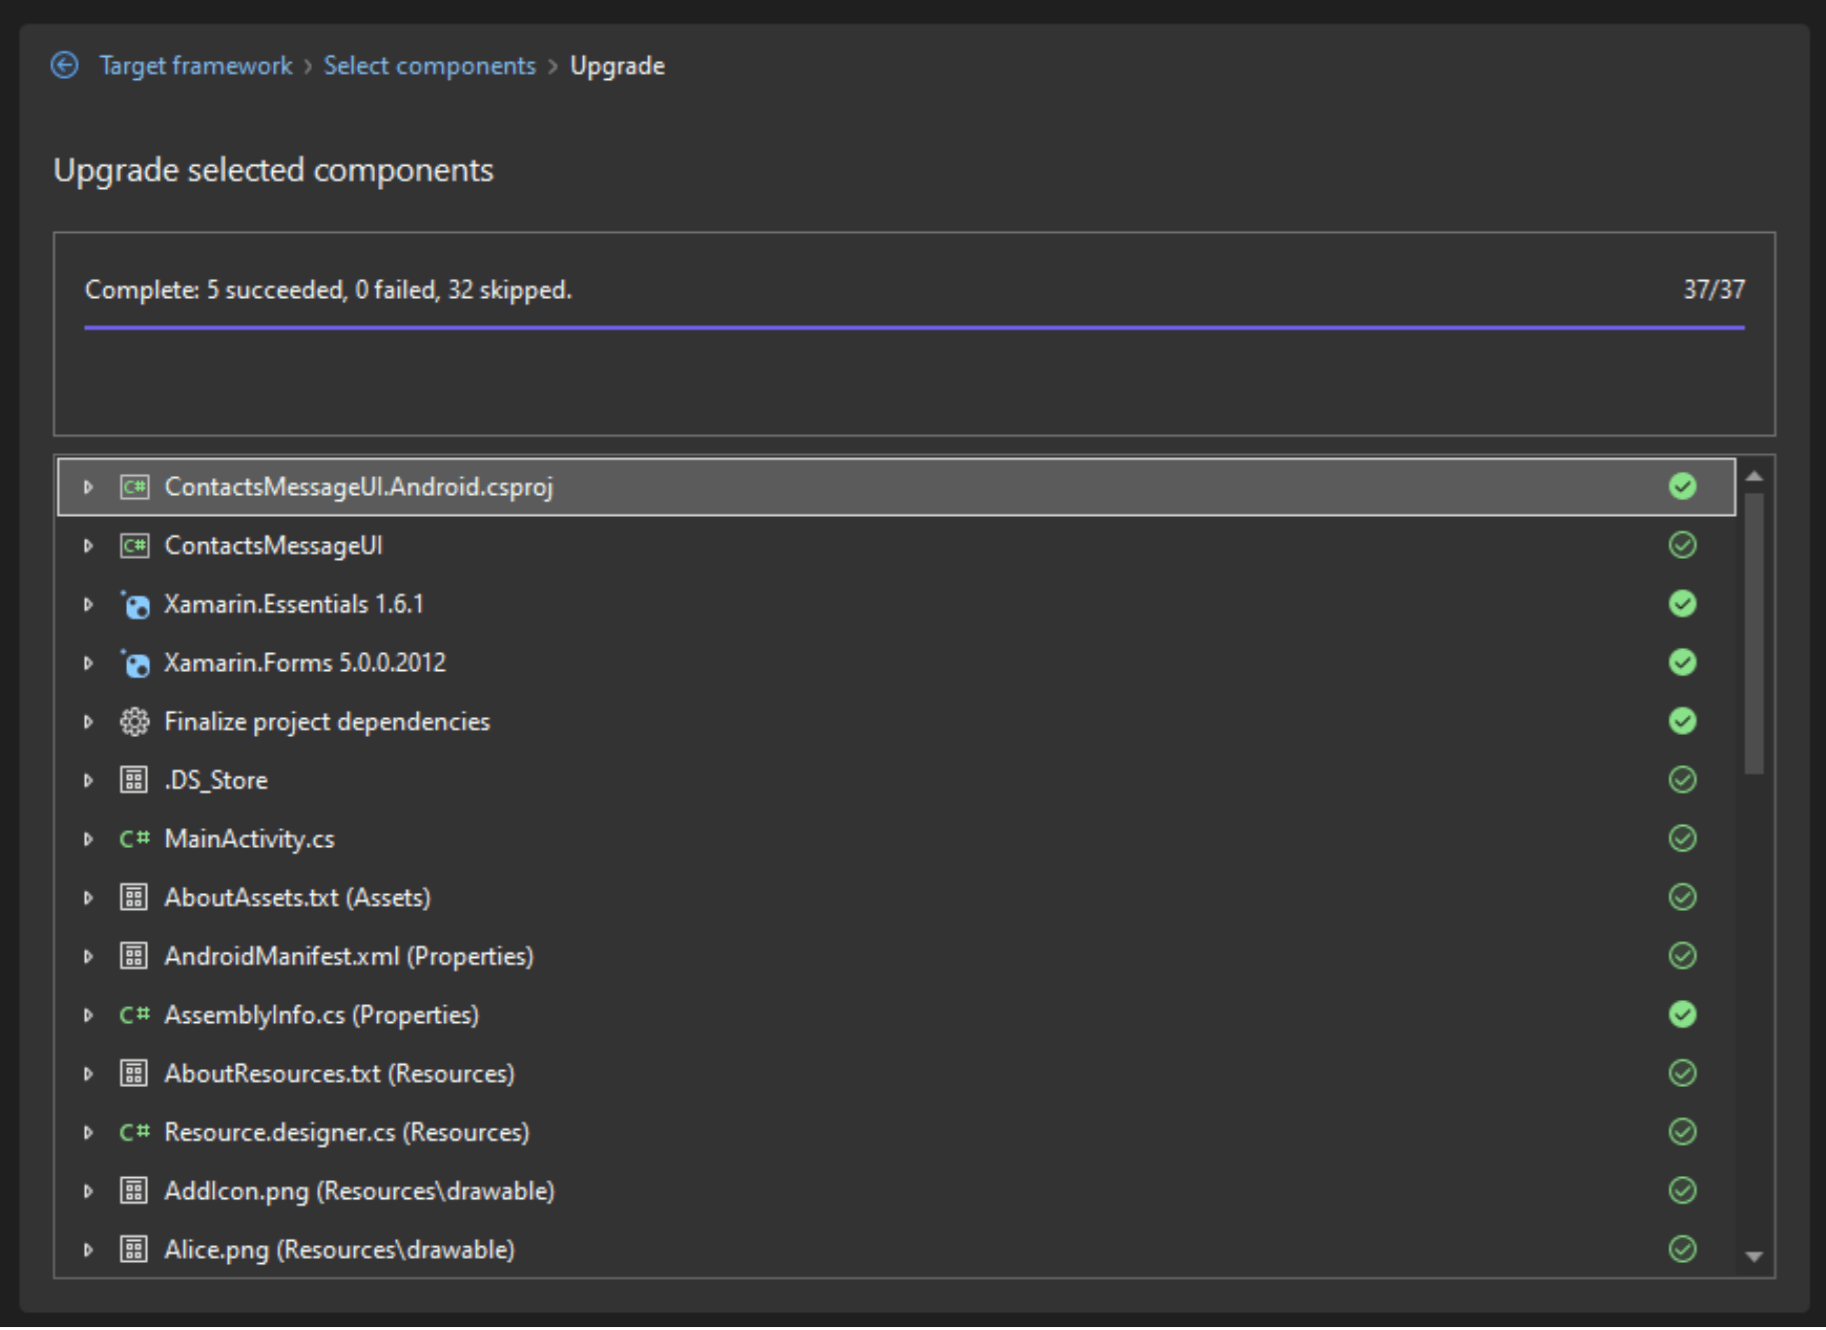
While it is updating, you will see the updates presented to you in the bottom bar. Every time changes are made to the project, it will download and reload things in the solution explorer, which is why you will see it blink.
At the end of the whole process, everything that was updated is shown, along with the things that it verified did not need to be updated—as you can see in the image attached below.
After this, you can continue with the iOS application with the same process.
To finish, let’s continue with the Xamarin Forms application (the main one). Repeat the same process: Right-click and then Upgrade.
You will see the same options we saw previously: “In-place” and “Side-by-side.” Now you need to decide where you want your updated project to be placed. It can either be in the same location or side-by-side, which allows you to move everything to a new .NET MAUI project. This is probably one of the best ways to accomplish it. So, for this example, you should choose the side-by-side option.
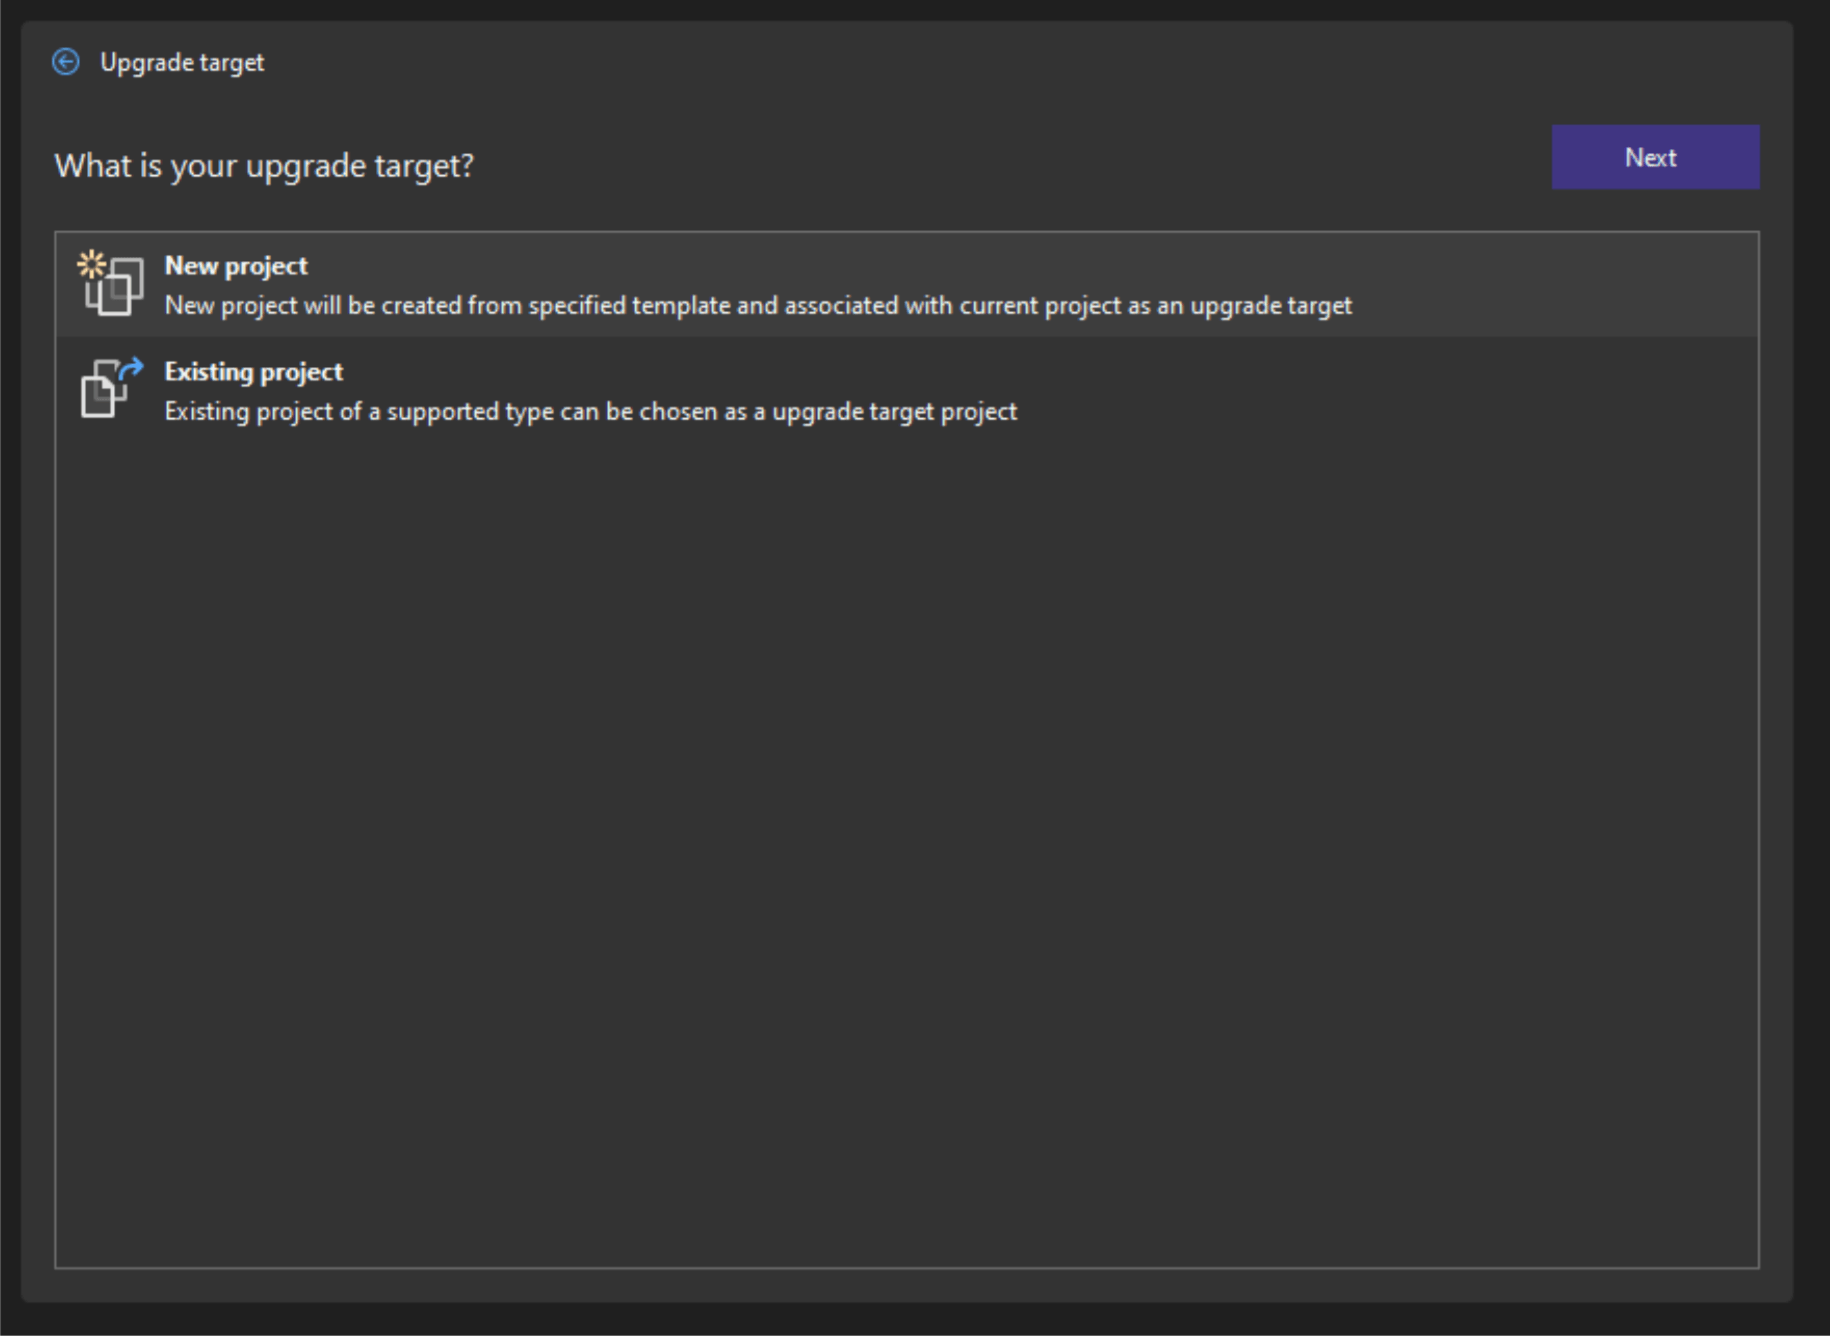
Next, two options will appear:
- New project: A new project will be created from specified template and associated with current project as an upgrade target.
- Existing project: An existing project of a supported type can be chosen as an upgrade target project.
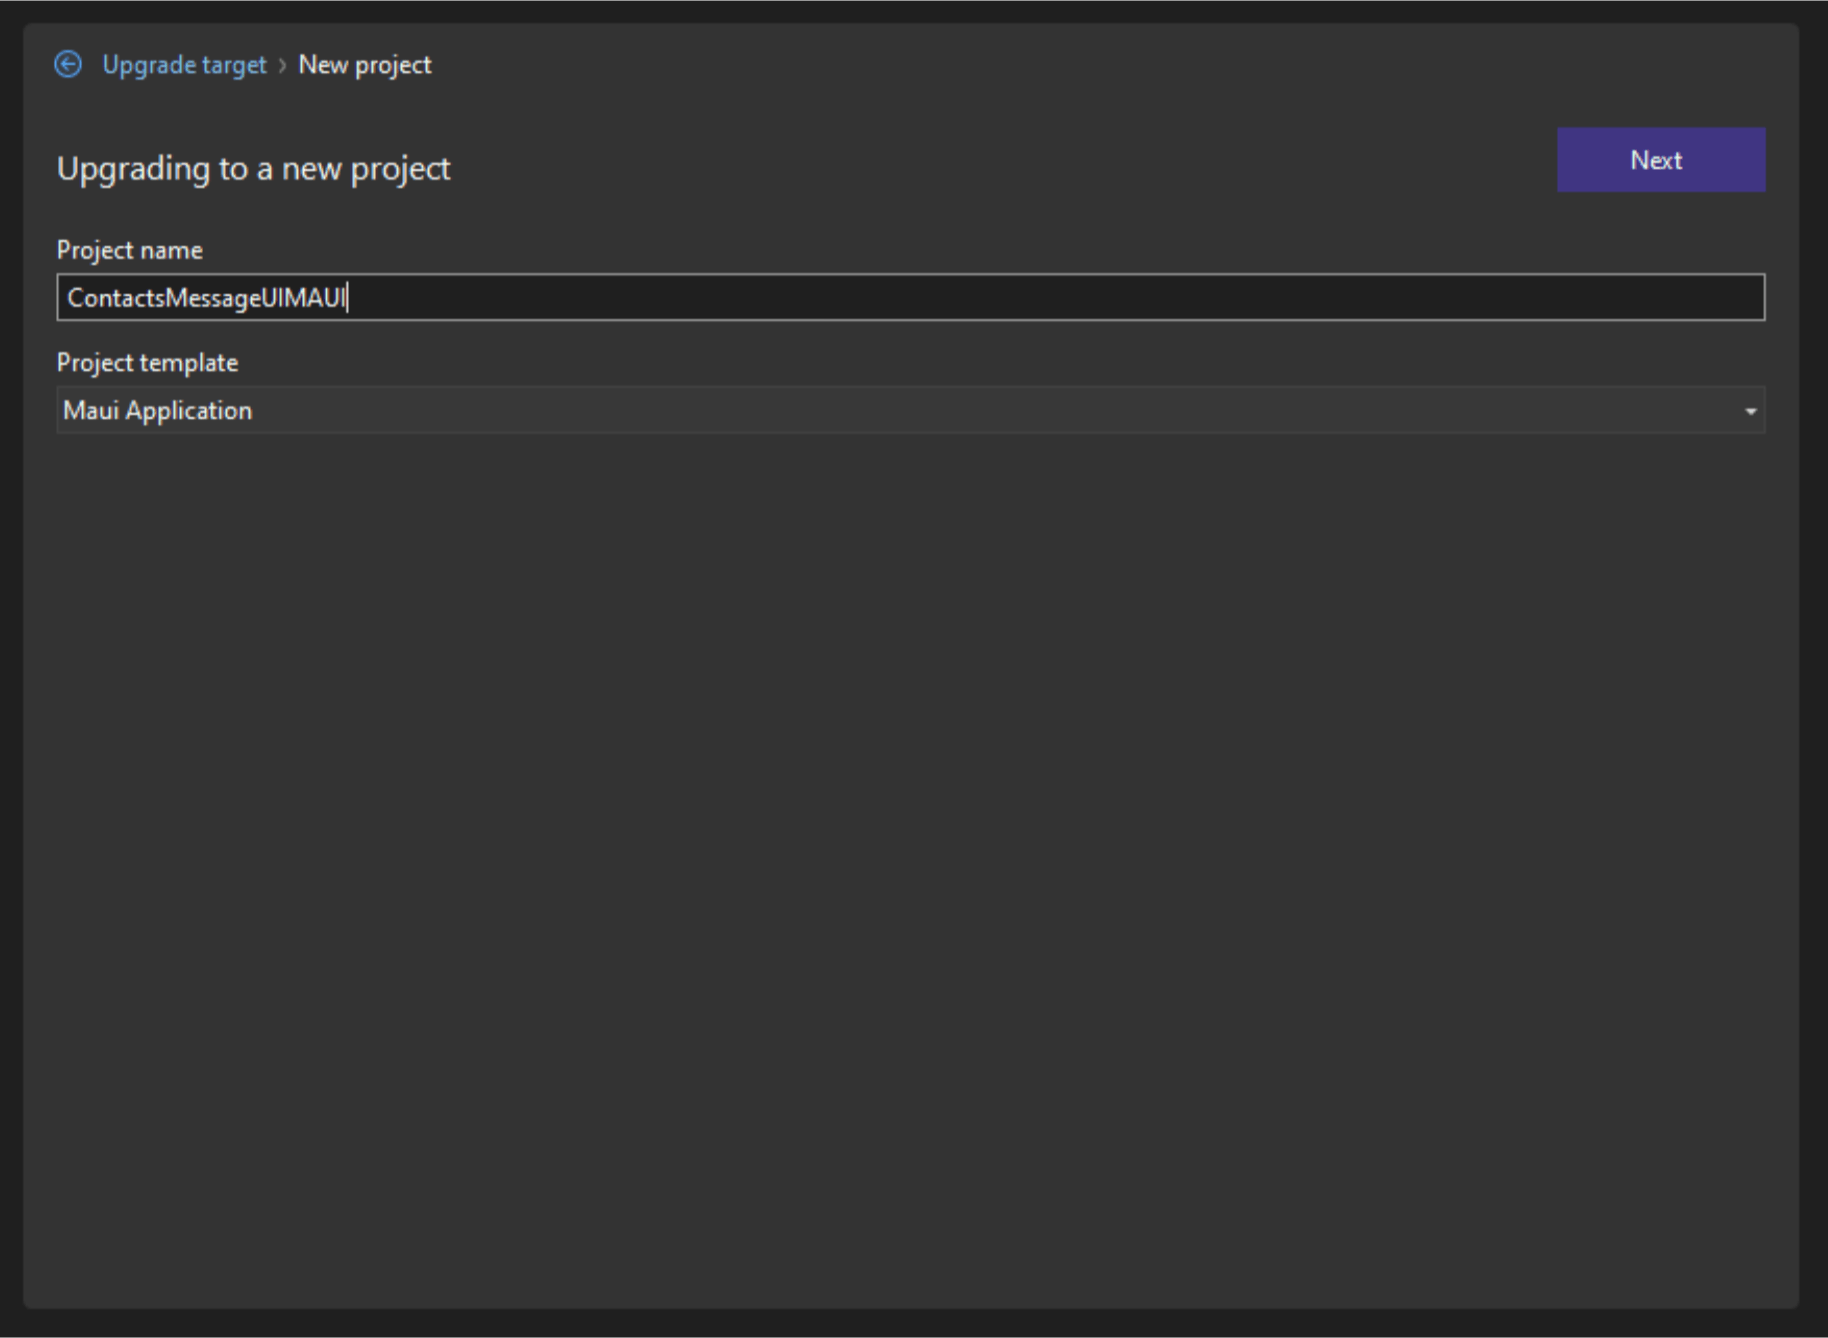
We will use the new project option in this example. Click on it and the following screen will appear:
You can change the name (I put “ContactMessageUIMAUI”) and then click “Next.”
Then the same options that we saw before will appear:
- Choose the preferred target (we will choose .NET 7 for this case).
- Then choose the components to update. Then click the Upgrade selection.
The process is extremely fast! Once completed, you will have a new project in your solution with a .NET MAUI app that has transformed your application code, which was previously in Xamarin.Forms.
In the following image you can see the “ContactMessageUIMAUI” project already migrated to .NET MAUI!
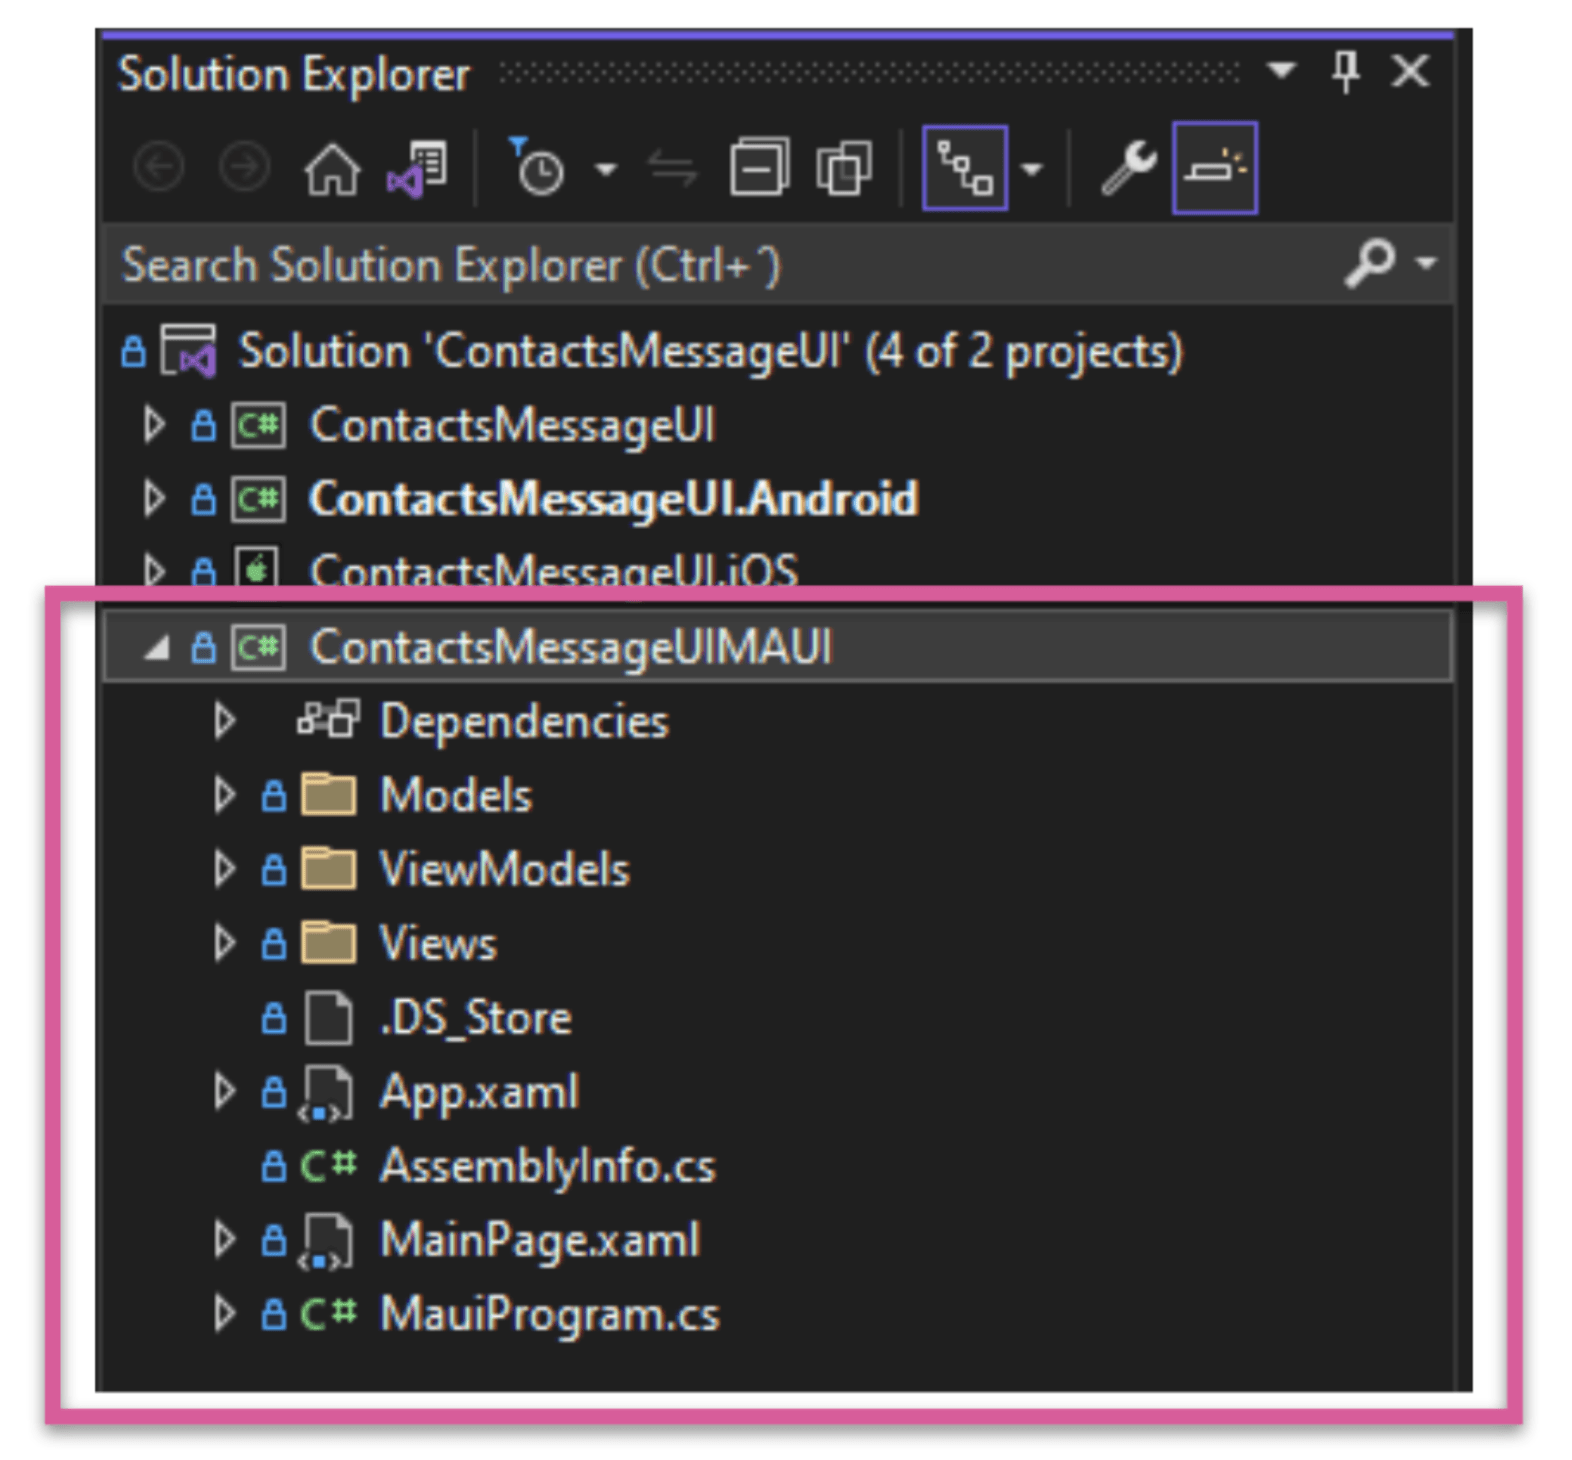
⚠ Sometimes you have to reload your Solution Explorer to be able to visualize the new project.
What’s Next?
If you were to build your app right now, there would likely be some bugs. This is because the Upgrade Assistance tool provides a large percentage of help, but as a developer, you must complete a few tasks to fully migrate your app. I recommend that after you use the assistant, you build your app and check for errors. Correct any errors, and then build it again.
Wrapping up
And that’s all! I invite you to continue exploring about the Upgrade Assistant to migrate your Xamarin and .NET MAUI applicationsI! I hope you liked this summary!
Let me know in the comments when you are starting your migrations! 💚💕
See you next time! 🙋♀️
Want to Continue Exploring?
- Take a look at the “All things client and mobile app development with .NET MAUI” Session.
- Read more blog posts about whether you should migrate from Xamarin to .NET MAUI, including more things to consider and tips and tricks.
- Check out the .NET MAUI controls from Progress Telerik—the best-in-class suite of 60+ .NET MAUI UI controls to meet all cross-platform app requirements for data handling, performance, UX, design, accessibility and so much more.
- If you're already a Progress Telerik user, you may find this guide helpful: Xamarin to .NET MAUI migration.
References

Leomaris Reyes
Leomaris Reyes is a Software Engineer from the Dominican Republic, with more than 5 years of experience. A Xamarin Certified Mobile Developer, she is also the founder of Stemelle, an entity that works with software developers, training and mentoring with a main goal of including women in Tech. Leomaris really loves learning new things! 💚💕 You can follow her: Twitter, LinkedIn , AskXammy and Medium.


