ASP.NET Core Basics: Globalizing a Web Application

Globalization allows developers to handle the internationalization and localization of a web application, making it more accessible to a broader audience. Check out how to globalize an app in ASP.NET Core in this blog post.
The globalization feature of an application has several advantages that make the application more useful for users, allowing them, for example, to choose which language to read the content in.
Globalization is a complex subject and can be implemented in different ways. In the post example, we will create an ASP.NET Core application and learn how to implement globalization.
The purpose of the post is to be a starting point for globalization, so some subjects will not be addressed, but you can use the example in the post to go deeper into the subject if you wish.
The Terms Globalization and Localization
According to Microsoft documentation, these are the definitions of the terms:
- Globalization: The process of making an app that supports different languages and regions. The abbreviation G11N comes from the first and last letters and the number of letters between them.
- Localization: The process of customizing a globalized app for specific languages and regions. Its abbreviation is L10N.
We can understand that localization is included in globalization, because when we customize a web application to make it available in a certain language, we are globalizing it, making it accessible to a wide audience.
What Is App Globalization and What are Its Advantages
App globalization in the context of ASP. NET Core refers to the ability to create a web application that can be adapted to different cultures and languages from anywhere in the world. This allows the application to be accessible to a wider audience, regardless of their geographic location or native language.
Advantages of app globalization in ASP. NET Core include:
- Increased usability: Adapting the app for different cultures ensures that the user interface is consistent and easy for all users, regardless of their geographic location.
- Increased accessibility: Allowing users to access the application in their native language increases the accessibility of the application and makes it easier to use.
- Global reach: Creating an app that can be used around the world expands the global reach and reaches a wider audience.
- Better user experience: Globalizing your app in ASP. NET Core allows you to provide a personalized user experience relevant to different cultures and languages, which can increase user satisfaction and improve customer loyalty.
- Adaptation to legal requirements: Some specific legal requirements must be met for apps and websites to work in some countries. The globalization of the app in ASP. NET Core allows these legal requirements to be met and thus expand market opportunities.
Implementing Globalization in an ASP.NET Core Application
First, let’s create the base application where we will add globalization.
Prerequisites:
- .NET 7 SDK or higher.
- An IDE. In this article, I will use Visual Studio. You can use another IDE of your choice, however instructions for other IDEs will not covered in this tutorial.
You can access the full source code of the example here: Source code.
In Visual Studio:
- Click on “Create a new project”
- Select ASP.NET Core Web App (Model-View-Controller)
- Choose a name for the project (in this article, I will use the name “MyGlobalApp,” but you can adapt it according to your preference)
- Choose the version of .NET 7 (Standard Term Support)
- Click on “Create”
Creating the Resource Files
In the context of ASP.NET Core, we use resource files to implement globalization. These files are stored in key-value format and have a .resx extension.
As a naming convention for these files, there are two models: Using a dot and using the path as you can see in the image below:
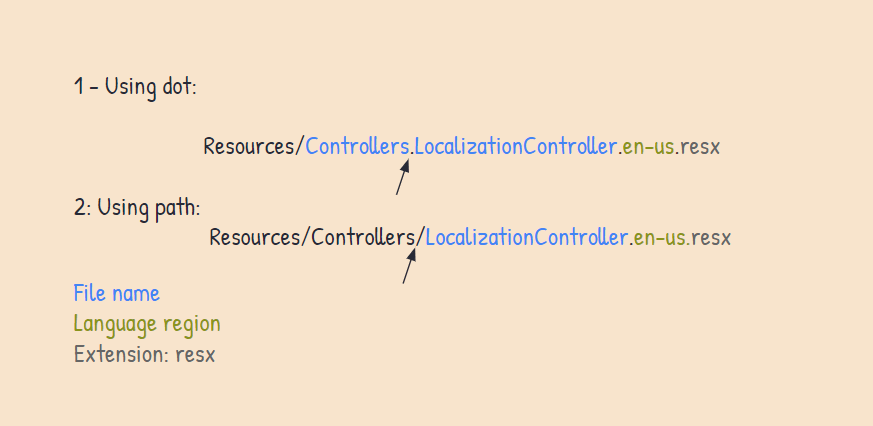
In this article’s example, we’re going to use the path model. So inside the project create a new folder called “Resources” and inside it create a folder called “Controllers.” Right-click on the Controllers folder and follow the steps below:
- Choose “Add”
- Choose “New item…”
- In the window that opens, search for “Resource” in the search bar and choose the option “Resources file”; then name it
LocalizationController.en-us.resxand click “Add” - Repeat the process but this time use the name
LocalizationController.es-es.resx.
When performing the previous steps, you should have a structure like the one shown below:
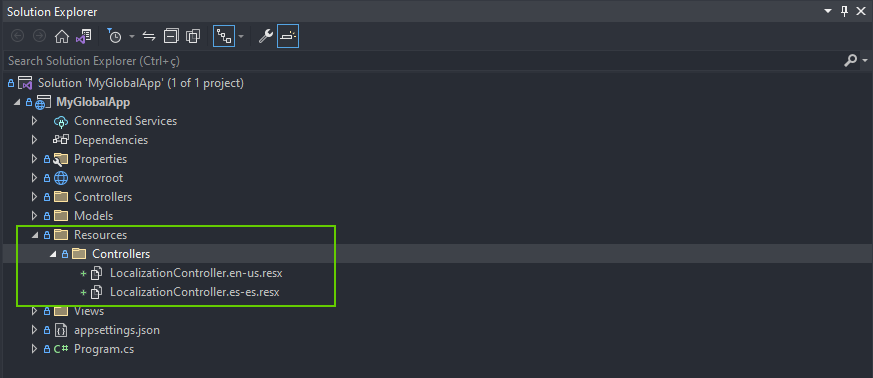
Note that we created two files where the name of each tells the languages of our application—in this case, US English (en-us) and Spanish Spanish (es-es). You can choose others if you wish.
Adding Key and Value to Resource Files
❗ An important topic that should be noted is that the visual resource is only available for Visual Studio for Windows. For the macOS version, you will need to add the code generated via Windows to the file and change the values in the code—but don’t worry, this will be explained below.
Adding Key and Value in Visual Studio for Windows
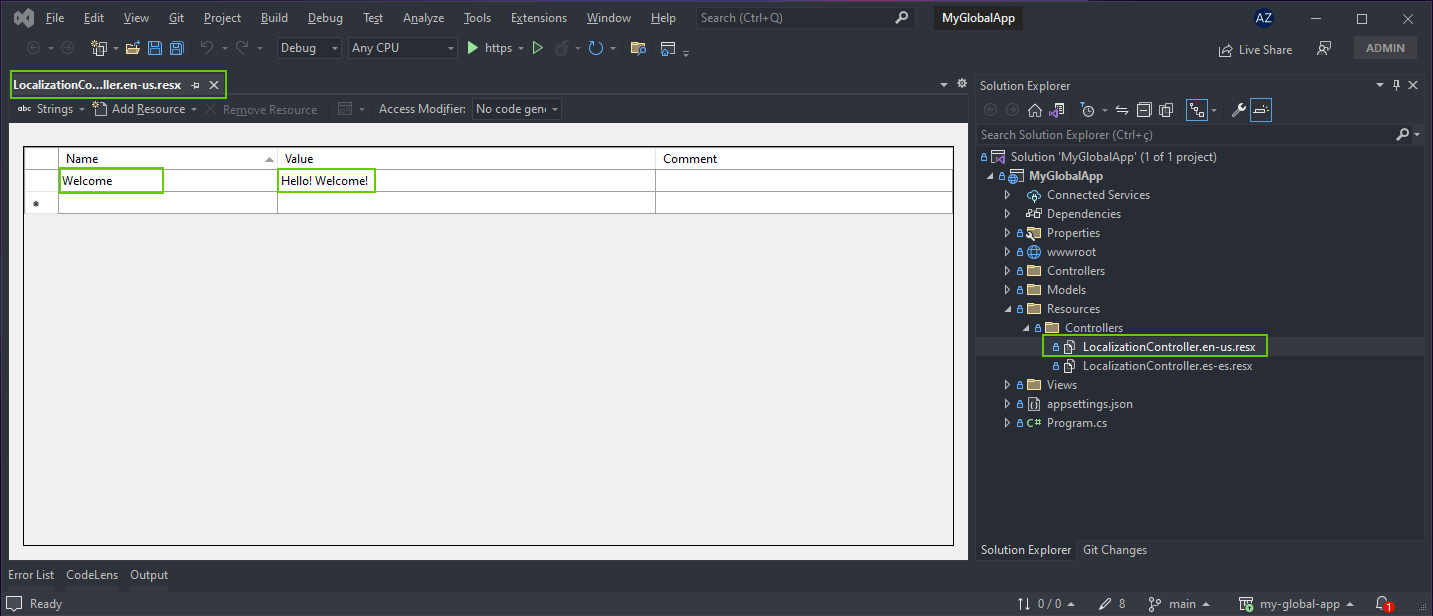
The key and value are text components that we need to add to the resx file. So, in Visual Studio, double-click on the file “LocalizationController.en-us.resx.”
Note that in the window that opened, there are three fields: Name, Value and Comment.
- In the Name field, add the text: “Welcome”
- In the Value field, add the text: “Hello! Welcome!”
- The comment field is optional, so you can leave it blank
So you should have something like the image below:
Double-click on the file: “LocalizationController.es-es.resx”
- In the Name field, add the text: “Welcome”
- In the Value field, add the text: “¡Hola! ¡Sea bienvenido!”
Note that we are assigning a key with the name “Welcome” that will receive a phrase in each file according to the chosen language.
Adding Key and Value in Visual Studio for macOS
If your operating system is macOS, there is no possibility to add keys and values to resx files via a graphical interface. To resolve this, just double-click on the file “LocalizationController.en-us.resx” and replace the existing source code with the code below:
<?xml version="1.0" encoding="utf-8"?>
<root>
  <xsd:schema id="root" xmlns="" xmlns:xsd="http://www.w3.org/2001/XMLSchema" xmlns:msdata="urn:schemas-microsoft-com:xml-msdata">
    <xsd:import namespace="http://www.w3.org/XML/1998/namespace" />
    <xsd:element name="root" msdata:IsDataSet="true">
      <xsd:complexType>
        <xsd:choice maxOccurs="unbounded">
          <xsd:element name="metadata">
            <xsd:complexType>
              <xsd:sequence>
                <xsd:element name="value" type="xsd:string" minOccurs="0" />
              </xsd:sequence>
              <xsd:attribute name="name" use="required" type="xsd:string" />
              <xsd:attribute name="type" type="xsd:string" />
              <xsd:attribute name="mimetype" type="xsd:string" />
              <xsd:attribute ref="xml:space" />
            </xsd:complexType>
          </xsd:element>
          <xsd:element name="assembly">
            <xsd:complexType>
              <xsd:attribute name="alias" type="xsd:string" />
              <xsd:attribute name="name" type="xsd:string" />
            </xsd:complexType>
          </xsd:element>
          <xsd:element name="data">
            <xsd:complexType>
              <xsd:sequence>
                <xsd:element name="value" type="xsd:string" minOccurs="0" msdata:Ordinal="1" />
                <xsd:element name="comment" type="xsd:string" minOccurs="0" msdata:Ordinal="2" />
              </xsd:sequence>
              <xsd:attribute name="name" type="xsd:string" use="required" msdata:Ordinal="1" />
              <xsd:attribute name="type" type="xsd:string" msdata:Ordinal="3" />
              <xsd:attribute name="mimetype" type="xsd:string" msdata:Ordinal="4" />
              <xsd:attribute ref="xml:space" />
            </xsd:complexType>
          </xsd:element>
          <xsd:element name="resheader">
            <xsd:complexType>
              <xsd:sequence>
                <xsd:element name="value" type="xsd:string" minOccurs="0" msdata:Ordinal="1" />
              </xsd:sequence>
              <xsd:attribute name="name" type="xsd:string" use="required" />
            </xsd:complexType>
          </xsd:element>
        </xsd:choice>
      </xsd:complexType>
    </xsd:element>
  </xsd:schema>
  <resheader name="resmimetype">
    <value>text/microsoft-resx</value>
  </resheader>
  <resheader name="version">
    <value>2.0</value>
  </resheader>
  <resheader name="reader">
    <value>System.Resources.ResXResourceReader, System.Windows.Forms, Version=4.0.0.0, Culture=neutral, PublicKeyToken=b77a5c561934e089</value>
  </resheader>
  <resheader name="writer">
    <value>System.Resources.ResXResourceWriter, System.Windows.Forms, Version=4.0.0.0, Culture=neutral, PublicKeyToken=b77a5c561934e089</value>
  </resheader>
  <data name="Welcome" xml:space="preserve">
    <value>Hello! Welcome!</value>
  </data>
</root>
Note that inside the data tag there is the name="Welcome" property, which is where the key is, while the value is inside the Value tag: <value>Hello! Welcome!</value>.
Then open the other file “LocalizationController.es-es.resx” and replace the existing code with the code below:
<?xml version="1.0" encoding="utf-8"?>
<root>
  <xsd:schema id="root" xmlns="" xmlns:xsd="http://www.w3.org/2001/XMLSchema" xmlns:msdata="urn:schemas-microsoft-com:xml-msdata">
    <xsd:import namespace="http://www.w3.org/XML/1998/namespace" />
    <xsd:element name="root" msdata:IsDataSet="true">
      <xsd:complexType>
        <xsd:choice maxOccurs="unbounded">
          <xsd:element name="metadata">
            <xsd:complexType>
              <xsd:sequence>
                <xsd:element name="value" type="xsd:string" minOccurs="0" />
              </xsd:sequence>
              <xsd:attribute name="name" use="required" type="xsd:string" />
              <xsd:attribute name="type" type="xsd:string" />
              <xsd:attribute name="mimetype" type="xsd:string" />
              <xsd:attribute ref="xml:space" />
            </xsd:complexType>
          </xsd:element>
          <xsd:element name="assembly">
            <xsd:complexType>
              <xsd:attribute name="alias" type="xsd:string" />
              <xsd:attribute name="name" type="xsd:string" />
            </xsd:complexType>
          </xsd:element>
          <xsd:element name="data">
            <xsd:complexType>
              <xsd:sequence>
                <xsd:element name="value" type="xsd:string" minOccurs="0" msdata:Ordinal="1" />
                <xsd:element name="comment" type="xsd:string" minOccurs="0" msdata:Ordinal="2" />
              </xsd:sequence>
              <xsd:attribute name="name" type="xsd:string" use="required" msdata:Ordinal="1" />
              <xsd:attribute name="type" type="xsd:string" msdata:Ordinal="3" />
              <xsd:attribute name="mimetype" type="xsd:string" msdata:Ordinal="4" />
              <xsd:attribute ref="xml:space" />
            </xsd:complexType>
          </xsd:element>
          <xsd:element name="resheader">
            <xsd:complexType>
              <xsd:sequence>
                <xsd:element name="value" type="xsd:string" minOccurs="0" msdata:Ordinal="1" />
              </xsd:sequence>
              <xsd:attribute name="name" type="xsd:string" use="required" />
            </xsd:complexType>
          </xsd:element>
        </xsd:choice>
      </xsd:complexType>
    </xsd:element>
  </xsd:schema>
  <resheader name="resmimetype">
    <value>text/microsoft-resx</value>
  </resheader>
  <resheader name="version">
    <value>2.0</value>
  </resheader>
  <resheader name="reader">
    <value>System.Resources.ResXResourceReader, System.Windows.Forms, Version=4.0.0.0, Culture=neutral, PublicKeyToken=b77a5c561934e089</value>
  </resheader>
  <resheader name="writer">
    <value>System.Resources.ResXResourceWriter, System.Windows.Forms, Version=4.0.0.0, Culture=neutral, PublicKeyToken=b77a5c561934e089</value>
  </resheader>
  <data name="Welcome" xml:space="preserve">
    <value>¡Hola! ¡Sea bienvenido!</value>
  </data>
</root>
Inside the data tag, the name="Welcome" property is where the key is, and the value is in the Value tag, but now with the text in Spanish: <value>¡Hola! ¡Sea bienvenido!</value>.
Creating the View Component
The view component will be used to display the text we created earlier.
Inside the “Views” folder, create a new folder called “Localization” and inside it create a new view following the steps below:
- Right-click on the “Localization” folder
- Choose the option “Add”- “View…”
- Choose “Razor View - Empty…”
- Enter the name “Index.cshtml” and click “Add”
Then replace the newly created code with the code below:
@{
    ViewData["Title"] = "Welcome";
}
<div class="text-center">
    <p>@ViewData["Welcome"]</p>
</div>
Note that we are passing to the ViewData component the key (“Welcome”) that represents the text to be displayed.
Creating the Dropdown Menu to Display the Language Options
Still in the “Views” folder inside the “Shared” folder, open the “_Layout.cshtml” file and just below the snippet:
                <div class="navbar-collapse collapse d-sm-inline-flex justify-content-between">
                    <ul class="navbar-nav flex-grow-1">
                        <li class="nav-item">
                            <a class="nav-link text-dark" asp-area="" asp-controller="Home" asp-action="Index">Home</a>
                        </li>
                        <li class="nav-item">
                            <a class="nav-link text-dark" asp-area="" asp-controller="Home" asp-action="Privacy">Privacy</a>
                        </li>
                    </ul>
                </div>
add the following code snippet:
 <div class="dropdown">
                  <button type="button" class="btn btn-primary dropdown-toggle" data-bs-toggle="dropdown">Language</button>
                  <ul class="dropdown-menu">
                    <li>
                        <a asp-controller="Localization" asp-action="Index" asp-route-culture="en-us" class="dropdown-item">
                        <i class="flag-icon flag-icon-gb"></i>English</a>
                    </li>
                    <li>
                        <a asp-controller="Localization" asp-action="Index" asp-route-culture="es-es" class="dropdown-item">
                        <i class="flag-icon flag-icon-gb"></i>Spanish</a>
                    </li>
                  </ul>
                </div>
Note that in the code above we are passing to the <a> tag the asp-route-culture="LANGUAGE" property that defines which language we want to display. For English, we pass “en-us”,
and for Spanish “es-es”.
Creating the New Controller
Now let’s create a new controller that will communicate with the page to be translated, right-click inside the “Controllers” folder. (It should be the “Controllers” folder at the root of the project, not the “Controllers” folder inside the “Resources” folder.)
Choose “Add” -> “…controller” -> “MVC Controller - Empty” -> “Add.” Put the name “LocalizationController” and click “Add.”
Then replace the generated code with the code below:
using Microsoft.AspNetCore.Mvc;
using Microsoft.Extensions.Localization;

namespace MyGlobalApp.Controllers
{
    public class LocalizationController : Controller
    {
        private readonly IStringLocalizer<LocalizationController> _localizer;

        public LocalizationController(IStringLocalizer<LocalizationController> localizer)
        {
            _localizer = localizer;
        }

        public IActionResult Index()
        {
            ViewData["Welcome"] = _localizer["Welcome"];
            return View();
        }
    }
}
Note that we are creating an instance of the “IStringLocalizer” interface and passing the “LocalizationController” controller to it. And in the Index method, we are passing the “Welcome” key to the instantiated object, which is equivalent to the resx file key that we defined earlier.
Adding Language Settings at the Application Startup
The last step is to define the language settings in the program class, which languages will be used, where the resource files will be located, etc.
So, in the “Program.cs” file just below the snippet:
builder.Services.AddControllersWithViews();
add the following code:
// Add services localization settings.
builder.Services.AddLocalization(options => options.ResourcesPath = "Resources");

const string defaultCulture = "en-us";

var supportedCultures = new[]
{
    new CultureInfo(defaultCulture),
    new CultureInfo("es-es")
};

builder.Services.Configure<RequestLocalizationOptions>(options => {
    options.DefaultRequestCulture = new RequestCulture(defaultCulture);
    options.SupportedCultures = supportedCultures;
    options.SupportedUICultures = supportedCultures;
});
Note that we are defining a string (defaultCulture) that will define the default language, which in this case will be “en-us.” We also define a variable (supportedCultures)
to store all available languages—in this case, “en-us” and “es-es”—and passing that variable to the service settings.
Now just below the snippet:
var app = builder.Build();
add the following code snippet:
// Add app localization settings.
app.UseRequestLocalization(app.Services.GetRequiredService<IOptions<RequestLocalizationOptions>>().Value);
Here we are passing the location service we just instantiated in the previous code to the application.
Running the Application
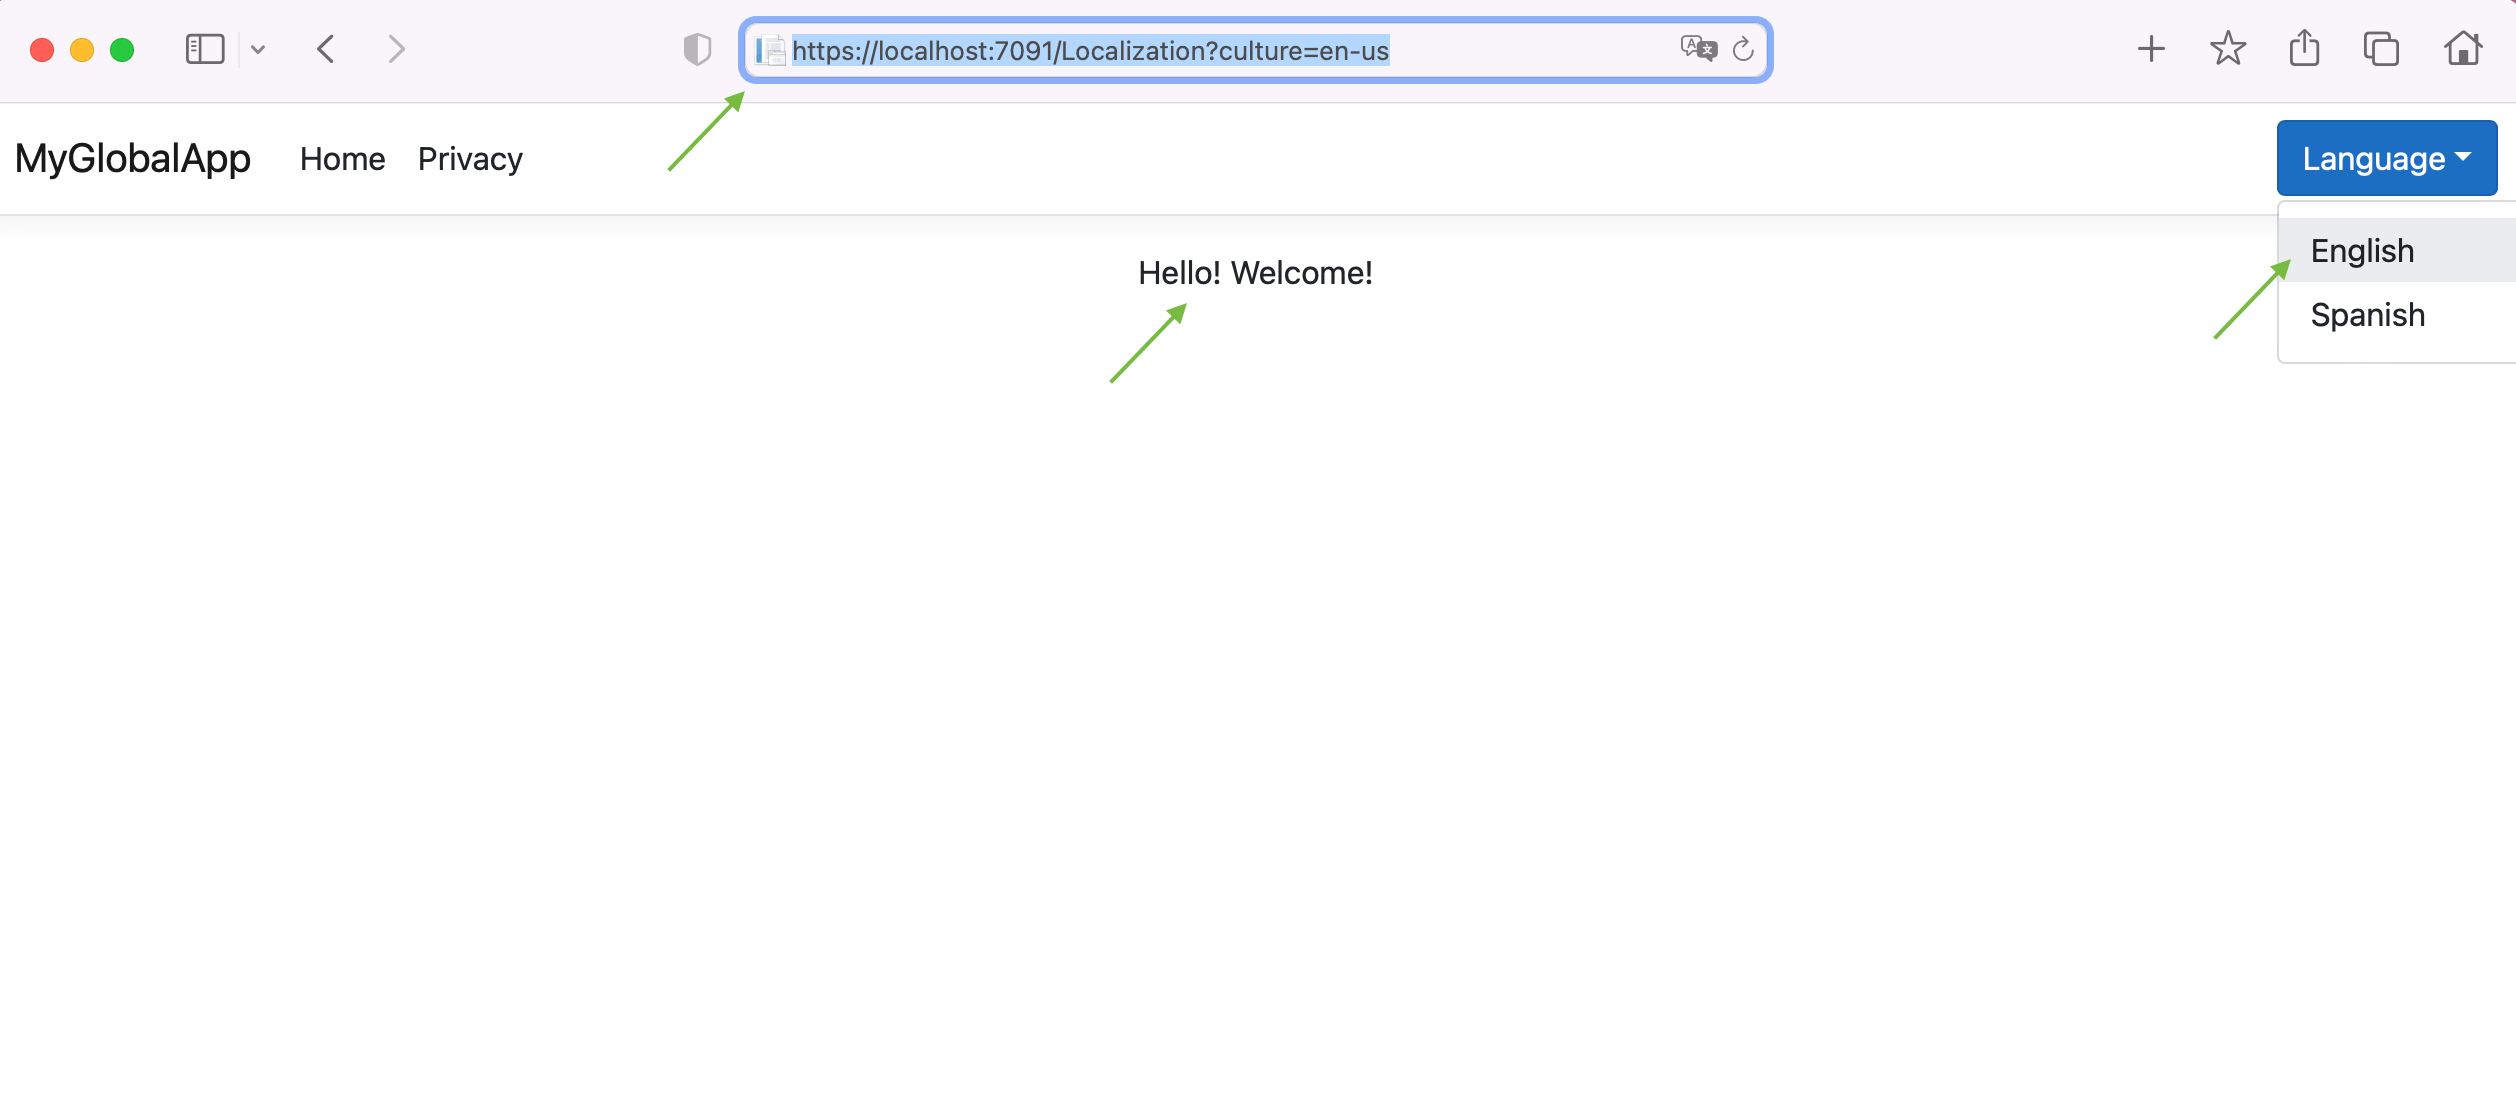
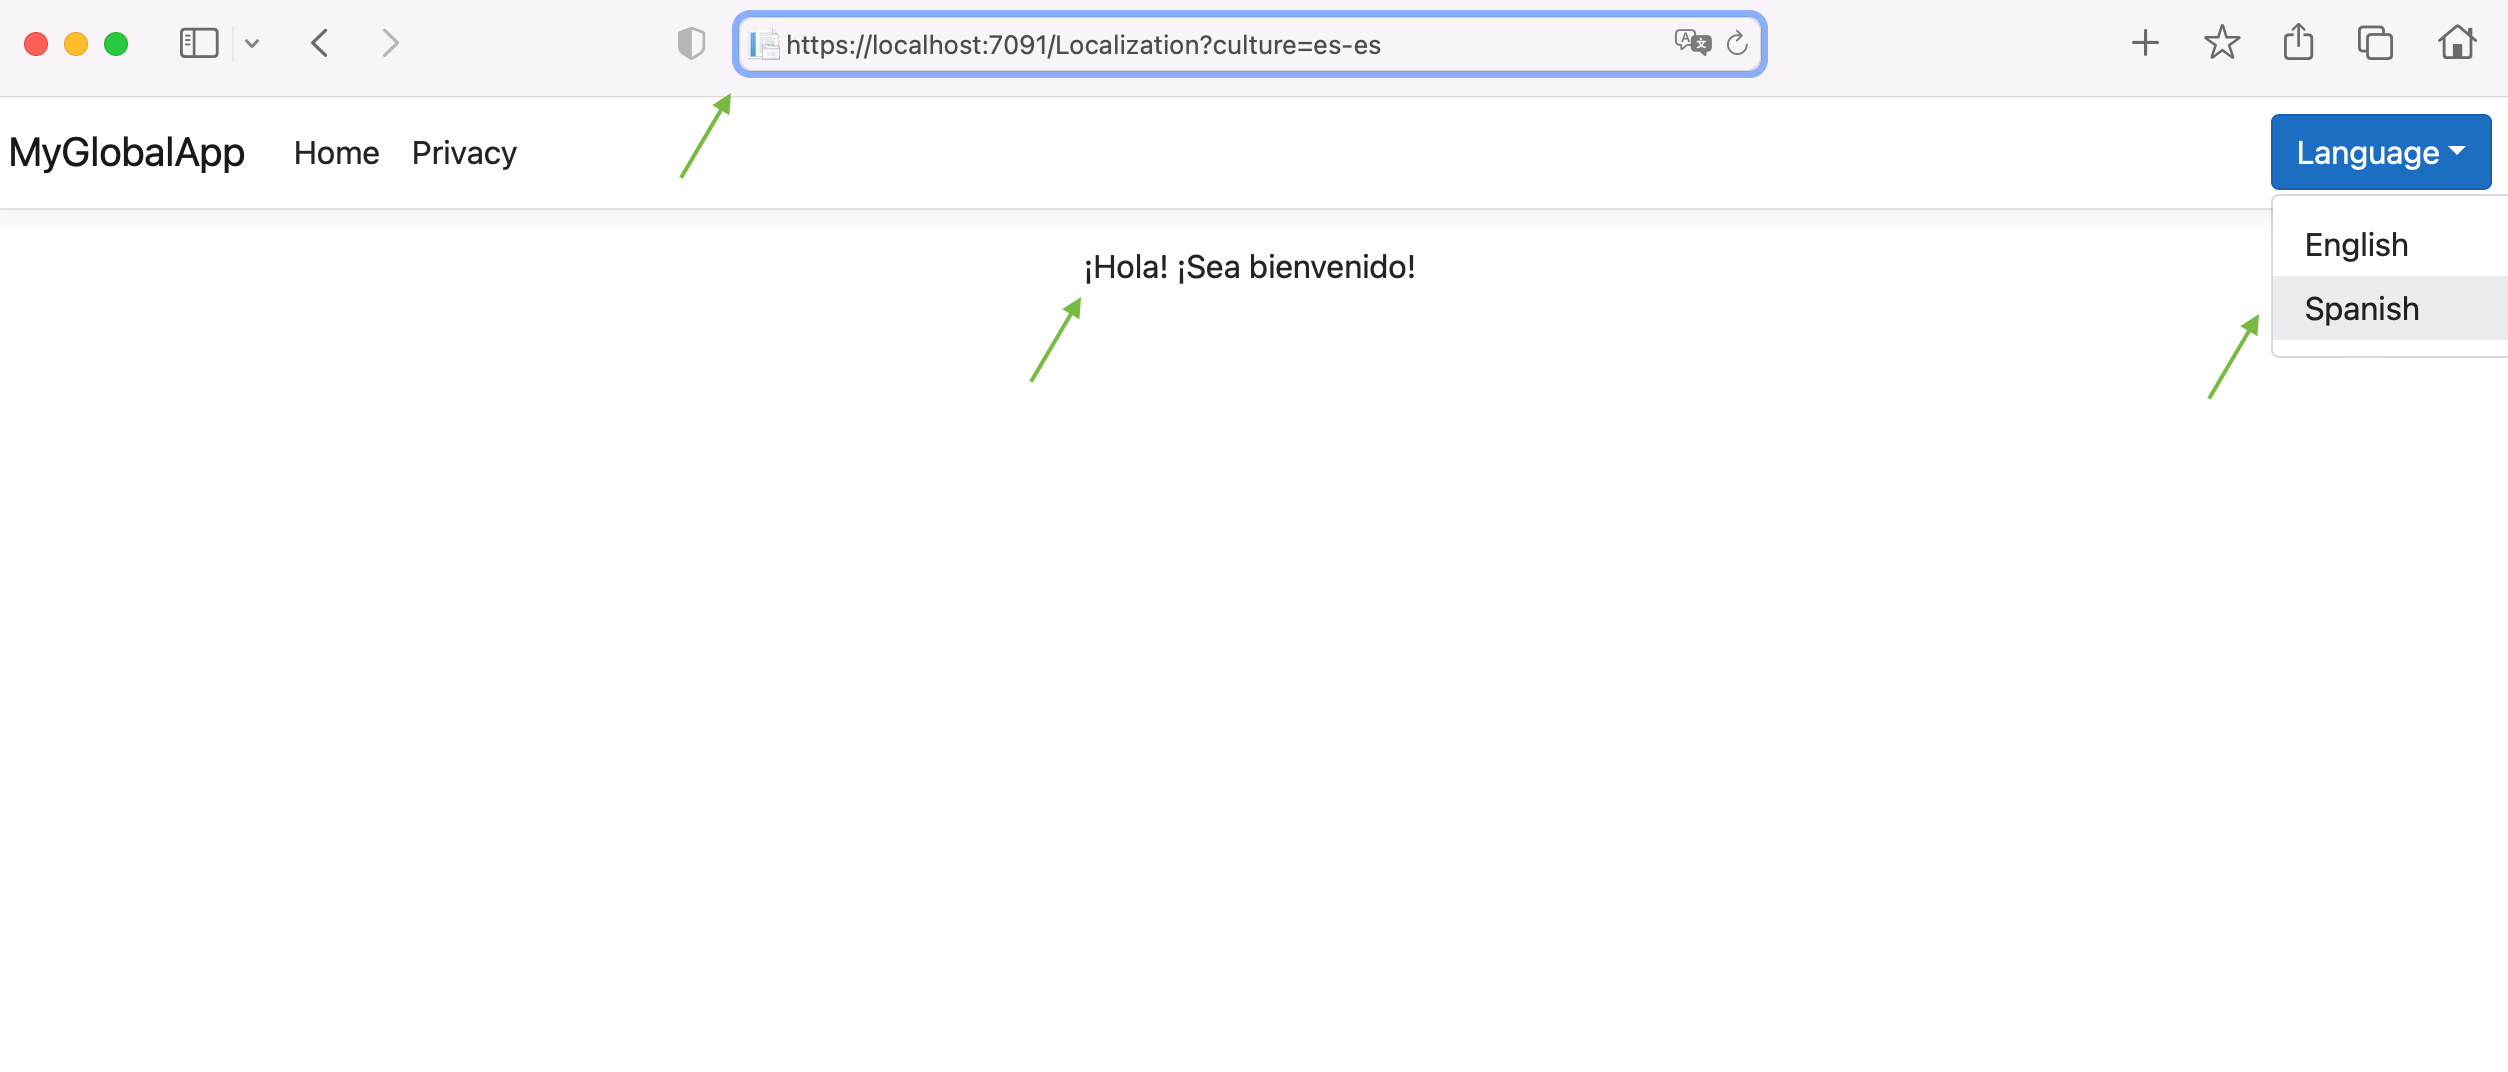
To run the application, just click on the play icon in Visual Studio. A browser window will open and you will have a result similar to the images below:
Conclusion
In this article, we had an introduction to the localization of the application in the context of ASP.NET Core, using native resources of .NET.
Check out other resources that can be used when globalizing an ASP.NET Core application through the official Microsoft documentation: Localization in ASP.NET Core.
Location is a complex subject, so if you have any questions, don’t hesitate to comment.


