
Use the Powerful Directive Composition API in Angular 15 with Kendo UI

Summarize with AI:
Angular 15 has many new features, including the new directive composition API. Let’s see how to use it with Kendo UI for Angular.
Angular 15 has many new features, including the new directive composition API. It helps to reuse behavior from directives. It enables us to create complex directives easily to help reduce the number of directives in the template to zero.
The new directive composition API works standalone only. To learn how to work with standalone components and Angular directives, I recommend checking out the following articles:
The best way to learn how to create, work with and compose directives using the composition API is to create a new project using Angular 15, with standalone components and directives for each use case, and compose in a single one. It can also be done to existing applications, as long as the components and directives in question are changed to standalone.
These steps are divided into five parts:
- Scenario
- Create the project and add standalone component
- Install and register Kendo UI Calendar
- Create standalone directives
- Compose directives
Scenario
We work for a company that uses Kendo UI Calendar, and we want to implement the following behavior easily:
- Calendar that allows hiding the navigation
- Calendar starting an a specific date
- Calendar with Friday, Saturday and Sunday disabled
Set up the Project
First, create a new app, composition-api-with-kendo, by running the command in the terminal:
npx @angular/cli new composition-api-with-kendo
npx takes the last version of Angular/CLI 15.
Go to the composition-api-with-kendo directory, edit the app.component.html and remove the default HTML.
Next, using the Angular CLI, we will create the home component using the --standalone flag:
ng g component home --standalone
Edit the app.module and register the home.component in the imports sections.
import {NgModule} from '@angular/core';
import {BrowserModule} from '@angular/platform-browser';
import {BrowserAnimationsModule} from '@angular/platform-browser/animations';
import {AppComponent} from './app.component';
import {HomeComponent} from './home/home.component';


@NgModule({
  declarations: [
    AppComponent,
  ],
  imports: [
    HomeComponent,
    BrowserModule,
    BrowserAnimationsModule,
  ],
  providers: [],
  bootstrap: [AppComponent]
})
export class AppModule {
}
Finally, add the home component <app-home> in HTML markup into the app.component.html.
<app-home></app-home><div>
  <h1>
My Amazing Calendar
  </h1>
</div>
<app-home></app-home>
<footer> 2023</footer>
Run the command ng serve -o and navigate to the home file.
Install and Register Kendo UI Calendar
Kendo UI components are ready to work with standalone components. We want to use the Angular schematic to install the Kendo UI Calendar into our app. The angular inputs package has the calendar, so let’s install that now. Run the following command in the terminal.
ng add @progress/kendo-angular-dateinputs
It automatically adds DateInputsModule, in the app.module; because we use standalone components, we must import the DateInputsModule in the home.component.ts imports sections.
import { Component } from '@angular/core';
import { CommonModule } from '@angular/common';
import {DateInputsModule} from '@progress/kendo-angular-dateinputs';

@Component({
  selector: 'app-home',
  standalone: true,
  imports: [CommonModule,
    DateInputsModule
  ],
  templateUrl: './home.component.html',
  styleUrls: ['./home.component.css']
})
export class HomeComponent {

}
Next, edit the home.component.html and add the Kendo UI Calendar to the HTML markup.
<kendo-calendar></kendo-calendar>
Save the changes from the terminal, run ng serve -o, and see the default Kendo UI Calendar component working.
ng serve -o
We’re finished setting up the app.component as standalone component. In the following steps, we will focus on changing the behavior of the Calendar Component using Directives.
Create Standalone Directives
We need to create three directives to cover each scenario:
- noNavigationDirective
- startDateDirective
- companyDayOff
Using the Angular CLI with --standalone generates our directives. Let’s start with hideNavigation:
ng g directive nonavigation --standalone
As we know, the directives allow us to easily change the behavior of our elements or components; one way is by injecting the component into the constructor and customizing it.
The noNavigation directive must inject the component to change the navigation behavior by default.
import {Directive} from '@angular/core';
import {CalendarComponent} from '@progress/kendo-angular-dateinputs';

@Directive({
  standalone: true,
  selector: '[noNavigation]'
})
export class NoNavigationDirective {

  constructor(private calendar: CalendarComponent) {
    this.calendar.navigation = false;
  }
}
Continue with the startDateDirective using the same command.
ng g directive startdate --standalone
Similar to noNavigation, inject the calendar Component into the constructor to allow setting the default day we need to do the following tasks:
- Create the variable
daywith@Input()decorator and set the default day to 12/12/2022 - Create a function
updateDayto assign the day input variable to the calendar value - Implement the
OnChangeslifecycle, calling theupdateDayfunction()
The final version of the code looks like this:
import {Directive, Input, OnChanges, SimpleChanges} from '@angular/core';
import {CalendarComponent} from '@progress/kendo-angular-dateinputs';

@Directive({
  standalone: true,
  selector: '[activeDay]'
})
export class ActiveDayDirective implements OnChanges {

  @Input() day = '12/12/2022'

  constructor(private calendar: CalendarComponent) {
  }

  ngOnChanges(changes: SimpleChanges) {
    this.updateDay()
  }

  updateDay() {
    const date = Date.parse(this.day);
    this.calendar.value = new Date(date)
  }
}
Create the last directive, companyDayOff, and repeat the same steps:
ng g directive companydayoff --standalone
Similar to noNavigation, inject the Calendar component in the constructor. Still, to set a specific day blocked, we need to do the following tasks:
- Import the day enum from
import {Day} from '@progress/kendo-date-math'; - Create blockedDays property
[Day.Friday, Day.Saturday, Day.Sunday]; - Set Calendar disabledDates property with daysBlocked array
The final code looks like this:
import {Directive} from '@angular/core';
import {CalendarComponent} from '@progress/kendo-angular-dateinputs';
import {Day} from '@progress/kendo-date-math';

@Directive({
  standalone: true,
  selector: '[companyDaysOff]'
})
export class CompanyDaysOffDirective {
  blockedDays: Day[] = [Day.Friday, Day.Saturday, Day.Sunday];
  constructor(private calendar: CalendarComponent) {
    this.calendar.disabledDates = this.blockedDays;
  }
}
Read more about customizing Kendo UI Calendar using directives.
Using Directives
To use the directive with the Kendo UI Calendar component, add the directives in the imports sections of the home.component
import {DateInputsModule} from '@progress/kendo-angular-dateinputs';
import {ActiveDayDirective} from '../directives/active-day.directive';
import {CompanyDaysOffDirective} from '../directives/company-days-off.directive';
import {NoNavigationDirective} from '../directives/no-navigation.directive';

@Component({
  selector: 'app-home',
  standalone: true,
  imports: [CommonModule,
    DateInputsModule,
    ActiveDayDirective,
    CompanyDaysOffDirective,
    NoNavigationDirective
  ],
  templateUrl: './home.component.html',
  styleUrls: ['./home.component.css']
})
export class HomeComponent {

}
Add more instances of kendo-calendar in the HTML markup with one directive.
<div class="default">
  <span>default</span>
  <kendo-calendar></kendo-calendar>
</div>
<div>
  <span>No Navigation</span>
  <kendo-calendar noNavigation></kendo-calendar>
</div>
<div>
  Company DayOff
  <kendo-calendar companyDaysOff></kendo-calendar>
</div>
<div>
  <span>Set Custom Default Day</span>
  <kendo-calendar [day]="'11/11/2023'" activeDay></kendo-calendar>
</div>
Save the changes. In the browser, every calendar has a custom behavior.
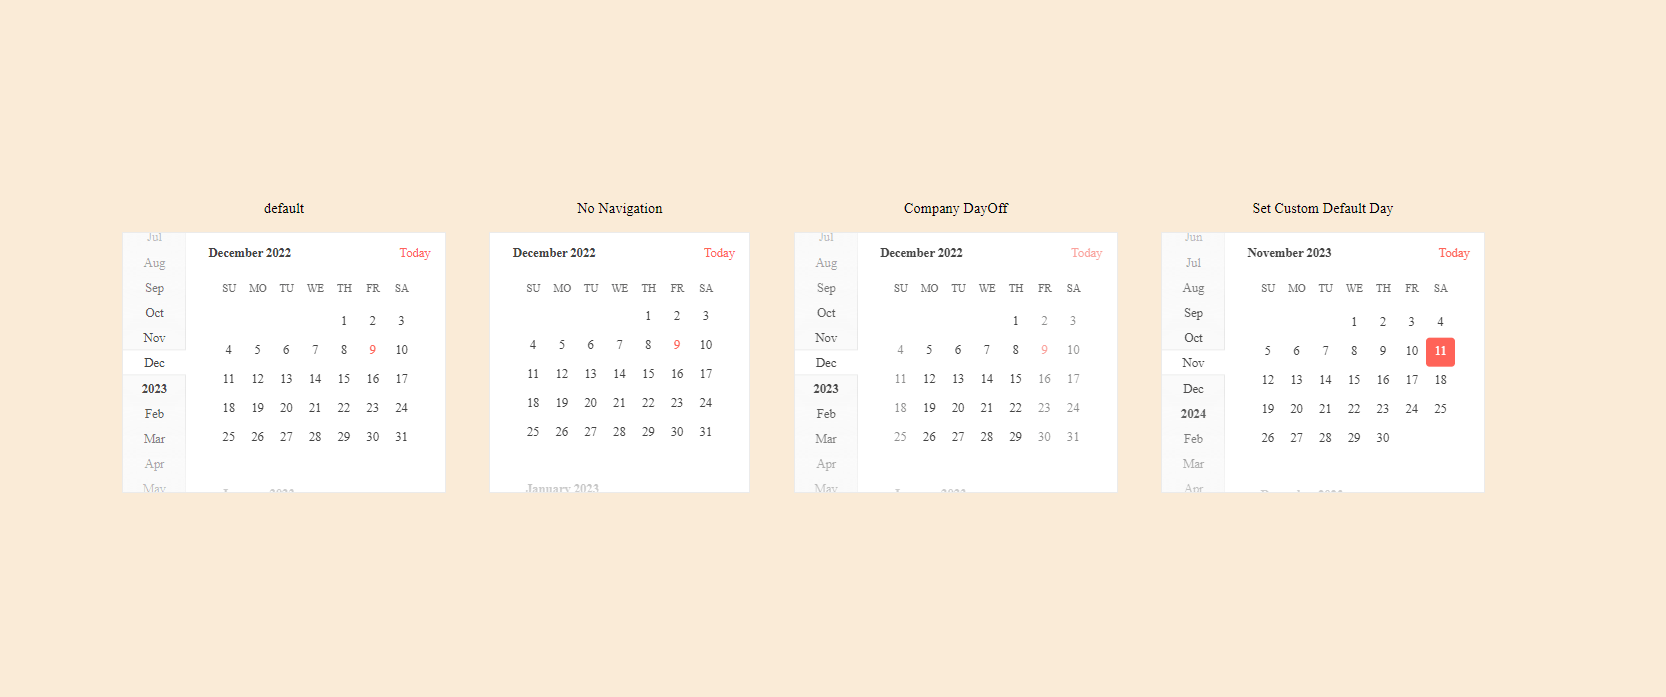
What happens if we want one calendar with some behavior or a mix of all? Before, we would have needed to add a vast list of directives in the HTML template. But the new composition API allows us to combine directives in the component or other directives. Let’s do it.
Compose Directives
To combine behaviors, first use the Angular/CLI to generate a new directive like companyDefault:
ng g directive companydefault --standalone
After the standalone property, add the new property hostDirectives and import the directives:
  hostDirectives: [
    NoNavigationDirective,
    CompanyDaysOffDirective]
The directives expose this behavior using the companyDefaultDirective, but what about with the ActiveDayDirective? It uses the parameter day as input. We reveal the directive as part of the directive and also rename the public
parameter.
Add the ActiveDayDirective as an object declaring the input property (also support output for an event). In the inputs, declare an array with the input property or set an alias. In my case, I want to rename day to startDate.
The directive is ready and it’s time to use it in the home component.
import {Directive} from '@angular/core';
import {ActiveDayDirective} from './active-day.directive';
import {CompanyDaysOffDirective} from './company-days-off.directive';
import {NoNavigationDirective} from './no-navigation.directive';

@Directive({
  selector: '[companyDefault]',
  standalone: true,
  hostDirectives: [
    NoNavigationDirective,
    CompanyDaysOffDirective,
    {
      directive: ActiveDayDirective,
      inputs: ['day: startDate']
    }
  ]
})
export class CompanyDefaultDirective {


}
Edit the home.component.ts to remove the directives and add the CompanyDefaultDirective.
import {Component} from '@angular/core';
import {CommonModule} from '@angular/common';
import {DateInputsModule} from '@progress/kendo-angular-dateinputs';
import {CompanyDefaultDirective} from '../directives/company-default.directive';

@Component({
  selector: 'app-home',
  standalone: true,
  imports: [CommonModule,
    DateInputsModule,
    CompanyDefaultDirective
  ],
  templateUrl: './home.component.html',
  styleUrls: ['./home.component.css']
})
export class HomeComponent {

}
Add a new Kendo UI Calendar component in the HTML markup with the directive CompanyDefault. It enables the startDate input property to the kendo-calendar to set the startDate.
<div>
  <span>All together</span>
  <kendo-calendar companyDefault startDate="'11/11/2023'"></kendo-calendar>
</div>
Save the changes and reload the page.
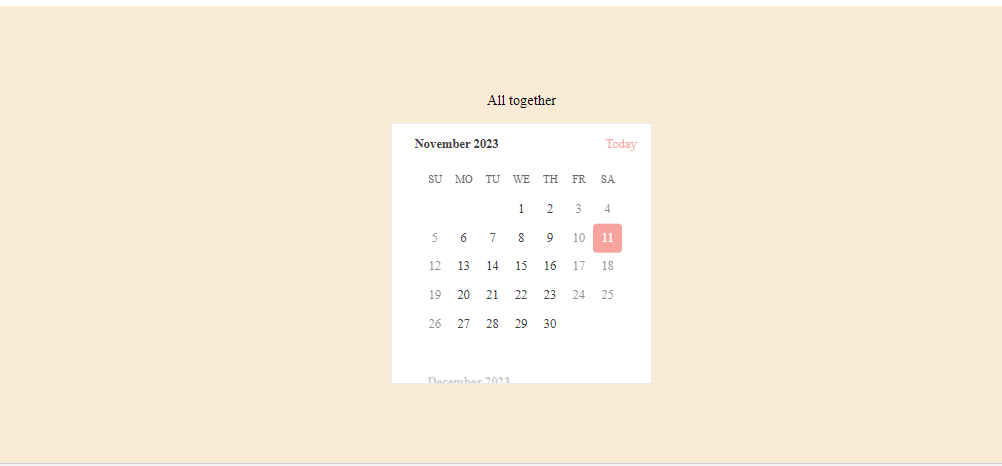
Yeah! The kendo-calendar has all our business requirements in a single directive!
Conclusion
We learned how to create directives and compose them together to customize the behavior of Kendo UI components, simplify and refactor, using an alias for input or output, creating a tremendous clean API using the power of the composition API in Angular 15.
You can find the complete code with the sample app here: GitHub.
Happy coding!

Dany Paredes
Dany Paredes is a Google Developer Expert on Angular and Progress Champion. He loves sharing content and writing articles about Angular, TypeScript and testing on his blog and on Twitter (@danywalls).
Related Posts
Comments
All articles
Topics
Web MobileMobile
Desktop
Design
Productivity
People
