
Passwordless Authentication Using Firebase

In this post, we will implement passwordless authentication in a Next.js app using Firebase.
The most common type of authentication method today is knowledge-based authentication, which uses passwords. However, this method has proven to be flawed, weak, non-scalable for use with multiple apps, and vulnerable to attacks.
In contrast, passwordless authentication provides a more elegant way for users to authenticate in an app without having to remember a password. Not only does this improve the user experience, but it also removes the overhead of managing and maintaining passwords.
Passwordless authentication generally comes in two flavors: 1) inheritance-based, where the user exchanges a physical trait, such as biometric data, to authenticate, or 2) possession-based, which is more common and involves the user exchanging a credential owned by the user, such as an email or phone number, for a link or OTP to authenticate.
In this post, we will focus on the latter, possession-based authentication. We will demonstrate how to build a passwordless authentication system that exchanges the user’s email for a link to authenticate them seamlessly using the Firebase Authentication service and its easy-to-use SDK within a TypeScript-powered Next.js app. Our mini application will include common features of an authentication system, such as signup, login and route protection.
Prerequisites
- A Google account
- A basic understanding of the Next.js framework and TypeScript
- Basic knowledge of Restful APIs, HTTP requests and responses
- A code editor
Project Setup
Open your terminal and enter the following commands to create a Next.js app powered by TypeScript.
yarn create next-app --typescript firebase-passwordless
Next, let’s install the Firebase SDK in our Next.js app, which is the only dependency we will need.
yarn add firebase
Setting up Firebase
Let’s now proceed to set up a Firebase project with the authentication service configured to allow passwordless authentication using an email link. We will do so via the following steps.
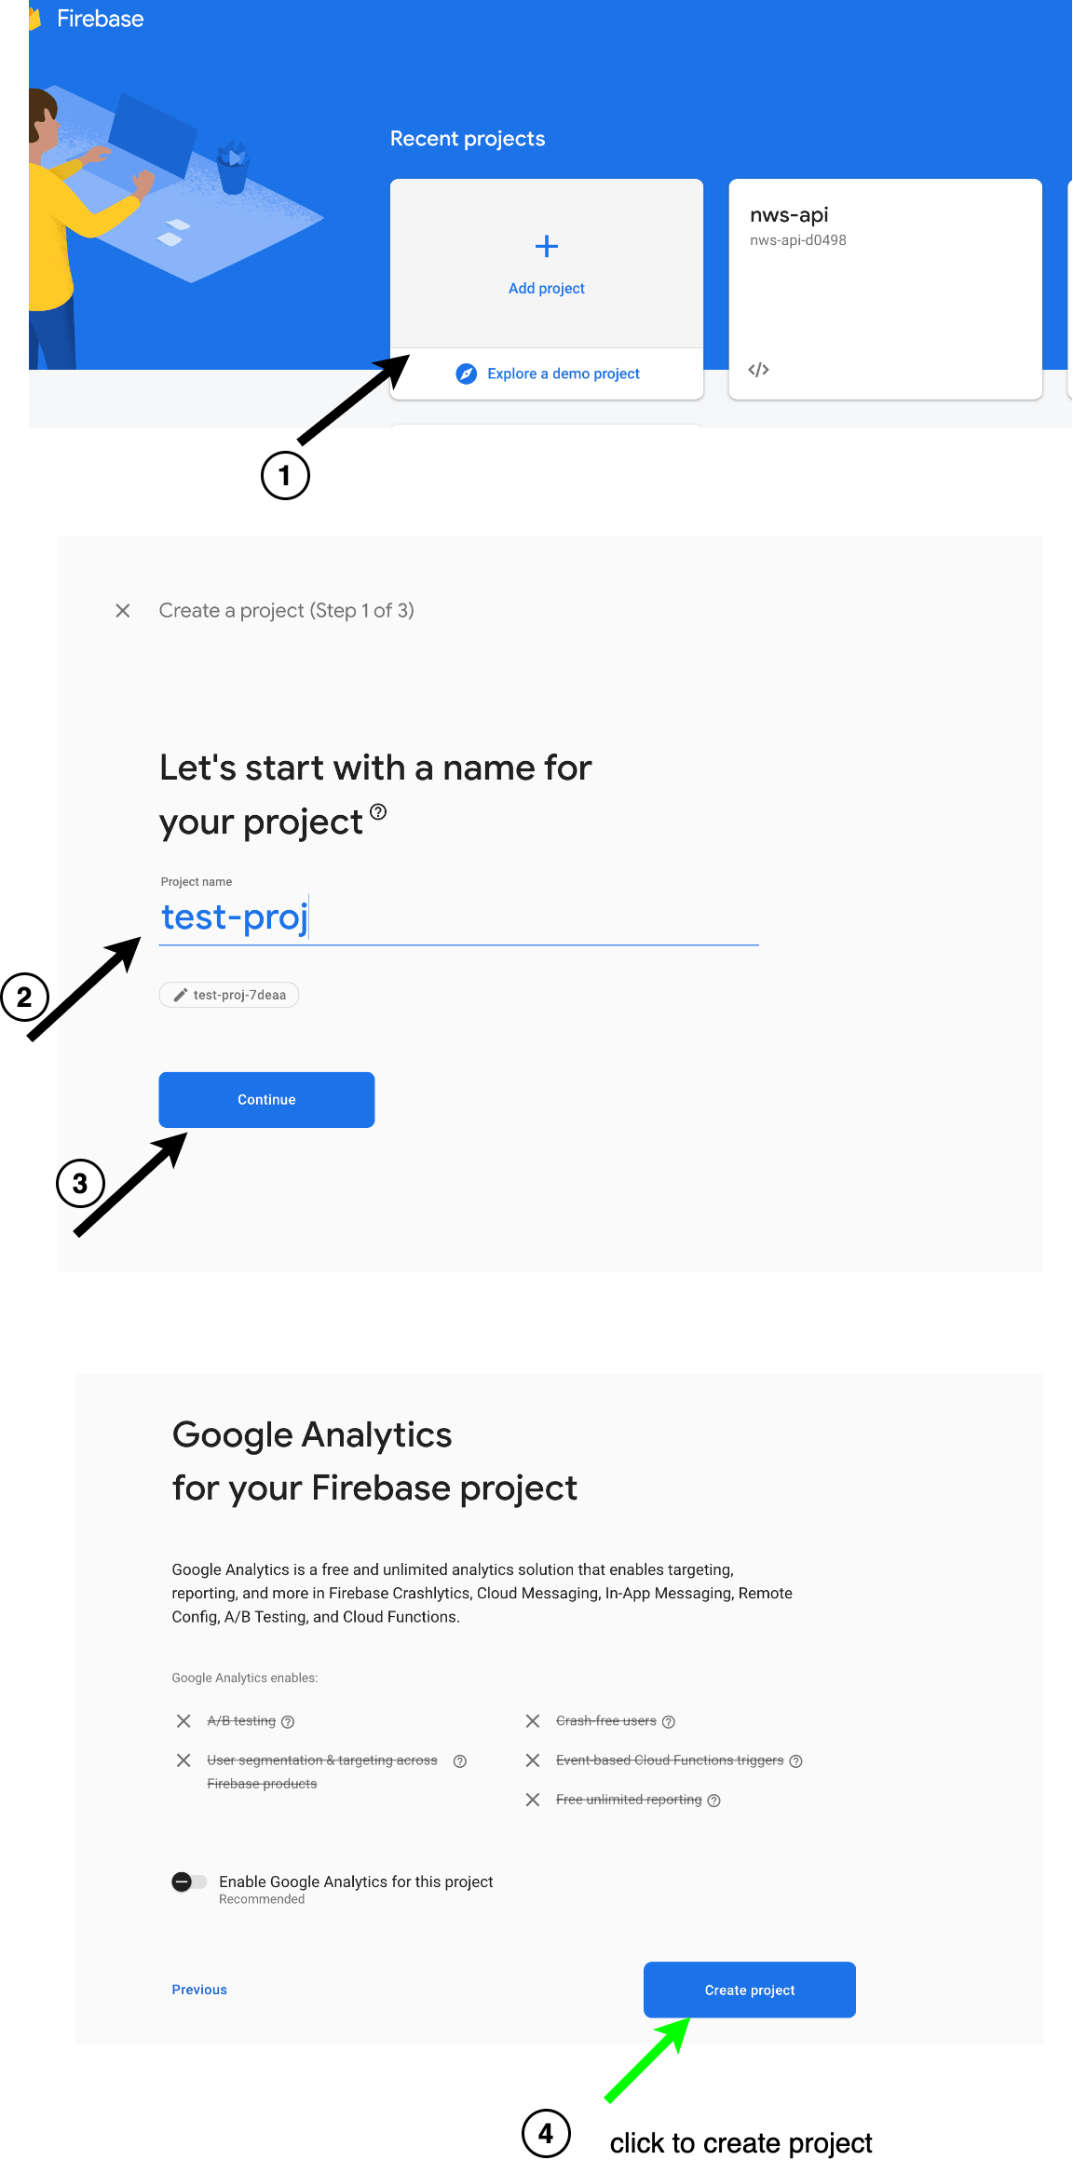
- Go to the Firebase console and create a project by selecting “Add project,” choosing the app name, and clicking “Create project,” as shown below.
- Next, let’s set up the authentication service with passwordless authentication by following these steps.
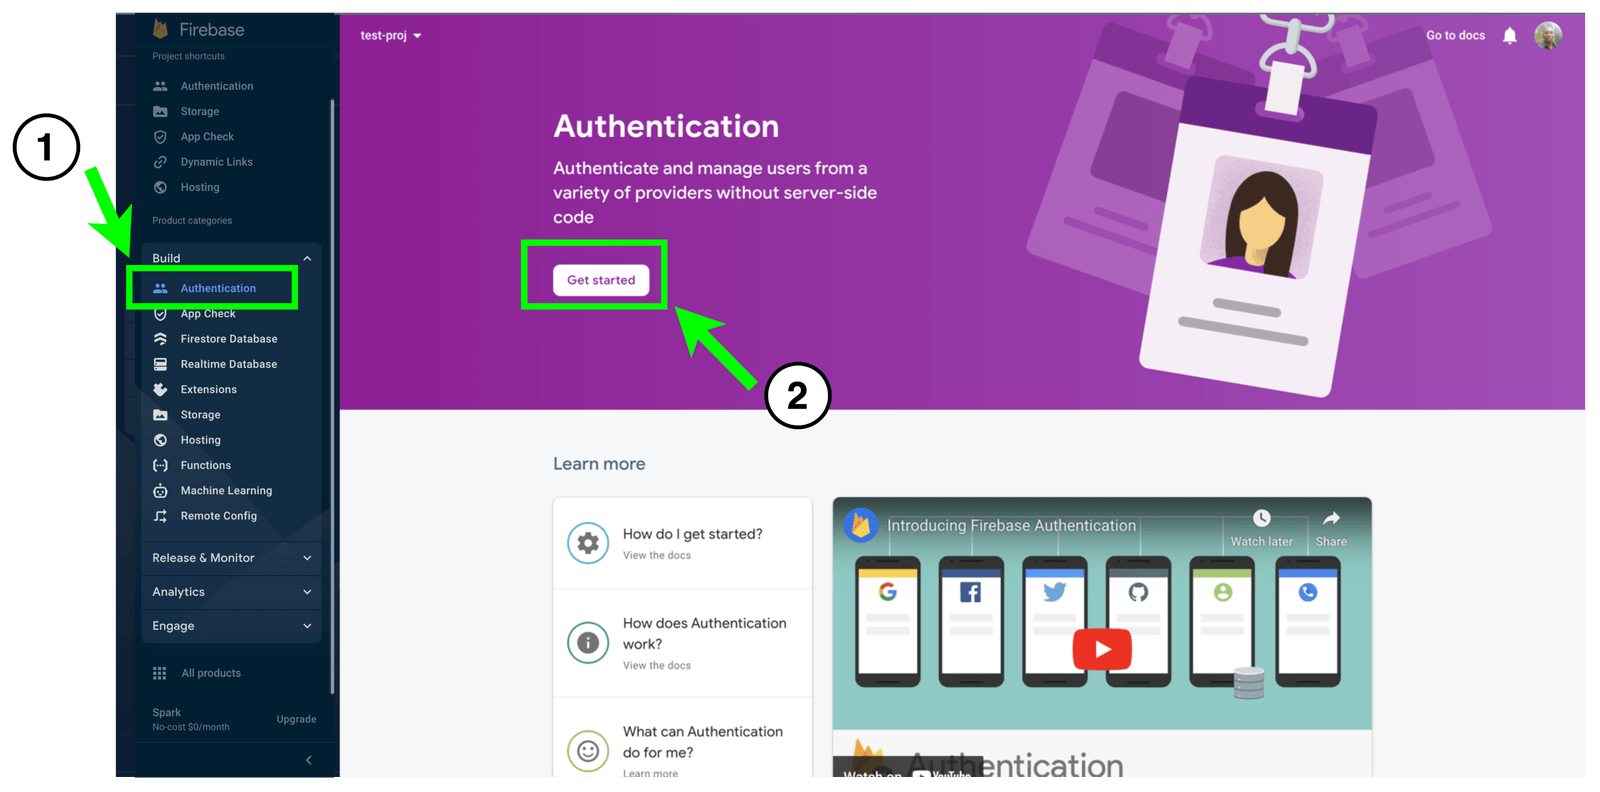
- On the sidebar on your Firebase console, select “Authentication” and click “Get Started.”
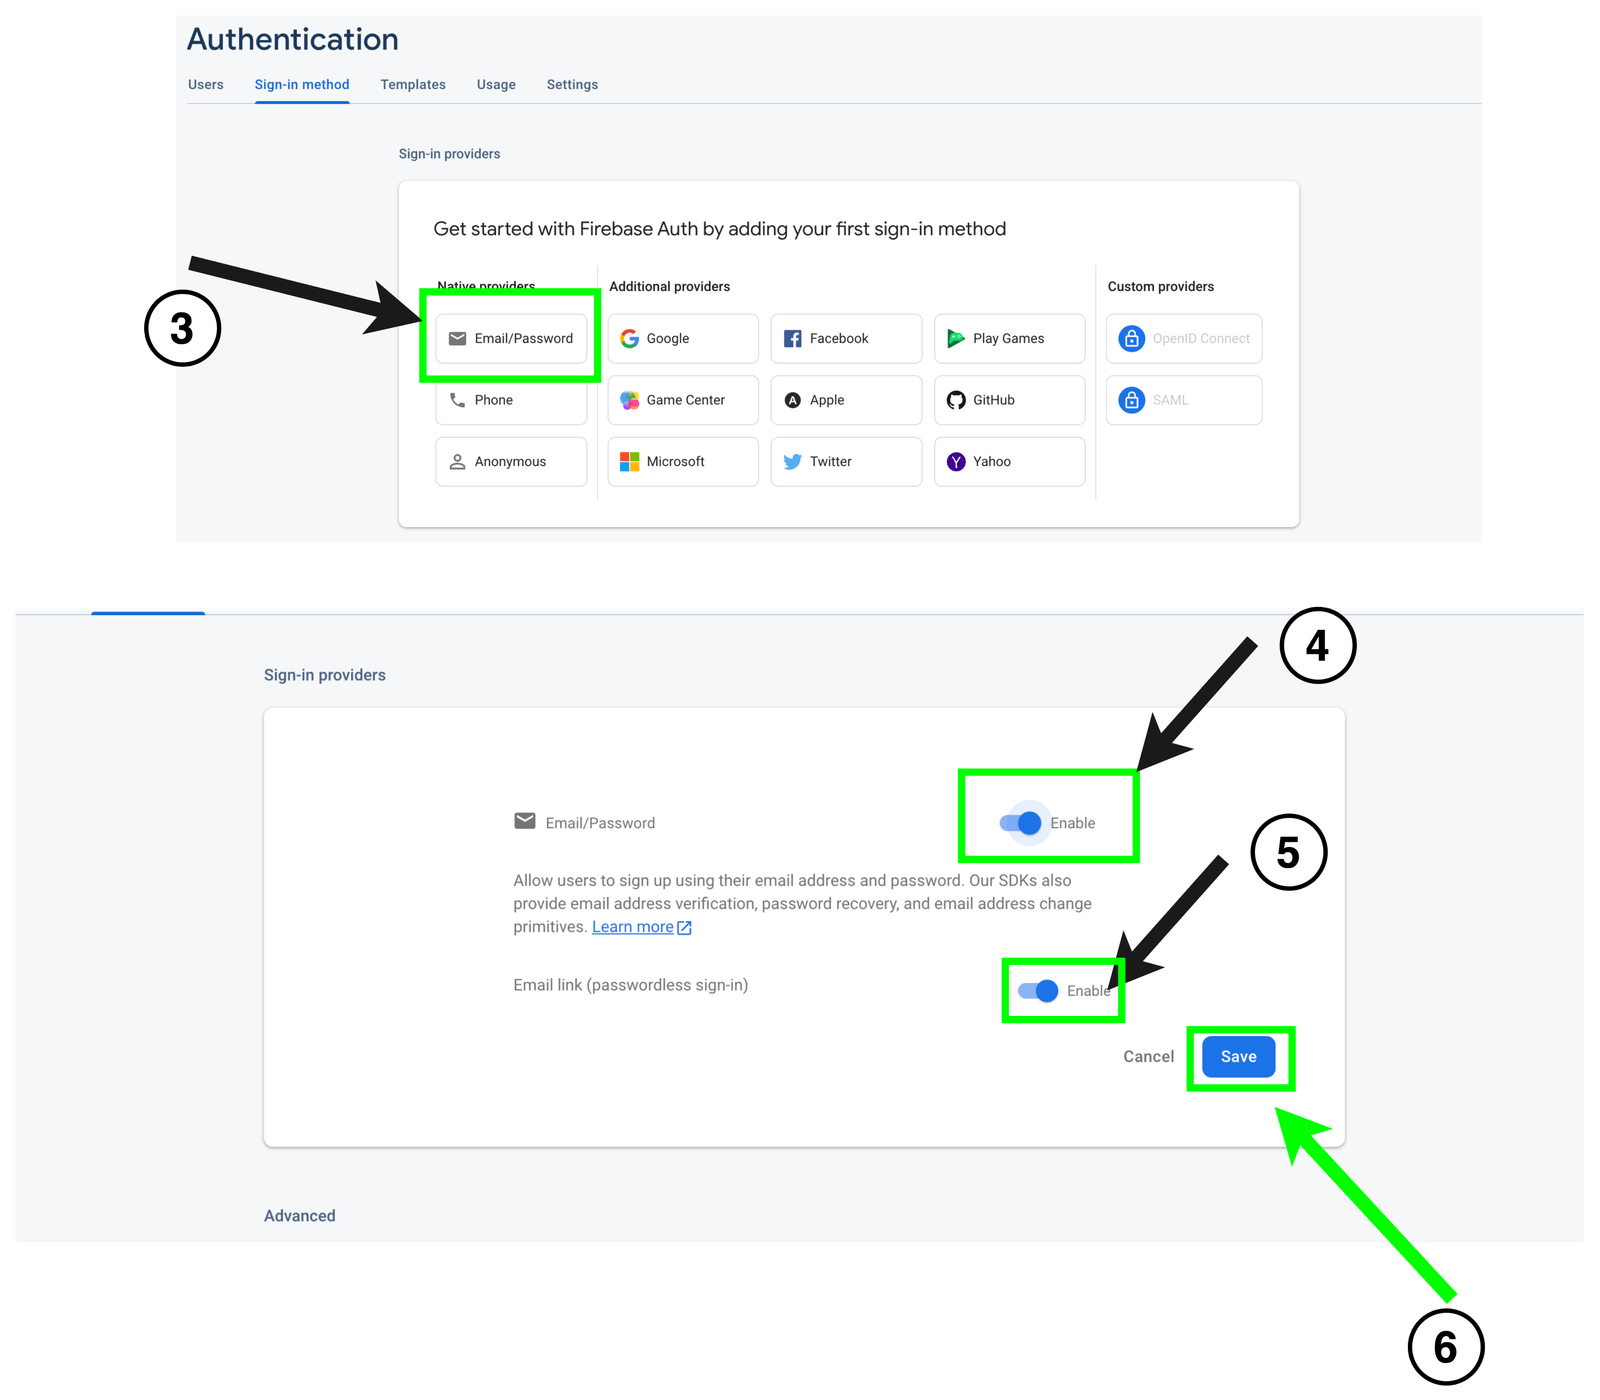
- Next, on the page, navigate to the “Sign-in methods” tab and choose the “Email and password provider” option. Enable it as well as the “Email link (passwordless)” option, and click “Save” as shown below.
- Finally, let’s get our Firebase credentials that we will need to integrate into our Next.js app. To do this, follow these steps:
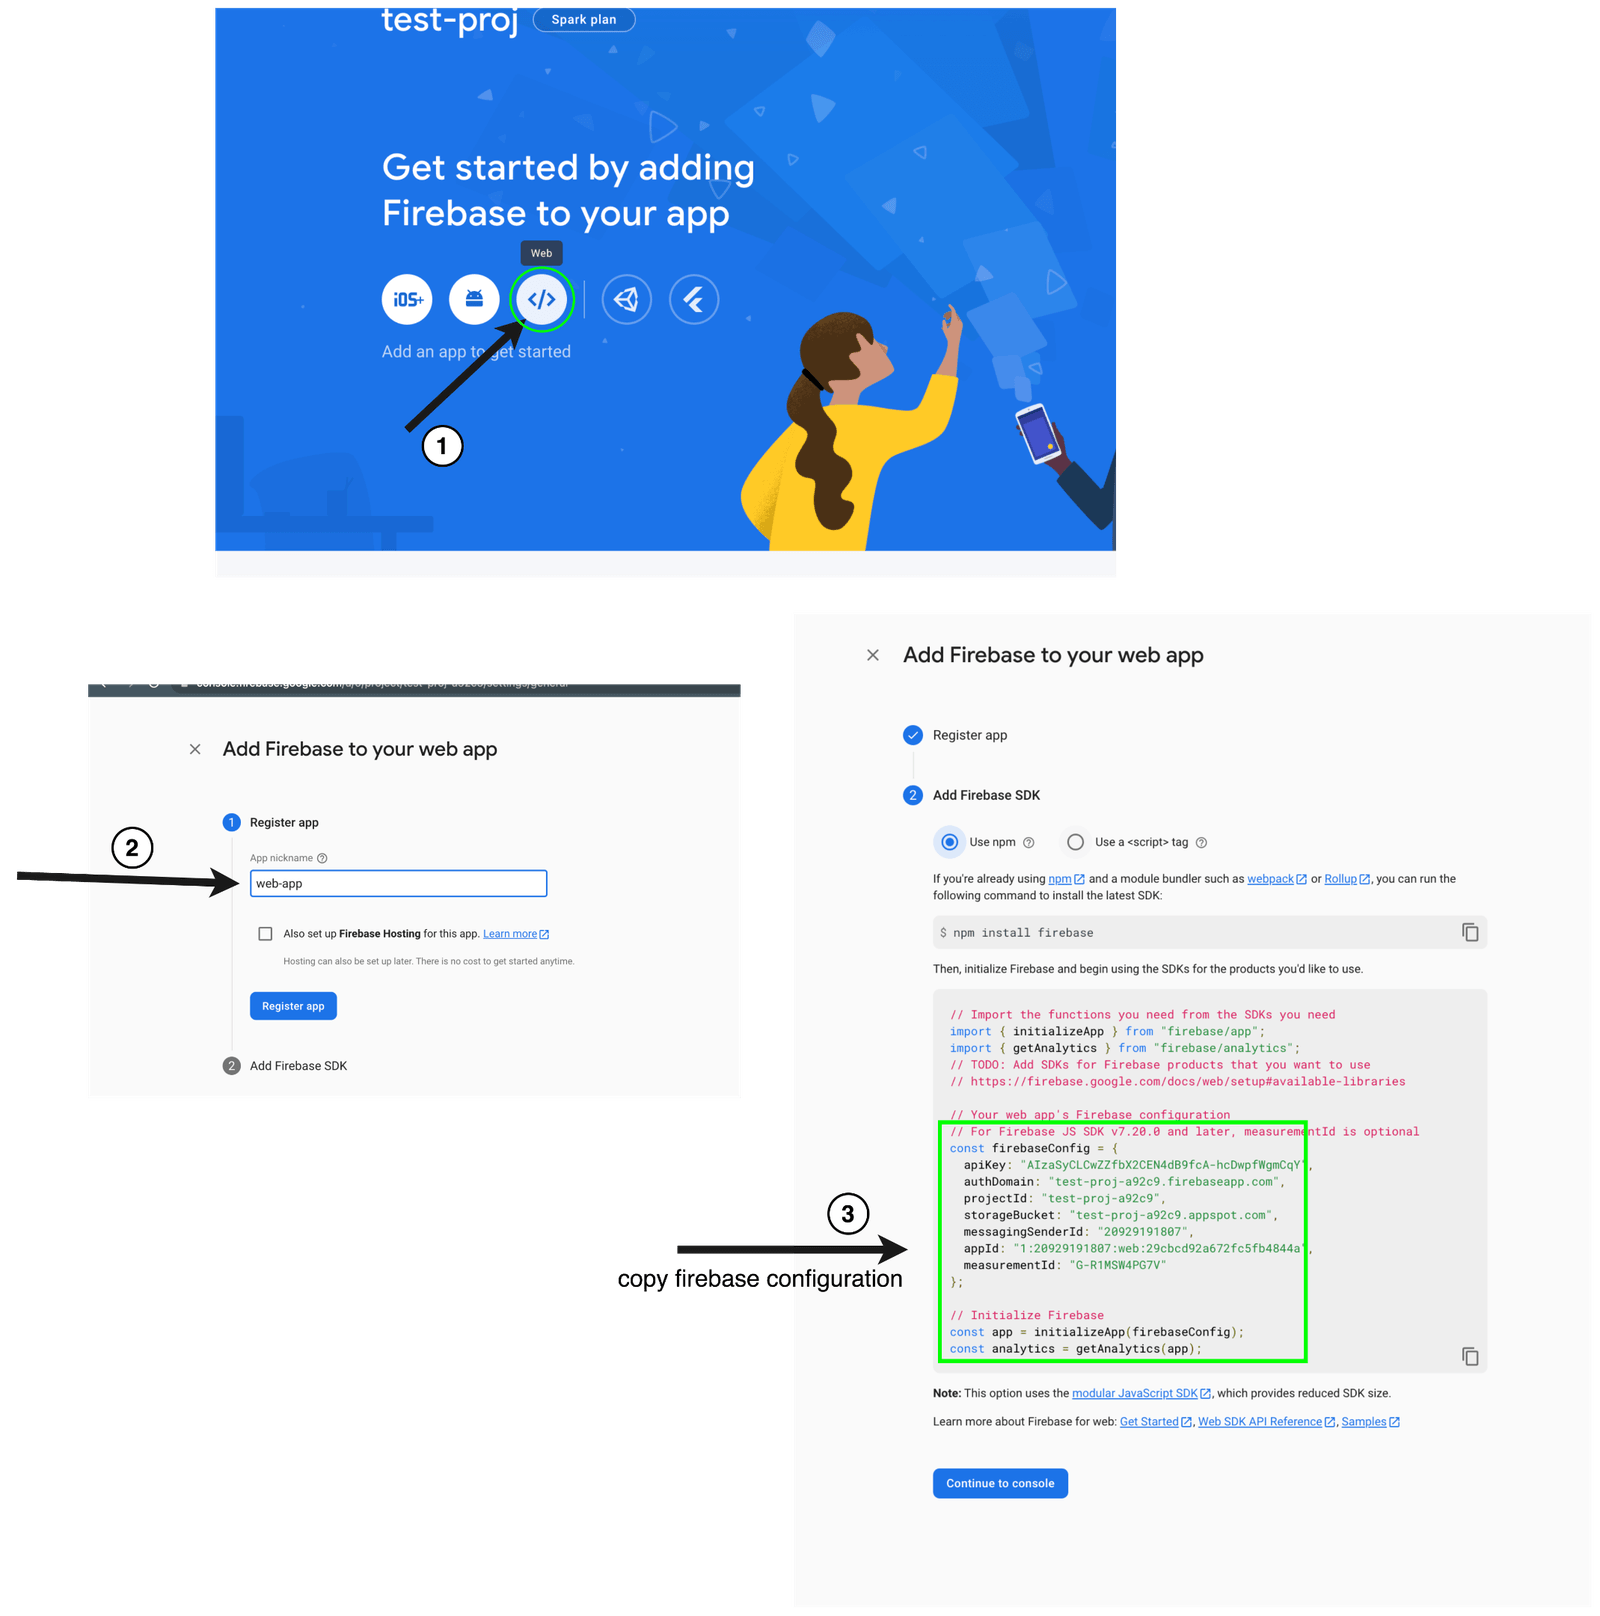
- In the project overview section, we need to create a web app. To do so, click on the web icon. You will then be presented with a form to choose a nickname for your web app. We called ours “web-app.” Once this is done, you will get all the configuration you need to set up the client SDK as shown below. Note: We are integrating with Next.js.
- Assuming you are at the root of your project, enter the following command in your terminal to create the file:
touch firebase.ts
- Update the file that was created with the code below.
import { initializeApp } from "firebase/app";
import { getAuth } from "firebase/auth";
const firebaseConfig = {
  apiKey: "AIzaSyCLCwZZfbX2CEN4dB9fcA-hcDwpfWgmCqY",
  authDomain: "test-proj-a92c9.firebaseapp.com",
  projectId: "test-proj-a92c9",
  storageBucket: "test-proj-a92c9.appspot.com",
  messagingSenderId: "20929191807",
  appId: "1:20929191807:web:29cbcd92a672fc5fb4844a",
  measurementId: "G-R1MSW4PG7V",
};
const app = initializeApp(firebaseConfig);
export const auth = getAuth(app);
This file creates a client-side firebase instance by calling initializeApp and storing it in a variable called app. It uses the firebase config for this purpose. It then extracts and exports the auth service by invoking
the getAuth function.
The Email Link Passwordless Flow
This section will form the basis for all decisions we will make in the remainder of this guide. Typically, getting the user authenticated (either by logging in or signing up) using the email link passwordless flow involves the following steps:
- Obtaining the user’s email and sending them an email that includes an authorization link.
- When the authorization link is visited, redirect the user to your page and then verify and authenticate them.
Given the above intuitive steps, we will need to create some files. Our app will consist of three pages. The homepage, which is the pages/index.tsx file, will be where the login or signup form will be located. Another
page, pages/completeAuth.tsx, will be the email action link, redirect link, authorization link handler page.
This is where the user will be directed after clicking the email authorization link from their email. We will include logic to verify and authenticate the user on this page. Finally, we will include a protected route called pages/profile.tsx.
This will be the file displayed when the user is authenticated in our app.
Since the pages/index.tsx file has already been created for us, let us create the other two files by running the following commands. These commands assume you are at the root of your project.
cd pages
touch completeAuth.tsx profile.tsx
In most apps, it is customary to create and expose an authentication context that holds all the functions needed for authentication. We will define functions for sending the user an email, verifying and authenticating, and logging out the user. Let’s
create a file called AuthProvider.tsx and run this command.
touch AuthProvider.tsx
Let’s update this file.
import { createContext, PropsWithChildren, useState, useContext, useEffect } from "react";
import { User,onAuthStateChanged} from "firebase/auth";
import { auth } from "./firebase";

type authStatus = "authenticated" | "unauthenticated" | "loading";
const AuthCtx = createContext<{
  sendAuthEmail(email: string): Promise<void>;
  verifyEmailLinkAndAuthenticate(): Promise<boolean>;
  signOut(): void;
  status: authStatus;
  user: User | null;
}>({
  async sendAuthEmail(a: string) {},
  status: "loading",
  async verifyEmailLinkAndLogin() {
    return false;
  },
  signOut() {},
  user: null,
});
export const useAuth = () => useContext(AuthCtx);

const AuthProvider = ({ children }: PropsWithChildren<{}>) => {
  const [status, setStatus] = useState<authStatus>("loading");
  const sendAuthEmail = async (email: string) => {

  };
  const verifyEmailLinkAndAuthenticate = async () => {

  };

  const signOut = async () => await auth.signOut();
  useEffect(() => {
    onAuthStateChanged(auth, (user) => {
      if (user) setStatus("authenticated");
      else setStatus("unauthenticated");
    });
  }, [status]);
  return (
    <AuthCtx.Provider
      value={{
        sendAuthEmail,
        status,
        verifyEmailLinkAndLogin,
        user: auth.currentUser,
        signOut,
      }}
    >
      {children}
    </AuthCtx.Provider>
  );
};
export default AuthProvider;
This file starts by bringing in some common React hooks. It is then followed by our auth service instance and finally the onAuthStateChange event listener.
Next, we define our Authentication context which exposes five properties: sendAuthEmail, status, verifyEmailLinkAndLogin, user and signOut. We will go over them in a minute. Next, we define and export a custom hook called useAuth that returns the authentication context using the useContext hook.
The AuthenticationProvider component implements all of the logic for the five properties that are exported by our Authentication context. The component begins by defining a state that represents the authentication status of the user. This status can be “authenticated,” “unauthenticated” or “loading,” which is the default.
The next two functions are the main building blocks of our passwordless authentication flow. These functions are the sendAuthEmail and verifyEmailLinkAndAuthenticate functions. Both
functions are currently empty, but we will update them later when we update the respective page files that trigger them.
Next, we defined a function called signOut which trivially invokes the signOut method on the “auth” service in order to clear and invalidate the user’s session.
We defined a lifecycle hook that listens to changes in the user’s authentication status or when the browser is refreshed. This hook invokes the onAuthStateChange handler, which is passed the authentication service
and a callback. The callback checks for the existence of an authenticated user object, which is passed to it as a parameter, and updates the user’s authentication status accordingly.
Finally, the AuthProvider component uses the Auth context provider to expose these five properties to our entire application, represented by the children prop, via the value prop. Let’s now update our _app.tsx file to use this component to wrap our entire app.
import "../styles/globals.css";
import AuthProvider from "../AuthProvider";

export default function App({ Component, pageProps }) {
  return (
    <AuthProvider>
        <Component {...pageProps} />
    </AuthProvider>
  );
}
Getting User’s Email, Sending an Authorization Link
Let’s now update our pages/index.tsx file, which will be where our Authentication form will live.
import { FormEvent, useRef } from "react";
import { useAuth } from "../AuthProvider";
export default function Home() {
  const emailRef = useRef() as { current: HTMLInputElement };
  const { sendAuthEmail } = useAuth();
  const handleSendEmail = async (e: FormEvent<HTMLFormElement>) => {
    e.preventDefault();
    const email = emailRef.current?.value as string;
    await sendAuthEmail(email);
  };
  return (
    <form onSubmit={handleSendEmail}>
      <input
        ref={emailRef}
        type='email'
        placeholder='enter your email here'
      />
      <button className='btn'>send email link</button>
    </form>
  );
}
This component renders a form UI with an input field bound to a DOM reference called emailRef. It accepts the user’s email, and a button that submits the form by triggering the handleSendEmail function. This function invokes our sendAuthEmail function from our authentication context and passes the user’s email extracted from the input field as an argument.
In the AuthProvider.tsx file, let’s define our sendAuthEmail function now. First, let’s update the imports from the firebase/auth module.
import { User,onAuthStateChanged,sendSignInLinkToEmail} from "firebase/auth";
Now, let’s define the function.
const sendAuthEmail = async (email: string) => {
  try {
    const actionCodeSettings = {
      url: "http://localhost:3000/completeAuth",
       : true,
    };
    await sendSignInLinkToEmail(auth, email, actionCodeSettings);
    window.localStorage.setItem("emailForAuth", email);
    alert("email sent check inbox to complete signup");
  } catch (error) {
    console.log(error);
  }
};
The SendAuthEmail function accepts an email as a string and attempts to send the user an authentication link. To do this, it starts by defining an object called actionCodeSettings.
This object allows us to configure the contents of the link that will be sent to the user’s email. The url property is set to http://localhost:3000/completeAuth,
which is our pages/completeAuth.tsx page file.
This is the URL that the user gets redirected to after they visit the link from their email. It is also referred to as the “continue URL.” You are also allowed to include request and/or query parameters that might be needed when the URL is visited.
Note the domain of the URL. In our case, “localhost” has to be registered on the list of authorized domains in your Firebase console. “localhost” has been added for us by Firebase automatically, as shown in the settings tab of our Firebase console below.
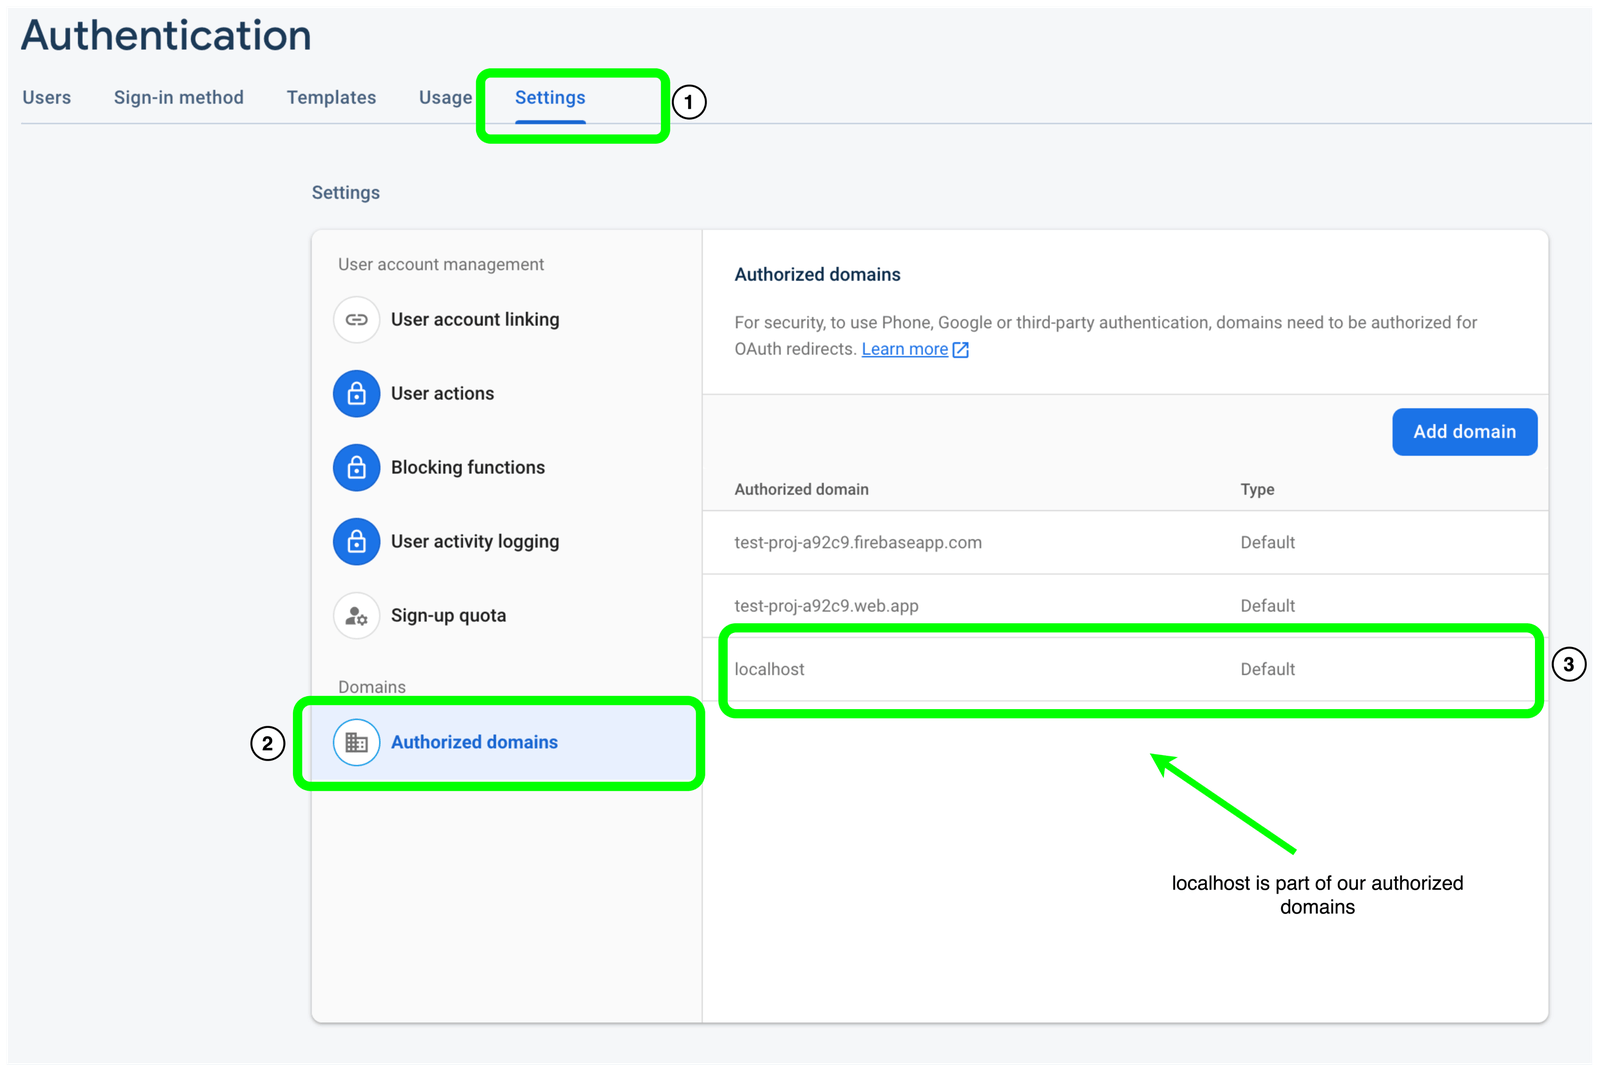
If you want to redirect the user to a domain that is not included in the list, you can click the “add domain” button, as shown above, to have it included.
The next property is called handleCodeInApp and it must be set to true. This is because we expect the user to be authenticated in our app when they visit this link. For this to be possible, the link must be handled
within our web app.
Note that the actionCodeSettings object supports more properties that can be used for other use cases, such as the need to open the link on a mobile device, and many more. Check here for more options supported by this object.
Next, we invoke the sendSignInLinkToEmail function, which is passed our auth service instance, the user’s email, and the action code settings object. If everything goes well, we display an alert informing
the user that the email has been successfully sent.
Finally, since we will still need the user’s email to successfully authenticate them when they visit the link from their email, we store the user’s email locally in local storage (you can also store it in a cookie). This is done so that the user can decide to visit the link on the same device they initiated the login. By storing the email locally, we can easily extract it to authenticate the user.
There are some “gotchas” that you must be aware of when setting the redirect URL.
- When including query parameters in the URL, you may be tempted to include the user’s email, such as “http://localhost:3000/completeAuth?email=usersemail@gmail.com.” However, this is not recommended as it has been known to allow attackers to hijack the user’s session.
- Ensure that your domain runs on HTTPS to prevent third parties from intercepting and viewing sensitive data.
To start your Next.js app, open your terminal and insert this command.
npx run dev
In the running app, we are now able to enter our email and receive an authentication link email. If you inspect the link in your inbox, you will observe that it takes the following form.
https://appname.firebaseapp.com/__/auth/action?
apiKey=${YOUR-APIKEY}&
mode=signIn&
oobCode=${OOBCODE}&
continueUrl=${URL e.g http://localhost:3000/completeAuth}&
lang=en
We will go over some noteworthy query parameters in this link. The first is the oobCode; this is a one-time code that will be used to validate the link and ensure that it can be used only once.
We also see the continueUrl parameter, which we set in our action code settings earlier. This is the URL pointing to our not yet defined completeAuth page.
The others are the API key of our firebase project and the special mode property. This will be used by our handler to determine what the link will be used for. Of course, since it is set to signIn, it will be used
to authenticate the user. You can learn more about other modes here.
Verifying and Authenticating the User
When you click on the link from our email, two things will happen. Firstly, you will be redirected to the default domain maintained for your Firebase project. Then, you will be taken to the URL in the ContinueURL query parameter. This URL will have the same query parameters as the parent link.
https://appname.firebaseapp.com/__/auth/action?
apiKey=${YOUR-APIKEY}&
mode=signIn&
oobCode=${OOBCODE}&
continueUrl=${URL e.g http://localhost:3000/completeAuth}&
lang=en
For now, nothing is happening as expected because we have not yet defined the handler on the completeAuth page, which is located at our continueURL (http://localhost:3000/completeAuth).
In our AuthProvider.tsx file, let’s first define the authorization link handler function, i.e., verifyEmailLinkAndAuthenticate.
Update the imports in this file to this:
import {
  User,
  onAuthStateChanged,
  sendSignInLinkToEmail,
  isSignInWithEmailLink,
  signInWithEmailLink,
} from "firebase/auth";
Let’s now update the body of this function:
const verifyEmailLinkAndAuthenticate = async () => {
    const continueUrl = window.location.href;
    try {
      const isValid = isSignInWithEmailLink(auth, continueUrl);
      if (!isValid) {
        return false;
      }
      const email = window.localStorage.getItem("emailForAuth") as string;
      if (!email) {
        // you can display a prompt to get user email
        return false;
      }
      const res = await signInWithEmailLink(auth, email, continueUrl);
      setStatus("authenticated");
      window.localStorage.removeItem("emailForAuth");
      return true;
    } catch (error) {
      console.log(error);
      setStatus("unauthenticated");
      return false;
    }
  };
This function returns a boolean indicating whether the verification and authentication process was successful or not. It starts by extracting the redirect or continueURL from the browser’s address bar and
storing it in a variable called continueURL.
Using this URL, it first checks if it is compatible to be used to authenticate the user with the isSignInWithEmailLink helper method. If it is not compatible, the function returns false.
Remember we said that we need the user’s email again to authenticate the user. Next, we check for the existence of the user’s email in local storage. If it is not found, the function ends and returns false. You can always display a prompt to allow the user to provide you with their email if it is not stored locally.
email = prompt("enter your email")
If everything has worked up to this point, it means that the URL is valid and we have the user’s email stored locally. Therefore, we invoke the signInWithEmailLink function to authenticate the user. This
function is fed to our Auth service instance, along with the user’s email and the URL. The signInWithEmailLink function does several things, which are worth mentioning:
- It authenticates the user.
- It verifies the user’s email and removes any unverified authentication methods associated with it. This means that if the email was used with plain unverified email and password authentication, the password will no longer work.
If everything succeeds, we will update the authentication status of the user to “authenticated” and remove the user’s email from local storage. The function will return true. If an error occurs at any point during the above steps, the user will be authenticated and the function will return false.
Next, let us update our pages/completeAuth.tsx file to use the verifyEmailLinkAndAuthenticate function.
import Image from "next/image";
import { useRouter } from "next/router";
import { useState, useEffect } from "react";
import { useAuth } from "../AuthProvider";
function CompleteAuth() {
  const [loading, setLoading] = useState(true);
  const { verifyEmailLinkAndAuthenticate } = useAuth();
  const router = useRouter();
  const handleVerify = async () => {
    setLoading(true);
    const isSuccess = await verifyEmailLinkAndAuthenticate();
    setLoading(false);
    if (!isSuccess) {
      return router.replace("/");
    }
    return router.replace("/profile");
  };
  useEffect(() => {
    handleVerify();
  }, []);
  return (
    <div className='grid_txt_2 u-center'>
      {loading && (
        <>
          <Image src='/loader.gif' alt='' width={200} height={200} />
          <h2>processing...</h2>
        </>
      )}
    </div>
  );
}
export default CompleteAuth;
This component is quite simple. It maintains some loading state and renders a simple loader while awaiting the verification and authentication process. Upon mount, it invokes its handleVerify function, which in
turn invokes the verifyEmailLinkAndAuthenticate function. If it succeeds, the user gets redirected to our protected page, i.e., pages/profile.tsx. Otherwise, if it fails, the
user is taken back to the login page.
Let’s now define our “pages/profile.tsx” file.
import React from "react";
import Image from "next/image";
import { useAuth } from "../AuthProvider";
function Profile() {
  const { user, signOut } = useAuth();
  return (
    <div>
      {user && (
        <>
          <div className='u-center'>
            <span>logged in as </span>
            <aside className='flexi'>
              <h2>{user.email}</h2>
              {user.emailVerified && <Image src='/verified.svg' alt='x' width={40} height={40} />}
            </aside>
            <button className='btn' onClick={signOut}>
              {" "}
              sign out
            </button>
          </div>
        </>
      )}
    </div>
  );
}
Profile.protected = true;
export default Profile;
In the code above we render the users email and an icon that shows that the user is verified. we also render a button that allows the user to sign out by triggering the signOut function from the Authentication
context.
Remember that our profile page is a protected route that requires the user to be authenticated in order to render properly. To add route protection to this page, we also set the protected boolean to true.
As a final step, let’s update our _app.tsx file so that it uses the “protected” boolean to prevent unauthorized access to protected pages.
import "../styles/globals.css";
import { AppPropsType, NextComponentType } from "next/dist/next-server/lib/utils";
import AuthProvider, { useAuth } from "../AuthProvider";
import { useRouter } from "next/router";
import { ReactNode } from "react";
function AuthManager({ children }: { children: ReactNode | ReactNode[] }) {
  const { status } = useAuth();
  const router = useRouter();
  if (status === "loading") {
    return <h1>loading please wait...</h1>;
  }
  if (status === "unauthenticated") {
    router.push("/");
    return null;
  }
  return <>{children}</>;
}
type CustomAppProps = AppPropsType & {
  Component: NextComponentType & { protected?: boolean }; // add auth type
};
export default function App({ Component, pageProps }: CustomAppProps) {
  return (
    <AuthProvider>
      {Component.protected ? (
        <AuthManager>
          <Component {...pageProps} />
        </AuthManager>
      ) : (
        <Component {...pageProps} />
      )}
    </AuthProvider>
  );
}
We updated our app component to include a new component called AuthManager. This component ensures that protected routes are inaccessible except when the user is authenticated and redirects the user to the login page if they are not.
We are now able to get the user’s email, send them a link, and authenticate and verify them in our app by running the application using npm run dev.
Conclusion
It is necessary to have a battle-tested authentication system when building a secure application. Firebase provides necessary tools to meet simple to complex authentication needs in web applications. Although this guide focuses more on passwordless authentication, you can always visit the docs to explore more of what this service has to offer.

Chinedu Imoh
Chinedu is a tech enthusiast focused on full-stack JavaScript and Infrastructure engineering.
Related Posts
Comments
All articles
Topics

Latest Stories
in Your Inbox
Subscribe to be the first to get our expert-written articles and tutorials for developers!
All fields are required