
jQuery Mobile and Kendo UI Mobile - A DOM Comparison
Summarize with AI:
Kendo UI Mobile and jQuery Mobile are similar projects with similar goals. Earlier this year I made a comparison of jQuery Mobile and Kendo UI Mobile to look at the differences between the projects at a high level. Today I want to discuss something more specific - the DOM conventions each frameworks uses.
The frameworks are similar in that they both are used to build SPAs (Single Page Applications). Therefore, instead of using traditional full-page based navigation, these frameworks work by placing several pages or views in the DOM simultaneously. When navigation occurs, the frameworks prevent the default browser behavior, and provide a custom animation while transitioning from one view to another.
While the frameworks take the same approach at a high level, the specific implementations are somewhat different. In this article we'll compare and contrast the markup structures each framework expects. Let's start by looking at how the frameworks organize their views.
Pages vs. Views
jQuery Mobile organizes its content into pages - which are nothing more than <div>s with a data-role attribute set to page. The following shows a jQuery Mobile application with two pages.
<body>
    <div data-role="page" id="one"></div>
    <div data-role="page" id="two"></div>
</body>
You can link between pages using a standard anchor tag.
<body>
    <div data-role="page" id="one">
        <a href="#two">Two</a>
    </div>
    <div data-role="page" id="two">
        Two
    </div>
</body>
The framework intercepts this link, and creates a transition from the first page to the second automatically.
Kendo UI Mobile works in the exact same manner with one small difference; it refers to these elements as views. Therefore the same markup is valid in Kendo UI Mobile by just changing "page" to "view", as shown below.
<body>
    <div data-role="view" id="one">
        <a href="#two">Two</a>
    </div>
    <div data-role="view" id="two">
        Two
    </div>
</body>
Note: I will be using "view" throughout the rest of this article to collectively refer to jQuery Mobile pages Kendo UI Mobile views.
Remote Views
The examples from the previous section are referred to as local views. The full markup of each view was present in the DOM when the application loaded. While this can be convenient, it can also become unwieldily for even medium sized applications.
As such, both frameworks support using external content as views. To do so in jQuery Mobile, point an anchor's href at that external resource.
The jQuery Mobile application below loads with one page with a link to a second page. When the link is clicked, jQuery Mobile performs an AJAX request to retrieve the contents of two.html, injects the external page into the main page's DOM, then transitions to the new page.
<!-- one.html -->
<div data-role="page">
    <a href="two.html">Two</a>
</div>

<!-- two.html -->
<div data-role="page">
    Two
</div>
To get this same functionality in Kendo UI Mobile, we need to make one small change. Kendo UI Mobile treats basic anchor tags as vanilla links that navigate outside of the app. Therefore to load a remove view from an anchor you can either prepend a "#" to the href attribute (i.e. <a href="#two.html">Two</a>), or convert the link into a navigation widget.
We'll discuss widgets in each framework later, but for now just know that adding a data-role="button" attribute to the link converts it into a navigation widget. Therefore, the following example loads a remote view in Kendo UI Mobile.
<!-- one.html -->
<div data-role="view">
    <a href="two.html" data-role="button">Two</a>
</div>

<!-- two.html -->
<div data-role="view">
    Two
</div>
There is one major advantage to using navigation widgets in Kendo UI Mobile - you get a fast click solution for free. What is a fast click?
Mobile browsers wait 300ms after a tap before firing a click event to ensure the user isn't double tapping to zoom. Because Kendo UI Mobile navigation widgets use a fast click solution, they're instantly activated without the standard delay. This leads to a better user experience as the application feels more responsive.
jQuery Mobile provides a vclick (virtual click) event that attempts to normalize touch and click events in their apps. Instead of listening for click or touch events, you can listen for vclick events to work around the 300ms delay. Whereas Kendo UI Mobile automatically provides a fast click solution, in jQuery Mobile you must explicitly listen for and respond to vclick events.
Now that we've seen how pages are structured in the two frameworks, let's look at the stuff you put in them.
Headers and Footers
Within views, the most common elements to add are headers and footers. On the surface jQuery Mobile and Kendo UI Mobile have very similar implementations - both optionally accept data-role="header" and data-role="footer" elements as children of the views. For example here's a jQuery Mobile page with a header and footer.
<div data-role="page">
    <div data-role="header">
        <h1>Header</h1>
    </div>
    <div data-role="footer">
        <p>Footer</p>
    </div>
</div>
And here's a Kendo UI Mobile view. Note that the only difference here is [data-role="view"] instead of [data-role="page"].
<div data-role="view">
    <div data-role="header">
        <h1>Header</h1>
    </div>
    <div data-role="footer">
        <p>Footer</p>
    </div>
</div>
There is one limitation of this approach; if you want to share a header or footer, you must hardcode it within each page. For example consider this jQuery Mobile application that shares the same header on two pages.
<div data-role="page" id="one">
    <div data-role="header">
        <h1>My Company</h1>
    </div>
    <div data-role="content">
        <a href="#two">Two</a>
    </div>
</div>
<div data-role="page" id="two">
    <div data-role="header">
        <h1>My Company</h1>
    </div>
    <div data-role="content">
        <p>Two</p>
    </div>
</div>
Note that the two headers duplicate the same three lines of HTML. If you're generating the HTML in a server side environment, this is not a problem as you can generate the header there. For example here's a PHP solution to this problem.
<? function generateHeader() { ?>
    <div data-role="header">
        <h1>My Company</h1>
    </div>
<? } ?>

<div data-role="page" id="one">
    <? generateHeader() ?>
    <div data-role="content">
        <a href="#two">Two</a>
    </div>
</div>
<div data-role="page" id="two">
    <? generateHeader() ?>
    <div data-role="content">
        <p>Two</p>
    </div>
</div>
However if you're coding in a hybrid app environment, you don't have access to these server side templating mechanisms. To solve this problem, Kendo UI Mobile introduces the concept of layouts.
Layouts are nothing more than shared containers that can be used with multiple views. For example consider the following example.
<div data-role="layout" data-id="main">
    <div data-role="header">
        <h1>My Company</h1>
    </div>
</div>

<div data-role="view" id="one" data-layout="main">
    <a href="#two">Two</a>
</div>
<div data-role="view" id="two" data-layout="main">
    <p>Two</p>
</div>
Here, note that our header is no longer hardcoded in each view. Instead, the header is within a [data-role="layout"] container, and each view chooses to use that layout by specifying [data-layout="main"]). The header is now shared on each of these views without having to duplicate the content. Footers can be shared in the same way.
Now that we have covered making headers and footers what can we put in them? jQuery Mobile's header and footer demos show how to add common features such as buttons. For example the following creates a header with a title and a single Save button.
<div data-role="header">
    <h1>Header</h1>
    <a href="#" data-icon="gear">Settings</a>
</div>
This displays as shown below.

While not always the case, Kendo UI mobile headers frequently contain a NavBar widget and its footers frequently contain a TabStrip widget. The following example shows a Kendo UI Mobile's version of a header with a title and a Save button.
<div data-role="header">
    <div data-role="navbar">
        Heading
        <a href="#" data-icon="settings" data-role="button" data-align="left">Settings</a>
    </div>
</div>
This displays as shown below.

We've seen that both jQuery Mobile and Kendo UI Mobile leverage HTML5 data-* attributes to declaratively configure views, headers, and footers. Next, we'll see how the same attributes are used to configure the frameworks' widgets.
Widgets
The widgets in both libraries are nothing more than reusable UI elements. As with the features we've seen thus far, the frameworks have a very similar approaches to building widgets with some nuanced differences.
For example consider building a common mobile control - a list of links. jQuery Mobile and Kendo UI Mobile both provide listview widgets for this purpose.
Note: Kendo UI Mobile's widget is a ListView and jQuery Mobile's is a Listview. The frameworks have different capitalization preferences and I don't believe there is a "correct" answer.
Here is how you create the most basic of Listviews in jQuery Mobile.
<ul data-role="listview">
    <li>
        <a href="settings.html">Settings</a>
    </li>
    <li>
        <a href="favorites.html">Favorites</a>
    </li>
    <li>
        <a href="about.html">About</a>
    </li>
</ul>
This displays as shown below.
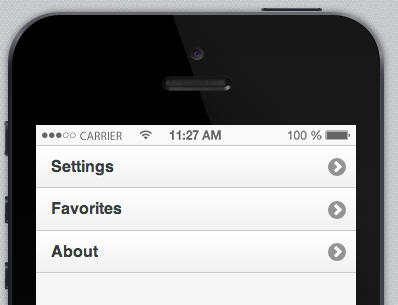
The configuration is nothing more than adding a data-role="listview" attribute.
How do you create ListView widgets in Kendo UI Mobile. Well as it turns out, the code is exactly the same!
<ul data-role="listview">
    <li>
        <a href="settings.html">Settings</a>
    </li>
    <li>
        <a href="favorites.html">Favorites</a>
    </li>
    <li>
        <a href="about.html">About</a>
    </li>
</ul>
Kendo's default ListView display is shown below.

Both frameworks utilize the data-role attribute to specify what type of widget the current DOM element should be enhanced with. And in this case, since both frameworks expect lowercased widget names in the attribute, they happen to be exactly the same.
Now this won't always be the case. In fact, there is actually little overlap in the names of the widgets each framework provides. The point here is that both frameworks utilize the data-role attribute to specify widget names.
But the similarities don't end there. Suppose you want to configure the look or behavior of these listviews. Both frameworks let you accomplish this with options, which are also configured using data-* attributes.
For example the following adds inset styling to the jQuery Mobile Listview and adds a few icons to our links.
<ul data-role="listview" data-inset="true">
    <li data-icon="gear">
        <a href="settings.html">Settings</a>
    </li>
    <li data-icon="star">
        <a href="favorites.html">Favorites</a>
    </li>
    <li data-icon="info">
        <a href="about.html">About</a>
    </li>
</ul>
Here is the updated display.

Here's the Kendo UI Mobile ListView with the same options.
<ul data-role="listview" data-style="inset">
    <li data-icon="settings">
        <a href="settings.html">Settings</a>
    </li>
    <li data-icon="toprated">
        <a href="favorites.html">Favorites</a>
    </li>
    <li data-icon="info">
        <a href="about.html">About</a>
    </li>
</ul>
And here is this ListView's updated look.

You can see that each framework uses the convention adding a data-[OPTION_NAME]="value" attribute to configure options on the widgets. The only code difference is in the name of the options and the icons. Each framework provides documentation on each option available. For example, here's jQuery Mobile's Listview's inset option docs and Kendo UI Mobile's ListView's style option docs.
So far, we have been discussing the frameworks' declarative approach to creating widgets, but each framework also provides an imperative means of creating widgets. We'll look at how each framework tackles that next.
Imperative Initialization
Both jQuery Mobile and Kendo UI Mobile default to a declarative means of building applications - meaning, you configure the application through HTML elements and attributes rather than JavaScript. Have you noticed that we haven't written a single line of JavaScript in this article yet?
When the page loads, jQuery Mobile automatically parses all HTML and creates the necessary pages and widgets based on the declarative configuration provided.
Kendo UI Mobile functions in much the same way, expect that you must explicitly create a new kendo.mobile.Application, which is usually done as follows.
<body>
    <!-- everything else -->
    <script>
        new kendo.mobile.Application( document.body );
    </script>
</body>
When the Application is created it also parses all HTML and builds the appropriate views and widgets based on the declarative configuration.
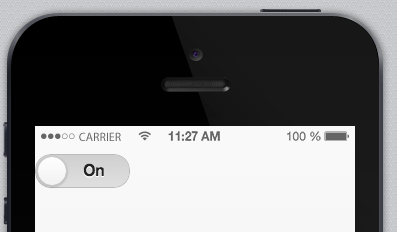
While the declarative approach is preferred by each framework, both also provide imperative APIs for explicitly creating widgets in JavaScript. For example suppose you had this container and you really wanted an iOS style switch in it.
<div id="container"></div>
In jQuery Mobile switches are a type of slider that are created from <select> elements. Therefore to imperatively create one, we create a <select>, append it to the container, then call the slider() plugin. This is shown below.
$( "<select></select>" )
    .append( "<option>On</option><option>Off</option>" )
    .appendTo( "#container" )
    .slider();
As you can see this indeed creates a switch widget.
In Kendo UI Mobile, switches are checkboxes. So to imperatively create a switch, we create an <input type="checkbox">, append it to the container, and call the kendoMobileSwitch() plugin.
$( "<input type='checkbox'>" )
    .appendTo( "#container" )
    .kendoMobileSwitch();
This also creates a switch.

While the syntax is a bit different, you can see that the approach is again very similar. While these imperative APIs work well for creating one-off widgets, suppose you receive a large chunk of HTML from a server or client side templating library. How do you go about batch creating widgets? As it turns out both frameworks give you APIs to do just that.
DOM Injection
The need to inject chunks of HTML into the DOM has become increasingly important to web applications, especially as single page applications become more prevalent. Let's look at how each framework allows you take declaratively marked up HTML - be it from a client side or server side templating library - and enhance it into widgets.
jQuery Mobile implements this functionality through a create event. For example our previous switch example can also be written as follows.
var html = "<select data-role='slider'><option>On</option><option>Off</option></select>";
$( "#container" ).html( html ).trigger( "create" );
When the create event is fired on the container, jQuery Mobile traverses its child elements and enhances any elements configured with data-role attributes into widgets. In the above example, jQuery Mobile creates a single switch control for the <select data-role='slider'> element. If additional elements with data-role attributes were present, they would have been converted as well.
Kendo UI Mobile has the a different API that performs the same functionality - kendo.mobile.init(). kendo.mobile.init() takes a single parameter - the element to initialize markup within. For example the previous Kendo UI Mobile switch example could also be written as follows.
var html = "<input type='checkbox' data-role='switch'>",
    container = $( "#container" ).html( html );

kendo.mobile.init( container );
In the example above, kendo.mobile.init() finds a single element with a data-role attribute and converts it into a switch widget.
While these APIs are extremely similar, there is one very important distinction. jQuery Mobile's create event must be triggered on a parent of the elements to actually enhance. For example the following does not work because create is triggered on the <select> rather than the container.
var switchWidget = $( "<select data-role='slider'><option>On</option><option>Off</option></select>" );
$( "#container" ).append( switchWidget );
switchWidget.trigger( "create" );
kendo.mobile.init() does not require a parent element be passed, therefore the same basic approach works.
var switchWidget = $( "<input type='checkbox' data-role='switch'>" );
$( "#container" ).append( switchWidget );
kendo.mobile.init( switchWidget );
What's Next?
Hopefully this was an interesting look at how jQuery Mobile and Kendo UI Mobile approach the problem of building mobile applications. While the finer points may differ, the libraries are actually quite similar. Both use a declarative markup approach to build single page applications, organize content into views, and allow widgets to be created declaratively and imperatively.
The best way to learn the ins and outs of the frameworks is to try them out. Both Kendo UI Mobile and jQuery Mobile are directly supported in Icenium. Icenium has sample apps for each project you can tinker with. Try it out today.

TJ VanToll
TJ VanToll is a frontend developer, author, and a former principal developer advocate for Progress.