Cascade Your Data With Kendo UI
Summarize with AI:
The other day I was looking with someone at the demos for the Kendo UI DropDown List and I noticed that the drop downs now have cascading functionality built right in out of the box. You would think that I would know these given the fact that I do work here. But as you know, it is a burden to know everything about everything. So I decided to sit down and put the cascading DropDown’s feature to the test. Note that this also works with the Kendo UI ComboBox and is very well documented there.
Choose Your Own Adventure
Remember those “Choose Your Own Adventure” books?  The concept of cascading DropDown’s is kind of a “Choose Your Own Adventure” UI paradigm. A narrowing set of choices. You start with an initial DropDown list. As you select the first option, the second DropDown then gives you choices based upon your selection in the first DropDown. A prime example is the whole Country/State scenario. You select your country and if you select the US, it gives you a DropDown of states to select from. If you select a different country, you might choose a province instead. This is very helpful for the user because it is intelligently funneling them down a certain decision path based on choices they have made previously.
Working From Bottom To Top
I think it’s actually easier to understand how Kendo UI Widgets work if you start at the back and work your way forward. In my case, I’m going to be using Northwind data in MySQL and some pretty simple PHP. Nothing fancy.
The first thing we need to do is to define the flow.
In the Northwind database, one category has many products, and each product has zero to many orders. We can cascade the data in that direction on our page
categories -> products -> orders
Now the way you might normally get your data into a drop down list in PHP might look a little something like this…
Traditional DropDown
<select>
<?php
    include("data/connection.php");

    $arr = array();

    foreach($db->query("SELECT CategoryID, CategoryName FROM Categories") as $row) {
        echo "<option value='$row[CategoryID]'>$row[CategoryName]</option>";
    }
?>
</select>
This is fine and renders a straight HTML DropDown list on the page. Note that I abstracted my connection info away into a different file and just included it. This is just to reduce the code smell. :)
The first thing we need to do to wire this same data up as a Kendo UI DropDown is to create a file which will return us the data as JSON. The file that you are going to create needs to be in a web accessible location. I put mine in a data directory which is accessible by the browser. Returning the data as JSON is pretty easy using the json_encode PHP function.
I am using PDO to query the database (for security reasons we’ll discuss in a moment), so I put the results in an array before serializing it as JSON. I also put all of the results under a “data” element. This isn’t required, it’s just a good idea to have your repeating data elements in a spot that you can remember within the JSON response. Having them at the top level is fine, but if you need to add some more top level data, you have to move the results to a top level variable.
Return Categories As JSON
<?php
    include("connection.php");

    $arr = array();

    foreach($db->query("SELECT CategoryID, CategoryName FROM Categories") as $row) {
        $arr[] = $row;
    }

    // add the header line to specify that the content type is JSON
    header("Content-type: application/json");

    echo "{\"data\":" .json_encode($arr). "}";
?>
This file is now accessible to the browser and you can call it just by entering the URL. For me, that looks like this:
http://localhost/cascadingDropDowns/data/categories.php
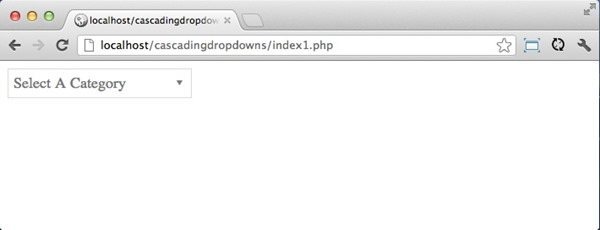
This will return the JSON results to you. Depending on which browser you are using, you may see the results displayed, or your browser may try and download a .json file. I believe Internet Explorer does this by default. In Chrome for instance, you would see this when hitting that URL:
Now that you have some data available, you can open or create an index.php or index.html file and create the first Kendo UI DropDown List.
The First Of 3
We are going to be using 3 different controls in this post, throwing in a bit of flash at the end. It will follow the cascading DropDown Demo for a while and then diverge a bit.
Of course when working with Kendo UI, the first thing that you are going to need to do is to add the appropriate Kendo UI CSS classes. This will be kendo.common.min.css and then the CSS file for the theme that you are using. For instance, if you are using the Metro theme, you will need to add kendo.metro.min.css. If you want the default Kendo theme, just use kendo.default.min.css.
Then you need to add the jQuery and Kendo JavaScript files. I do this at the end of my body tag below all of the HTML that I’m going to write. This is generally best practice as you don’t want your script files to hold up the loading of the page. Script files are loaded synchronously by the browser. Your HTML will look something like this when you are finished adding all of your references. Your paths may be different than mine.
Include Kendo UI Files
<!DOCTYPE HTML>
<html lang="en-US">
    <head>
        <meta charset="UTF-8">
        <title>Northwind Dashboard</title>
        <link href="styles/kendo.common.min.css" rel="stylesheet">
        <link href="styles/kendo.metro.min.css" rel="stylesheet">
    </head>
    <body>

        <!-- all our HTML will go here -->

        <script src="js/jquery-1.7.1.min.js"></script>
        <script src="js/kendo.all.min.js"></script>

        <!-- all the javascript magic will happen here! -->

    </body>
</html>
To create the first DropDown, add an input element and give it an id of categories.
Create HTML Element For The First DropDown
<input id="categories"/>
Now to transform this input into a DropDown list, we are going to use what is called imperative initialization. This means we are going to select the input by its ID with jQuery, and then use the kendoDropDown function to create the widget. Open up a script block below the kendo JavaScript include.
<script src="js/kendo.all.min.js"></script>
<script>

    // create a self-invoking anonomous function to protect the global
    // namespace. Set it to the MYAPP variable which will be avaiable
    // in the global namespace.
    var MYAPP = (function($, kendo) {

        // select the categories DropDown and turn it into a kendo ui
        // DropDown widget
        $("#categories").kendoDropDownList();

    })(jQuery, kendo);

</script>
Lets talk a bit about the above piece of JavaScript code as it might look a little bizarre to you if you aren’t terribly familiar with JavaScript patterns and concepts.
The first thing that I did was create a self-invoking anonymous function. This simply means that I created a function without a name.
function() {

}
That’s an anonymous function. The next thing I did was make it “self-invoking”. You do this by putting the whole function in parenthesis. Then you invoke it by putting an extra set at the very end.
(function() {

})()
Now this function is self-executing, so it’s going to run as soon as the page loads. You might be saying to yourself “Can’t I just use the jQuery document ready function?”. Sure! Use what makes you happy. But since we are at the bottom of the page, the DOM is already ready.
Notice that I also passed jQuery and kendo into the function as parameters. Why? It’s good practice not to depend on global variables like this inside of anonymous functions. So you pass them in as parameters. This allows you to make jQuery anything you want inside the function. I could have passed in burke as jQuery and used it instead of the $ sign. If I were so vain.
(function(burke, kendo) {

    // I AM JQUERY!
    burke("#categories").kendoDropDownList();

})(jQuery, kendo)
That was just for the sake of explanation. Obviously you would never do that.
Then I assigned the entire self-invoking anonymous function (also known as an IIFE (prounounced “Iffy”. Short for Immediately Invoke Function Expression) to the MYAPP variable. That means that whatever this function returns will be assigned to the MYAPP variable. Right now, it’s returning undefined because we haven’t specified what to return.
The drop down is currently empty, so let’s get the data out of the categories.php file and put it in the categories drop down.
Using The Kendo UI DataSource
To do that, we are going to need a Kendo UI DataSource. The Kendo UI DataSource takes care of all of the interaction with your server by making AJAX calls. An AJAX call is simply a call to the server that’s made in the background without you having to actually submit the entire page.
$("#categories").kendoDropDownList({
    dataSource: new kendo.data.DataSource({
        transport: {
            read: "data/categories.php"
        },
        schema: {
            data: "data"
        }
    }),
    optionLabel: "Select A Category",
    dataTextField: "CategoryName",
    dataValueField: "CategoryID"
});
DataSource Configuration
Lets look a bit at the above DataSource configuration.
The transport on the DataSource specified where you will be reading the data from. My php file is relative to the index.php file where this JavaScript code is so I can use the relative path.
You cannot make AJAX calls to files on other domains. This is called a cross-domain request. Security restrictions in browsers will not allow this. There are some ways around it. Specifically, using JSONP or cross-origin resource sharing (CORS).
I also set the schema. The schema object simply holds a little bit of info about the structure of our incoming JSON that the DataSource needs to know. Specifically, we are telling it where the repeating data in our data set is. This is done by setting the data property of the schema. If you remember from above, I put all the items under a “data” element.
You can find a complete documented list of DataSource configuration, events and methods here.
DropDown Configuration
For DropDown, I set the DataSource first, then I set the optionLabel. This tells the DropDown what to display by default. If you don’t specify this, the first item will be shown.
To set which fields from the DataSource we want to display in the DropDown, I set the dataTextField and dataValueField. The dataTextField is the text we want the DropDown to display. The dataValueField is the underlying value of each item in the list. This is set to the ID value of the corresponding category.
At this point we have a working Kendo UI DropDown List wired up to the database.
Cascading The Data
Of course, before we can cascade the data, we need some more data to cascade! I created a second file called products.php in my publicly accessible data directory. In this case, you are going to need to pass in a parameter to the SQL. This is where using PDO comes in handy. Let’s look at the code and then we’ll talk about why use PDO.
Products Data
prepare("SELECT ProductID, ProductName FROM Products WHERE CategoryID = ?");
if ($stmt->execute(array($_GET["CategoryID"]))) {
while ($row = $stmt->fetch()) {
$arr[] = $row;
}
}
// add the header line to specify that the content type is JSON
header("Content-type: application/json");
echo "{\"data\":" .json_encode($arr). "}";
?>
PDO cleanses your SQL using prepared statements. This is because you are wide open to SQL Injection if you just pass in a value from the front end and append it to your SQL string. PDO protects you against this.
You can see that I’m looking for a CategoryID value on the global _GET container. This variable will have all of the variables that we pass in with an HTTP GET (which is what our DataSource is doing for a read unless we tell it otherwise).
Now lets create that second DropDown. Add a second input element with the id Products
Add A Second Input Element
<input id="products"/>
And create the second DropDown just like we did the first the imperative initialization.
Create The Second DropDown
$("#products").kendoDropDownList({
    dataSource: new kendo.data.DataSource({
        transport: {
            read: "data/products.php"
        },
        schema: {
            data: "data"
        }
    }),
    optionLabel: "Select A Product",
    dataTextField: "ProductName",
    dataValueField: "ProductID"
});
That looks essentially identical to the categories DropDown.
Cascading
Now we get to the fun part. Cascading the drop downs. To do this, add the cascadeFrom configuration attribute to the products DropDown. You simply need to specify the id of the DropDown you want to cascade from. You will also need to toggle serverFiltering on the DataSource so that the DataSource will send filter values to the server. Lastly, toggle autoBind off so that the second DropDown won’t try and read from the DataSource when it first loads. This is the default.
$("#products").kendoDropDownList({
    dataSource: new kendo.data.DataSource({
        transport: {
            read: "data/products.php"
        },
        schema: {
            data: "data"
        },
        serverFiltering: true
    }),
    optionLabel: "Select A Product",
    dataTextField: "ProductName",
    dataValueField: "ProductID",
    cascadeFrom: "categories",
    autoBind: false
});
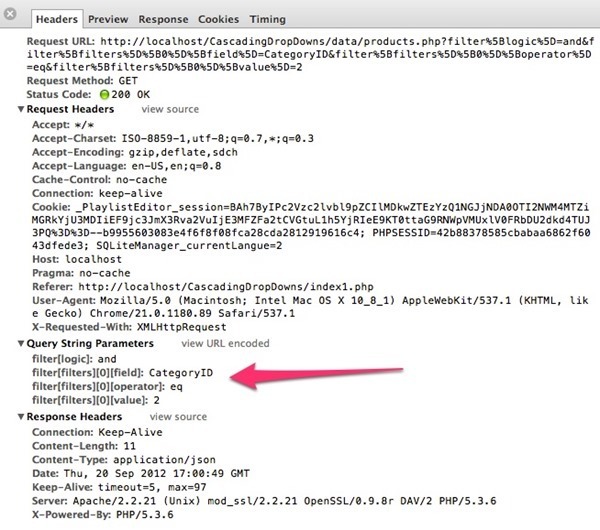
Should you run this, it will appear to work. The second DropDown will not be enabled until a value in the first one is selected. However, the second DropDown will be empty. If you inspect your page using the F12 Developers Tools or FireBug or Chrome Dev Tools (whichever of these suits you best), you will be able to see the request for products.php go across the wire. Notice what parameters are being sent with it.
Kendo UI sends a filter array object by default. If you recall, we are expecting a single CategoryID parameter in the products.php file. We have 2 options here. We can either parse the parameters on the server, or on the client. Parsing parameters with Kendo UI is super simple so I’m going to do it client-side.
Add a parameterMap function to the DataSource transport, right after the read. This function is called by the DataSource PRIOR to it sending any request over the wire. It takes two parameters. The first contains any options we are sending to the server. It currently contains the array of filter values. The second is the operation parameter which will give you more information about what operation is currently being performed (create, read, update or destroy). We won’t be using the operation parameter in this example.
Whatever you return out of this function is what Kendo UI will send with the AJAX request. If you don’t return anything, nothing will be sent.
In order to get the value out, we just need the filter object. It contains an array of filters. We only have 1. It’s the CategoryID. We need its value.
Parse The CategoryID Parameter
$("#products").kendoDropDownList({
    dataSource: new kendo.data.DataSource({
        transport: {
            read: "data/products.php",
            parameterMap: function(options, operation) {
                return {
                    CategoryID: options.filter.filters[0].value
                }
            }
        },
        schema: {
            data: "data"
        },
        serverFiltering: true
    }),
    optionLabel: "Select A Product",
    dataTextField: "ProductName",
    dataValueField: "ProductID",
    cascadeFrom: "categories",
    autoBind: false
});
Voila!
You have cascading DropDown lists! Nice!
Notice that as you change the first DropDown, Kendo UI takes care of disabling the second one until you select a legitimate value. When you do, it makes a request to the server and gets the related records. Meanwhile PDO on the server makes sure that nobody meaning you harm can send malicious values to your database and drop your tables or expose your sensitive data.
A Step Further
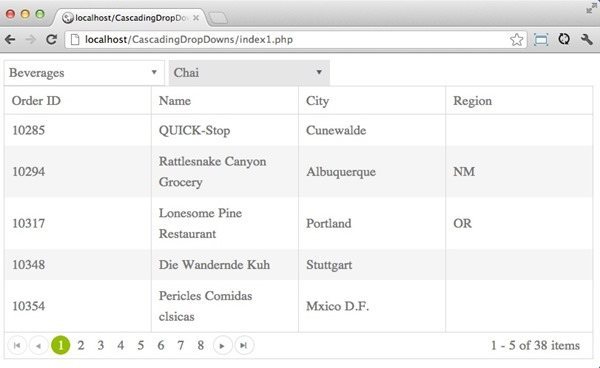
Lets go another step and add a grid to this mix. Each product has associated orders and it would be nice to display those in a grid below the DropDown’s.
First things first, here is the code to retrieve the data from the Orders table by joining to OrderDetails and then selecting all the relevant orders by ProductID
Select Orders By Product ID
<?php

    include("connection.php");

    $arr = array();

    $stmt = $db->prepare("SELECT o.OrderID, o.ShipCity, o.ShipName, o.ShipRegion
                          FROM OrderDetails d
                          INNER JOIN Orders o ON d.OrderID = o.OrderID
                          WHERE d.ProductID = ?");

    if ($stmt->execute(array($_GET["ProductID"]))) {
        while ($row = $stmt->fetch()) {
            $arr[] = $row;
        }
    }

    // add the header line to specify that the content type is JSON
    header("Content-type: application/json");

    echo "{\"total\":" .count($arr). ", \"data\":" .json_encode($arr). "}";

?>
Take notice that on the very last line I’m returning a total count of records along with the grid data. This is why I mentioned at the very beginning that it’s a good idea to put your actual data in a “data” object of some sort. The total is needed here for us to be able to have paging in the grid. It needs to know how many pages of data there are or paging won’t have enough information to work.
For the grid, just add an empty div below the inputs.
Add Grid Div
<input id="categories" />
<input id="products" />
<div id="orders"></div>
Create the Kendo UI Grid widget by selecting the orders div and calling the kendoGrid function. I configured a few columns as well, but nothing fancy. We also of course need to assign the DataSource for the Grid the same way we did the DropDowns.
Now this grid doesn’t have a cascadeFrom toggle like the DropDown’s do. You need to listen to the change event on the second DropDown and then tell the grid DataSource to read. To pass the parameter, I am going to use an additional variable called productId which I can set to the selected product id.
Grid Initialization Code
// create a product variable to hold the selected
// product id.  set it to 0 by default
var productId = 0;
$("#orders").kendoGrid({
    columns: [{ field: 'OrderID', title: 'Order ID'},
             { field: 'ShipName', title: 'Name'},
             { field: 'ShipCity', title: 'City' },
             { field: 'ShipRegion', title: 'Region'}],
    dataSource: new kendo.data.DataSource({
        transport: {
            read: "data/orders.php",
            parameterMap: function(options, operation) {
                // return the value of the selected product
                return {
                    ProductID: productId
                }
            }
        },
        schema: {
            data: "data",
            total: "total"
        },
        pageSize: 10
    }),
    pageable: true,
    autoBind: false
});
Add an event listener to the second DropDown change event. Assign the productId variable to the selected DropDown value. This value is passed to the change function on the sender object value() method.
Add Change Event Listener To Products
$("#products").kendoDropDownList({
    dataSource: new kendo.data.DataSource({
        transport: {
            read: "data/products.php",
            parameterMap: function(options, operation) {
                return {
                    CategoryID: options.filter.filters[0].value
                }
            }
        },
        schema: {
            data: "data"
        },
        serverFiltering: true
    }),
    optionLabel: "Select A Product",
    dataTextField: "ProductName",
    dataValueField: "ProductID",
    cascadeFrom: "categories",
    autoBind: false,
    change: function(e) {
        // the products DropDown is e.sender. to get it's selected value
        // call the view() method
        productId = e.sender.value();
        // tell the grid to refresh
        $("#orders").data("kendoGrid").refresh();
    }
});
Awesome! That’s a pageable grid. We are now cascading our data all the way down from the top level category.
Make It More Better
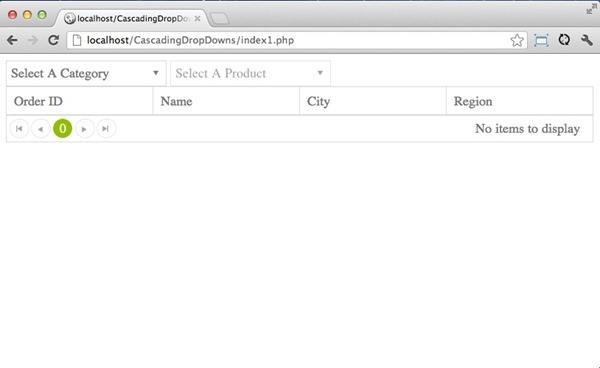
We have some issues though. Primarily, an empty grid is displayed before the second item is selected. That’s not ideal.
This isn’t amateur hour! Lets fix it.
First off, I’m going to add just a bit of style to the head of the page. This will set a top margin on the grid so it’s not right up against the DropDowns. It will additionally make the grid hidden by default by setting display: none.
Add Some Style
<style>
    #orders {
        margin-top: 20px;
        display: none;
    }
</style>
Now the grid doesn’t display by default. To display it, we just need to show it after the change event on the Products DropDown. I’m not just going to make it visible though. I want it to animate in and out. I’m going to use the newly documented kendo animations to zoom the grid out and in as the selection changes. I’ll zoom it out and then back in again when the first animation completes.
Animate The Grid’s Visibility
// this is the CHANGE event on the Products DropDown.
// the other code has been omitted for berevity
...
change: function(e) {
    // first zoom the grid out
    $("#orders").kendoAnimate({
        effects: "zoom:out fade:out",
        // this fires when the zoom out completes
        complete: function() {
            // the products DropDown is e.sender. to get it's selected value
            // call the view() method
            productId = e.sender.value();
            // tell the grid datasource to read
            $("#orders").data("kendoGrid").dataSource.read();
            // zoom the grid back in
            $("#orders").kendoAnimate({
                effects: "zoom:in fade:in",
                // the show toggles the items display css property
                show: true
            });
        }
    });
}
That’s really slick. But when you change the first DropDown, the grid doesn’t disappear. Should you want it too, simply add a change event on the Categories DataSource that animates the grid out. You can even choose a different effect!
Hide The Grid When The Category Changes
// this is the CHANGE function on the categories drop down.
// the rest of the code from the widget has been omitted for brevity.
...
change: function() {
// if the grid is visible
    if ($("#orders").is(":visible")) {
        // animate it out and hide it
        $("#orders").kendoAnimate({
            effects: "slide:down fade:out",
            hide: true
        });
    }
},
...
In order to see this in all it’s glory, I’ve put together a very short video showing what we built here today in action.
That’s All I’ve Got
You have successfully learned how to “Choose Your Own Adventure” with PHP and Kendo UI. Cascading data is really easy to do with DropDowns. It can be manually done with change events and a little bit of animation can take your app from drab to fab. Yes, I just used “drab to fab” in a blog post. My wife watches a lot of “Say Yes To The Dress” which means I watch a lot of “Say Yes To The Dress”.
Grab the source code from this article on our PHP Samples GitHub Repo.
Download Kendo UI today and get started building rich interactive applications with HTML5 and whatever server-side language you like the most. We talked about PHP here, but remember, Kendo UI loves servers everywhere and works with whatever you decide to use.
Happy Adventures!

Burke Holland
Burke Holland is a web developer living in Nashville, TN and was the Director of Developer Relations at Progress. He enjoys working with and meeting developers who are building mobile apps with jQuery / HTML5 and loves to hack on social API's. Burke worked for Progress as a Developer Advocate focusing on Kendo UI.


