# Use the Step Builder to Add Steps
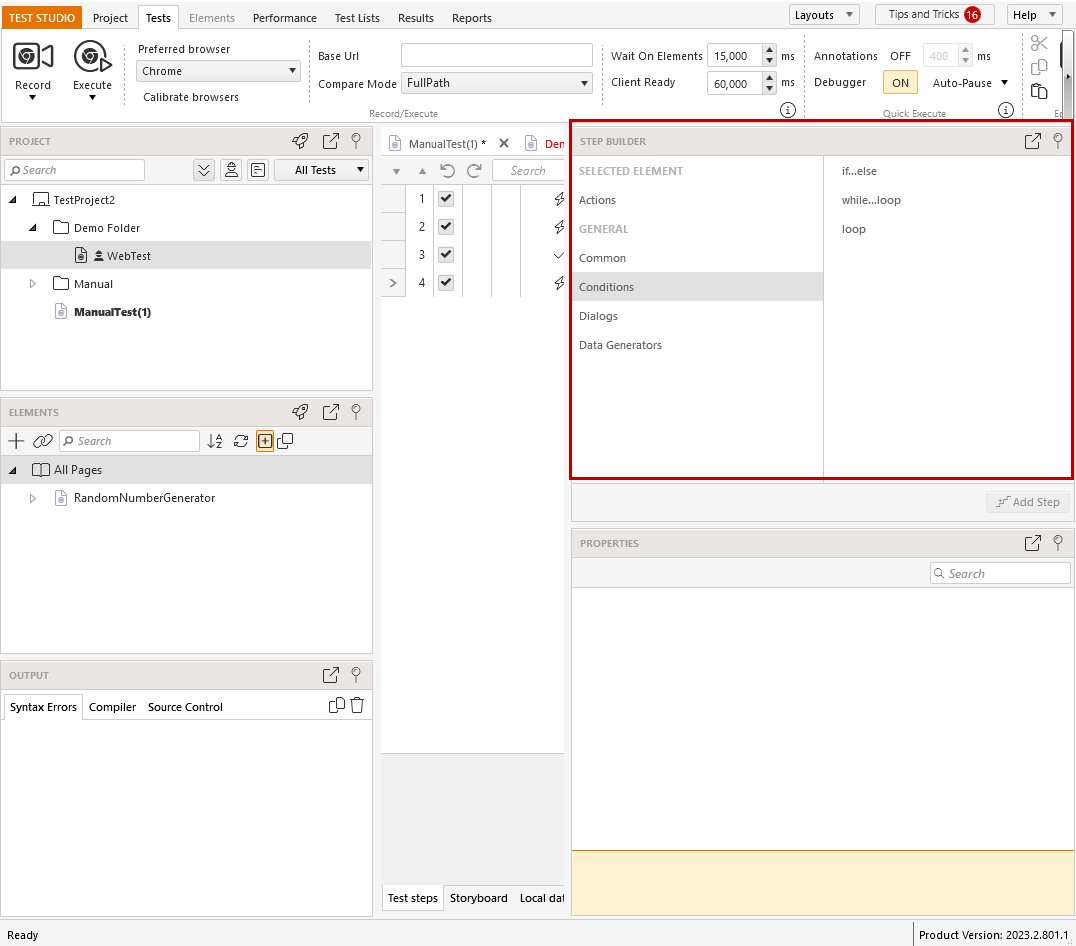
The Advanced Recording Tools window can help build a wide range of automation and verification quickly and without having to resort to manual configuration. There are some common steps like adding a comment, or clearing the browser cache, which need to be added outside of the recorded actions. The **Step Builder** pane in the project area provides a list of these additional steps and let's you maintain them in the tests.
Depending on the Test Studio project's layout you use, the **Step Builder** pane could be located on different place - usually on the right side of the project area, either pinned or hidden.
## Add Step for a Recorded Element
The Step Builder can also be used to build steps against already recorded elements in the Elements Explorer.
1. Open a test in which you need to add a step. Choose an element from the **Elements Explorer**.
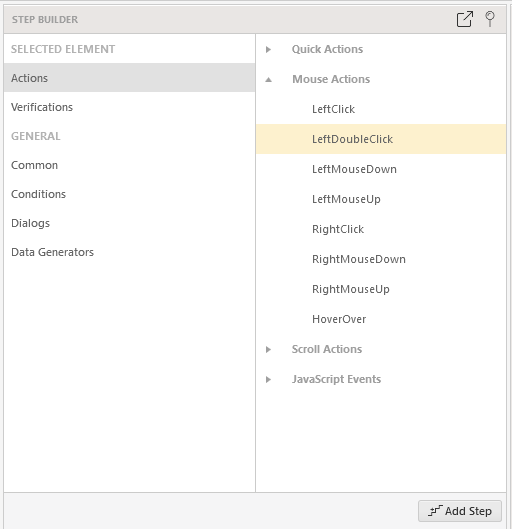
2. Click the **Step Builder** pane to activate it. Under the **Actions** and **Verification** sections, you can see the options corresponding to the type of selected element.
3. Choose the action or verification you need and click the **Add Step** button to insert the step in the test.
> **Tip**
> You can check this short video demonstrating how to add a step for an existing element in Test Studio.
## Add a General Step from the Step Builder
The **General** section in the **Step Builder** is divided in three sub-sections - **Common**, **Conditions** and **Dialogs**.
* The **Conditions** section provides the option to add the built-in logical blocks - if..else, loop and while..loop.
* The **Dialogs** section allows you to manually add steps for handling different dialogs.
* The **Common** section consists of different steps suggestions based on the type of test - web, desktop or WPF.
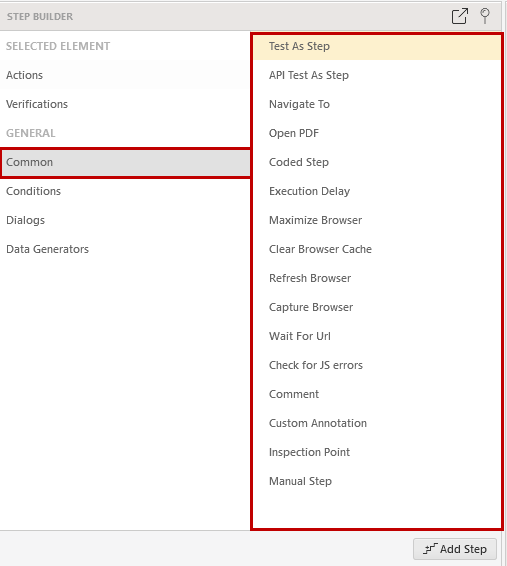
**Web Test** |
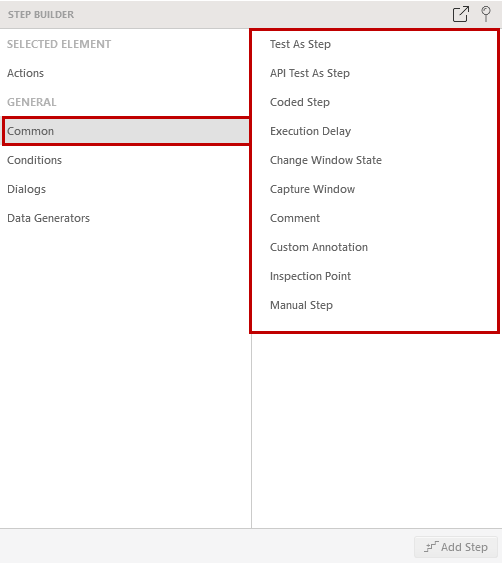
**WPF Test** |
1. [Test as Step](https://www.telerik.com/teststudio/documentation/features/custom-steps/test-as-step) - run an existing test as a single step.
2. [API Test as Step](https://www.telerik.com/teststudio/documentation/features/execute-apitest/add-api-test-as-step) - run an existing API test as a single step.
3. [Navigate To](https://www.telerik.com/teststudio/documentation/features/custom-steps/navigate-to) - navigate to an URL step.
4. [Open PDF](https://www.telerik.com/teststudio/documentation/features/custom-steps/open-pdf) - insert step to open a locally stored PDF file .
5. [Coded Step](https://www.telerik.com/teststudio/documentation/features/custom-steps/script-step) - add a coded step and open the code editor.
6. [Execution Delay](https://www.telerik.com/teststudio/documentation/features/custom-steps/execution-delay) - pause the test for a specified amount of time.
7. [Maximize Browser](https://www.telerik.com/teststudio/documentation/features/custom-steps/maximize-browser) - maximize, minimize or restore the active browser (Change Window State for WPF).
8. [Clear Browser Cache](https://www.telerik.com/teststudio/documentation/features/custom-steps/clear-browser-cache) - clears all cookies, temp files or history from the active browser depending on the user's choice.
9. [Refresh Browser](https://www.telerik.com/teststudio/documentation/features/custom-steps/browser-refresh) - refresh the active browser.
10. [Capture Browser](https://www.telerik.com/teststudio/documentation/features/custom-steps/capture) - take a screenshot of only the browser or the entire desktop.
11. [Wait For URL](https://www.telerik.com/teststudio/documentation/features/custom-steps/wait-for-url) - pause the test until the specified URL is loaded into the browser address bar.
12. [Check for JS Errors](https://www.telerik.com/teststudio/documentation/features/custom-steps/check-js-errors) - verify if there are any JS errors on the page.
13. [Comment](https://www.telerik.com/teststudio/documentation/features/custom-steps/comment) - a comment as a step in the test
14. [Custom Annotation](https://www.telerik.com/teststudio/documentation/features/custom-steps/custom-annotation) - add a note to display when running "Quick Execution" with Annotation turned on.
15. [Inspection Point](https://www.telerik.com/teststudio/documentation/features/custom-steps/inspection-point) - pause the test and display the DOM Explorer.
16. [Manual Step](https://www.telerik.com/teststudio/documentation/features/custom-steps/manual-step) - display a dialog box to enter directions for a manual step.
17. [Change Window State](https://www.telerik.com/teststudio/documentation/features/custom-steps/change-window-state) - alter the state of the WPF application window.