# Ordered Wrap Panel

RadRibbonView's dynamic layout resizing allows you to optimize the layout depending on the available space.

This feature is enabled with the **RadOrderedWrapPanel** (described in this article) and the [RadCollapsiblePanel](https://www.telerik.com/winui/documentation/controls/radribbonview/layout-controls/collapsible-panel).

> tip Read the [Resizing](https://www.telerik.com/winui/documentation/controls/radribbonview/features/resizing) topic, which is tightly connected with the RadOrderedWrapPanel behavior.

## Fundamentals

> You can access the **RadOrderedWrapPanel** control through an alias pointing to the **Telerik.UI.Xaml.Controls** namespace: `xmlns:telerik="using:Telerik.UI.Xaml.Controls"`

**RadOrderedWrapPanel** is used together with **RadButtonGroup** to create a layout known from the Microsoft Office applications. It has two states:

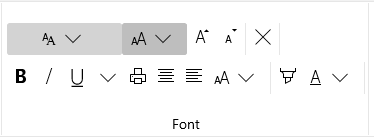
#### **Figure 1: Normal State**
![WinUI RadRibbonView Normal State](https://www.telerik.com/winui/documentation/assets/b57d1ea80a41242fafbf14d2a2608106/radribbonview_ordered_wrappanel.png)

The **RadOrderedWrapPanel** displays its children along **two** horizontal lines in the **normal** state.

> tip When there is enough space, the **RadOrderedWrapPanel** always tries to layout its children in **Normal** state.

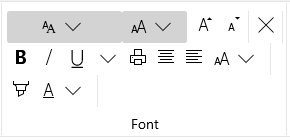
#### **Figure 2: Compressed State**
![WinUI RadRibbonView Compressed State](https://www.telerik.com/winui/documentation/assets/29c57d392ea0990eede5483187c19aa5/radribbonview_ordered_wrappanel_compressed.png)

In the **compressed** state the **RadOrderedWrapPanel** displays its children along **three** horizontal lines, thus achieving a more compact and tightly packed structure.

> tip If you refer to the Microsoft Office Word product, you will note that a similar layout behavior is used by the "Font" and "Paragraph" groups.

You have the ability to specify when the Panel should go into the **Compressed** state by using the **RadOrderedWrapPanel**'s **CompressedThreshold** property. Its values are predefined in the **CollapseThreshold** enumeration, which exposes the following fields:

* **Never**: The panel never goes in **Compressed** state.
* **WhenGroupIsSmall**: The panel goes in **Compressed** state when the group is in **Small** variant.
* **WhenGroupIsMedium**: The panel goes in **Compressed** state when the group is in **Medium** valiant.

At this point, if you fill your panel with RadControls, you will have a functioning layout that splits itself into two or three lines, depending on the available space. There is another important property: **CompressedItemsOrder**. It allows you to change the order of the panel's children upon being compressed. This is very useful because when your child controls are split into three lines, you may want to alter their order because some are being used more frequently than others. The **CompressedItemsOrder** property is a simple **Int32** collection, that you are able to set with a comma-delimited list of integers in XAML.

## Using RadOrderedWrapPanel

The next example demonstrates how to build a "Font" like **RadRibbonGroup** using the **RadOrderedWrapPanel**.

#### **Example 1: Using RadOrderedWrapPanel**

```XAML
<telerik:RadRibbonView x:Name="radRibbonView"  
					Title="My Title" 
					ApplicationName="My Application">
	<telerik:RadRibbonTab Header="Home">
		<telerik:RadRibbonGroup Header="Font">
			<telerik:RadOrderedWrapPanel CompressedItemsOrder="0,3,2,4,1">
				<StackPanel Orientation="Horizontal">
					<telerik:RadRibbonDropDownButton Width="115" Background="LightGray" telerik:ScreenTip.Title="Font" telerik:ScreenTip.Description="Change the font face.">
						<telerik:RadRibbonDropDownButton.SmallIcon>
							<SymbolIcon Symbol="Font"/>
						</telerik:RadRibbonDropDownButton.SmallIcon>
					</telerik:RadRibbonDropDownButton>
					<telerik:RadRibbonDropDownButton Name="comboFontSize" Width="65" Background="LightGray" telerik:ScreenTip.Title="Font Size"  telerik:ScreenTip.Description="Change the font size.">
						<telerik:RadRibbonDropDownButton.SmallIcon>
							<SymbolIcon Symbol="FontSize"/>
						</telerik:RadRibbonDropDownButton.SmallIcon>
					</telerik:RadRibbonDropDownButton>
				</StackPanel>
				<telerik:RadButtonGroup>
					<telerik:RadRibbonButton telerik:ScreenTip.Title="Grow Font" >
						<telerik:RadRibbonButton.SmallIcon>
							<SymbolIcon Symbol="FontIncrease"/>
						</telerik:RadRibbonButton.SmallIcon>
					</telerik:RadRibbonButton>
					<telerik:RadRibbonButton telerik:ScreenTip.Title="Shrink Font" >
						<telerik:RadRibbonButton.SmallIcon>
							<SymbolIcon Symbol="FontDecrease"/>
						</telerik:RadRibbonButton.SmallIcon>
					</telerik:RadRibbonButton>
				</telerik:RadButtonGroup>
				<telerik:RadButtonGroup>
					<telerik:RadRibbonButton  Text="Clear Formatting" telerik:ScreenTip.Title="Clear Formatting" >
						<telerik:RadRibbonButton.SmallIcon>
							<SymbolIcon Symbol="Clear"/>
						</telerik:RadRibbonButton.SmallIcon>
					</telerik:RadRibbonButton>
				</telerik:RadButtonGroup>
				<telerik:RadButtonGroup>
					<telerik:RadRibbonToggleButton x:Name="BoldButton" telerik:ScreenTip.Title="Bold" telerik:ScreenTip.Description="Make the selected text bold." >
						<telerik:RadRibbonToggleButton.SmallIcon>
							<SymbolIcon Symbol="Bold"/>
						</telerik:RadRibbonToggleButton.SmallIcon>
					</telerik:RadRibbonToggleButton>
					<telerik:RadRibbonToggleButton  x:Name="ItalicButton" telerik:ScreenTip.Title="Italic" telerik:ScreenTip.Description="Italicize the selected text." >
						<telerik:RadRibbonToggleButton.SmallIcon>
							<SymbolIcon Symbol="Italic"/>
						</telerik:RadRibbonToggleButton.SmallIcon>
					</telerik:RadRibbonToggleButton>
					<telerik:RadRibbonSplitButton  x:Name="UnderlineButton" telerik:ScreenTip.Title="Underline" telerik:ScreenTip.Description="Underline the selected text.">
						<telerik:RadRibbonSplitButton.SmallIcon>
							<SymbolIcon Symbol="Underline"/>
						</telerik:RadRibbonSplitButton.SmallIcon>
					</telerik:RadRibbonSplitButton>
					<telerik:RadRibbonToggleButton telerik:ScreenTip.Title="Print" >
						<telerik:RadRibbonToggleButton.SmallIcon>
							<SymbolIcon Symbol="Print"/>
						</telerik:RadRibbonToggleButton.SmallIcon>
					</telerik:RadRibbonToggleButton>
					<telerik:RadRibbonToggleButton telerik:ScreenTip.Title="AlignCenter" >
						<telerik:RadRibbonToggleButton.SmallIcon>
							<SymbolIcon Symbol="AlignCenter"/>
						</telerik:RadRibbonToggleButton.SmallIcon>
					</telerik:RadRibbonToggleButton>
					<telerik:RadRibbonToggleButton telerik:ScreenTip.Title="AlignLeft">
						<telerik:RadRibbonToggleButton.SmallIcon>
							<SymbolIcon Symbol="AlignLeft"/>
						</telerik:RadRibbonToggleButton.SmallIcon>
					</telerik:RadRibbonToggleButton>
					<telerik:RadRibbonDropDownButton Text="Change Font Size" telerik:ScreenTip.Title="Font Size" telerik:ScreenTip.Description="Change font size.">
						<telerik:RadRibbonDropDownButton.SmallIcon>
							<SymbolIcon Symbol="FontSize"/>
						</telerik:RadRibbonDropDownButton.SmallIcon>
					</telerik:RadRibbonDropDownButton>
				</telerik:RadButtonGroup>
				<telerik:RadButtonGroup>
					<telerik:RadRibbonButton Text="Highlight Color" telerik:ScreenTip.Title="Text Highlight Color" telerik:ScreenTip.Description="Make text look like it was marked with a highlighter pen.">
						<telerik:RadRibbonButton.SmallIcon>
							<SymbolIcon Symbol="Highlight"/>
						</telerik:RadRibbonButton.SmallIcon>
					</telerik:RadRibbonButton>
					<telerik:RadRibbonDropDownButton  Text="Font Color" telerik:ScreenTip.Title="Font Color" telerik:ScreenTip.Description="Change the text color.">
						<telerik:RadRibbonDropDownButton.SmallIcon>
							<SymbolIcon Symbol="FontColor"/>
						</telerik:RadRibbonDropDownButton.SmallIcon>
					</telerik:RadRibbonDropDownButton>
				</telerik:RadButtonGroup>
			</telerik:RadOrderedWrapPanel>
		</telerik:RadRibbonGroup>
	</telerik:RadRibbonTab>
</telerik:RadRibbonView>
```

## CompressedThreshold Property

The **CompressedThreshold**  property allows you to specify when the panel goes into **Compressed** mode. For example, you may set this property to **CollapseThreshold.Never**.

#### **Example 2: Setting CompressedThreshold Property**

```XAML
<telerik:RadOrderedWrapPanel CompressedThreshold="Never">
```

In this case the panel never goes into **Compressed** state, even though there isn't enough space to display all of its children.

## CompressedItemsOrder Property

The **RadOrderedWrapPanel**'s **CompressedItemsOrder** property allows you to change the order of the panel's children upon being compressed. This is very useful because when your child controls are split into three lines, you may want to alter their order because some are being used more frequently than others.

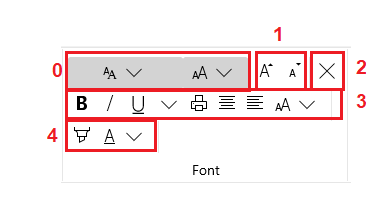
The next snapshot shows you the wrap panel from the first example in **compressed** state. The **CompressedItemsOrder** property is not set. The different RadButton groups are marked with indexes from 0 to 4 (there are 5 button groups).

#### **Figure 3: Compressed State With Marked Groups**

![WinUI RadRibbonView Compressed State With Marked Groups](https://www.telerik.com/winui/documentation/assets/647b680d036e476743eabbb0d4c97aee/radribbonview_ordered_wrappanel_normalorder.png)

For example, you may wish to change the groups order. In this case you should set the **RadOrderedWrapPanel**'s **CompressedItemsOrder** property. You can do it in XAML by specifying a comma-delimited list of integers like in the example below.

#### **Example 3: Setting CompressedItemsOrder property**

```XAML
<telerik:RadOrderedWrapPanel CompressedItemsOrder="0,3,2,4,1">
```

And the result is shown in **Figure** 4. Note how the order of the groups is altered.

#### **Figure 4: Compressed State With Altered Groups Order**
![WinUI RadRibbonView Compressed State With Altered Groups Order](https://www.telerik.com/winui/documentation/assets/d2a9e35e02d221e150447aa2a306db41/radribbonview_ordered_wrappanel_compressedorder.png)
