# Getting Started with WinUI RibbonView
This tutorial will walk you through the creation of a sample application that contains **RadRibbonView**.
> Before reading this tutorial you should get familiar with the [Visual Structure](https://www.telerik.com/winui/documentation/controls/radribbonview/visual-structure) of the control.
## Assembly References
In order to use the **RadRibbonView** control, you will need to add references to the following assemblies:
* `Telerik.WinUI.Controls.dll`
* `Telerik.Licensing.Runtime.dll`
## Defining a RadRibbonView
You can add a **RadRibbonView** manually in XAML as demonstrated in **Example 1**.
> You can access the **RadRibbonView** control through an alias pointing to the **Telerik.UI.Xaml.Controls** namespace: `xmlns:telerik="using:Telerik.UI.Xaml.Controls"`
#### **Example 1: Adding a RadRibbonView in XAML**
```XAML
```
At this state, the ribbonview is empty. The following section we will demonstrate how to populate the control with **RadRibbonTabs**.
## Adding Ribbon Tabs
The **RadRibbonView** helps users to quickly find the tools and options they need in order to complete a task. Tools and options are organized in logical groups that are collected together under specific tabs. The ribbon tabs allows you to categorize the commands to be displayed to the users. The class that represents the ribbon tab is the **RadRibbonTab**.
> For more information about the **RadRibbonTab**, check out the [Ribbon Tab](https://www.telerik.com/winui/documentation/controls/radribbonview/ribbon-controls/ribbon-tab) help article in the **Ribbon Controls** section. Also, keep in mind that you can use contextual tabs. You can read more about this in the [Contextual Tabs](https://www.telerik.com/winui/documentation/controls/radribbonview/features/contextual-tabs) topic.
The tabs can be added in the **Items** collection of RadRibbonView. The **RadRibbonTab** class exposes a **Header** property that is used to define the content of its header. **Example 2** and **Example 3** demonstrate how to do this in XAML and code-behind.
#### **Example 2: Adding RadRibbonTabs in XAML**
```XAML
```
#### **Figure 2: RadRibbonView with several RadRibbonTabs defined in its Items collection**

## Adding Content in the Ribbon Tabs
**RadRibbonTab** is a HeaderedItemsControl, which means that it can contain a collection of items. The children of the ribbon tab should be objects of type **RadRibbonGroup**. They expose a **Header** property that is used to define the content of their header.
> The Items collection of RadRibbonTab can contain any UIElement. However, if you do not wrap it manually into a RadRibbonGroup control, the ribbonview will do it automatically.
> You can find more information about **RadRibbonGroup** in the [Ribbon Group](https://www.telerik.com/winui/documentation/controls/radribbonview/ribbon-controls/ribbon-group) help article.
#### **Example 3: Adding RadRibbonGroups**
```XAML
```
#### **Figure 3: A RadRibbonTab with a couple RadRibbonGroups defined in its Items collection**

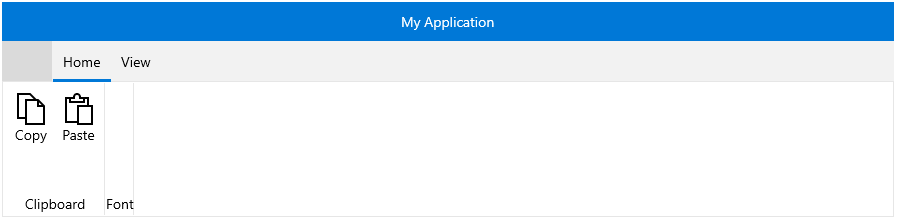
**RadRibbonGroup** is also a HeaderedItemsControl and it can have child elements on its own.
#### **Example 4: Adding RadRibbonGroup content**
```XAML
```
#### **Figure 4: A RadRibbonGroup with a couple ribbon buttons defined in its Items collection**
## Resizing
One of the most important features of **RadRibbonView** is the dynamic layout resizing. It refers to the **RadRibbonView**'s ability to optimize its layout depending on how much space is available. This process can't be automated; however, the **RadRibbonView**'s API gives you the ability to specify how you would like the resizing to occur.
Check out the following topics, which are tightly connected to the resizing behavior:
* [Resizing](https://www.telerik.com/winui/documentation/controls/radribbonview/features/resizing)
* [Ordered Wrap Panel](https://www.telerik.com/winui/documentation/controls/radribbonview/layout-controls/ordered-wrap-panel)
* [Collapsible Panel](https://www.telerik.com/winui/documentation/controls/radribbonview/layout-controls/collapsible-panel)
## Setting up the Application Button Icon
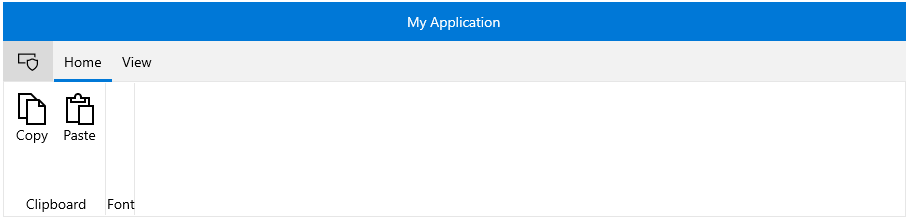
You can set the icon of the ribbonview's application button through the **ApplicationButtonIcon** property, which is of type **IconElement**.
#### **Example 6: Setting the RadRibbonView application button image source in XAML**
```XAML
```
#### **Figure 5: RadRibbonView application button image**
## Setting up the Application Title and Name
The header displayed at the title bar of **RadRibbonView** is constructed by its **Title** and **ApplicationName** properties with a dash separator between them. You can take a peek at the [Visual Structure](https://www.telerik.com/winui/documentation/controls/radribbonview/visual-structure) article to see how it looks.
#### **Example 7: Setting the RadRibbonView application title and name**
```XAML
```
#### **Figure 6: Title and ApplicationName properties reflected in the UI**

## Setting up the Ribbon Backstage
The **backstage menu** is equivalent to the **File** menu of the traditional menu UIs. It is represented by the rectangular button (the **application button**) in the upper-left corner of the **RadRibbonView** control. The backstage menu appears when a user clicks the application button. This menu can be used to display controls used to perform actions on the entire document like save, print and send.
To declare a backstage menu in **RadRibbonView** you can set its **Backstage** property to an object of type **RadRibbonBackstage**.
> You can learn more about the backstage control in the [Ribbon Backstage](https://www.telerik.com/winui/documentation/controls/radribbonview/ribbon-controls/ribbon-backstage) help article.
#### **Example 8: Sample backstage definition with several child RadRibbonBackstageItems in its Items collection.**
```XAML
```
#### **Figure 7: RadRibbon Backstage example**

## Setting up the Quick Access Toolbar
The **Quick Access Toolbar** is used to render a set of **RadRibbonView** controls (commands) that are most commonly used in the application. It is rendered right above the ApplicationButton to make it easily accessible to users. To declare the Quick Access ToolBar, you need to set the **QuickAccessToolBar** property.
#### **Example 10: Sample setup of QuickAccessToolBar**
```XAML
```
#### **Figure 8: QuickAccessToolBar visualization with one of its buttons hovered**

> For more information and a practical example you can see the [Quick Access Toolbar](https://www.telerik.com/winui/documentation/controls/radribbonview/ribbon-controls/qat) topic.
## Telerik UI for WinUI Learning Resources
* [Telerik UI for WinUI RibbonView Component](https://www.telerik.com/winui/ribbon)
* [Getting Started with Telerik UI for WinUI Components](https://www.telerik.com/winui/documentation/getting-started/first-steps-nuget)
* [Telerik UI for WinUI Installation](https://www.telerik.com/winui/documentation/installation-and-deployment/installing-which-file-do-i-need)
* [Telerik UI for WinUI Examples](https://www.telerik.com/winui/documentation/examples/demos-app)
* [Telerik UI for WinUI Accessibility](https://www.telerik.com/winui/documentation/common/accessibility)
* [Telerik UI for WinUI License Agreement](https://www.telerik.com/purchase/license-agreement/winui)
## See Also
* [Events](https://www.telerik.com/winui/documentation/controls/radribbonview/events-overview)
* [Minimization](https://www.telerik.com/winui/documentation/controls/radribbonview/features/minimization)
* [Ribbon Backstage](https://www.telerik.com/winui/documentation/controls/radribbonview/ribbon-controls/ribbon-backstage)
* [Ribbon Group](https://www.telerik.com/winui/documentation/controls/radribbonview/ribbon-controls/ribbon-group)
* [Ribbon Tab](https://www.telerik.com/winui/documentation/controls/radribbonview/ribbon-controls/ribbon-tab)
* [RibbonButtons - Overview](https://www.telerik.com/winui/documentation/controls/radribbonview/ribbon-buttons/overview)
* [Screen Tips](https://www.telerik.com/winui/documentation/controls/radribbonview/ribbon-controls/screentips)
* [Quick Access Toolbar](https://www.telerik.com/winui/documentation/controls/radribbonview/ribbon-controls/qat)