# Simplified Ribbon
**RadRibbonView** control for WinUI gives you the option to change the default layout mode to a simplified one. The simplified layout's idea is to be more compact and take up less vertical space on the screen.
## SimplifiedItems
Before switching the layout, you have to define what will be shown in the simplified state of the RadRibboonView. This is done through the new **SimplifiedItems** property of the [RadRibbonTab](https://www.telerik.com/winui/documentation/controls/radribbonview/ribbon-controls/ribbon-tab). You can also set the **SimplifiedContentHeight** property in order to control the Height while the layout is simplified.
> You can access the **RadRibbonView** controls through an alias pointing to the **Telerik.UI.Xaml.Controls** namespace: `xmlns:telerik="using:Telerik.UI.Xaml.Controls"`
#### **Example 1: Setting the SimplifiedItems property**
```XAML
```
#### **Figure 1: Changing RadRibbonView layout**
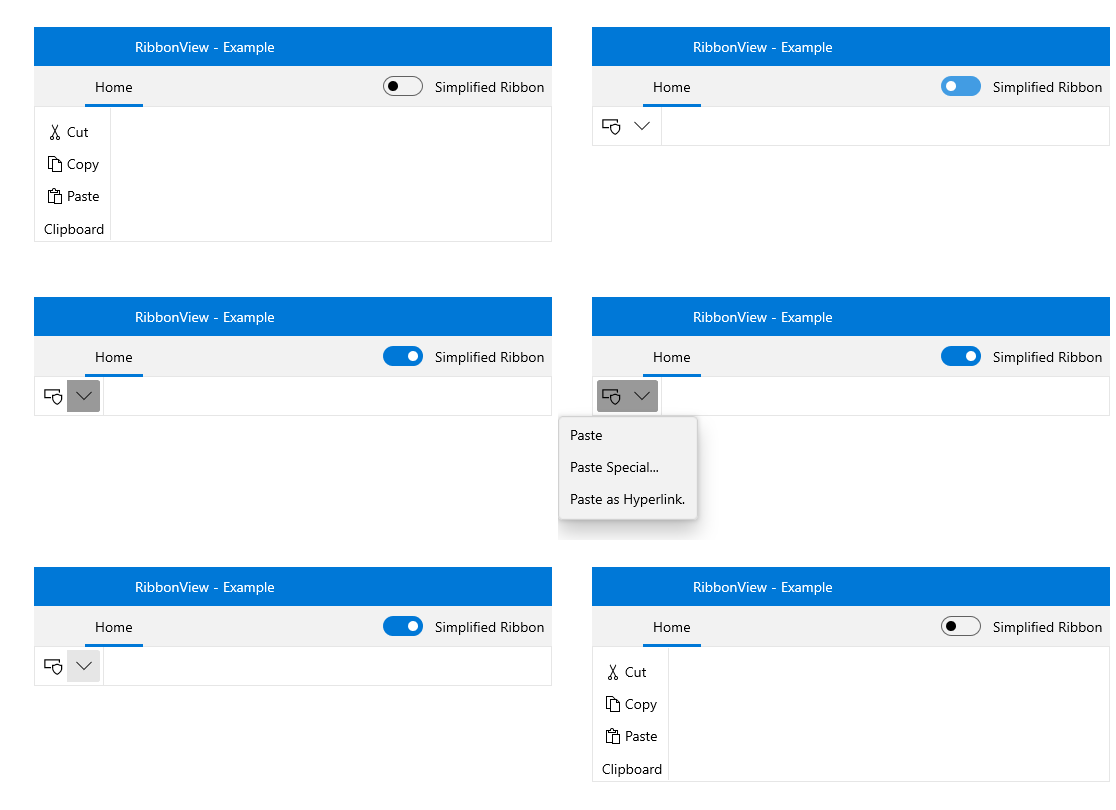
> The **SimplifiedResourses** property of the **RadRibbonTab** can be used in order to add any resources that should be applied when the LayoutMode is Simplified.
## Data Binding
In an MVVM scenario, the **SimplifiedItemTemplate** property of the RadRibbonView needs to be set along with the **ItemTemplate**.
## LayoutMode
In order to change the default layout mode, there are two options. Switch the layout through the UI or programmatically.
* **Switch the layout through the UI**: By default the button that switches between the default and the simplified layout is not visible. You can set the **ShowLayoutModeButton** property to **True** in order to show it. You can also set the **LayoutModeButtonContent** property in order to change the Content of the switch button.
#### **Example 2: Showing the LayoutMode button and changing its Content**
```XAML
```
#### **Figure 2: LayoutMode button**

* **Switch the layout programmatically**: In order to change the layout in code, you can set the **LayoutMode** property to **Simplified**.
#### **Example 2: Switching the layout in code**
```C#
this.ribbonView.LayoutMode = RibbonLayout.Simplified;
```
## Simplifying the Layout
The **SimplifiedItems** property, described in the first section, gives you full control over what is displayed, when the layout mode of the RadRibbonView is simplified. Here are some tips on how to adapt the default layout accordingly.
* Remove elements (buttons, groups) that are not an integral part of your application. The idea of the simplified ribbon is to save vertical space, however, it comes from the cost of the horizontal one. Keep in mind that, if a certain element is missing from the simplified layout, the user can always switch to the default one.
* Whenever possible, try to combine multiple elements inside the drop down of a single one. For example, if you have "Cut", "Copy" and "Paste" buttons in the default layout, you can combine them in a single [RadRibbonSplitButton](https://www.telerik.com/winui/documentation/controls/radribbonview/ribbon-buttons/split-button) in the simplified layout, as demonstrated in **Example 1**.
* If you do not want a particular **RadRibbonGroup** to be collapsed when the LayoutMode is Simplified, you can utilize the [Variants](https://www.telerik.com/winui/documentation/controls/radribbonview/features/resizing#variants) property of the RadRibbonGroup.
## See Also
* [Getting Started](https://www.telerik.com/winui/documentation/controls/radribbonview/getting-started)
* [Events](https://www.telerik.com/winui/documentation/controls/radribbonview/events-overview)