# Getting Started with WinUI NumericBox
This topic demonstrates how to start using RadNumericBox for WinUI.
## Assembly References
In order to use the RadNumericBox in your projects, you have to add references to the following assembly:
* `Telerik.WinUI.Controls.dll`
* `Telerik.Licensing.Runtime.dll`
## Defining a RadNumericBox
> You can access the **RadNumericBox** control through an alias pointing to the **Telerik.UI.Xaml.Controls.Input** namespace: `xmlns:input="using:Telerik.UI.Xaml.Controls.Input"`
#### **Example 1: Adding a RadNumericBox in XAML**
```XAML
```
#### **Figure 1: Result from Example 1**
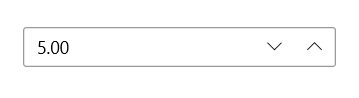
## Watermark and WatermarkTemplate
The **Watermark** and **WatermarkTemplate** properties allow you to customize what is displayed when the Value of the control is not set.
#### **Example 2: Setting the Watermark**
```XAML
```
#### **Example 3: Setting the Watermark and WatermarkTemplate**
```XAML
```
#### **Figure 2: Result from Example 3**

## Header and HeaderTemplate
The **Header** and **HeaderTemplate** properties allow you to customize the header of the control displayed above it.
#### **Example 4: Setting the Header**
```XAML
```
#### **Example 5: Setting the Header and HeaderTemplate**
```XAML
```
#### **Figure 3: Result from Example 5**

## ValueFormat and ValueFormatSelector
The **ValueFormat** and **ValueFormatSelector** properties allow you to provide a custom format for the data. The ValueFormatSelector allows you to choose a format depending on the current value.
#### **Example 5: Setting the ValueFormat**
```XAML
```
#### **Example 6: Setting the ValueFormatSelector**
```C#
public sealed partial class MainPage : Page
{
public MainPage()
{
this.InitializeComponent();
this.numericBox.ValueFormatSelector = new ValueFormatSelector();
}
}
public class ValueFormatSelector : Telerik.Core.IFormatSelector
{
public string GetFormat(object value)
{
if(double.Parse(value.ToString()) > 5)
{
return "{0:C}";
}
else
{
return "{0:N}";
}
}
}
```
## SmallChange and LargeChange
The **SmallChange** and **LargeChange** properties allow for customizing with how much the Value of the control is increased/decreased. The SmallChange is used when scrolling the mouse wheel while the control is focused and also when the up/down arrow keys are pressed. The **LargeChange** is used when the page up/page down keys are pressed.
## Telerik UI for WinUI Learning Resources
* [Telerik UI for WinUI NumericBox Component](https://www.telerik.com/winui/numericbox)
* [Getting Started with Telerik UI for WinUI Components](https://www.telerik.com/winui/documentation/getting-started/first-steps-nuget)
* [Telerik UI for WinUI Installation](https://www.telerik.com/winui/documentation/installation-and-deployment/installing-which-file-do-i-need)
* [Telerik UI for WinUI Examples](https://www.telerik.com/winui/documentation/examples/demos-app)
* [Telerik UI for WinUI Accessibility](https://www.telerik.com/winui/documentation/common/accessibility)
* [Telerik UI for WinUI License Agreement](https://www.telerik.com/purchase/license-agreement/winui)
## See Also
* [Properties and Configuration](https://www.telerik.com/winui/documentation/controls/radnumericbox/propertiesandconfigurations)