# Getting Started with WinUI DataGrid
This guide provides the information you need to start using the Telerik UI for WinUI DataGrid by adding the component to your project.
At the end, you will be able to achieve the following result.
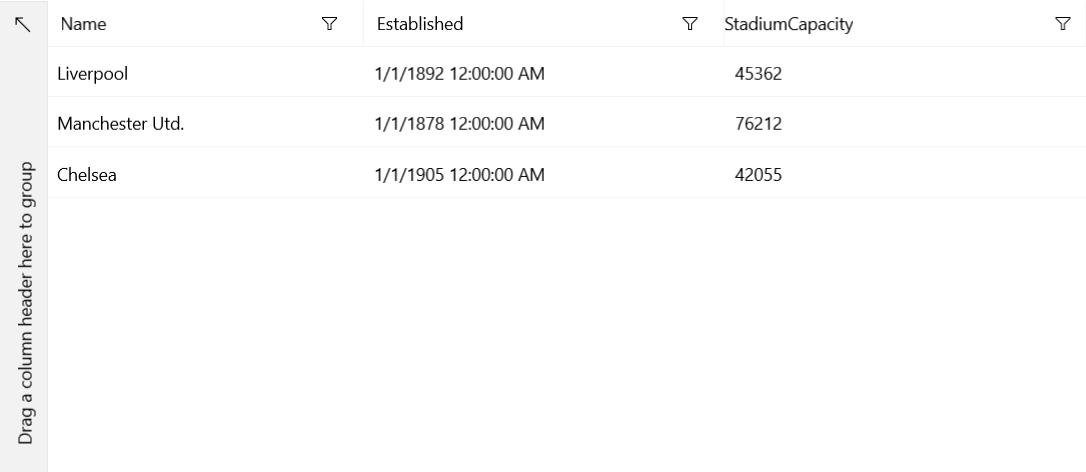
## Prerequisites
Before adding the DataGrid, you need to:
1. [Set up your WinUI project](https://www.telerik.com/winui/documentation/installation-and-deployment/systemrequirements).
2. Create your Telerik UI for WinUI application and install the Telerik UI for WinUI components depending on the required installation approach:
* [Getting Started with NuGet](https://www.telerik.com/winui/documentation/getting-started/first-steps-nuget#step-2-create-the-winui-application)
* [Getting Started with the MSI file](https://www.telerik.com/winui/documentation/getting-started/first-steps-msi#step-2-create-the-winui-application)
* [Getting Started with the ZIP file](https://www.telerik.com/winui/documentation/getting-started/first-steps-zip#step-2-create-the-winui-application)
* [Getting Started with the Telerik UI Visual Studio Extension](https://www.telerik.com/winui/documentation/getting-started/first-steps-vsextension#step-2-create-the-winui-application)
## Add the Assembly References
To use the `RadDataGrid` component, add references to `Telerik.WinUI.Controls.dll` and `Telerik.Licensing.Runtime.dll`.
## Define the Component
After you have included the necessary references, add the `Telerik.UI.Xaml.Controls.Grid` namespace and define the DataGrid in XAML.
#### **Define the DataGrid**
```XAML
```
## Add Sample Data
At this point, your application displays an empty grid with no columns and rows. Since the DataGrid is a data-bound component, to add data, you have to create a data model and set its `ItemsSource` to a collection of those models.
The following example demonstrates how to implement a sample `Model` and `ViewModel` in the DataGrid. Note that the `ViewModelBase` class is located in the `Telerik.Core` namespace and provides an implementation of the `INotifyPropertyChanged` interface.
#### **Define the Model and ViewModel of the DataGrid**
```C#
public class Club : ViewModelBase
{
private string name;
private DateTime established;
private int stadiumCapacity;
public Club(string name, DateTime established, int stadiumCapacity)
{
this.name = name;
this.established = established;
this.stadiumCapacity = stadiumCapacity;
}
public string Name
{
get { return this.name; }
set
{
if (value != this.name)
{
this.name = value;
this.OnPropertyChanged("Name");
}
}
}
public DateTime Established
{
get { return this.established; }
set
{
if (value != this.established)
{
this.established = value;
this.OnPropertyChanged("Established");
}
}
}
public int StadiumCapacity
{
get { return this.stadiumCapacity; }
set
{
if (value != this.stadiumCapacity)
{
this.stadiumCapacity = value;
this.OnPropertyChanged("StadiumCapacity");
}
}
}
}
public class MyViewModel : ViewModelBase
{
private ObservableCollection clubs;
public ObservableCollection Clubs
{
get
{
if (this.clubs == null)
{
this.clubs = this.CreateClubs();
}
return this.clubs;
}
}
private ObservableCollection CreateClubs()
{
ObservableCollection clubs = new ObservableCollection();
Club club;
club = new Club("Liverpool", new DateTime(1892, 1, 1), 45362);
clubs.Add(club);
club = new Club("Manchester Utd.", new DateTime(1878, 1, 1), 76212);
clubs.Add(club);
club = new Club("Chelsea", new DateTime(1905, 1, 1), 42055);
clubs.Add(club);
return clubs;
}
}
```
## Display the Sample Data
Each DataGrid row represents an object in the data source and each DataGrid column shows the value for one property of the bound object. The following examples demonstrate how to display the sample data from the previous one by setting the `DataContext` of the page and the `ItemsSource` of the DataGrid.
#### **Set the ItemsSource in XAML**
```XAML
```
#### **Set the ItemsSource in code**
```C#
public sealed partial class MainPage : Page
{
public MainPage()
{
this.InitializeComponent();
this.dataGrid.ItemsSource = new MyViewModel().Clubs;
}
}
```
Alternatively, you can also bind the control to a `DataTable`.
#### **Using a DataTable as the ItemsSource**
```C#
public MainPage()
{
this.InitializeComponent();
this.dataGrid.ItemsSource = this.GetDataTable();
}
private DataTable GetDataTable()
{
DataTable clubs = new DataTable();
clubs.TableName = "Clubs";
clubs.Columns.Add("Name", typeof(string));
clubs.Columns.Add("Established", typeof(DateTime));
clubs.Columns.Add("StadiumCapacity", typeof(int));
clubs.Rows.Add("Liverpool", new DateTime(1892, 1, 1), 45362);
clubs.Rows.Add("Manchester Utd.", new DateTime(1878, 1, 1), 76212);
clubs.Rows.Add("Chelsea", new DateTime(1905, 1, 1), 42055);
return clubs;
}
```
## Style the Component
Let's now add some styles to the DataGrid by merging the `Generic.xaml` ResourceDictionary in `App.xaml`.
#### **Style the DataGrid**
```XAML
```
## Define Columns Manually
The `RadGridView` from the previous examples contains three automatically generated columns, one for each of the properties of the `Club` class. The type of the generated column depends on the `type` property of the bound object. If you want to prevent the automatic generation of the columns and define them manually, set the `AutoGenerateColumns` property to `False`.
#### **Define the Columns Manually**
```XAML
```
## Implement Data Selection
By default, when the user clicks the DataGrid, the entire row is selected. To override this built-in behavior and specify whether rows or cells can be selected on user interaction, set the `SelectionUnit` property. To opt for a single or multiple selection, set the `SelectionMode` property.
## Sort, Group, and Filter the Data
By default, the sorting, grouping, and filtering features of the DataGrid are enabled. To disable any of these functionalities, set the respective `UserSortMode`, `UserFilterMode`, or `UserGroupMode` DataGrid properties, or the `CanUserSort`, `CanUserGroup`, or `CanUserFilter` property of the corresponding DataGrid column.
## Telerik UI for WinUI Learning Resources
* [Telerik UI for WinUI DataGrid Component](https://www.telerik.com/winui/datagrid)
* [Getting Started with Telerik UI for WinUI Components](https://www.telerik.com/winui/documentation/getting-started/first-steps-nuget)
* [Telerik UI for WinUI Installation](https://www.telerik.com/winui/documentation/installation-and-deployment/installing-which-file-do-i-need)
* [Telerik UI for WinUI Examples](https://www.telerik.com/winui/documentation/examples/demos-app)
* [Telerik UI for WinUI Accessibility](https://www.telerik.com/winui/documentation/common/accessibility)
* [Telerik UI for WinUI License Agreement](https://www.telerik.com/purchase/license-agreement/winui)
## See Also
* [Editing](https://www.telerik.com/winui/documentation/controls/raddatagrid/editing/datagrid-overview)
* [Commands](https://www.telerik.com/winui/documentation/controls/raddatagrid/commands/datagrid-overview)
* [Validation](https://www.telerik.com/winui/documentation/controls/raddatagrid/validation)
* [Row Details](https://www.telerik.com/winui/documentation/controls/raddatagrid/row-details)
* [Aggregates](https://www.telerik.com/winui/documentation/controls/raddatagrid/aggregates/datagrid-overview)