# How to Create a Unique Look for the Button Component
In this ThemeBuilder tutorial, you will learn how to create a unique look for the Telerik and Kendo Button component by using ThemeBuilder's component configurations and duplicates. While the article highlights the **Button** component as an example, the same approach applies to all Kendo and Telerik components exposed in ThemeBuilder.
## Understanding Component Variants
In a typical application, developers use different variants of the Button component. For example, they may need primary, secondary, and base buttons that use the theme colors of the design system. Additionally, they may use success, info, warning, and error buttons to indicate status. These are just some of the styling options available for a button; others include size, rounding, and fill mode. A button can also have variations that include text only, icon and text, or icon only.
In projects created with Kendo theme version Q1 2024 or earlier, only the most commonly used combinations of the Button component are available for editing on the canvas.
Starting with Kendo Theme version Q1 2026, ThemeBuilder introduced *component configurations* for all exposed Kendo and Telerik components. This version also expanded the **Button** component configurations to support the exposed button variants, such as `Text`, `Icon Only`, and `Icon & Text`.
## Using Component Configurations
> tip Component configurations are available in projects based on Kendo Theme version Q1 2026 or later. For earlier versions, if the variants listed on the canvas are insufficient, refer to [Duplicating Components](https://www.telerik.com/themebuilder/documentation/working-with-kendo/tutorials/unique-look-button#duplicating-components).
To create a unique look for the Button using a component configuration, follow these steps:
1. Enable **Advanced Edit** mode in ThemeBuilder.
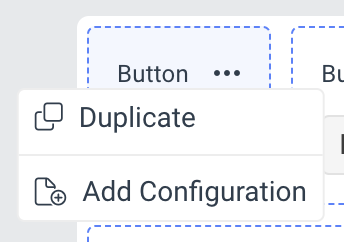
2. Hover over the drill-down container of the **Button** component and select the **...** button (more options).
3. Select **Add Configuration**.
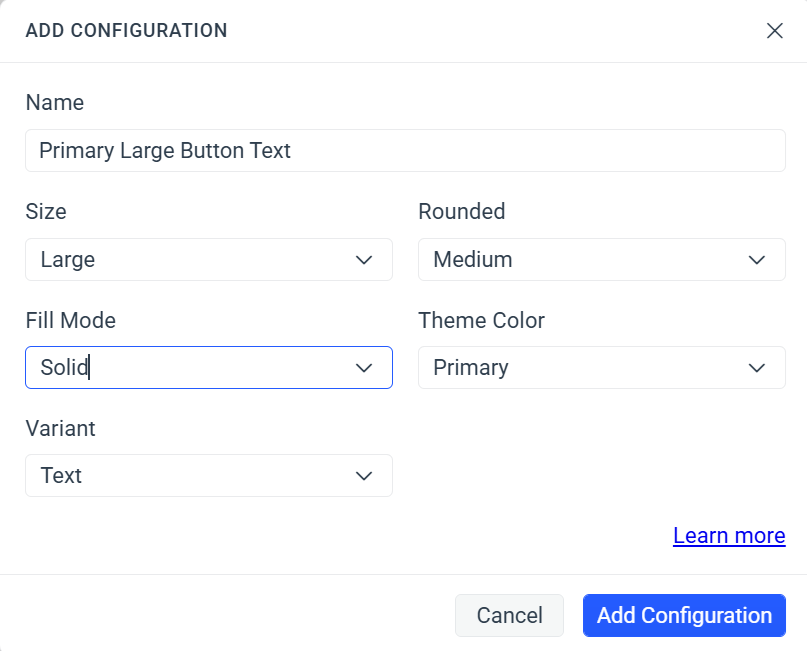
4. In the **ADD CONFIGURATION** popup:
* Enter a name for the new component variant, for example, `Primary Large Button Text`.
* Select the desired values for the exposed component properties. For the **Button** component, the available properties are `Size`, `Rounded`, `Fill Mode`, and `Theme Color`. You can omit any of the properties.
* Select the component variant from the exposed variants. For the **Button** component, the available variants are `Text`, `Icon & Text`, and `Icon Only`.
5. Select **Add Configuration** to add the new component variant.
6. [Apply advanced customizations](https://www.telerik.com/themebuilder/documentation/building-visual-styles/apply-advanced-customizations) to the newly created component variant.
To use the styles applied to the component variant through ThemeBuilder, render it in your application by choosing the same options you used in the component configuration:
```Angular
```
```Blazor
Primary Large Button
```
```React
```
```jQuery
$("#button").kendoButton({
size: "large",
themeColor: "primary",
fillMode: "solid",
rounded: "medium",
})
```
```Vue
Primary Large Button
```
```ASP.NET Core MVC HtmlHelper
@(Html.Kendo().Button()
.Name("button")
.Size(ComponentSize.Large)
.ThemeColor(ThemeColor.Primary)
.FillMode(ButtonFillMode.Solid)
.Rounded(Rounded.Medium)
.Content("Primary Large Button")
)
```
```ASP.NET Core TagHelper
Primary Large Button
```
## Duplicating Components
Similar to [component configurations](https://www.telerik.com/themebuilder/documentation/working-with-kendo/tutorials/unique-look-button#using-component-configurations), component duplicates enable you to create different variants of the Button component. However, instead of relying on configuration options like theme color or size, they use custom classes. To use component duplicates to create a unique look for the Button component, follow these steps:
1. Enable **Advanced Edit** mode in ThemeBuilder.
2. Hover over the drill-down container of the **Button** component and select the **...** button (more options).
3. Select **Duplicate**.
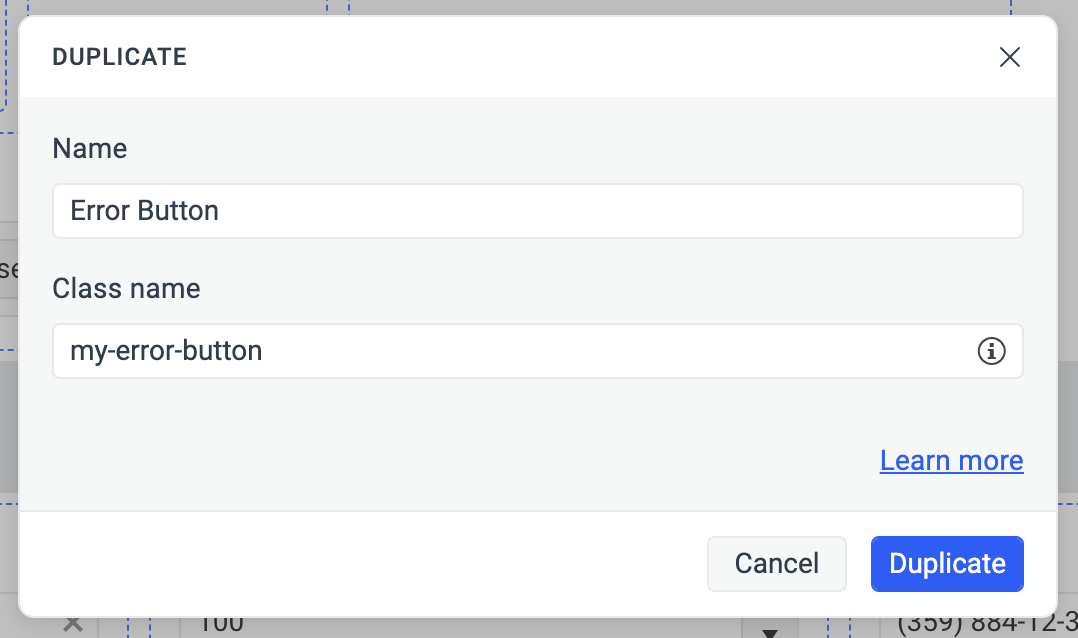
4. In the **DUPLICATE** popup:
* Enter a name for the new component variant, for example, `Error Button`.
* Enter a class name, for example, `my-error-button`—this becomes the unique selector for the newly created component variant.
5. [Apply advanced customizations](https://www.telerik.com/themebuilder/documentation/building-visual-styles/apply-advanced-customizations) to the newly created component variant.
> For projects based on Kendo theme versions Q1 2024 or earlier, make changes to the default top-left templates on the canvas of the component duplicate. This allows you to apply styles by adding a custom class to the component when rendering it, without setting additional configuration options as detailed in [Using Component Configurations](https://www.telerik.com/themebuilder/documentation/working-with-kendo/tutorials/unique-look-button#using-component-configurations).
To use the styles applied to the component variant through ThemeBuilder, render it in your application by choosing the class name you used in the creation of the duplicate:
```Angular
```
```Blazor
Error Button
```
```React
```
```jQuery
$("#button").kendoButton().addClass("my-error-button");
```
```Vue
Error Button
```
```ASP.NET Core MVC HtmlHelper
@(Html.Kendo().Button()
.Name("button")
.HtmlAttributes(new { @class = "my-error-button" })
.Content("Error Button")
)
```
```ASP.NET Core TagHelper
Error Button
```
## Related Articles
* [Applying Advanced Customizations](https://www.telerik.com/themebuilder/documentation/building-visual-styles/apply-advanced-customizations)
* [Creating and Configuring Component Variants](https://www.telerik.com/themebuilder/documentation/working-with-kendo/component-variants)
* [How to Create a Unique Look for the TextBox Component](https://www.telerik.com/themebuilder/documentation/working-with-kendo/tutorials/unique-look-textbox)
 3. Select **Add Configuration**.
4. In the **ADD CONFIGURATION** popup:
* Enter a name for the new component variant, for example, `Primary Large Button Text`.
* Select the desired values for the exposed component properties. For the **Button** component, the available properties are `Size`, `Rounded`, `Fill Mode`, and `Theme Color`. You can omit any of the properties.
* Select the component variant from the exposed variants. For the **Button** component, the available variants are `Text`, `Icon & Text`, and `Icon Only`.
 5. Select **Add Configuration** to add the new component variant.
6. [Apply advanced customizations](https://www.telerik.com/themebuilder/documentation/building-visual-styles/apply-advanced-customizations) to the newly created component variant.
To use the styles applied to the component variant through ThemeBuilder, render it in your application by choosing the same options you used in the component configuration:
```Angular
```
```Blazor
 5. [Apply advanced customizations](https://www.telerik.com/themebuilder/documentation/building-visual-styles/apply-advanced-customizations) to the newly created component variant.
> For projects based on Kendo theme versions Q1 2024 or earlier, make changes to the default top-left templates on the canvas of the component duplicate. This allows you to apply styles by adding a custom class to the component when rendering it, without setting additional configuration options as detailed in [Using Component Configurations](https://www.telerik.com/themebuilder/documentation/working-with-kendo/tutorials/unique-look-button#using-component-configurations).
To use the styles applied to the component variant through ThemeBuilder, render it in your application by choosing the class name you used in the creation of the duplicate:
```Angular
```
```Blazor