# First Steps with ThemeBuilder
In this ThemeBuilder tutorial, you will learn the basics and then explore advanced features. By using [ThemeBuilder](https://www.telerik.com/themebuilder), you can style the Telerik and Kendo UI components to match the design requirements of your project.
> note Most steps in this tutorial require an active free trial or a [ThemeBuilder subscription](https://www.telerik.com/themebuilder/documentation/introduction#themebuilder-tiers).
## Prerequisites
To follow the steps in this tutorial, you need a Telerik account. If you do not have a Telerik account yet, [register](https://www.telerik.com/login/themebuilder#register) and start your free ThemeBuilder trial in a single step.
If you do not have a ThemeBuilder subscription, you can start a free trial by following the instructions in this guide.
## Creating a Telerik and Kendo UI Project
To start applying your styles and customizing your favorite themes, you must create a ThemeBuilder project. ThemeBuilder is a cloud application and it automatically saves the changes in your project as you make them. You can also share projects with colleagues and collaborate.
To create a new ThemeBuilder project:
1. Navigate to [ThemeBuilder](https://themebuilderapp.telerik.com/).
2. Enter the credentials for your [Telerik account](https://www.telerik.com/account/) and log in.
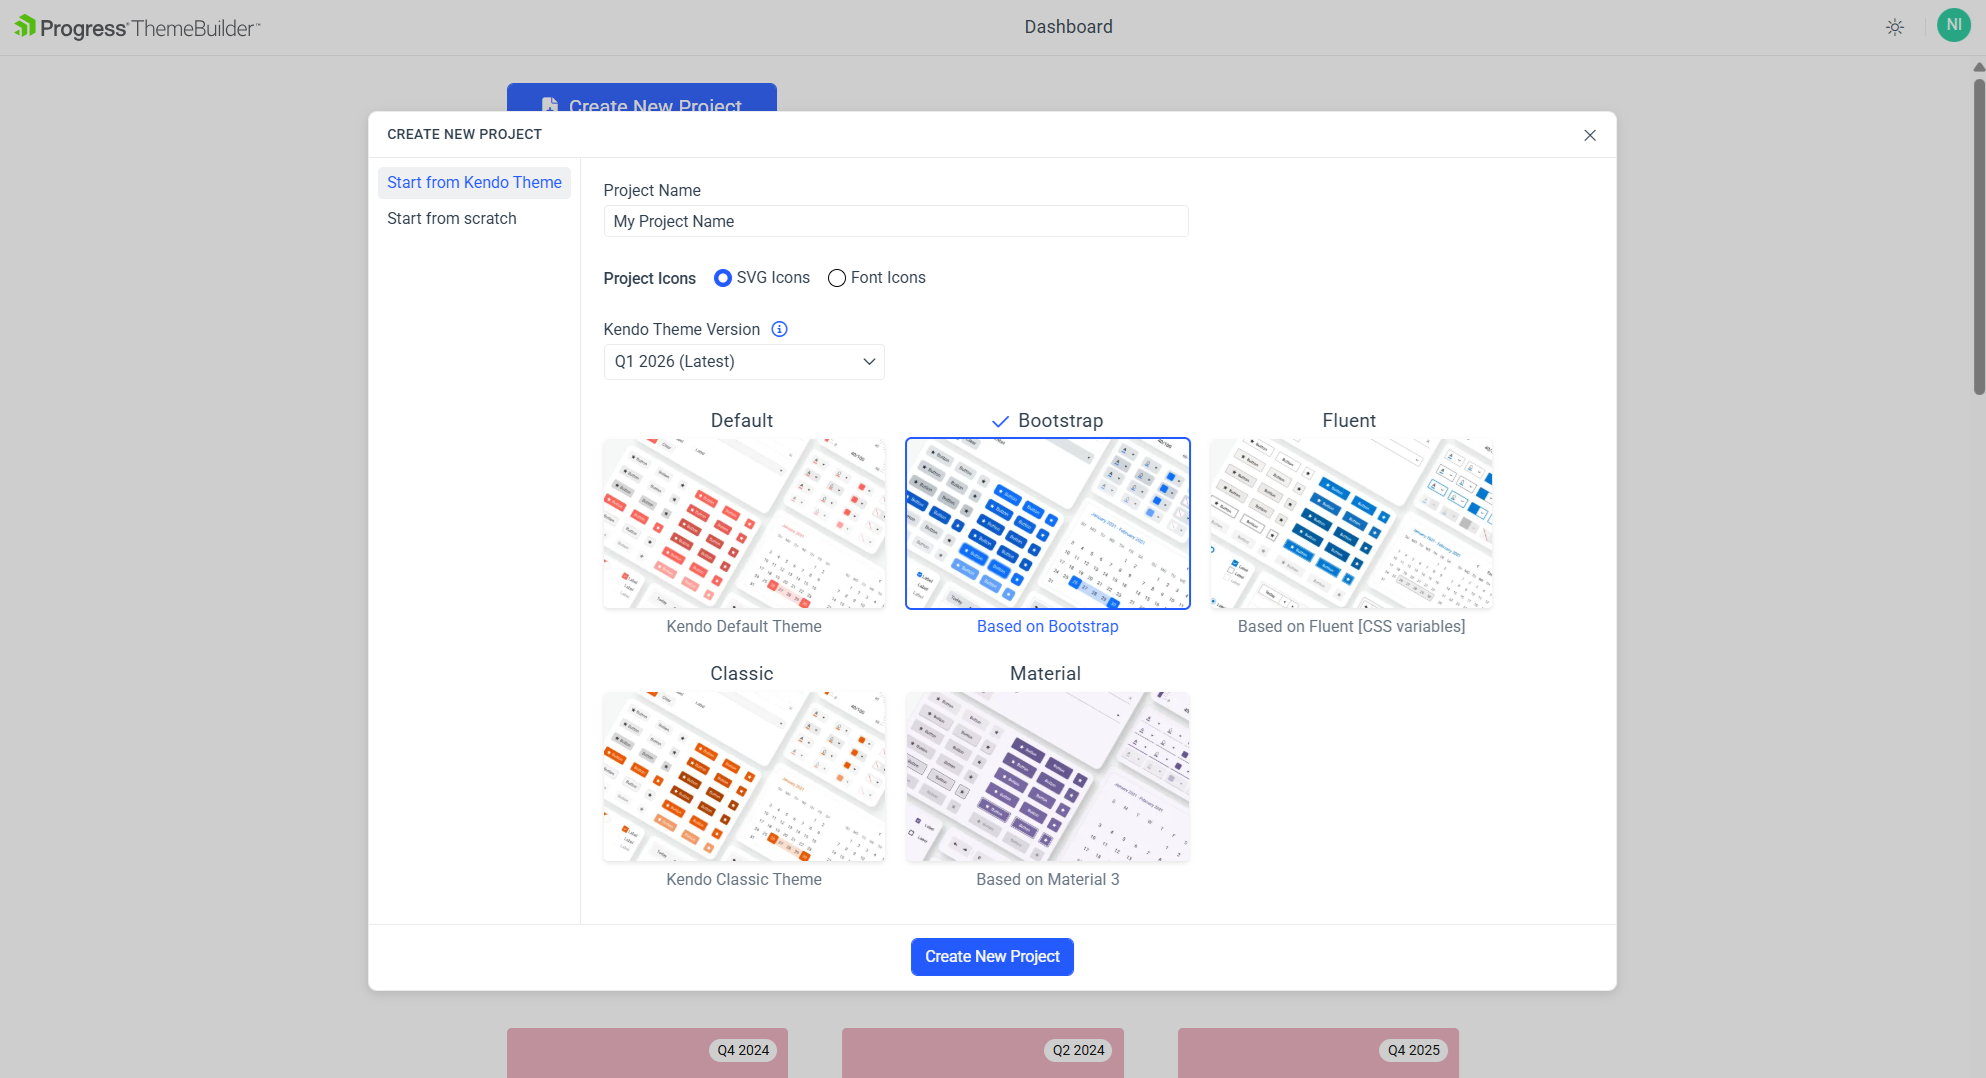
3. Click the **Create New Project** button.
4. Choose the **Start from Kendo Theme** tab.
5. Enter a name for your project and then choose a Theme version compatible with the version of your Telerik and Kendo UI components. By default, the latest version is selected and recommended.
6. Select the **Kendo Bootstrap Theme** base theme. Bootstrap is one of the five themes that you can use as a starting point for your customizations.
7. Finally, click **Create New Project**.
After creating the project, you will see the ThemeBuilder workspace:
* The UI components are in the center of the screen. These are live components—any change to their styles is immediately rendered on the screen.
* The Kendo variables are in the **THEME STYLES** pane on the left-hand side of the screen.
## (Optional) Activating Your Free Trial
This tutorial demonstrates various features that require the ThemeBuilder subscription or a free trial license. If you already have access to the paid features, continue to the [Customizing Theme Variables](https://www.telerik.com/themebuilder/documentation/get-started/first-steps-kendo#customizing-theme-variables) section.
To activate your free trial:
1. Locate and click the **Start Trial** banner in the toolbar or one of the star icons in your ThemeBuilder project, for example:
* Click the banner at the top of the ThemeBuilder screen.
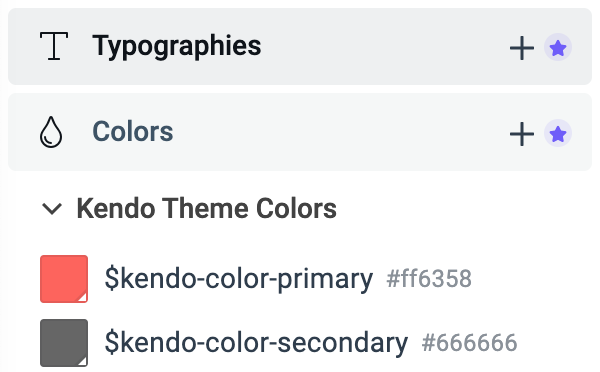
* Click the star icon near **Typographies** and **Colors** on the left side of the screen.
2. In the new window that opens, click **Start a Trial**. Then accept the license agreement.
## Customizing Theme Variables
A visual theme consists of multiple Sass or CSS variables, their values, and complex style inheritance relations. Customizing these variables is the first step to meeting the application requirements.
To customize the variables for this tutorial:
1. In the **STYLES** pane, select the `$kendo-color-primary` variable.
2. In the color editor that appears, change the primary color value to `#40C676`.
The primary color and all components that use it are immediately updated, and you can see their new appearance on the screen. All changes that you make in ThemeBuilder are applied to the live components almost instantly.
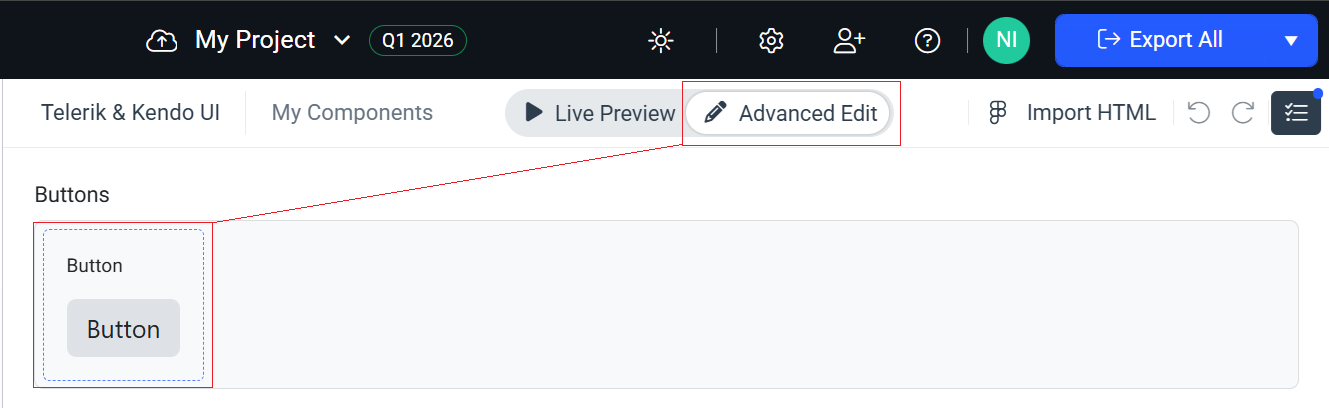
3. To access more customization options, switch from **Live Preview** to **Advanced Edit**.
4. To access the component-specific variables of the **Button** component, enable the **Advanced Edit** mode and then click on the **Button** component.
5. In the **STYLES** pane, use the search box to find and update the values of the following variables:
| Variable | New Value | Description |
| :--------------------------- | :-------- | :-------------------------------------- |
| `$kendo-button-text` | `#004284` | Changes the text color in the Buttons |
| `$kendo-button-bg` | `#EFF4F9` | Changes the background of the Buttons |
| `$kendo-button-border-width` | `2px` | Changes the border width of the Buttons |
> tip You will use the component-specific variables later in [Using Advanced Customization](https://www.telerik.com/themebuilder/documentation/get-started/first-steps-kendo#using-advanced-customization).
## Creating Custom Theme Variables
Adding new variables gives you endless possibilities to style the UI components as you like or as required by the application design.
To create the custom variables for this tutorial:
1. Navigate to the **STYLES** pane and click the **+** button next to the **Color** section.
2. In the **ADD COLOR** editor:
2.1. Enter `Custom variables` as a category name and `$button-border` as a name for the new variable.
2.2. Enter `#DBE3ED` as the value for the new variable.
2.3. Click **Create**.
3. Repeat the steps above to add the following new variables:
| New Variable | Value | Description |
| :----------------------- | :-------- | :---------------------------------- |
| `$primary-button-border` | `#19B859` | The border for the Primary Button |
| `$input-border` | `#CED4DA` | The border for the Input components |
| `$label-color` | `#004284` | The color for labels |
The newly added variables appear in the **Custom variables** category.
## Adding Custom Typography
Adding custom typography allows you to change various font-related styles.
1. Select the **+** button next to **Typographies**.
2. Enter `Custom typographies` as a category name and `$text-typography` as a name for the new variable, then set the following properties:
* Select the `Verdana` font family.
* Set the font weight to `400`.
* Set the font size to `14px`.
* Set the line height to `24px`.
## Using Advanced Customization
To enable the advanced mode, select the **Advanced Edit** button at the top of your screen. This will allow you to select a specific component, edit all its properties, and apply the custom variables that you created earlier in this tutorial.

### Editing Advanced Button Properties
1. To access the properties of the Button component and see all its states, select the **Button** frame in [**Advanced Edit**](https://www.telerik.com/themebuilder/documentation/building-visual-styles/apply-advanced-customizations) mode.
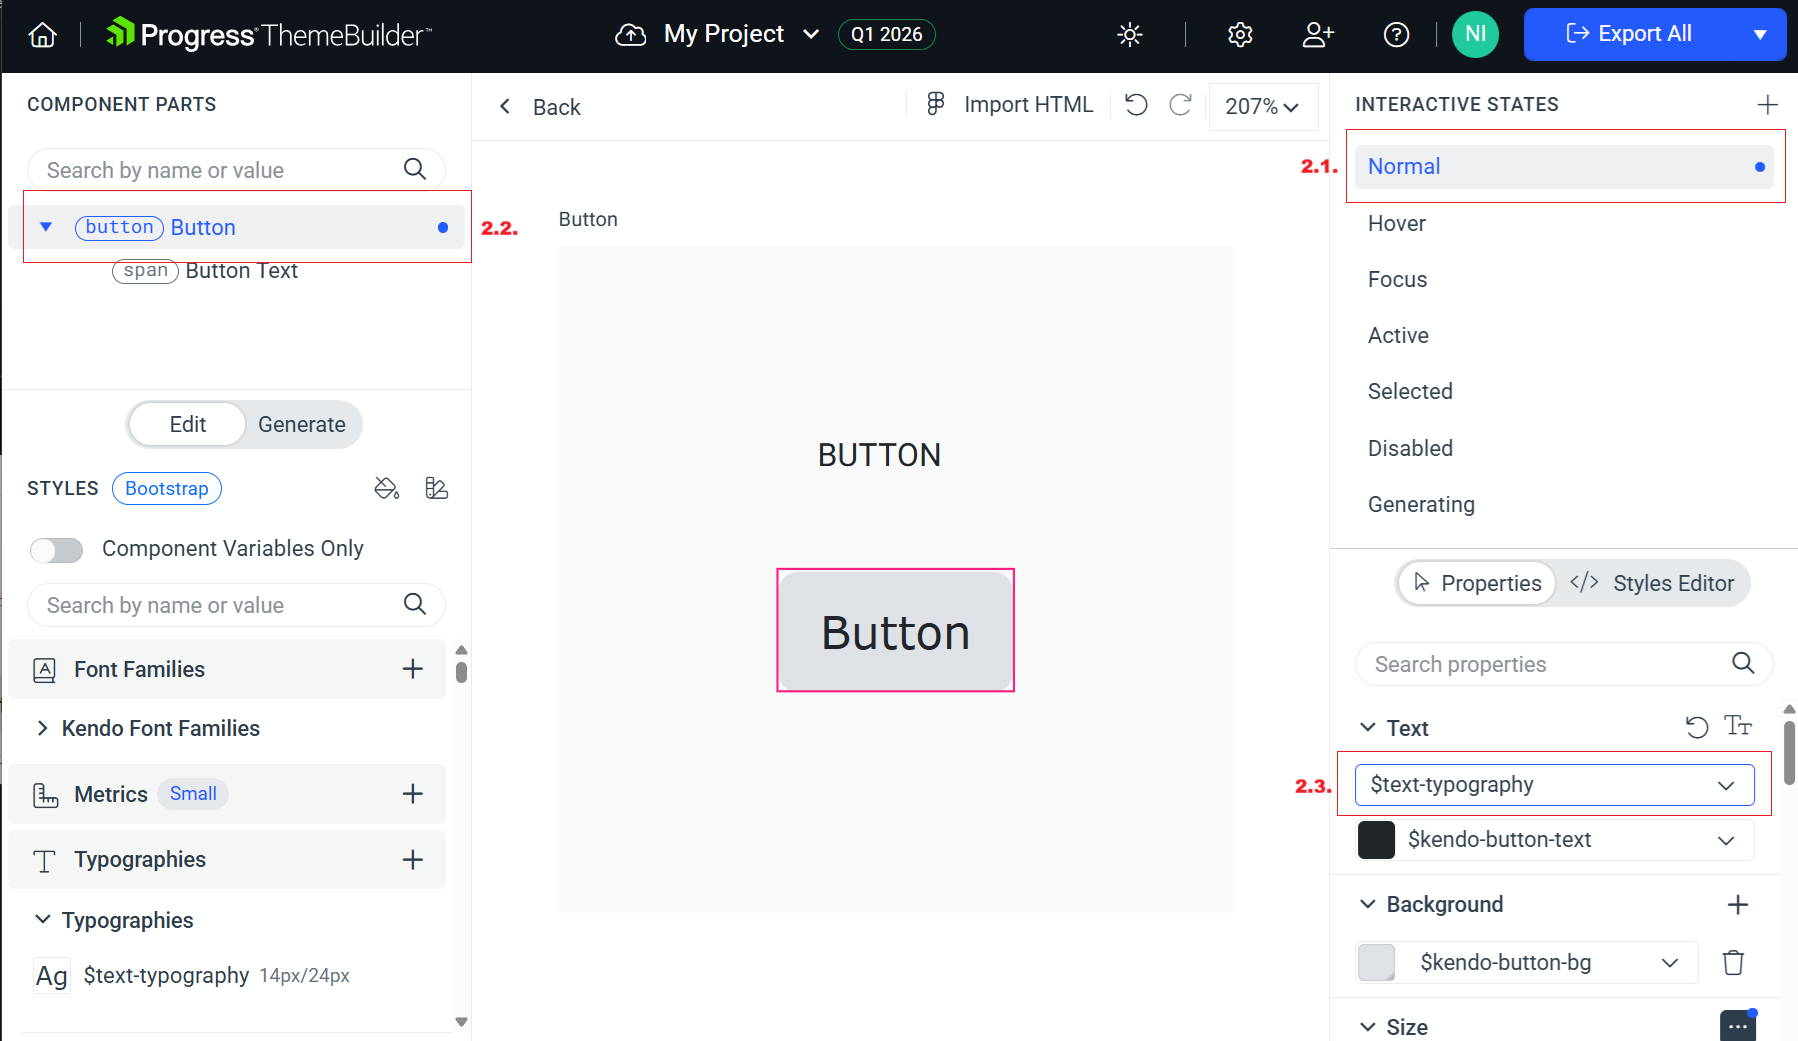
2. Change the typography of the secondary Button component:
2.1. Select the Button in its **Normal** interactive state.
> tip Adjust the zoom level by using the `+` and `-` keys or `Ctrl` + mouse wheel.
2.2. In the **COMPONENT PARTS** pane on the right, select **Button**. The **COMPONENT PARTS** pane represents the DOM tree and informs you about the structure of the component.
2.3. In the **PROPERTIES** pane on the right, locate the **Text** property.
2.4. From the drop-down menu, select `$text-typography`—the custom typography that you added in [the previous part of this tutorial](https://www.telerik.com/themebuilder/documentation/get-started/first-steps-kendo#adding-custom-typography).
> tip The top left component propagates its styles to all other instances of the component. That is why applying style changes from left to right and from top to bottom is the main [styling strategy](https://www.telerik.com/themebuilder/documentation/working-with-kendo/style-strategy) that you can use in ThemeBuilder. This approach saves time and allows you to style more components because it takes advantage of the built-in style inheritance.
3. Change the border of the Button component:
3.1. In the **PROPERTIES** pane, locate the **Border** property.
3.2. Enter `2px` as a value for the border width.
3.3. To change the border color, select `$button-border` from the border color drop-down list on the right. You added this color [earlier in this tutorial](https://www.telerik.com/themebuilder/documentation/get-started/first-steps-kendo#creating-custom-theme-variables).
### Editing Advanced TextBox Properties
Next, you will customize the style of the **TextBox** component. Note that the same approach applies to all Kendo and Telerik components (available from version Q1 2026).
To access the advanced properties of the **TextBox** component, select **< Back** to exit the advanced view for the Button component and see the frames with all other components. Then select the **TextBox**.
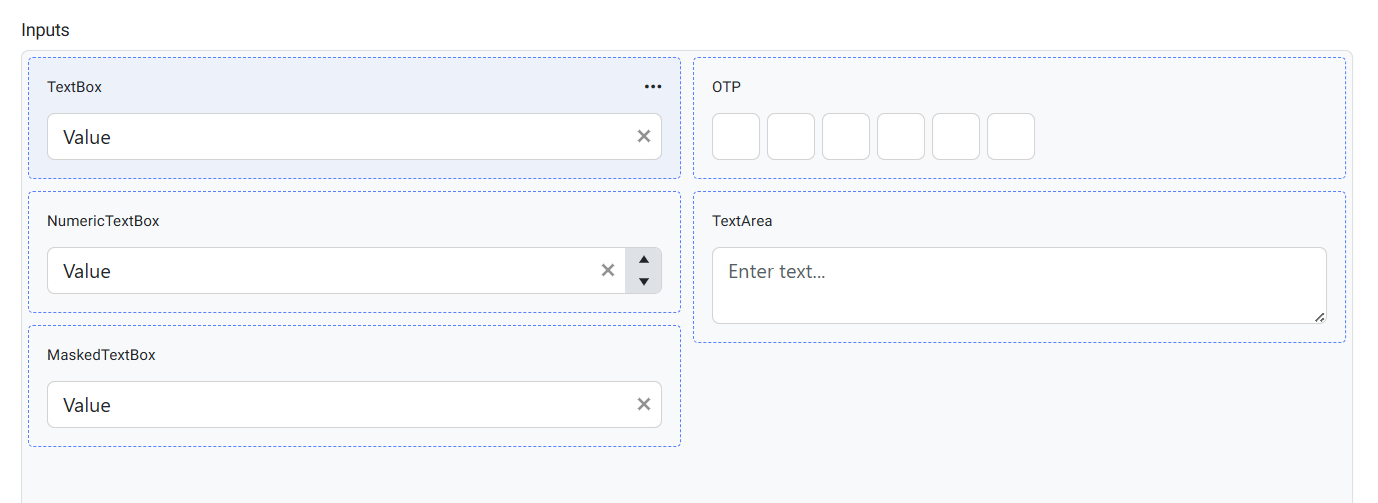
To style the **TextBox** component:
1. (Optional) Switch to **Advanced Edit** and open the meatball menu (three horizontal dots) in the top-right corner of the component.
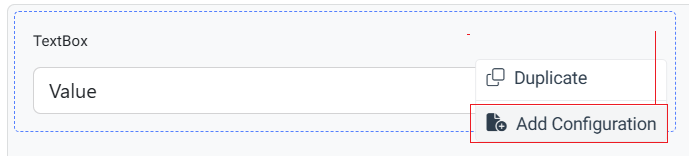
2. Select **Add Configuration** and set the desired component property values.
* Choose the configuration properties.
* Set a descriptive name for the template.
* Click **Add Configuration**.
> tip If you work with the default template, ThemeBuilder applies styles globally for the selected component (in this case the **TextBox** component).
1. Drill down into the selected configuration in **Advanced Edit**.
2. Select the root component part **(span) TextBox** from the **COMPONENT PARTS** pane to the right.
3. Select the **Normal** state from the **INTERACTIVE STATES** pane on the left.
4. In the **PROPERTIES** pane on the right, locate the **Border** property:
1. Enter `2px` as a value for the border width.
2. To change the border color, select `$input-border` from the border color drop-down list on the right. You added this color [earlier in this tutorial](https://www.telerik.com/themebuilder/documentation/get-started/first-steps-kendo#creating-custom-theme-variables).
## Using Generative AI
To create a custom Kendo theme using generative AI, select the **Generate** tab at the top of your screen. This allows you to provide natural language instructions and let the AI create the theme efficiently based on your prompt.
[Learn more about using AI to generate Kendo themes](https://www.telerik.com/themebuilder/documentation/working-with-kendo/creating-themes-with-ai).
## Creating Custom UI Components
Custom components in ThemeBuilder allow you to enrich your set of available UI components. They are based on pure HTML and can be styled using the out-of-the-box features and capabilities of ThemeBuilder.
To create a custom UI component for this tutorial:
1. Click the **+ Add Component** button.
2. Enter `My Form` in the **Name** field as a name and `Forms` in the **Category** field, and then select **Add Component**.
3. Enable the advanced mode by clicking the **Advanced Edit** tab on the top of the screen.
4. Click **My Form** to open the component for editing.
5. Click **\ Add HTML** to open the HTML editor and paste the following code:
```html
```
6. Select **Save & Close** from the drop-down button in the top-right corner.
7. Select the **My Form** frame on the screen to access the properties of the component.
8. To style your custom component, apply the same styles that you used for the [Telerik and Kendo Button component](https://www.telerik.com/themebuilder/documentation/get-started/first-steps-kendo#editing-advanced-button-properties) and [Telerik and Kendo TextBox component](https://www.telerik.com/themebuilder/documentation/get-started/first-steps-kendo#editing-advanced-textbox-properties) earlier in this tutorial.
That's it! You styled the Telerik and Kendo UI Button and TextBox components and then added a custom component by using HTML. Then, you applied the styles you used for the Telerik and Kendo UI components to your custom component.
## Exporting Your Theme
When you are done styling the Telerik and Kendo UI components, you can export the theme that you created by clicking **Export** in the top right corner.
The exported file is a zip archive that contains:
* An npm package—You can use it in version control so that your styles are versioned.
* A minified compiled CSS—You can directly reference these styles in your application.
* Sass files—You can add them to the build of your project to style the components.
## Next Steps
* [First steps with ThemeBuilder](https://www.telerik.com/themebuilder/documentation/get-started/first-steps-blank)
* [Creating a new ThemeBuilder project](https://www.telerik.com/themebuilder/documentation/basic-project-operations/creating-new-projects)
* [Generating a custom Kendo theme with AI](https://www.telerik.com/themebuilder/documentation/working-with-kendo/creating-themes-with-ai)
* [Exploring the Component Properties](https://www.telerik.com/themebuilder/documentation/building-visual-styles/component-properties)
* [Using the Exported ThemeBuilder Package](https://www.telerik.com/themebuilder/documentation/using-exported-styles/exported-package)
* [Keyboard Shortcuts in ThemeBuilder](https://www.telerik.com/themebuilder/documentation/knowledge-base/keyboard-shortcuts)
* [From Design to Development in 7 Steps With ThemeBuilder (Blog Post)](https://www.telerik.com/blogs/design-development-7-steps-themebuilder)
 * Click the star icon near **Typographies** and **Colors** on the left side of the screen.
 2. In the new window that opens, click **Start a Trial**. Then accept the license agreement.
## Customizing Theme Variables
A visual theme consists of multiple Sass or CSS variables, their values, and complex style inheritance relations. Customizing these variables is the first step to meeting the application requirements.
To customize the variables for this tutorial:
1. In the **STYLES** pane, select the `$kendo-color-primary` variable.
2. In the color editor that appears, change the primary color value to `#40C676`.
The primary color and all components that use it are immediately updated, and you can see their new appearance on the screen. All changes that you make in ThemeBuilder are applied to the live components almost instantly.
3. To access more customization options, switch from **Live Preview** to **Advanced Edit**.
4. To access the component-specific variables of the **Button** component, enable the **Advanced Edit** mode and then click on the **Button** component.
5. In the **STYLES** pane, use the search box to find and update the values of the following variables:
| Variable | New Value | Description |
| :--------------------------- | :-------- | :-------------------------------------- |
| `$kendo-button-text` | `#004284` | Changes the text color in the Buttons |
| `$kendo-button-bg` | `#EFF4F9` | Changes the background of the Buttons |
| `$kendo-button-border-width` | `2px` | Changes the border width of the Buttons |
> tip You will use the component-specific variables later in [Using Advanced Customization](https://www.telerik.com/themebuilder/documentation/get-started/first-steps-kendo#using-advanced-customization).
## Creating Custom Theme Variables
Adding new variables gives you endless possibilities to style the UI components as you like or as required by the application design.
To create the custom variables for this tutorial:
1. Navigate to the **STYLES** pane and click the **+** button next to the **Color** section.
2. In the **ADD COLOR** editor:
2.1. Enter `Custom variables` as a category name and `$button-border` as a name for the new variable.
2.2. Enter `#DBE3ED` as the value for the new variable.
2.3. Click **Create**.
3. Repeat the steps above to add the following new variables:
| New Variable | Value | Description |
| :----------------------- | :-------- | :---------------------------------- |
| `$primary-button-border` | `#19B859` | The border for the Primary Button |
| `$input-border` | `#CED4DA` | The border for the Input components |
| `$label-color` | `#004284` | The color for labels |
The newly added variables appear in the **Custom variables** category.
## Adding Custom Typography
Adding custom typography allows you to change various font-related styles.
1. Select the **+** button next to **Typographies**.
2. Enter `Custom typographies` as a category name and `$text-typography` as a name for the new variable, then set the following properties:
* Select the `Verdana` font family.
* Set the font weight to `400`.
* Set the font size to `14px`.
* Set the line height to `24px`.
## Using Advanced Customization
To enable the advanced mode, select the **Advanced Edit** button at the top of your screen. This will allow you to select a specific component, edit all its properties, and apply the custom variables that you created earlier in this tutorial.

### Editing Advanced Button Properties
1. To access the properties of the Button component and see all its states, select the **Button** frame in [**Advanced Edit**](https://www.telerik.com/themebuilder/documentation/building-visual-styles/apply-advanced-customizations) mode.

2. Change the typography of the secondary Button component:
2.1. Select the Button in its **Normal** interactive state.
> tip Adjust the zoom level by using the `+` and `-` keys or `Ctrl` + mouse wheel.
2.2. In the **COMPONENT PARTS** pane on the right, select **Button**. The **COMPONENT PARTS** pane represents the DOM tree and informs you about the structure of the component.
2.3. In the **PROPERTIES** pane on the right, locate the **Text** property.
2.4. From the drop-down menu, select `$text-typography`—the custom typography that you added in [the previous part of this tutorial](https://www.telerik.com/themebuilder/documentation/get-started/first-steps-kendo#adding-custom-typography).

> tip The top left component propagates its styles to all other instances of the component. That is why applying style changes from left to right and from top to bottom is the main [styling strategy](https://www.telerik.com/themebuilder/documentation/working-with-kendo/style-strategy) that you can use in ThemeBuilder. This approach saves time and allows you to style more components because it takes advantage of the built-in style inheritance.
3. Change the border of the Button component:
3.1. In the **PROPERTIES** pane, locate the **Border** property.
3.2. Enter `2px` as a value for the border width.
3.3. To change the border color, select `$button-border` from the border color drop-down list on the right. You added this color [earlier in this tutorial](https://www.telerik.com/themebuilder/documentation/get-started/first-steps-kendo#creating-custom-theme-variables).
### Editing Advanced TextBox Properties
Next, you will customize the style of the **TextBox** component. Note that the same approach applies to all Kendo and Telerik components (available from version Q1 2026).
To access the advanced properties of the **TextBox** component, select **< Back** to exit the advanced view for the Button component and see the frames with all other components. Then select the **TextBox**.

To style the **TextBox** component:
1. (Optional) Switch to **Advanced Edit** and open the meatball menu (three horizontal dots) in the top-right corner of the component.

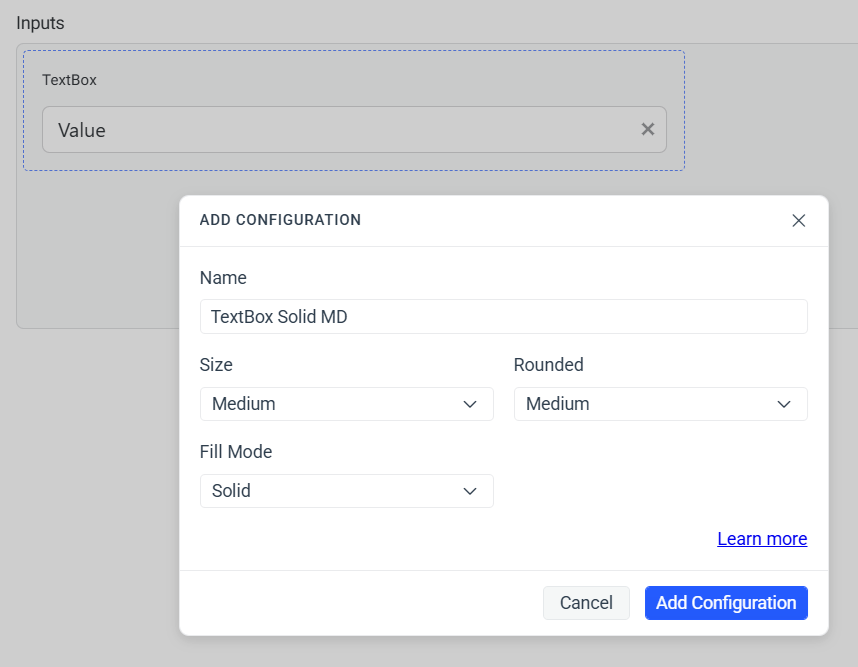
2. Select **Add Configuration** and set the desired component property values.
* Choose the configuration properties.
* Set a descriptive name for the template.
* Click **Add Configuration**.
 > tip If you work with the default template, ThemeBuilder applies styles globally for the selected component (in this case the **TextBox** component).
1. Drill down into the selected configuration in **Advanced Edit**.
2. Select the root component part **(span) TextBox** from the **COMPONENT PARTS** pane to the right.
3. Select the **Normal** state from the **INTERACTIVE STATES** pane on the left.
4. In the **PROPERTIES** pane on the right, locate the **Border** property:
1. Enter `2px` as a value for the border width.
2. To change the border color, select `$input-border` from the border color drop-down list on the right. You added this color [earlier in this tutorial](https://www.telerik.com/themebuilder/documentation/get-started/first-steps-kendo#creating-custom-theme-variables).
## Using Generative AI
To create a custom Kendo theme using generative AI, select the **Generate** tab at the top of your screen. This allows you to provide natural language instructions and let the AI create the theme efficiently based on your prompt.
[Learn more about using AI to generate Kendo themes](https://www.telerik.com/themebuilder/documentation/working-with-kendo/creating-themes-with-ai).
## Creating Custom UI Components
Custom components in ThemeBuilder allow you to enrich your set of available UI components. They are based on pure HTML and can be styled using the out-of-the-box features and capabilities of ThemeBuilder.
To create a custom UI component for this tutorial:
1. Click the **+ Add Component** button.
2. Enter `My Form` in the **Name** field as a name and `Forms` in the **Category** field, and then select **Add Component**.
3. Enable the advanced mode by clicking the **Advanced Edit** tab on the top of the screen.
4. Click **My Form** to open the component for editing.
5. Click **\ Add HTML** to open the HTML editor and paste the following code:
```html