# Dialog Handling Steps
Recording dialogs is an out-of-the-box feature in Test Studio. The steps recorded for the dialogs provide various properties to fine tune the execution. The steps to handle dialogs can be added also manually in the test.
In this article you can find useful information about:
* [Dialog Handling Steps](https://www.telerik.com/teststudio/documentation/features/dialogs-and-popups/dialogs#dialog-handling-steps)
* [Add a Handle Dialog Step Manually](https://www.telerik.com/teststudio/documentation/features/dialogs-and-popups/dialogs#add-a-handle-dialog-step-manually)
* [Properties for Handle Dialog Steps](https://www.telerik.com/teststudio/documentation/features/dialogs-and-popups/dialogs#properties-for-handle-dialog-steps)
* [Timeouts](https://www.telerik.com/teststudio/documentation/features/dialogs-and-popups/dialogs#timeouts)
* [Handle Button](https://www.telerik.com/teststudio/documentation/features/dialogs-and-popups/dialogs#handle-button)
* [Download and Upload Paths in Web Test](https://www.telerik.com/teststudio/documentation/features/dialogs-and-popups/dialogs#download-and-upload-paths-in-web-test)
* [SaveFile and OpenFile Paths in WPF Test](https://www.telerik.com/teststudio/documentation/features/dialogs-and-popups/dialogs#savefile-and-openfile-paths-in-wpf-test)
## Add a Handle Dialog Step Manually
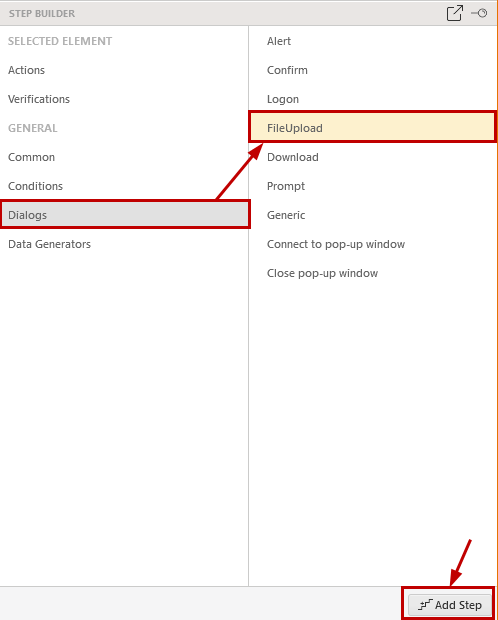
Even if you work on the tests in the project and have no active recording session, you can add the specific steps to handle a dialog from the Step Builder. All dialog steps are listed under the General section of the Step Builder, under **Dialogs**. Select the type of dialog to handle and add hit the **Add Step** button.
## Properties for Handle Dialog Steps
The various properties allows you to fine tune the steps to handle dialogs across the automated page.
## Timeouts
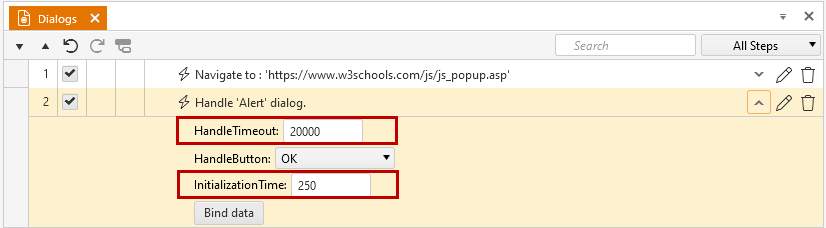
The properties common for all dialogs are the **HandleTimeout** - controls the time, which the test waits for the dialog to be handled, and the **InitializationTime** - controls the time, which the test waits before it starts searching for such dialog. It is useful to increase these when it takes longer time for the dialog to appear, or to be finished (usually for the handle download dialogs, when the file to download is too large).
## Handle Button
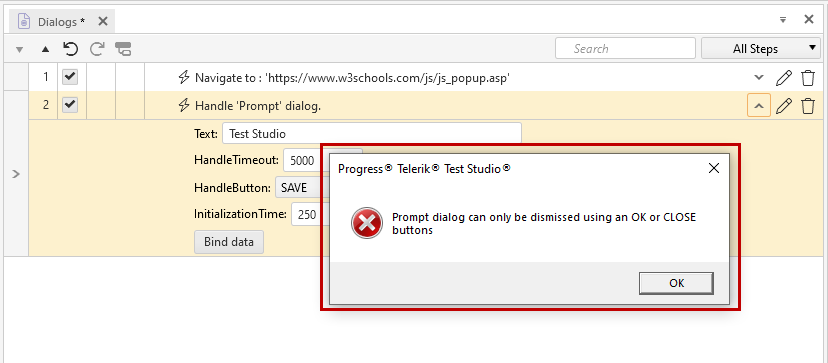
Each dialog step gives the option to change the button used to handle it during recording, or to adjust it if added manually.
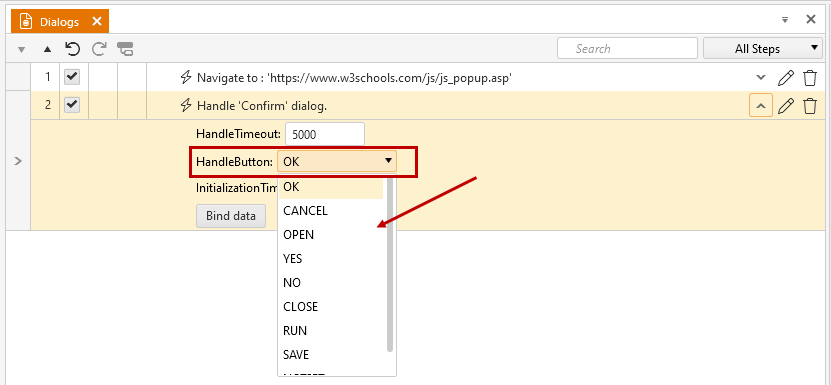
The dropdown list provides all possible options for a button to handle a dialog. If you choose wrong type of button for the specific step, there is a prompt message to inform you which are the possible dismiss options for this dialog.
## Download and Upload Paths in Web Test
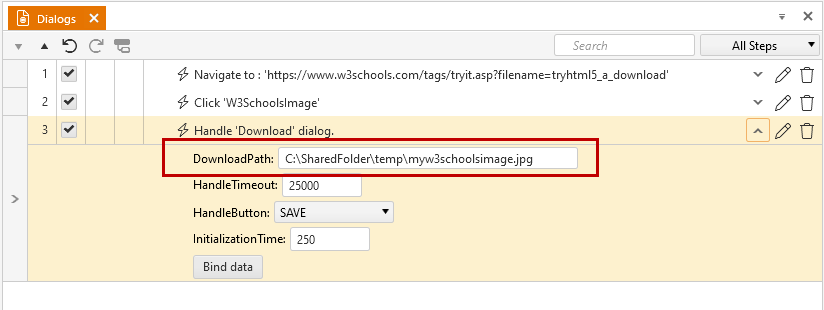
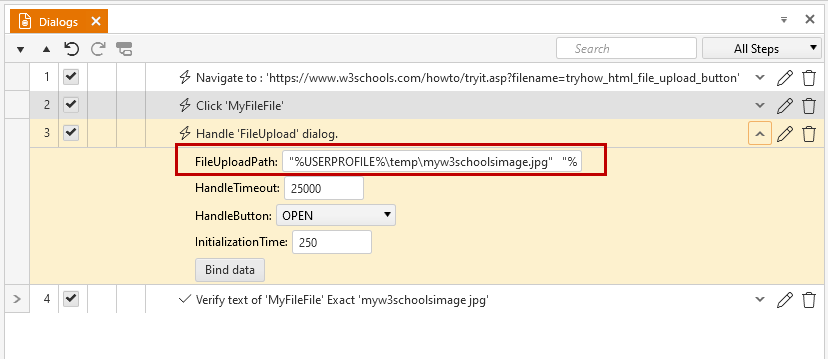
The **DownloadPath** and **FileUploadPath** properties are mandatory for the respective type dialog. They require a valid full path to the file to interact with.
> **Tip!**
>
>
> If the user selects any system folder which can be replaced with a recognized system variable **Test Studio automatically converts the path using the respective system variable**
>
>
> For example, if the user selects a destination folder under the current Windows user folder **Test Studio automatically converts the path using the Windows variable %USERPROFILE%**.
The **FileUploadPath** accepts multiple files listed quoted and space separated. These will be uploaded if the server accepts multiple files upload.
## SaveFile and OpenFile Paths in WPF Test
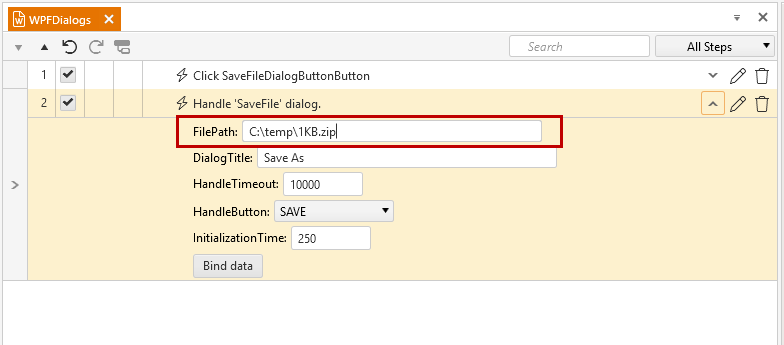
The **FilePath** property is mandatory for the **SaveFile** and **OpenFile** dialogs. They require a valid full path to the file to interact with.
> **Tip!**
>
>
> If the user selects any system folder which can be replaced with a recognized system variable **Test Studio automatically converts the path using the respective system variable**
>
>
> For example, if the user selects a destination folder under the current Windows user folder **Test Studio automatically converts the path using the Windows variable %USERPROFILE%**.
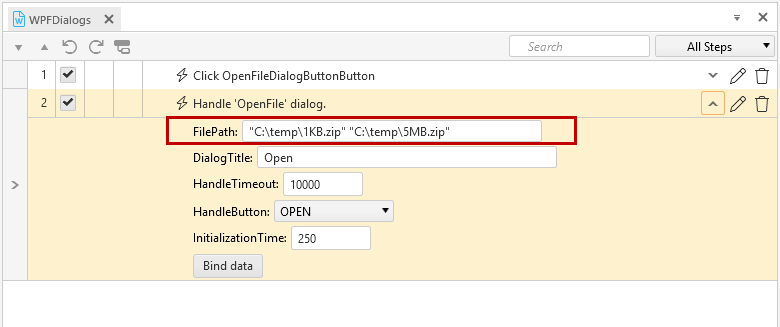
The **FilePath** property in **OpenFile** dialog accepts multiple files listed quoted and space separated. These will be uploaded if the server accepts multiple files upload.