# Create Data Bound Chart
**RadChart** is an advanced WPF control providing full Blend support. From within the visual environment of Blend, you can easily perform various tasks such as edit control properties, modify themes, create and modify templates and more.
This tutorial will walk you through the creation of a **RadChart** and will show how to:
* [Add RadChart using Expression Blend](https://www.telerik.com/products/wpf/documentation/controls/radchart/getting-started/create-data-bound-chart#adding-radchart)
* [Create and bind SplineChart to collection of custom objects using SeriesMapping/ItemMapping](https://www.telerik.com/products/wpf/documentation/controls/radchart/getting-started/create-data-bound-chart#binding-the-radchart)
* [Create categorical chart](https://www.telerik.com/products/wpf/documentation/controls/radchart/getting-started/create-data-bound-chart#creating-categorical-chart)
> Before reading this tutorial you should get familiar with the [Visual Structure](https://www.telerik.com/products/wpf/documentation/controls/radchart/general-information/visual-structure) of the standard **RadChart** control and its elements.
For the purpose of this tutorial, you will need to create an empty WPF Application project and open it in Blend.
## Adding RadChart
* Open the **Asset Library** (*Window->Assets*) in Expression Blend and start writing the name of the **RadChart** in the search box.
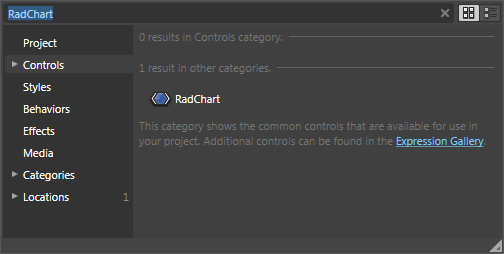
* Drag a **RadChart** on the artboard.
As result you can see the **RadChart** with some demo data displayed. The underlaying XAML is pretty simple and looks like this:
```XAML
```
There are two things you should pay attention to: First is the declaration of the **Telerik.Windows.Controls** namespace from **Telerik.Windows.Controls.Charting** assembly and the second is the declaration of the **RadChart** control itself.
## Creating Custom Data Object
* In order to bind your **RadChart** you will need custom data object. Let's create one and name it **ProductSales**, add the properties as shown below:
```C#
public class ProductSales
{
public ProductSales( int quantity, int month, string monthName )
{
this.Quantity = quantity;
this.Month = month;
this.MonthName = monthName;
}
public int Quantity
{
get;
set;
}
public int Month
{
get;
set;
}
public string MonthName
{
get;
set;
}
}
```
```VB.NET
Public Class ProductSales
Public Sub New(ByVal quantity As Integer, ByVal month As Integer, ByVal monthName As String)
Me.Quantity = quantity
Me.Month = month
Me.MonthName = monthName
End Sub
Private _Quantity As Integer
Public Property Quantity() As Integer
Get
Return _Quantity
End Get
Set(ByVal value As Integer)
_Quantity = value
End Set
End Property
Private _Month As Integer
Public Property Month() As Integer
Get
Return _Month
End Get
Set(ByVal value As Integer)
_Month = value
End Set
End Property
Private _MonthName As String
Public Property MonthName() As String
Get
Return _MonthName
End Get
Set(ByVal value As String)
_MonthName = value
End Set
End Property
End Class
```
* Now create custom method that returns collection populated with several **ProductSales** objects.
```C#
private List CreateData()
{
List persons = new List();
persons.Add( new ProductSales( 154, 1, "January" ) );
persons.Add( new ProductSales( 138, 2, "February" ) );
persons.Add( new ProductSales( 143, 3, "March" ) );
persons.Add( new ProductSales( 120, 4, "April" ) );
persons.Add( new ProductSales( 135, 5, "May" ) );
persons.Add( new ProductSales( 125, 6, "June" ) );
persons.Add( new ProductSales( 179, 7, "July" ) );
persons.Add( new ProductSales( 170, 8, "August" ) );
persons.Add( new ProductSales( 198, 9, "September" ) );
persons.Add( new ProductSales( 187, 10, "October" ) );
persons.Add( new ProductSales( 193, 11, "November" ) );
persons.Add( new ProductSales( 212, 12, "December" ) );
return persons;
}
```
```VB.NET
Private Function CreateData() As List(Of ProductSales)
Dim persons As New List(Of ProductSales)()
persons.Add(New ProductSales(154, 1, "January"))
persons.Add(New ProductSales(138, 2, "February"))
persons.Add(New ProductSales(143, 3, "March"))
persons.Add(New ProductSales(120, 4, "April"))
persons.Add(New ProductSales(135, 5, "May"))
persons.Add(New ProductSales(125, 6, "June"))
persons.Add(New ProductSales(179, 7, "July"))
persons.Add(New ProductSales(170, 8, "August"))
persons.Add(New ProductSales(198, 9, "September"))
persons.Add(New ProductSales(187, 10, "October"))
persons.Add(New ProductSales(193, 11, "November"))
persons.Add(New ProductSales(212, 12, "December"))
Return persons
End Function
```
## Binding the RadChart
* Now after you have the needed data object it is time to configure and bind the **RadChart** to the appropriate properties of the **ProductSales** class. It can be done using **SeriesMapping/ItemMapping** from XAML or code-behind, but in most cases it is better to do it declaratively.
```XAML
```
```C#
SeriesMapping seriesMapping = new SeriesMapping();
seriesMapping.LegendLabel = "Product Sales";
seriesMapping.SeriesDefinition = new SplineSeriesDefinition();
seriesMapping.ItemMappings.Add( new ItemMapping( "Month", DataPointMember.XValue ) );
seriesMapping.ItemMappings.Add( new ItemMapping("Quantity", DataPointMember.YValue));
radChart.SeriesMappings.Add( seriesMapping );
this.radChart.ItemsSource = this.CreateData();
```
```VB.NET
Dim seriesMapping As New SeriesMapping()
seriesMapping.LegendLabel = "Product Sales"
seriesMapping.SeriesDefinition = New SplineSeriesDefinition()
seriesMapping.ItemMappings.Add(New ItemMapping("Month", DataPointMember.XValue))
seriesMapping.ItemMappings.Add(New ItemMapping("Quantity", DataPointMember.YValue))
radChart.SeriesMappings.Add(seriesMapping)
Me.radChart.ItemsSource = Me.CreateData()
```
In the source code above one instance of the class **SeriesMapping** is created with two **ItemMappings**, one for **X-axis** and one for **Y-axis**. **X-axis** is bound to the **ProductSales.Month** property, while **Y-axis** is bound to **ProductSales.Quantity** property. Both properties are numeric, that's why their **DataPointMember** property is set to **XValue** and **YValue** respectively. If you want to bind your **X-axis** to string values read [Categorical Charts](https://www.telerik.com/products/wpf/documentation/controls/radchart/features/categorical-charts) or read below.
* And the last step is to set the **ItemSource** of the **RadChart** control to the collection returned by the **GetData** method. You can insert this call inside your Constructor right after the **InitializeComponent()** method call.
```C#
this.radChart.ItemsSource = this.CreateData();
```
```VB.NET
Me.radChart.ItemsSource = Me.CreateData()
```
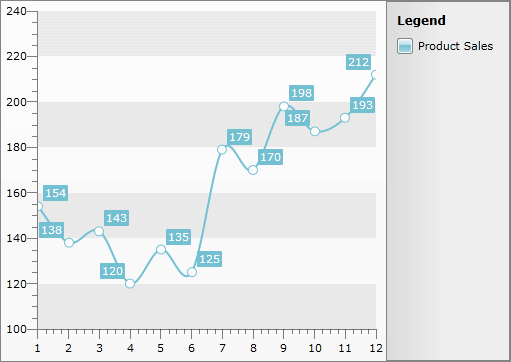
Now if you run your application, the result should be similar to the below snapshot. Note that:
* **RadChart** has automatically generated value ranges for both axes X and Y, based on the values provided by the data source. If needed you can specify the ranges [manually](https://www.telerik.com/products/wpf/documentation/controls/radchart/features/axes/overview).
* The [Chart Legend](https://www.telerik.com/products/wpf/documentation/controls/radchart/features/chart-legend) is also generated automatically, containing information about the only one available series "Product Sales".
* [X-Axis](https://www.telerik.com/products/wpf/documentation/controls/radchart/features/axes/x-axis) shows the month numbers.
* [Y-Axis](https://www.telerik.com/products/wpf/documentation/controls/radchart/features/axes/y-axis) shows the sold quantity values.
* Spline connects all dots in one smooth graphic
## Creating Categorical Chart
The **X-axis** can be further customized by replacing the month numbers (1, 2, 3...) with the respective month names (January, February, March...). To achieve this we have to set the **ItemMapping.DataPointMember** property for the **X-axis** to **XCategory** and the **ItemMapping.FieldName** to "**MonthName**", as shown in the samples below.
```XAML
```
```C#
seriesMapping.ItemMappings.Add(new ItemMapping("MonthName", DataPointMember.XCategory));
```
```VB.NET
seriesMapping.ItemMappings.Add(New ItemMapping("MonthName", DataPointMember.XCategory))
```
And here is the same chart but this time showing month names as categories for the **X-axis** instead of the month numbers.
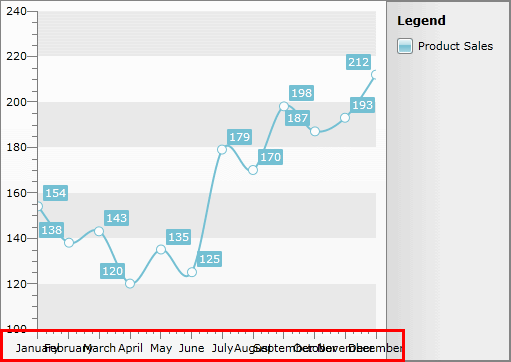
> tip To make the x-Axis labels more readable you can use one of the label features provided by the **XAxis** class. For more information read [here](https://www.telerik.com/products/wpf/documentation/controls/radchart/features/axes/x-axis).
If you need further customizations of the chart you can take a look at some of the following topics:
* Change the [Layout Mode](https://www.telerik.com/products/wpf/documentation/controls/radchart/features/layout-mode) of the chart.
* Format your labels using [Format Expressions](https://www.telerik.com/products/wpf/documentation/controls/radchart/features/format-expressions).
* Change your [Chart Point-marks](https://www.telerik.com/products/wpf/documentation/controls/radchart/features/chart-point-marks).
* Improve your [Interactivity](https://www.telerik.com/products/wpf/documentation/controls/radchart/features/interactivity) using [ToolTips](https://www.telerik.com/products/wpf/documentation/controls/radchart/features/tooltips).
* Customize your [Chart Title](https://www.telerik.com/products/wpf/documentation/controls/radchart/features/chart-title), [Chart Legend](https://www.telerik.com/products/wpf/documentation/controls/radchart/features/chart-legend) or [Chart Area](https://www.telerik.com/products/wpf/documentation/controls/radchart/features/chart-area).
* Show [Multi-series Charts](https://www.telerik.com/products/wpf/documentation/controls/radchart/features/multi-series-charts).
* Customize the chart [Animations](https://www.telerik.com/products/wpf/documentation/controls/radchart/features/animations).
* Change the [Striplines and Gridlines](https://www.telerik.com/products/wpf/documentation/controls/radchart/features/axes/striplines-and-gridlines) of both axes.
If you need to know more about **RadChart** data binding, take a look at the following topics:
* [Data Binding Support Overview](https://www.telerik.com/products/wpf/documentation/controls/radchart/populating-with-data/data-binding-support-overview)
* [Data Binding with Automatic Series Mappings](https://www.telerik.com/products/wpf/documentation/controls/radchart/populating-with-data/data-binding-with-automatic-series-binding) or [Data Binding with Manual Series Mapping](https://www.telerik.com/products/wpf/documentation/controls/radchart/populating-with-data/data-binding-with-manual-series-mapping)
* [Data Binding to Nested Collections](https://www.telerik.com/products/wpf/documentation/controls/radchart/populating-with-data/data-binding-to-nested-collections)
* [Data Binding to Many Chart Areas](https://www.telerik.com/products/wpf/documentation/controls/radchart/populating-with-data/data-binding-to-many-chart-areas)
* [Data Binding to WCF Service](https://www.telerik.com/products/wpf/documentation/controls/radchart/populating-with-data/binding-to-wcf)
* [Data Binding to ADO.NET Data Service](https://www.telerik.com/products/wpf/documentation/controls/radchart/populating-with-data/binding-to-adonet-service)
## See Also
* [Key Features](https://www.telerik.com/products/wpf/documentation/controls/radchart/general-information/overview-key-features)
* [Visual Structure](https://www.telerik.com/products/wpf/documentation/controls/radchart/general-information/visual-structure)
* [Create a Line Chart with Static Data](https://www.telerik.com/products/wpf/documentation/controls/radchart/getting-started/create-a-line-chart-with-static-data)