# Phone Layout End User Experience
This article shows some basic examples how the end user can interact with the phone-optimized RadEditor control:
* [Start Editing](https://www.telerik.com/products/aspnet-ajax/documentation/controls/editor/mobile-support/phone-layout/end-user-experience#start-editing)
* [Using the Tools](https://www.telerik.com/products/aspnet-ajax/documentation/controls/editor/mobile-support/phone-layout/end-user-experience#using-the-tools)
* [Using Tabs and Contextual Tabs](https://www.telerik.com/products/aspnet-ajax/documentation/controls/editor/mobile-support/phone-layout/end-user-experience#using-tabs-and-contextual-tabs)
* [Toggling HTML Mode](https://www.telerik.com/products/aspnet-ajax/documentation/controls/editor/mobile-support/phone-layout/end-user-experience#toggling-html-mode)
* [Using Built-in Mobile Dialogs](https://www.telerik.com/products/aspnet-ajax/documentation/controls/editor/mobile-support/phone-layout/end-user-experience#using-built-in-mobile-dialogs)
* [Common Elements](https://www.telerik.com/products/aspnet-ajax/documentation/controls/editor/mobile-support/phone-layout/end-user-experience#common-elements)
* [Hyperlink Manager](https://www.telerik.com/products/aspnet-ajax/documentation/controls/editor/mobile-support/phone-layout/end-user-experience#hyperlink-manager)
* [File Browser Dialogs](https://www.telerik.com/products/aspnet-ajax/documentation/controls/editor/mobile-support/phone-layout/end-user-experience#file-browser-dialogs)
* [Insert Table](https://www.telerik.com/products/aspnet-ajax/documentation/controls/editor/mobile-support/phone-layout/end-user-experience#insert-table)
* [Find and Replace](https://www.telerik.com/products/aspnet-ajax/documentation/controls/editor/mobile-support/phone-layout/end-user-experience#find-and-replace)
## Start Editing
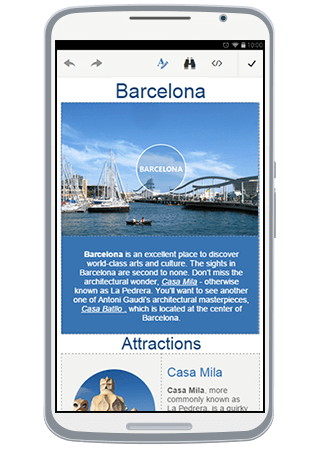
Initially, **RadEditor** is loaded in **Preview** mode (**Figure 1**). In order to start editing the content (full screen mode), the user should tap either the content, or the **Edit Content** button ().
> caption Figure 1: Phone Layout in Preview mode and how to start editing

In full screen mode, user can edit the text and operate with the header tools.
> caption Figure 2: Full screen mode where you can edit the content
## Using the Tools
The **ToolZone** can be shown by pressing the **Toggle ToolZone** button from the Header Tools (). Using the tools will affect the current selection.
> caption Figure 3: Toggling the ToolZone.

The animation in **Figure 4** shows how a user would be able to use the tools and edit or format the content.
> caption Figure 4: User experience with content editing.

## Using Tabs and Contextual Tabs
To change the current tab, the user should press the **Tab Chooser** button (). As shown in **Figure 5**, a pop-up with all available tabs will be shown. Tapping on one of them, will load the corresponding tools from this tab into the **ToolZone**.
> caption Figure 5: Changing the Tab.

Additionally, tabs can be configured to be shown only when a certain element is selected. This can be controlled via the **Context** property of the **EditorToolGroup** items. You can read more about that in the [Toolbar Configuration](https://www.telerik.com/products/aspnet-ajax/documentation/controls/editor/mobile-support/phone-layout/toolbar-configuration) article.
In **Figure 6**, you can see how selecting an `![]() ` element in the content and opening the **ToolZone**, automatically shows the built-in **Image** tab.
> caption Figure 6: Working with contextual tabs.

## Toggling HTML Mode
The user can edit the content as HTML by switching to HTML mode. This is done by tapping the **Toggle HTML** button () from the header tools. This will show the content's HTML. Once user is done, tapping the same button will switch the mode back to Design.
> caption Figure 7: Toggling HTML mode.

## Using Built-in Mobile Dialogs
With the creation of the phone-optimized **RadEditor**, the built-in dialogs also have also been re-designed in order to expose a more user-friendly UI under phone devices. You can learn more details about how to configure the built-in dialogs in the [Mobile Dialogs](https://www.telerik.com/products/aspnet-ajax/documentation/controls/editor/mobile-support/phone-layout/dialogs) article.
> caption Figure 8: Built-in Mobile Dialogs (Insert Table, Insert Image, Insert Link, Find and Replace).

The following sections explain the specific elements for each mobile dialog.
### Common Elements
All built-in dialogs have **OK**/**Insert** and **Cancel** buttons that are used to perform the dialog's action and to cancel the operation. With the mobile-optimized dialogs, these buttons are placed at the top toolbar of the dialog.
> caption Figure 9: OK and Cancel buttons of the mobile-optimized built-in dialogs.

### Hyperlink Manager
* **Url** (text input)—the URL of the link to be inserted.
* **Link Text** (text input)—the text of the link.
* **Target** (select input)—the target attribute of the link.
### File Browser Dialogs
*  **Upload**—opens an UI for the user to upload a file *(available if the **UploadPaths** property is set)*.
*  **Delete**—deletes the selected file *(available if the **DeletePaths** property is set)*.
*  **List View**—toggles the view mode to **List**.
*  **Thumbnail View**—toggles the view mode to **Thumbnails**.
### Insert Table
*  **Increase/Decrease** (spin buttons)—enables the user to increase or decrease the value in the numeric text-box.
* **Columns** (numeric text-box)—sets the number of the table's columns.
* **Rows** (numeric text-box)— sets the number of the table's rows.
* **Cell Padding** (numeric text-box)—adds a padding to the table's cells.
* **Cell Spacing** (numeric text-box)—adds spacing between the table's cells.
### Find and Replace
* **Find** and **Find and Replace** (radio buttons)—Toggles between the two modes.
* **Match Case** (check-box)—Defines whether to match the case.
## See Also
* [Getting Started](https://www.telerik.com/products/aspnet-ajax/documentation/controls/editor/mobile-support/phone-layout/getting-started)
* [Elements Structure](https://www.telerik.com/products/aspnet-ajax/documentation/controls/editor/mobile-support/phone-layout/elements-structure)
* [Toolbar Configuration](https://www.telerik.com/products/aspnet-ajax/documentation/controls/editor/mobile-support/phone-layout/toolbar-configuration)
* [Mobile Dialogs](https://www.telerik.com/products/aspnet-ajax/documentation/controls/editor/mobile-support/phone-layout/dialogs)