# Appearance

The ChipList provides predefined appearance options such as different sizes, border radiuses, fill modes and theme colors.
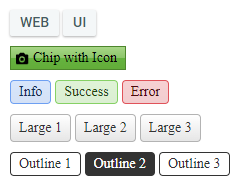
!["ChipLists with different appearance"](https://www.telerik.com/products/aspnet-ajax/documentation/assets/cfaccaf5c2093c39783c56592af83e7a/chiplist-appearance-styles.png "ChipLists with different appearance")

For a live example, visit the [Appearance Demo of the ChipList](https://demos.telerik.com/aspnet-ajax/chiplist/appearance/defaultcs.aspx).

## Options

The Telerik WebForms ChipList supports the following styling options:

* [`Size`](https://www.telerik.com/products/aspnet-ajax/documentation/controls/chiplist/appearance#size)—Configures the overall size of the component.
* [`ItemSize`](https://www.telerik.com/products/aspnet-ajax/documentation/controls/chiplist/appearance#themecolor)—Configures what color will be applied to the component.
* [`ThemeColor`](https://www.telerik.com/products/aspnet-ajax/documentation/controls/chiplist/appearance#themecolor)—Configures how the color is applied to the component.
* [`FillMode`](https://www.telerik.com/products/aspnet-ajax/documentation/controls/chiplist/appearance#fillmode)—Configures how the color is applied to the component.
* [`Rounded`](https://www.telerik.com/products/aspnet-ajax/documentation/controls/chiplist/appearance#rounded)—Configures the border radius of the component.
* [`Icon`](https://www.telerik.com/products/aspnet-ajax/documentation/controls/chiplist/appearance#icon)—Displays an icon.

## Size

Specifies the gap between the Chips in the ChipList.
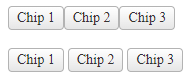
!["ChipList Size"](https://www.telerik.com/products/aspnet-ajax/documentation/assets/03e65f992134b5096957b02f504a742a/chiplist-appearance-size.png "ChipList Size")

The following values are available for the `Size` option:

* `Small`
* `Medium` (default)
* `Large`
* `None`—No gaps between the Chips

Example

```ASP.NET
<telerik:RadChipList ID="RadChipList1" runat="server" Size="None">
    <Items>
        <telerik:ChipListItem Label="Chip 1" />
        <telerik:ChipListItem Label="Chip 2" />
        <telerik:ChipListItem Label="Chip 3" />
    </Items>
</telerik:RadChipList>

<telerik:RadChipList ID="RadChipList2" runat="server" Size="Large">
    <Items>
        <telerik:ChipListItem Label="Chip 1" />
        <telerik:ChipListItem Label="Chip 2" />
        <telerik:ChipListItem Label="Chip 3" />
    </Items>
</telerik:RadChipList>
```

## ItemSize

The `ItemSize` option controls how big or small the rendered chip items look.
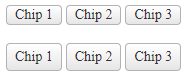
!["ChipList Item Size"](https://www.telerik.com/products/aspnet-ajax/documentation/assets/07f5ef576fa3b3a3a1509d7cf0a26202/chiplist-appearance-itemsize.png "ChipList Item Size")

The following values are available for the `ItemSize` option:

* `Small`
* `Medium` (default)
* `Large`
* `None`—The chip will naturally resize based on the content

Example

```ASP.NET
<telerik:RadChipList ID="RadChipList1" runat="server" ItemSize="Small">
    <Items>
        <telerik:ChipListItem Label="Chip 1" />
        <telerik:ChipListItem Label="Chip 2" />
        <telerik:ChipListItem Label="Chip 3" />
    </Items>
</telerik:RadChipList>

<telerik:RadChipList ID="RadChipList2" runat="server" ItemSize="Large">
    <Items>
        <telerik:ChipListItem Label="Chip 1" />
        <telerik:ChipListItem Label="Chip 2" />
        <telerik:ChipListItem Label="Chip 3" />
    </Items>
</telerik:RadChipList>
```

## ThemeColor

The `ThemeColor` option controls the color of the chips in the ChipList. This option is applied to the **ChipListItem**, therefore, each item can be individually colored.

!["ChipList Item ThemeColor"](https://www.telerik.com/products/aspnet-ajax/documentation/assets/91ffe5da6acdbbb129d930486057ef8d/chiplist-appearance-themecolor.png "ChipList Item ThemeColor")

The following values are available for the `ThemeColor` option:

* `Base` (default)
* `Info`
* `Success`
* `Warning`
* `Error`

Example

```ASP.NET
<telerik:RadChipList ID="RadChipList1" runat="server">
    <Items>
        <telerik:ChipListItem Label="Base" ThemeColor="Base" />
        <telerik:ChipListItem Label="Info" ThemeColor="Info" />
        <telerik:ChipListItem Label="Success" ThemeColor="Success" />
        <telerik:ChipListItem Label="Warning" ThemeColor="Warning" />
        <telerik:ChipListItem Label="Error" ThemeColor="Error" />
    </Items>
</telerik:RadChipList>
```

## FillMode

The `FillMode` specifies the background and border styles of the Chip items in the ChipList.
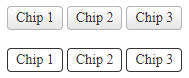
!["ChipList FillMode"](https://www.telerik.com/products/aspnet-ajax/documentation/assets/8bec25c4776442fad05b0ab9dc16a880/chiplist-appearance-fillmode.png "ChipList FillMode")

The following values are available for the `FillMode` option:

* `Solid` (default)
* `Outline`

Example

```ASP.NET
<telerik:RadChipList ID="RadChipList1" runat="server" FillMode="Solid">
    <Items>
        <telerik:ChipListItem Label="Chip 1" />
        <telerik:ChipListItem Label="Chip 2" />
        <telerik:ChipListItem Label="Chip 3" />
    </Items>
</telerik:RadChipList>

<telerik:RadChipList ID="RadChipList2" runat="server" FillMode="Outline">
    <Items>
        <telerik:ChipListItem Label="Chip 1" />
        <telerik:ChipListItem Label="Chip 2" />
        <telerik:ChipListItem Label="Chip 3" />
    </Items>
</telerik:RadChipList>
```

## Rounded

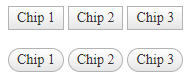
The `Rounded` option controls how much border radius is applied to the Chips inside the ChipList.
!["ChipList Rounded"](https://www.telerik.com/products/aspnet-ajax/documentation/assets/883219342fccc9e4a21c178af52455bd/chiplist-appearance-rounded.png "ChipList Rounded")

The following values are available for the `Rounded` option:

* `Small`
* `Medium` (default)
* `Large`
* `Full`
* `None`

Example

```ASP.NET
<telerik:RadChipList ID="RadChipList1" runat="server" Rounded="None">
    <Items>
        <telerik:ChipListItem Label="Chip 1" />
        <telerik:ChipListItem Label="Chip 2" />
        <telerik:ChipListItem Label="Chip 3" />
    </Items>
</telerik:RadChipList>

<telerik:RadChipList ID="RadChipList2" runat="server" Rounded="Full">
    <Items>
        <telerik:ChipListItem Label="Chip 1" />
        <telerik:ChipListItem Label="Chip 2" />
        <telerik:ChipListItem Label="Chip 3" />
    </Items>
</telerik:RadChipList>
```

## Icon

To enable icons for the items in the ChipList, set the `Icon` property to the **name** of the embedded icon. This option is applied to **ChipListItem**, therefore, each individual item can have its own icon.

!["ChipList with Icon"](https://www.telerik.com/products/aspnet-ajax/documentation/assets/ad6690090f2ad9f4963c03ef372c322d/chiplist-appearance-icon.png "ChipList with Icon")

Visit the [Web Font Icons - List of Font Icons](https://docs.telerik.com/kendo-ui/styles-and-layout/sass-themes/font-icons#list-of-font-icons) page and find the icon of your choice then copy its name without the `.k-i-` prefix.

For example, if the icon is called `.k-i-plus-outline` the name would be `plus-outline`.

!["Icon name"](https://www.telerik.com/products/aspnet-ajax/documentation/assets/8717c44bcdc590505c3ee60adb81768d/chiplist-appearance-icon-name.png "Icon name")

Example

```ASP.NET
<telerik:RadChipList ID="RadChipList1" runat="server">
    <Items>
        <telerik:ChipListItem runat="server" Icon="plus-outline" Label="plus-outline"></telerik:ChipListItem>
        <telerik:ChipListItem runat="server" Icon="bell" Label="bell"></telerik:ChipListItem>
        <telerik:ChipListItem runat="server" Icon="youtube" Label="youtube"></telerik:ChipListItem>
        <telerik:ChipListItem runat="server" Icon="shapes" Label="shapes"></telerik:ChipListItem>
        <telerik:ChipListItem runat="server" Icon="file-wrench" Label="file-wrench"></telerik:ChipListItem>
        <telerik:ChipListItem runat="server" Icon="heart-outline" Label="heart-outline"></telerik:ChipListItem>
        <telerik:ChipListItem runat="server" Icon="clipboard" Label="clipboard"></telerik:ChipListItem>
        <telerik:ChipListItem runat="server" Icon="anchor" Label="anchor"></telerik:ChipListItem>
        <telerik:ChipListItem runat="server" Icon="user" Label="user"></telerik:ChipListItem>
    </Items>
</telerik:RadChipList>
```

## Next Steps

* [Customize the ChipList](https://www.telerik.com/products/aspnet-ajax/documentation/controls/chiplist/customization)
* [Enable Selection](https://www.telerik.com/products/aspnet-ajax/documentation/controls/chiplist/selection-mode)
* [Removable](https://www.telerik.com/products/aspnet-ajax/documentation/controls/chiplist/removable)
* [Client-side Programming](https://www.telerik.com/products/aspnet-ajax/documentation/controls/chiplist/client-side-programming/overview)
* [Server-side Programming](https://www.telerik.com/products/aspnet-ajax/documentation/controls/chiplist/server-side-programming/overview)

## See Also

* [Overview](https://www.telerik.com/products/aspnet-ajax/documentation/controls/chiplist/overview)
* [Getting Started with the ChipList](https://www.telerik.com/products/aspnet-ajax/documentation/controls/chiplist/getting-started)
* [Customize the ChipList](https://www.telerik.com/products/aspnet-ajax/documentation/controls/chiplist/customization)
* [Enable Selection](https://www.telerik.com/products/aspnet-ajax/documentation/controls/chiplist/selection-mode)
* [Removable](https://www.telerik.com/products/aspnet-ajax/documentation/controls/chiplist/removable)
* [Client-side Programming](https://www.telerik.com/products/aspnet-ajax/documentation/controls/chiplist/client-side-programming/overview)
* [Server-side Programming](https://www.telerik.com/products/aspnet-ajax/documentation/controls/chiplist/server-side-programming/overview)
