# .NET MAUI DataForm Editors Styling
The DataForm control for .NET MAUI provides styling options for customizing the appearance of its editors. You have to apply a style to each editor individually.
Each editor provides the following properties:
* `BackgroundColor`—Defines the background color of the editor.
* `BorderColor`—Defines the border color of the editor.
* `BorderThickness`—Specifies the border thickness of the editor.
* `EditorStyle` (`Style` with `TargetType` depending on the input control which the editor uses). For example, the target type of the `RadCheckBoxEditor` is `RadCheckBox`.
## Example
The following example shows how to style the DataForm:
**1.** Define the `RadDataForm` and the editors:
```XAML
```
Note that `local` in the snippet above points to the namespace where the `EditorsViewModel` is defined.
**2.** Define the `CheckBoxStyle` for the `DataFormRadCheckBoxEditor`:
```XAML
```
**3.** Add the following namespace:
```XAML
xmlns:telerik="http://schemas.telerik.com/2022/xaml/maui"
```
**4.** Define the `ViewModel` used as a `BindingContext` for the `RadDataForm`:
```C#
public class EditorsViewModel : NotifyPropertyChangedBase
{
private string name;
private DateTime? startDate;
private DateTime? endDate;
private double? people;
private bool? visited;
private TimeSpan? duration;
private EnumValue accommodation = EnumValue.Apartment;
public enum EnumValue
{
SingleRoom,
Apartment,
House
}
[Required]
[Display(Name = "Select accomodation")]
public EnumValue Accommodation
{
get
{
return this.accommodation;
}
set
{
if (this.accommodation != value)
{
this.accommodation = value;
this.OnPropertyChanged();
}
}
}
[Required]
[Display(Name = "First Name")]
public string FirstName
{
get => this.name;
set => this.UpdateValue(ref this.name, value);
}
[Required]
[Display(Name = "Start date")]
public DateTime? StartDate
{
get => this.startDate;
set => this.UpdateValue(ref this.startDate, value);
}
[Required]
[Display(Name = "End Date")]
public DateTime? EndDate
{
get => this.endDate;
set => this.UpdateValue(ref this.endDate, value);
}
[Required]
[Display(Name = "Number of People")]
[Range(1, 10)]
public double? People
{
get => this.people;
set => this.UpdateValue(ref this.people, value);
}
[Display(Name = "Visited before")]
public bool? Visited
{
get => this.visited;
set => this.UpdateValue(ref this.visited, value);
}
[Display(Name = "Duration")]
public TimeSpan? Duration
{
get => this.duration;
set => this.UpdateValue(ref this.duration, value);
}
}
```
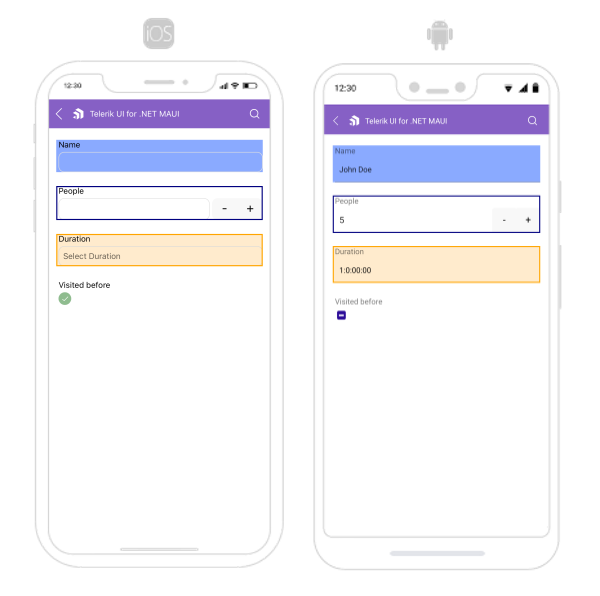
The following image shows what the DataForm control looks like when the styles described above are applied:
> For a runnable example with the DataForm Editors Styling scenario, see the [SDKBrowser Demo Application](https://www.telerik.com/maui-ui/documentation/demos-and-sample-apps/sdkbrowser-app) and go to **DataForm > Styling** category.
## See Also
* [Groups Styling](https://www.telerik.com/maui-ui/documentation/controls/dataform/styling/groups-styling)
* [Error Message Styling](https://www.telerik.com/maui-ui/documentation/controls/dataform/styling/error-message-styling)
* [Validation Styling](https://www.telerik.com/maui-ui/documentation/controls/dataform/styling/validation-styling)
* [Header Styling](https://www.telerik.com/maui-ui/documentation/controls/dataform/styling/header-styling)