# Consuming Data from Amazon DynamoDB
This tutorial demonstrates how to create a table in [Amazon DynamoDB](https://aws.amazon.com/dynamodb/) and configure the Kendo UI Grid for Angular to retrieve, create, update, and destroy items in that table.
## Prerequisites
* [Amazon AWS account](https://aws.amazon.com/account/)
* Basic knowledge on using the [AWS Console](https://console.aws.amazon.com/)
## Creating Users to Access and Manipulate the Amazon DynamoDB Table
The following instructions demonstrate how to create a user identity and use that identity directly on the client to access a DynamoDB table.
> Exposing user credentials directly on the client is not recommended. That is why, before sharing the client implementation with third parties or users, switch to the [Amazon Cognito](https://docs.aws.amazon.com/cognito/latest/developerguide/what-is-amazon-cognito.html) authentication.
1. In the [AWS Console](https://console.aws.amazon.com/), search for `"iam"` (Identity and Access Management).
2. In the IAM console, select **Users** and then **Add User**.
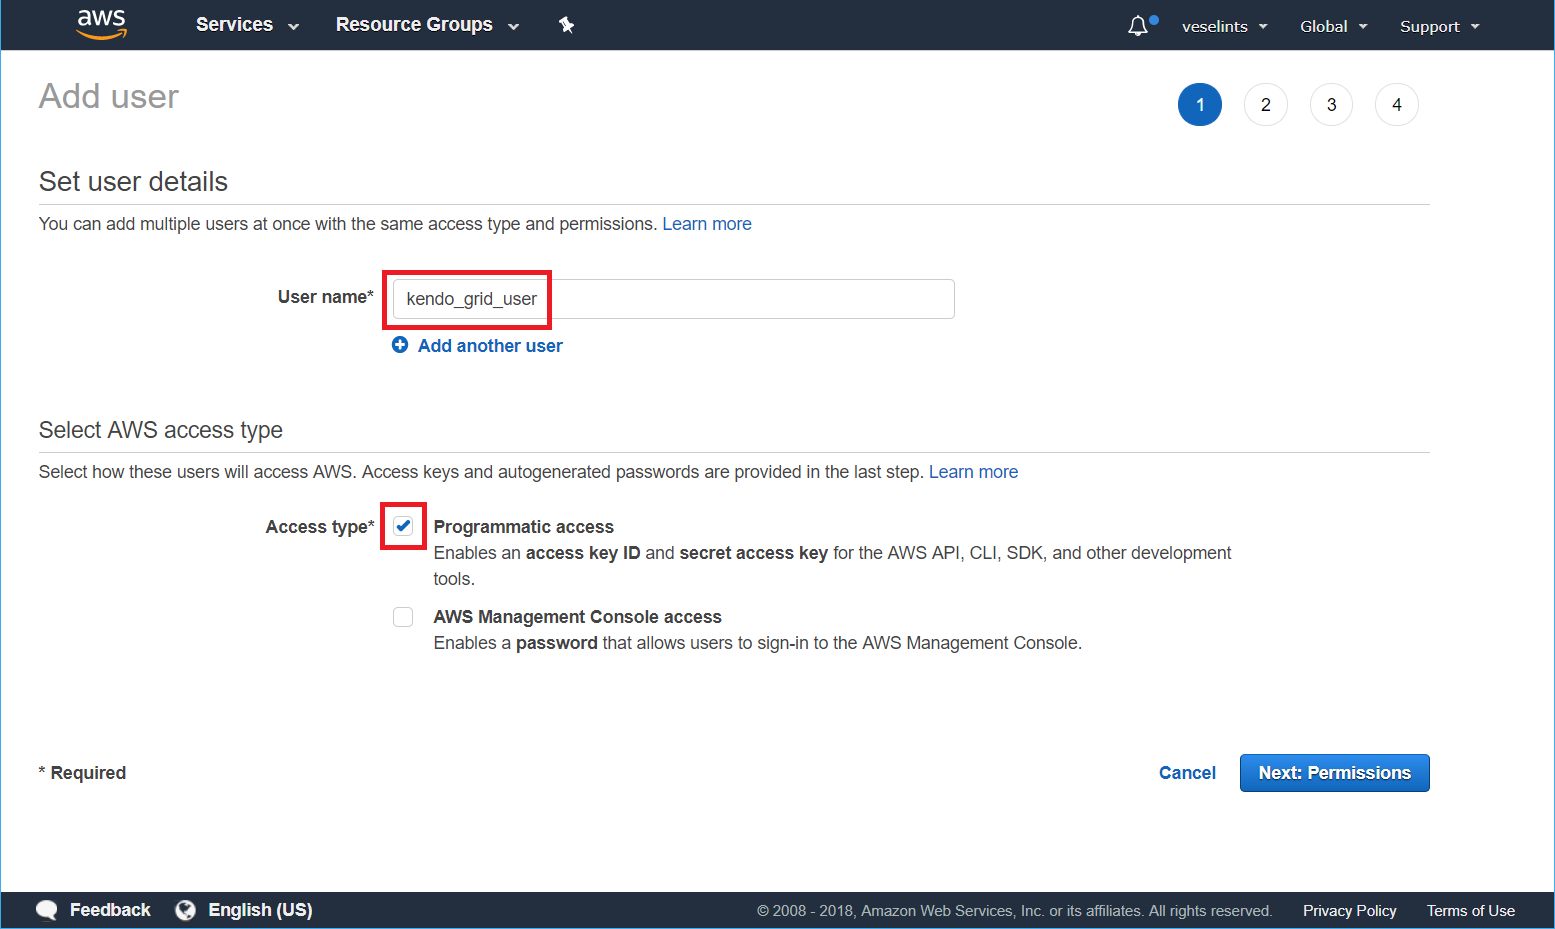
3. Type a user name and check the **Programmatic access** option—for example, `kendo_grid_user`. Click **Next: Permissions**.
**Image 1: Adding a new user**
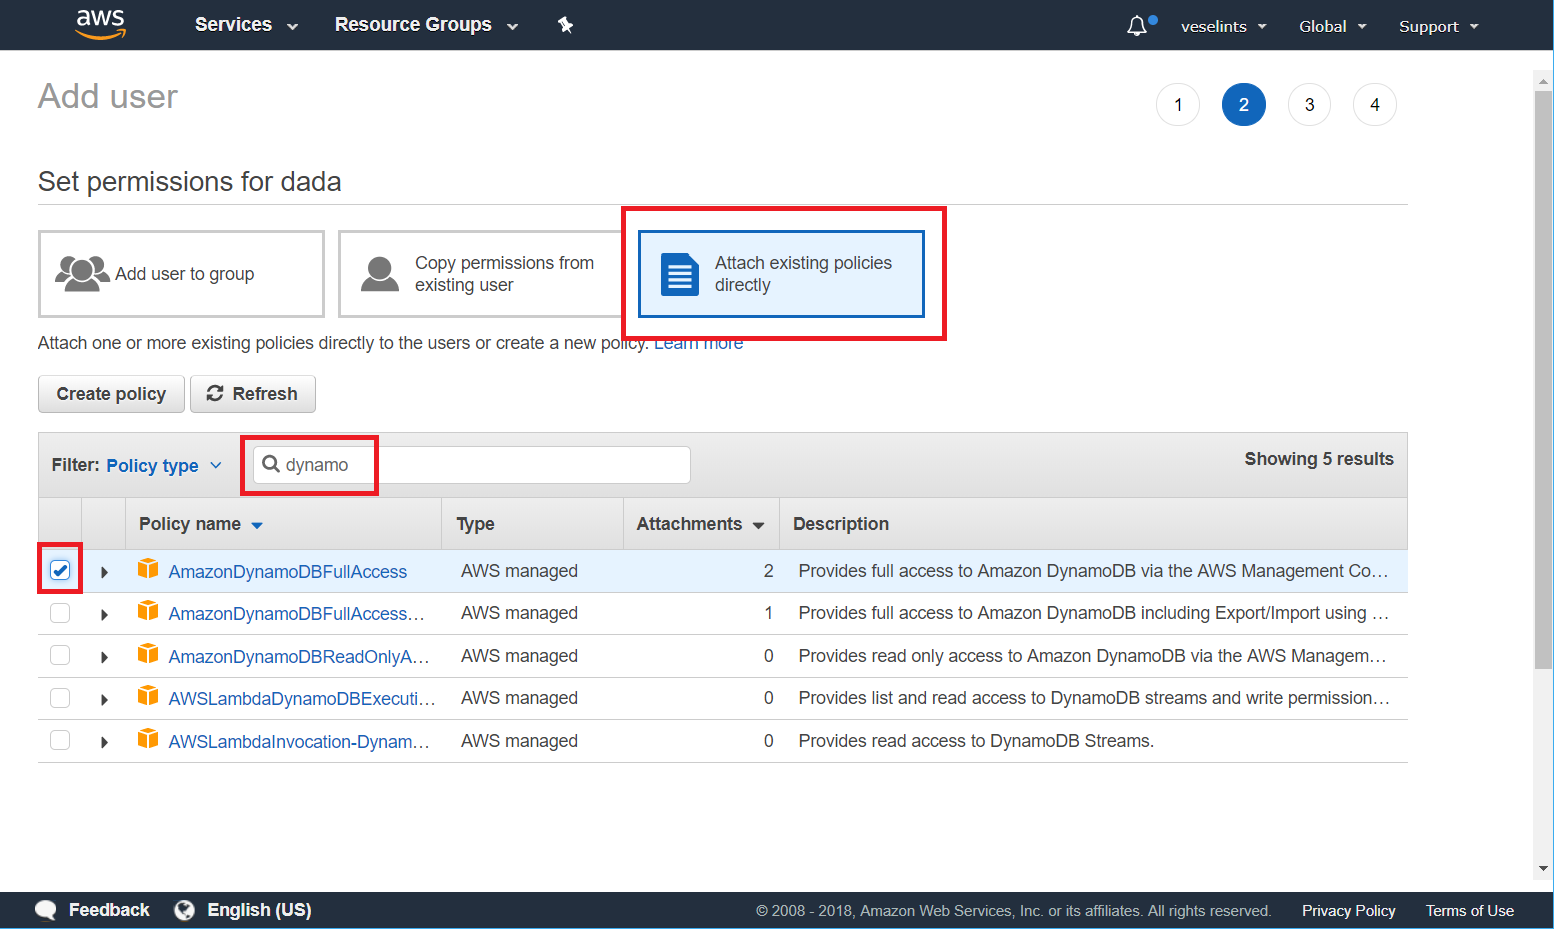
4. Select **Attach existing policies directly**. In the search field, type `dynamodb` and check the **AmazonDynamoDBFullAccess** option in the table. Click **Next: Review** > **Create user**
**Image 2: Configuring the user permissions**
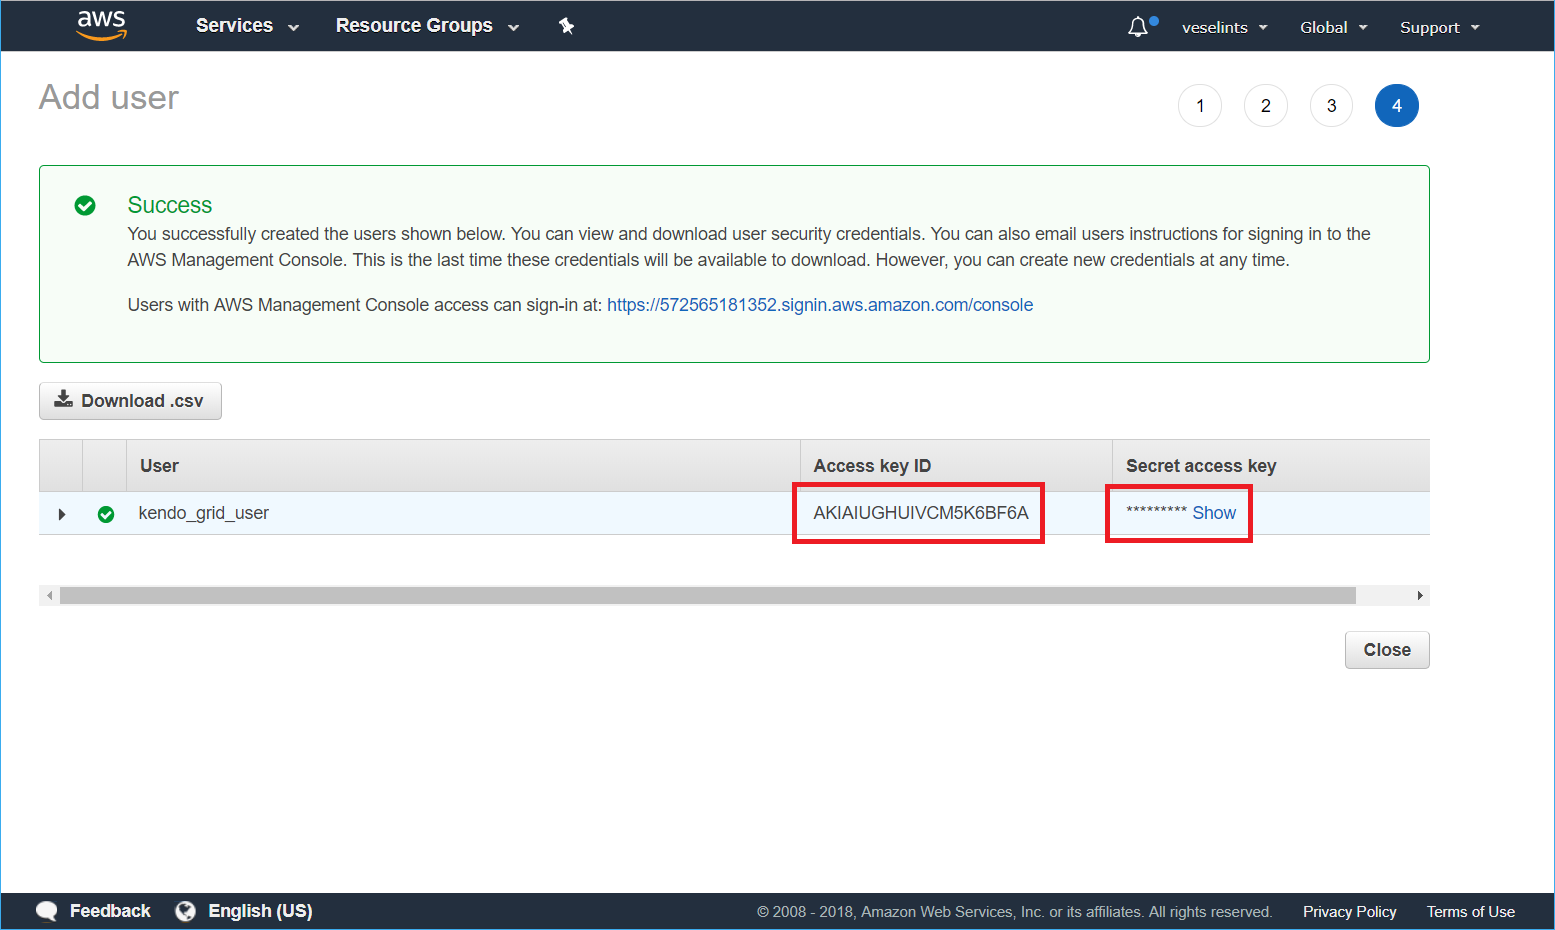
5. From the summary view of the newly created user, copy the **Access key ID** and the **Secret access key**.
**Image 3: Getting the user credentials**
## Configuring the Grid for Consuming and Manipulating Available DynamoDB Data
1. To create the Angular service, install and configure the [AWS SDK](https://www.npmjs.com/package/aws-sdk) by following the [guidelines for using it with TypeScript](https://www.npmjs.com/package/aws-sdk#usage-with-typescript) and [integrating it in the Angular application](https://www.npmjs.com/package/aws-sdk#with-angular).
2. Import and use the AWS SDK for creating the service methods which are related to the CRUD operations.
```ts
import { Injectable } from '@angular/core';
import * as AWS from 'aws-sdk';
import { Observable } from 'rxjs';
import { UUID } from 'angular2-uuid'; // use a third-party library or custom logic for generating the GUIDs of the newly created items
@Injectable({
providedIn: 'root'
})
export class DataService {
private dynamodb;
private docClient;
private params = {
TableName: 'Movies'
};
private readObs = Observable.create(observer => {
this.docClient.scan(this.params, (err, data) => {
if (err) {
observer.error(err);
} else {
observer.next(data.Items.map(item => {
item.release_date = new Date(item.release_date);
return item;
}));
}
});
});
constructor() {
// provide your access key and secret access key as obtained in the previous step
AWS.config.credentials = new AWS.Credentials('accessKeyId', 'secretAccessKey', null);
AWS.config.update({
region: 'us-east-1'
});
this.dynamodb = new AWS.DynamoDB();
this.docClient = new AWS.DynamoDB.DocumentClient();
}
public getItems(): Observable {
return this.readObs;
}
public create(item) {
item.id = UUID.UUID();
const params = {
TableName: 'Movies',
Item: Object.assign({}, item, { release_date: item.release_date.toISOString() })
};
return Observable.create(observer => {
this.docClient.put(params, (err, data) => {
if (err) {
observer.error(err);
} else {
observer.next(item);
}
});
});
}
public save(item, isNew) {
if (isNew) {
return this.create(item);
}
return this.update(item);
}
private update(item) {
const updateArray = [];
const updateArrtibutes = {};
const updated = Object.assign({}, item, { release_date: item.release_date.toISOString() }); // serialize the JavaScript Date Object
for (const property in updated) {
if (updated.hasOwnProperty(property) && property !== 'id') {
updateArray.push(`${property} = :${property}`);
updateArrtibutes[`:${property}`] = updated[property];
}
}
const updateExpression = `set ${updateArray.join(',')}`;
const params = {
TableName: 'Movies',
Key: {
id: updated.id
},
UpdateExpression: updateExpression,
ExpressionAttributeValues: updateArrtibutes,
ReturnValues: 'ALL_NEW'
};
return Observable.create(observer => {
this.docClient.update(params, (err, data) => {
if (err) {
observer.error(err);
} else {
observer.next(item);
}
});
});
}
public remove(item) {
const params = {
TableName: 'Movies',
Key: {
id: item.id
},
ReturnValues: 'ALL_OLD'
};
return Observable.create(observer => {
this.docClient.delete(params, (err, data) => {
if (err) {
observer.error(err);
} else {
observer.next(200);
}
});
});
}
}
```
3. Bind the Grid and consume the service endpoints in the editing-related event handlers.
The following example demonstrates the code for the component.
```ts
import { Component } from '@angular/core';
import { DataService } from './data.service';
import { FormGroup, FormControl, Validators } from '@angular/forms';
@Component({
selector: 'app-root',
templateUrl: './app.component.html',
styleUrls: ['./app.component.scss']
})
export class AppComponent {
public gridData;
public formGroup: FormGroup;
public editedRowIndex: number;
public state = {
skip: 0,
sort: [{ field: 'release_date', dir: 'desc' }],
take: 10
};
constructor(private dataService: DataService) {
dataService.getItems().subscribe(res => this.gridData = res);
}
public addHandler({ sender }) {
this.closeEditor(sender);
this.formGroup = new FormGroup({
'title': new FormControl('', Validators.required),
'release_date': new FormControl(),
'directors': new FormControl(),
'actors': new FormControl(),
'plot': new FormControl()
});
sender.addRow(this.formGroup);
}
public editHandler({ sender, rowIndex, dataItem }) {
this.closeEditor(sender);
this.formGroup = new FormGroup({
'title': new FormControl(dataItem.title, Validators.required),
'release_date': new FormControl(dataItem.release_date),
'directors': new FormControl(dataItem.directors),
'actors': new FormControl(dataItem.actors),
'plot': new FormControl(dataItem.plot)
});
this.editedRowIndex = rowIndex;
sender.editRow(rowIndex, this.formGroup);
}
public cancelHandler({ sender, rowIndex }) {
this.closeEditor(sender, rowIndex);
}
public saveHandler({ sender, rowIndex, formGroup, dataItem, isNew }) {
const updated = Object.assign({}, dataItem, formGroup.value);
const itemIndex = this.gridData.findIndex(pr => pr.id === dataItem.id);
this.dataService.save(updated, isNew).subscribe(result => {
if (isNew) {
this.gridData = [...this.gridData, result];
} else {
Object.assign(dataItem, result);
}
});
sender.closeRow(rowIndex);
}
public removeHandler({ dataItem }) {
const itemIndex = this.gridData.findIndex(pr => pr.id === dataItem.id);
this.dataService.remove(dataItem).subscribe(() => {
this.gridData = [...this.gridData.slice(0, itemIndex), ...this.gridData.slice(itemIndex + 1)];
});
}
private closeEditor(grid, rowIndex = this.editedRowIndex) {
grid.closeRow(rowIndex);
this.editedRowIndex = undefined;
this.formGroup = undefined;
}
}
```
The following example demonstrates the template.
```html
```
## Suggested Links
* [Consuming Data from Azure Cosmos DB](https://www.telerik.com/kendo-angular-ui/components/cloud/cosmos-db)
* [Binding the Grid to Azure Functions](https://www.telerik.com/kendo-angular-ui/components/cloud/azure-functions)
* [Uploading Images to Azure Face API](https://www.telerik.com/kendo-angular-ui/components/cloud/face-api)
* [Consuming Data from Google Cloud Big Query](https://www.telerik.com/kendo-angular-ui/components/cloud/google-big-query)
 4. Select **Attach existing policies directly**. In the search field, type `dynamodb` and check the **AmazonDynamoDBFullAccess** option in the table. Click **Next: Review** > **Create user**
**Image 2: Configuring the user permissions**
 5. From the summary view of the newly created user, copy the **Access key ID** and the **Secret access key**.
**Image 3: Getting the user credentials**
 ## Configuring the Grid for Consuming and Manipulating Available DynamoDB Data
1. To create the Angular service, install and configure the [AWS SDK](https://www.npmjs.com/package/aws-sdk) by following the [guidelines for using it with TypeScript](https://www.npmjs.com/package/aws-sdk#usage-with-typescript) and [integrating it in the Angular application](https://www.npmjs.com/package/aws-sdk#with-angular).
2. Import and use the AWS SDK for creating the service methods which are related to the CRUD operations.
```ts
import { Injectable } from '@angular/core';
import * as AWS from 'aws-sdk';
import { Observable } from 'rxjs';
import { UUID } from 'angular2-uuid'; // use a third-party library or custom logic for generating the GUIDs of the newly created items
@Injectable({
providedIn: 'root'
})
export class DataService {
private dynamodb;
private docClient;
private params = {
TableName: 'Movies'
};
private readObs = Observable.create(observer => {
this.docClient.scan(this.params, (err, data) => {
if (err) {
observer.error(err);
} else {
observer.next(data.Items.map(item => {
item.release_date = new Date(item.release_date);
return item;
}));
}
});
});
constructor() {
// provide your access key and secret access key as obtained in the previous step
AWS.config.credentials = new AWS.Credentials('accessKeyId', 'secretAccessKey', null);
AWS.config.update({
region: 'us-east-1'
});
this.dynamodb = new AWS.DynamoDB();
this.docClient = new AWS.DynamoDB.DocumentClient();
}
public getItems(): Observable