Create Your Own .NET Core Templates in 4 Easy Steps

Learn how you can save time by creating your own reusable .NET Core templates in just a few steps.
Do you ever develop prototypes, or starter projects/accelerators, that you’d like to use again in the future? A good way to do that is by creating custom templates for dotnet. Once completed, anytime you want to create a new project of that type in the future, you can key in “dotnet new ” and you’re off, complete with correct namespaces. You can even do conditional checks, or variable replacements.
-
To start, clone or download the MyGameStartup project which will make following along easy. There is nothing special about this, it’s just for the purposes of showing how you can bundle multiple projects, and do some variable replacements. Note: You’ll need .NET Core 2.1 SDK for this at a minimum. Once open, you’ll see a solution file, and a few simple projects with some basic Entity Framework Core behavior.
-
Note that in the downloaded project, there is a folder labeled “.template.config” with a file inside it labeled “template.json”. Let’s review the contents of that file. Feel free to update this file with values you plan to use for your own project type, but you can leave these if you want to just continue with the demo.
01.{02."$schema":"http://json.schemastore.org/template",// https://github.com/dotnet/templating/wiki/Reference-for-template.json03."author":"Kyle Ballard",04."classifications": ["Web/MVC/Razor Pages"],// Use command 'dotnet new' to see list of other classifications05."name":"My Game Startup",// Name that is displayed when running 'dotnet new' command06."identity":"MyGameStartup",// Unique name for this template07."shortName":"mygamestartup",// Alternative shortname, i.e. 'dotnet new mygamestartup'08."tags": {09."language":"C#",// Specify that this template is in C#.10."type":"project"11.},12."sourceName":"MyGameStartup",// Will replace the string 'MyStartup' with the value provided via -n.13."preferNameDirectory":true,// If -n is not specified, will use name of the current directory14."symbols": {15."db": {// If code or config contains {{Database_Name}} value will be replaced with parameter --db <value_here>16."type":"parameter",17."isRequired":"true",18."datatype":"string",19."replaces":"{{Database_Name}}",20."defaultValue":"MyGameStartupDB",21."description":"The database name attached to this project."22.}23.}24.}I’ve added comments to the file so it is easy to understand, along with a link to the official documentation. There are more features than I am covering here if you wish to add them. A few noteworthy settings in the file are the “shortName” property. This is the trigger for your project, i.e. ‘dotnet new mygamestartup.’ Also, if you see the section labeled “symbols,” and then cross-reference this with the projects ‘appsettings.json’ file, you’ll see the connection string’s database will be replaced with the “–db” parameter once we run it.
-
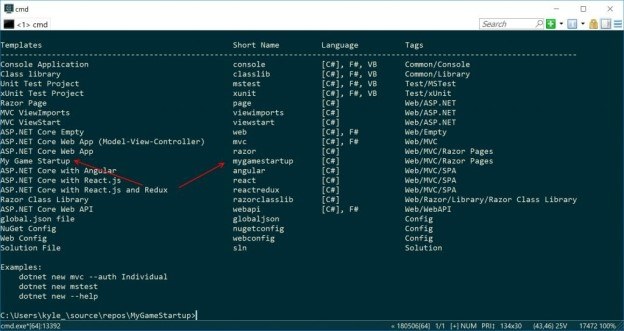
Ready to add this new project type to your available list? I’ll also show you how to remove it if you no longer plan to use this one. Run the command “dotnet new -i .” from the same folder as the downloaded .sln file and .template.config folder. The dot here refers simply to the current directory. You could have also specified the path, but this is easier. If successful, you should see a list of project types, along with your project type added.
Woohoo! You now have your own custom accelerator template you can use for other projects. Side note: This screenshot is from the ConEmu terminal which I use. You can download it here.
An important note also on this step. Running the “dotnet new -i .” command will bundle the current folder. I may not have discovered the setting yet, but keep in mind this skips empty folders. So if your wwwroot folder was empty, you will see this is not created after installing. I added a site.css to my version to avoid this.
-
We’re moving along quickly now. Next step… fire up a new project with our new template! Navigate the directory you’d like your project to be a folder within, such as “C:\Users\myusername\source\repos” and then issue the command, “dotnet new mygamestartup –db MyCustomStartupDB -n MyCustomName.“ The database name will be set in the connection string in appsettings.json and a folder will be created named MyCustomName. Your projects namespace will also be MyCustomName. Note: If you get an error about a lock, be sure your Visual Studio instance with “MyGameStartup” project you downloaded in step 1 is closed. You may need to remove the MyCustomName folder and try again.
Follow the steps in the README to create the database with the name you specified, and also steps on how to run the Entity Framework Core Update-Database command properly. After that, you’re done! You just created a new project from a template you previously created.
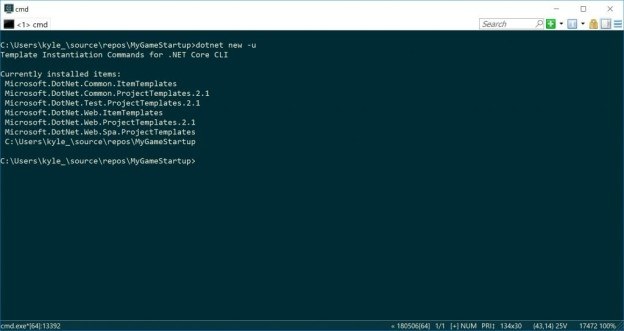
Optional: To Uninstall the project, you can use the “dotnet new -u” command to list the currently installed projects. You should see your “MyGameStartup” project listed here. You can simply remove it with the command “dotnet new -u “Path-To-Folder” such as shown below.
Next Steps: A few steps I haven’t taken yet, but may in the future, is to add the following features to my template:
- Create a nuget package to easily distribute your new package.
- Add a new ‘symbol’ to the template.json which has datatype ‘choice.’ A choice symbol will allow the user to pick from several options when creating your template.
- Modifiers can be used to conditionally output certain code or not. You may wish to optionally include authentication as an example. More details here.
And that’s it. Four easy steps and you’ve created custom templates for dotnet. Now anytime you want to create a new project of that type in the future, you can use key in “dotnet new ” and you’re off, complete with correct namespaces.
If you haven't yet checked out the Telerik .NET performance and productivity tools, just download a free 30-day trial of DevCraft and get access to all of them.

Kyle Ballard
Kyle Ballard is a software developer specializing in Ecommerce (C#, JS, Mobile), a father and a technology enthusiast. Based in Chicago, IL, Kyle is an avid writer and curator of Coding Music.


