# Agentic UI Generator Overview
The Agentic UI Generator provides AI assistance for building and updating Telerik UI for Blazor applications. It uses the Telerik Blazor [Model Context Protocol (MCP) server](https://modelcontextprotocol.io/docs/getting-started/intro) to connect your AI client to UI-generation capabilities and knowledge specific to Telerik UI for Blazor.
Use the Agentic UI Generator to generate complete pages, configure components, align with the Progress Design System, and reduce repetitive setup work. For AI interaction with components in a running browser application, use [WebMCP](https://www.telerik.com/blazor-ui/documentation/ai/web-mcp/overview). See the [AI Tools Overview](https://www.telerik.com/blazor-ui/documentation/ai/overview) to compare the development-time and runtime browser AI tools.
Set up the Agentic UI Generator with the Telerik CLI, the AI plugin, or a manual MCP server configuration. The [Agentic UI Generator Getting Started](https://www.telerik.com/blazor-ui/documentation/ai/agentic-ui-generator/getting-started#quick-start) article explains each option. The AI plugin provides the same capabilities as skills and starts the MCP server automatically. Do not configure the plugin and the Telerik MCP server separately in the same AI client.
## What the Agentic UI Generator Does
The Telerik Blazor MCP Server is a local MCP server that is distributed through the [Telerik.Blazor.MCP](https://www.nuget.org/packages/Telerik.Blazor.MCP) NuGet package.
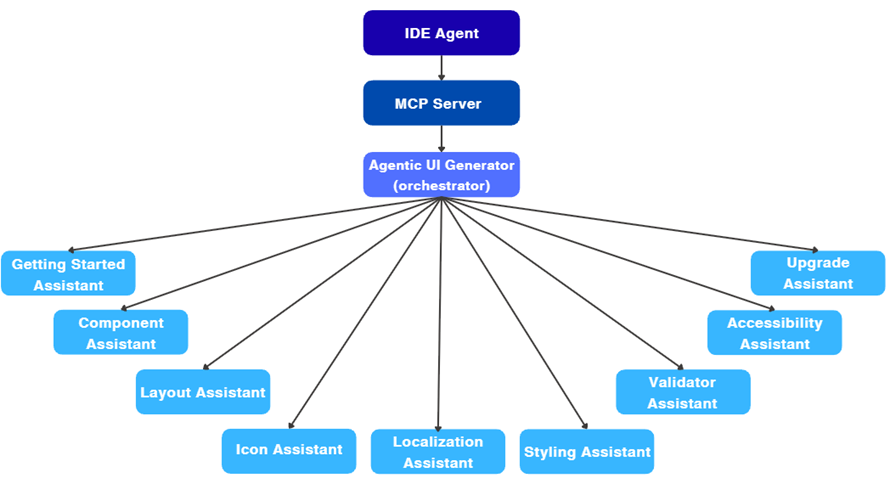
The Agentic UI Generator can use specialized assistants for different development tasks. Use the full generator for a complete page or select a specialized assistant when you need focused help. The following cards describe the available assistants:
UI Generator (Orchestrator)Getting Started AssistantComponent AssistantIcon AssistantLayout AssistantLocalization AssistantStyling AssistantAccessibility AssistantValidator AssistantUpgrade Assistant
The Agentic UI Generator coordinates the assistants that are relevant to your request. It can build pages and components, apply styling and theming, and follow the design system in one request.
## Use the Right Assistant for Your Task
Use the Agentic UI Generator for a complete task, such as creating a dashboard or adding a page with several components. It interprets the request, selects relevant assistants, and combines their output into one response.
Use a specialized assistant when you need focused help with an area, such as:
* Component configuration
* Responsive layout
* Custom themes
* Icon selection
* Accessibility requirements
* Localization tasks
* License key issues
* Version upgrades
When you use the MCP server directly, start a complete request with `#telerik_ui_generator` or use natural-language. When you use the AI plugin, invoke the `telerik-blazor-ui-generator` skill explicitly. See [Prompt Library](https://www.telerik.com/blazor-ui/documentation/ai/agentic-ui-generator/prompt-library) for examples of both approaches.

### Getting Started Assistant
Use the Getting Started Assistant when you want a guided onboarding flow for first-time setup. Call it to scaffold a Blazor project, configure the Telerik MCP server, set up Telerik UI for Blazor in the project, and complete license activation with minimal manual steps.
It is useful when setting up a new environment, validating your initial MCP integration, or preparing a clean proof of concept quickly.
### Layout Assistant
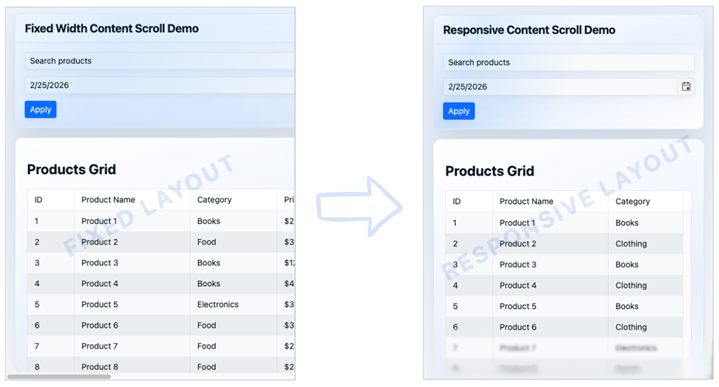
Use the Layout Assistant to set up or refine the page structure. It helps with section order, spacing, and responsive behavior so the UI stays clear across desktop, tablet, and mobile.
Typical tasks include adding a new dashboard section, cleaning up visual hierarchy, and converting desktop-first screens into responsive layouts.
### Component Assistant
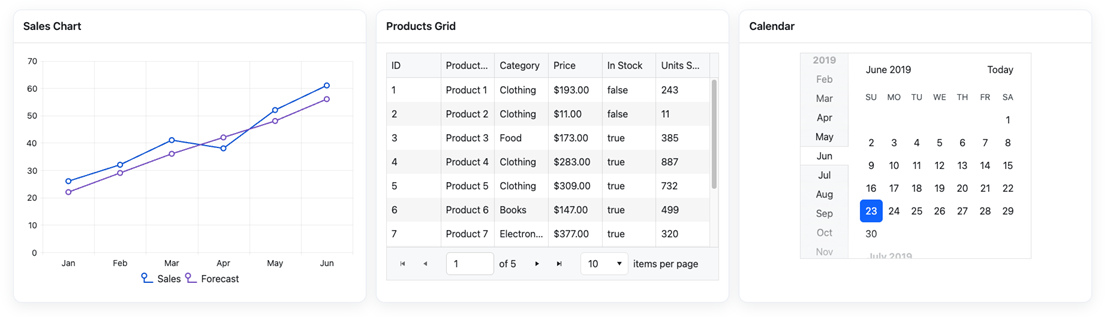
Use the Component Assistant when you need help configuring Telerik UI for Blazor components. It helps you pick the right component and wire it correctly with real API patterns.
Common tasks include enabling Grid features (sorting, paging, filtering, grouping), building validated forms, setting up virtual scrolling or export, and using sample data for safe prototyping.
### Styling Assistant
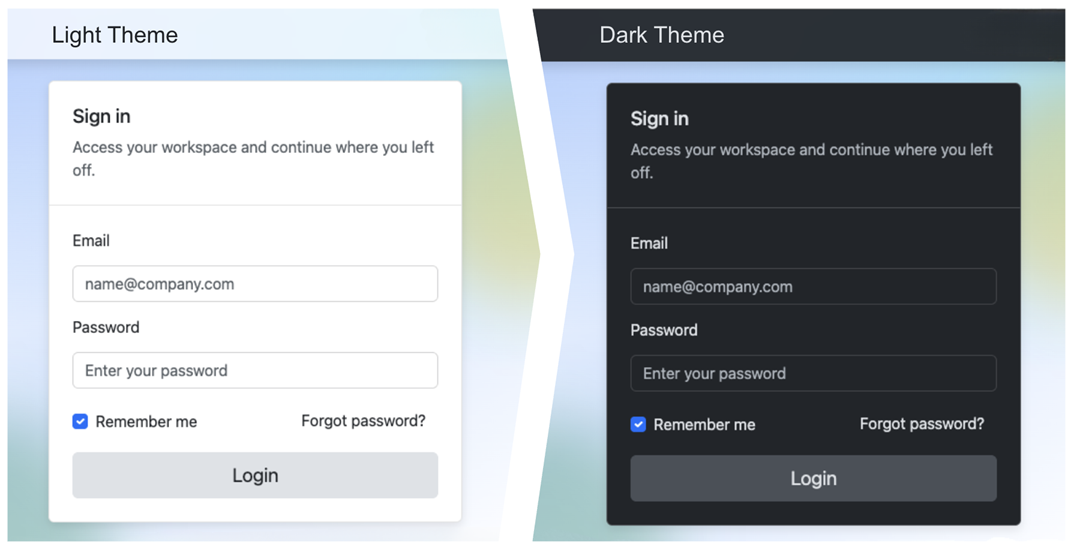
Use the Styling Assistant when you want consistent visuals across the app. It helps define reusable tokens and CSS variables for scalable theming.
Typical tasks include applying brand colors, adding dark mode or high-contrast variants, and keeping styling behavior consistent as new pages are added.
### Icon Assistant
Use the Icon Assistant to choose icons that match user actions and UI context. This assistant helps you achieve visually consistent navigation, status indicators, and action buttons.
It is useful for toolbars, navigation menus, cards, and any new section where icon consistency matters.
### Localization Assistant
Use the Localization Assistant to translate UI strings or complete resource `.resx` files in your Blazor app. See the dedicated [Telerik UI for Blazor Localization Assistant page](https://www.telerik.com/blazor-ui/documentation/ai/agentic-ui-generator/localization-assistant) for setup and usage instructions.
### Accessibility Assistant
Use the Accessibility Assistant to apply WCAG 2.2 Level AA guidance during implementation, not after it. It helps with ARIA usage, keyboard navigation, semantic markup, and color contrast validation for text and UI controls.
It is especially useful for interactive templates, complex component flows, and final semantic checks before release.

### Validator Assistant
Not designed to be invoked manually. It is called automatically by the UI Generator Orchestrator and ensures the generated code follows Telerik UI for Blazor best practices and standards.
### Upgrade Assistant
Use the Upgrade Assistant to migrate existing Blazor applications to the latest version of Telerik UI for Blazor. It automates detection and resolution of [breaking API changes](https://www.telerik.com/blazor-ui/documentation/upgrade/breaking-changes/list), NuGet version bumps, and CDN reference updates.
For best results, use the Upgrade Assistant with the highest-tier model available in your AI client. More capable models reason more accurately over complex migration scenarios and produce more reliable file edits.
## Start Building in Minutes
Go from zero setup to your first generated UI quickly with the smart Getting Started assistant. Start with [Agentic UI Generator Getting Started](https://www.telerik.com/blazor-ui/documentation/ai/agentic-ui-generator/getting-started) for a simple, guided flow through Telerik CLI installation, MCP setup, license activation, and your first prompt.
Explore the [Agentic UI Generator Prompt Library](https://www.telerik.com/blazor-ui/documentation/ai/agentic-ui-generator/prompt-library) for ready-to-use prompts covering common UI scenarios.
## License Requirements
The Telerik UI for Blazor MCP server and its tools are offered as a single experience through the **Agentic UI Generator** (`#telerik_ui_generator`) in [all active Telerik subscription licenses](https://www.telerik.com/purchase.aspx?filter=web).
## Privacy
The Telerik MCP server operates under the following conditions:
* The MCP server does not have access to your workspace and application code. Note that when using the Telerik MCP server (or any other MCP server), the LLM generates parameters for the MCP server request, which may include parts of your application code.
* The MCP server does not use your prompts to train Telerik AI models.
* The MCP server does not generate the actual responses and has no access to these responses. The MCP server only provides a better context that helps your selected model (for example, GPT, Gemini, Claude) produce better responses.
* The MCP server does not associate your prompts with your Telerik user account. Your prompts and generated context are anonymized and stored for statistical and troubleshooting purposes.
## Next Steps
* [Agentic UI Generator Getting Started](https://www.telerik.com/blazor-ui/documentation/ai/agentic-ui-generator/getting-started)
* [Agentic UI Generator Prompt Library](https://www.telerik.com/blazor-ui/documentation/ai/agentic-ui-generator/prompt-library)
## See Also
* [MCP Clients](https://modelcontextprotocol.io/clients)
* [Changelog](https://www.telerik.com/blazor-ui/documentation/ai/agentic-ui-generator/changelog)