# Getting Started with the TreeView
This tutorial explains how to set up a basic Telerik UI for ASP.NET MVC TreeView and highlights the major steps in the configuration of the component.
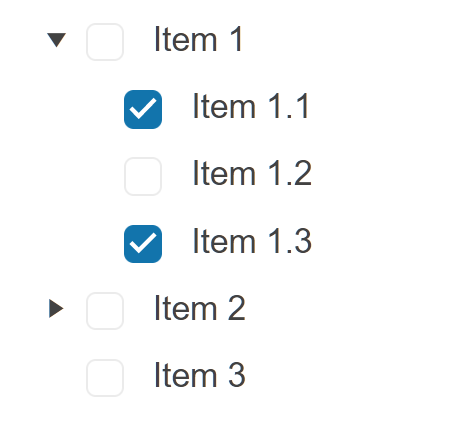
You will initialize a TreeView component with several items and checkboxes.
## Prerequisites
To successfully complete the tutorial, you need a project that is already configured to use the Telerik UI for ASP.NET MVC components:
* To create a new pre-configured project for the Telerik UI for ASP.NET MVC components, you can [use a project template](https://www.telerik.com/aspnet-mvc/documentation/getting-started-mvc/first-steps).
* To manually configure an existing project by using NuGet, see the [Adding Telerik UI through NuGet](https://www.telerik.com/aspnet-mvc/documentation/getting-started/setup-with-nuget).
## 1. Prepare the CSHTML File
The first step is to add the required directives at the top of the `.cshtml` document:
* To use the Telerik UI for ASP.NET MVC HtmlHelpers:
```cshtml
@using Kendo.Mvc.UI
```
Optionally, you can structure the document by adding the desired HTML elements like headings, divs, paragraphs, and others.
```Razor HtmlHelper
@using Kendo.Mvc.UI
TreeView with items
```
## 2. Initialize the TreeView
Use the TreeView HtmlHelper to add the component to a page:
* The `Name()` configuration method is mandatory as its value is used for the `id` and the name attributes of the TreeView element.
* The `Expanded()` configuration of a TreeView item specifies whether it will be expanded initially.
```Razor HtmlHelper
@using Kendo.Mvc.UI
TreeView with a Placeholder
@(Html.Kendo().TreeView()
.Name("treeview")
.Size(ComponentSize.Medium)
.Items(items =>
{
items.Add().Text("Item 1").Expanded(true)
.Items(subItems =>
{
subItems.Add().Text("Item 1.1");
subItems.Add().Text("Item 1.2");
subItems.Add().Text("Item 1.3");
});
items.Add().Text("Item 2")
.Items(subItems =>
{
subItems.Add().Text("Item 2.1");
subItems.Add().Text("Item 2.2");
subItems.Add().Text("Item 2.3");
});
items.Add().Text("Item 3");
})
)
```
## 3. Select a Default Value
The next step is to enable the `Checkboxes()` of the TreeView and to configure two of the items as checked by default.
```Razor HtmlHelper
@using Kendo.Mvc.UI
TreeView with items
@(Html.Kendo().TreeView()
.Name("treeview")
.Size(ComponentSize.Medium)
.Checkboxes(true)
.Items(items =>
{
items.Add().Text("Item 1").Expanded(true)
.Items(subItems =>
{
subItems.Add().Text("Item 1.1").Checked(true);
subItems.Add().Text("Item 1.2");
subItems.Add().Text("Item 1.3").Checked(true);
});
items.Add().Text("Item 2")
.Items(subItems =>
{
subItems.Add().Text("Item 2.1");
subItems.Add().Text("Item 2.2");
subItems.Add().Text("Item 2.3");
});
items.Add().Text("Item 3");
})
)
```
## 4. Handle a TreeView Event
The TreeView component provides convenient events for implementing your desired logic. In this tutorial, you will use the exposed `Check()` event to log a new entry in the browser's console.
```Razor HtmlHelper
@using Kendo.Mvc.UI
TreeView with items
@(Html.Kendo().TreeView()
.Name("treeview")
.Size(ComponentSize.Medium)
.Checkboxes(true)
.Events(e => e.Check("check"))
.Items(items =>
{
items.Add().Text("Item 1").Expanded(true)
.Items(subItems =>
{
subItems.Add().Text("Item 1.1").Checked(true);
subItems.Add().Text("Item 1.2");
subItems.Add().Text("Item 1.3").Checked(true);
});
items.Add().Text("Item 2")
.Items(subItems =>
{
subItems.Add().Text("Item 2.1");
subItems.Add().Text("Item 2.2");
subItems.Add().Text("Item 2.3");
});
items.Add().Text("Item 3");
})
)
```
## 5. (Optional) Reference Existing TreeView Instances
You can reference the TreeView instances that you have created and build on top of their existing configuration:
1. Use the `id` attribute of the component instance to establish a reference.
```JS script
```
2. Use the [TreeView client-side API](https://docs.telerik.com/kendo-ui/api/ui/treeview#methods) to control the behavior of the widget. In this example, you will use the `findByText` and `select` methods to select an item.
```JS script
```
## Next Steps
* [Binding the TreeView to Data](https://www.telerik.com/aspnet-mvc/documentation/html-helpers/navigation/treeview/binding)
* [Customizing the Appearance of the TreeView](https://www.telerik.com/aspnet-mvc/documentation/html-helpers/navigation/treeview/appearance)
* [Using Checkboxes](https://www.telerik.com/aspnet-mvc/documentation/html-helpers/navigation/treeview/checkboxes)
## See Also
* [Using the API of the TreeView for ASP.NET MVC (Demo)](https://demos.telerik.com/aspnet-mvc/treeview/api)
* [TreeView Client-Side API](https://docs.telerik.com/kendo-ui/api/ui/treeview)
* [Server-Side API of the TreeView](https://www.telerik.com/aspnet-mvc/documentation/api/treeview)
* [Knowledge Base Section](https://www.telerik.com/aspnet-mvc/documentation/knowledge-base)