# Getting Started with the Timeline
This tutorial explains how to set up a basic Telerik UI for ASP.NET Core Timeline and highlights the major steps in the configuration of the component.
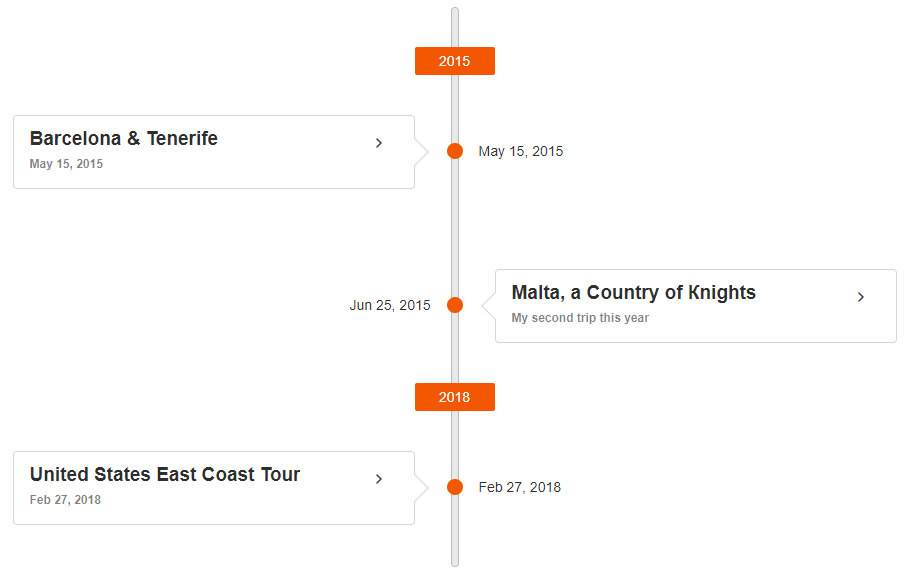
You will initialize a Timeline and learn how to set its orientation. Then, you will see how to attach an event handler to the component.
Finally, you can run the sample code in [Telerik REPL](https://netcorerepl.telerik.com/) and continue exploring the component.
## Prerequisites
To successfully complete the tutorial, you need a project that is already configured to use the Telerik UI for ASP.NET Core components:
* You can use the [Telerik REPL](https://netcorerepl.telerik.com/) playground and skip installing the components on your system and configuring a project.
* You can prepare a Visual Studio project by following the following guide:
* Creating a new pre-configured project for the Telerik UI for ASP.NET Core components from [a project template](https://www.telerik.com/aspnet-core-ui/documentation/vs-integration/new-project-wizard).
## 1. Prepare the CSHTML File
The first step is to add the required directives at the top of the `.cshtml` document:
* To use the Telerik UI for ASP.NET Core HtmlHelpers:
```cshtml
@using Kendo.Mvc.UI
```
* To use the Telerik UI for ASP.NET Core TagHelpers:
```cshtml
@addTagHelper *, Kendo.Mvc
```
Optionally, you can structure the document by adding the desired HTML elements like headings, divs, paragraphs, and others.
```Razor HtmlHelper
@using Kendo.Mvc.UI
Timeline with event handler
```
```Razor TagHelper
@addTagHelper *, Kendo.Mvc
Timeline with event handler
```
## 2. Initialize the Timeline
Use the Timeline HtmlHelper or TagHelper to add the component to a page:
* The `Name()` configuration method is mandatory as its value is used for the `id` and the `name` attributes of the Timeline element.
* The `DataDateField()` configuration method sets the field of the data item that provides information when the given event happened in time.
* The `DataDescriptionField()` configuration method sets the field of the data item that provides the description information for the event.
* The `DataSubtitleField()` configuration method sets the field of the data item that provides the subtitle information for the event.
* The `DataTitleField()` configuration method sets the field of the data item that provides the title information for the event.
* The `DataImagesAltField()` configuration method sets the field of the data item that provides the value for the alt attribute of the images.
* The `DataImagesField()` configuration method sets the field of the data item that provides the images information for the event.
* The `DataActionsField()` configuration method sets the field of the data item that provides the actions information for the event.
* The `Orientation()` configuration method sets the orientation of the timeline axis. The widget expects "Horizontal" or "Vertical".
* The `AlternatingMode()` configuration method indicates whether events are positioned on both sides of the timeline axis.
* The `CollapsibleEvents()` configuration method enables the events in the Kendo UI Timeline to be expandable or collapsible.
```Razor HtmlHelper
@using Kendo.Mvc.UI
Timeline with event handler
@(Html.Kendo().Timeline()
.Name("Timeline")
.DataDateField("EventDate")
.DataDescriptionField("Description")
.DataSubtitleField("Subtitle")
.DataTitleField("Title")
.DataImagesAltField("AltField")
.DataImagesField("Images")
.DataActionsField("Actions")
.Orientation(TimelineOrientation.Horizontal)
.AlternatingMode()
.CollapsibleEvents()
.DataSource(dt => dt.Read("GetEvents", "Timeline"))
)
```
```Razor TagHelper
@addTagHelper *, Kendo.Mvc
Timeline with event handler
```
## 3. Set the orientation of the Timeline to Vertical
The next step is to change the Orientation configuration of the Timeline to Vertical. You can do that by using the `Orientation()` configuration.
```Razor HtmlHelper
@using Kendo.Mvc.UI
Timeline with event handler
@(Html.Kendo().Timeline()
.Name("Timeline")
.DataDateField("EventDate")
.DataDescriptionField("Description")
.DataSubtitleField("Subtitle")
.DataTitleField("Title")
.DataImagesAltField("AltField")
.DataImagesField("Images")
.DataActionsField("Actions")
.Orientation(TimelineOrientation.Vertical)
.AlternatingMode()
.CollapsibleEvents()
.DataSource(dt => dt.Read("GetEvents", "Timeline"))
)
```
```Razor TagHelper
@addTagHelper *, Kendo.Mvc
Timeline with event handler
```
## 4. Handle a Timeline Event
The Timeline exposes a `Expand()` event that you can handle and assign specific functions to the component. In this tutorial, you will use the `Expand()` event to display a message when the user expands an event of in the Timeline.
```Razor HtmlHelper
@using Kendo.Mvc.UI
Timeline with event handler
@(Html.Kendo().Timeline()
.Name("Timeline")
.DataDateField("EventDate")
.DataDescriptionField("Description")
.DataSubtitleField("Subtitle")
.DataTitleField("Title")
.DataImagesAltField("AltField")
.DataImagesField("Images")
.DataActionsField("Actions")
.Orientation(TimelineOrientation.Vertical)
.AlternatingMode()
.CollapsibleEvents()
.DataSource(dt => dt.Read("GetEvents", "Timeline"))
.Events(e => e.Expand("onExpand"))
)
```
```Razor TagHelper
@addTagHelper *, Kendo.Mvc
Timeline with event handler
```
For more examples, refer to the [demo on using the events of the Timeline](https://demos.telerik.com/aspnet-core/timeline/events).
## 5. (Optional) Reference Existing Timeline Instances
You can reference the Timeline instances that you have created and build on top of their existing configuration:
1. Use the `id` attribute of the component instance to establish a reference.
```JS script
```
2. Use the [Timeline client-side API](https://docs.telerik.com/kendo-ui/api/ui/timeline#methods) to control the behavior of the widget. In this example, you will use the `open` method to open an event details of the Timeline.
```JS script
```
For more information on referencing specific helper instances, see the [Methods and Events](https://www.telerik.com/aspnet-core-ui/documentation/html-helpers/helper-basics/events-and-methods) article.
## Explore this Tutorial in REPL
You can continue experimenting with the code sample above by running it in the Telerik REPL server playground:
* [Sample code with the Timeline HtmlHelper](https://netcorerepl.telerik.com/QyuvYGlw33Kqxu7n28)
* [Sample code with the Timeline TagHelper](https://netcorerepl.telerik.com/cyaPaGvG33ebDIUw47)
## Next Steps
* [Use Templates in the Timeline](https://www.telerik.com/aspnet-core-ui/documentation/html-helpers/navigation/timeline/templates)
* [Use Shared DataSource for the Timeline](https://www.telerik.com/aspnet-core-ui/documentation/html-helpers/navigation/timeline/shared-datasource)
## See Also
* [Using the API of the Timeline for ASP.NET Core (Demo)](https://demos.telerik.com/aspnet-core/timeline/api)
* [Client-Side API of the Timeline](https://docs.telerik.com/kendo-ui/api/ui/timeline)
* [Server-Side API of the Timeline](https://www.telerik.com/aspnet-core-ui/documentation/api/timeline)
* [Knowledge Base Section](https://www.telerik.com/aspnet-core-ui/documentation/knowledge-base)