# Getting Started with the Chip
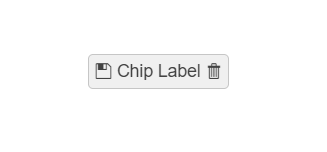
This tutorial explains how to set up a basic Telerik UI for ASP.NET Core Chip and highlights the major steps in the configuration of the component.
You will initialize a Chip control, configure its icons, and handle its events.
Finally, you can run the sample code in [Telerik REPL](https://netcorerepl.telerik.com/) and continue exploring the components.
## Prerequisites
To successfully complete the tutorial, you need a project that is already configured to use the Telerik UI for ASP.NET Core components:
* You can use the [Telerik REPL](https://netcorerepl.telerik.com/) playground and skip installing the components on your system and configuring a project.
* You can prepare a Visual Studio project by following the following guide:
* Creating a new pre-configured project for the Telerik UI for ASP.NET Core components from [a project template](https://www.telerik.com/aspnet-core-ui/documentation/vs-integration/new-project-wizard).
## 1. Prepare the CSHTML File
The first step is to add the required directives at the top of the `.cshtml` document:
* To use the Telerik UI for ASP.NET Core HtmlHelpers:
```
@using Kendo.Mvc.UI
```
* To use the Telerik UI for ASP.NET Core TagHelpers:
```
@addTagHelper *, Kendo.Mvc
```
## 2. Initialize the Chip
Use the Chip HtmlHelper or TagHelper to add the component to a page. The `Name()` configuration method is mandatory as its value is used for the `id` and the `name` attributes of the Chip's Html element.
```Razor HtmlHelper
@using Kendo.Mvc.UI
@(Html.Kendo().Chip()
.Name("chip")
)
```
```Razor TagHelper
@addTagHelper *, Kendo.Mvc
```
## 3. Add an Icon
You can display an icon in the Chip by configuring the [`Icon`](https://www.telerik.com/aspnet-core-ui/documentation/api/kendo.mvc.ui.fluent/chipbuilder#iconsystemstring) option. for more information about the variety of the icons supported by the chip, refer to the article on [customizing the chip](https://www.telerik.com/aspnet-core-ui/documentation/html-helpers/navigation/chip/customization).
```Razor HtmlHelper
@(Html.Kendo().Chip()
.Name("iconSaveChip")
.Icon("save")
)
```
```Razor TagHelper
@addTagHelper *, Kendo.Mvc
```
## 4. Add a Label
To display a label on the Chip, use the [`Label`](https://www.telerik.com/aspnet-core-ui/documentation/api/kendo.mvc.ui.fluent/chipbuilder#labelsystemstring) option.
```Razor HtmlHelper
@(Html.Kendo().Chip()
.Name("iconSaveChip")
.Icon("save")
.Label("Save")
)
```
```Razor TagHelper
@addTagHelper *, Kendo.Mvc
```
## Next Steps
* [Referencing Existing Component Instances](https://docs.telerik.com/kendo-ui/intro/widget-basics/events-and-methods#referencing-existing-component-instances)
* [Demo Page for the Chip](https://demos.telerik.com/aspnet-core/chip)
## See Also
* [Using the API of the Chip for ASP.NET Core (Demo)](https://demos.telerik.com/aspnet-core/chip/api)
* [Client-Side API of the Chip HtmlHelper for ASP.NET Core](https://docs.telerik.com/kendo-ui/api/ui/chip)
* [Server-Side API of the Chip HtmlHelper for ASP.NET Core](https://www.telerik.com/aspnet-core-ui/documentation/api/chip)
* [Knowledge Base Section](https://www.telerik.com/aspnet-core-ui/documentation/knowledge-base)