# Getting Started with the OTPInput
This tutorial explains how to set up a basic Telerik UI for ASP.NET Core OTPInput component and highlights the major steps in the configuration of the component.
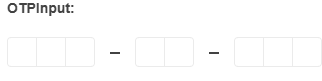
You will initialize an OTPInput component with a set of items. Which will be either grouped together or rendered as standalone OTPInputs. This gives you control over the component's input composition.
Then, you will use the events of the UI component. Finally, you can run the sample code in [Telerik REPL](https://netcorerepl.telerik.com/) and continue exploring the components.
## Prerequisites
To successfully complete the tutorial, you need a project that is already configured to use the Telerik UI for ASP.NET Core components:
* You can use the [Telerik REPL](https://netcorerepl.telerik.com/) playground and skip installing the components on your system and configuring a project.
* You can prepare a Visual Studio project by following the following guide:
* Creating a new pre-configured project for the Telerik UI for ASP.NET Core components from [a project template](https://www.telerik.com/aspnet-core-ui/documentation/vs-integration/new-project-wizard).
## 1. Prepare the CSHTML File
The first step is to add the required directives at the top of the `.cshtml` document:
* To use the Telerik UI for ASP.NET Core HtmlHelpers:
```cshtml
@using Kendo.Mvc.UI
```
* To use the Telerik UI for ASP.NET Core TagHelpers:
```cshtml
@addTagHelper *, Kendo.Mvc
```
Optionally, you can structure the document by adding the desired HTML elements like headings, divs, paragraphs, and others.
```Razor HtmlHelper
@using Kendo.Mvc.UI
OTPInput with Predefined Items
```
```Razor TagHelper
@addTagHelper *, Kendo.Mvc
OTPInput with Predefined Items
```
## 2. Initialize the OTPInput
Use the OTPInput HtmlHelper or TagHelper to add the component to a page:
* The `Name()` configuration method is mandatory as its value is used for the `id` and the `name` attributes of the OTPInput element.
* The `Items()` collection contains the list of items representing the different input groups.
* The `Space()` configuration controls the spacing behavior between each of the input groups.
```Razor HtmlHelper
@using Kendo.Mvc.UI
OTPInput with Predefined Items
@(Html.Kendo().OTPInput()
.Name("otp")
.Items(items => {
items.Add().GroupLength(3);
items.Add().GroupLength(2);
items.Add().GroupLength(3);
})
.Space(false)
)
```
```Razor TagHelper
@addTagHelper *, Kendo.Mvc
OTPInput with Predefined Items
```
## 3. Configure the Separator
The OTPInput components allows you to add a separator between each of the established input groups. In this tutorial, you will use the available `SeparatorHandler()` option to render an [SVG Icon](https://docs.telerik.com/aspnet-core/styles-and-layout/sass-themes/svg-icons#what-are-svg-icons).
```Razor HtmlHelper
@using Kendo.Mvc.UI
OTPInput with Predefined Items
@(Html.Kendo().OTPInput()
.Name("otp")
.Items(items => {
items.Add().GroupLength(3);
items.Add().GroupLength(2);
items.Add().GroupLength(3);
})
.Space(false)
.SeparatorHandler("separatorHandler")
)
```
```Razor TagHelper
@addTagHelper *, Kendo.Mvc
OTPInput with Predefined Items
```
```JavaScript
```
## 4. Handle an OTPInput Event
The OTPInput component provides a convenient event for implementing your desired logic. In this tutorial, you will use the exposed `Change()` event to log a new entry in the browser's console.
```Razor HtmlHelper
@using Kendo.Mvc.UI
OTPInput with Predefined Items
@(Html.Kendo().OTPInput()
.Name("otp")
.Items(items => {
items.Add().GroupLength(3);
items.Add().GroupLength(2);
items.Add().GroupLength(3);
})
.Space(false)
.SeparatorHandler("separatorHandler")
.Events(events => events.Change("onChange"))
)
```
```Razor TagHelper
@addTagHelper *, Kendo.Mvc
OTPInput with Predefined Items
```
```JavaScript
```
## 5. (Optional) Reference Existing OTPInput Instances
You can reference the OTPInput instances that you have created and build on top of their existing configuration:
1. Use the `id` attribute of the component instance to establish a reference.
```JS script
```
2. Use the [OTPInput client-side API](https://docs.telerik.com/kendo-ui/api/ui/otpinput#methods) to control the behavior of the widget. In this example, you will use the `enable` method to disable the OTPInput.
```JS script
```
## Next Steps
* [Customize the Type of the OTPInput](https://www.telerik.com/aspnet-core-ui/documentation/html-helpers/editors/otpinput/types)
* [Configure the Appearance of the OTPInput](https://www.telerik.com/aspnet-core-ui/documentation/html-helpers/editors/otpinput/appearance)
## See Also
* [Using the API of the OTPInput for ASP.NET Core (Demo)](https://demos.telerik.com/aspnet-core/otpinput/api)
* [Server-Side API of the OTPInput HtmlHelper](https://www.telerik.com/aspnet-core-ui/documentation/api/otpinput)
* [Server-Side API of the OTPInput TagHelper](https://www.telerik.com/aspnet-core-ui/documentation/api/taghelpers/otpinput)
* [Client-Side API of the OTPInput](https://docs.telerik.com/kendo-ui/api/ui/otpinput)
* [Knowledge Base Section](https://www.telerik.com/aspnet-core-ui/documentation/knowledge-base)