# Toolbar Commands
The Telerik UI for ASP.NET Core FileManager component contains a nested Telerik UI for ASP.NET Core Toolbar component.
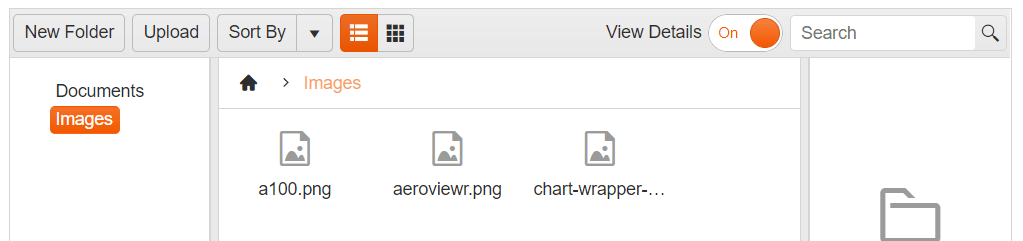
The toolbar has a predefined set of tools which you can show or hide, depending on your preferences and business scenario. By default, the toolbar contains the following tools:
* *New Folder* button, allowing you to create new folders in the current location.
* *Upload Button* prompting you with a window to upload files.
* *Sort By* dropdown, allowing you to sort by a number of predicates
* *Views* button group to control
* *View Details* switch button to toggle the Preview Pane visibility
* *Search* textbox to filter the content
**Inbuilt Sort functionality in Telerik UI for ASP.NET Core FileManager:**
 ## Customizing the Toolbar Commands
To Enable/Disable a Toolbar command button or update the its text you can use the `Toolbar.Items()` configuration option:
```Razor HtmlHelper
.Toolbar(toolbar => toolbar.Items(items =>
{
items.Add("").Text("Add New Folder").Enable(false).Command("CreateFolderCommand").Type("button");
}))
```
```Razor TagHelper
-
```
## Adding Custom Commands to the Toolbar
As of Kendo UI R1 2020 SP1 the kendo.ui.filemanager namespace exposes the FileManagerCommand class that could be extended to implement a custom FileManager command. The example below demonstrates how to create a custom command that shows the total size of the selected files.
First, create a new command by extending the FileManagerCommand class.
```JS
```
Then add the custom command to the FileManager Toolbar:
```Razor HtmlHelper
.Toolbar(toolbar => toolbar.Items(items =>
{
items.Add("").Type("button").Name("GetInfo").Text("Get Info").Command("MyCustomCommand");
}))
```
```Razor TagHelper
-
```
You can also add the custom command to the ContextMenu of the FileManager
```Razor HtmlHelper
.ContextMenu(context => context.Items(items =>
{
items.Add("rename");
items.Add("delete");
items.Add("custom").Name("GetInfo").Text("Get Info").Command("MyCustomCommand").SpriteCssClass("k-icon k-i-info");
}))
```
```Razor TagHelper
-
-
-
```
## Overflow
The built-in toolbar provides properties for customizing its overflow behavior and appearance.
The following example demonstrates how to modify the default overflow settings of the toolbar through the `Oveflow()` configuration.
```Razor
@(Html.Kendo().FileManager().Name("filemanager")
.DataSource(ds =>
{
...
);
})
.UploadUrl("Upload", "FileManagerData")
.Toolbar(tb => tb.Items(items =>
{
items.Add("createFolder");
items.Add("upload");
items.Add("sortField");
items.Add("changeView");
items.Add("spacer");
items.Add("details");
items.Add("search");
})
.Overflow(o => o
.Mode(ToolBarOverflowMode.Scroll)
.ScrollButtons(ScrollButtonsType.Auto)
.ScrollButtonsPosition(ScrollButtonsPositionType.Start)
.ScrollDistance(50))
)
.ContextMenu(context => context.Items(items => items.Add("rename")))
)
```
```Razor TagHelper
...
-
-
-
-
-
-
-
-
```
For more information on the available overflow options, refer to the [Appearance documentation of the ToolBar component](https://www.telerik.com/aspnet-core-ui/documentation/html-helpers/navigation/toolbar/appearance).
## See Also
* [Overview of Telerik UI for ASP.NET Core FileManager](https://www.telerik.com/aspnet-core-ui/documentation/html-helpers/data-management/filemanager/overview)
* [ContextMenu in Telerik UI for ASP.NET Core FileManager](https://www.telerik.com/aspnet-core-ui/documentation/html-helpers/data-management/filemanager/context-menu)
* [Drag and Drop in Telerik UI for ASP.NET Core FileManager](https://www.telerik.com/aspnet-core-ui/documentation/html-helpers/data-management/filemanager/drag-and-drop)