
Getting Started with Test Studio for APIs

Learn how you can easily verify the reliability and integrity of your APIs. Even non-technical users can get up to speed with API testing in Test Studio.
Test Studio for APIs is a web service testing application and is part of Test Studio Ultimate. It allows you to test the integrity of your web services by executing test HTTP requests and performing a wide range of verifications over the received responses. You can extract the received responses or partial values from them and store them in variables for reuse in further test steps. With steps like GoTo and Wait you can manage the control flow of your tests. Powerful coded steps can be used to achieve any complex scenario that your test suite might require.
This is the first of a series of articles about API testing. In this one we will go through an end-to-end scenario for building a very simple demo test project to help you get familiar with Test Studio for APIs and its basic concepts. This article is mostly appropriate for beginner users, who have no experience working with Test Studio for APIs. Experienced users might also find some parts of the article useful.
Blog post content:
- Using the Sample Project and Demo Application
- Creating Your Project
- Making HTTP Requests
- Executing Test Cases
- Analyzing Request Responses
- Verifications
- Variables
- Summary
Using the Sample Project and Demo Application
To help you get started, Test Studio for APIs comes with a built-in sample project. The sample project provides working examples of the most common test use cases that can be achieved with Test Studio for APIs. You can take a look at it to get your first impressions of the application or later if you need inspiration or a reference to a specific example.
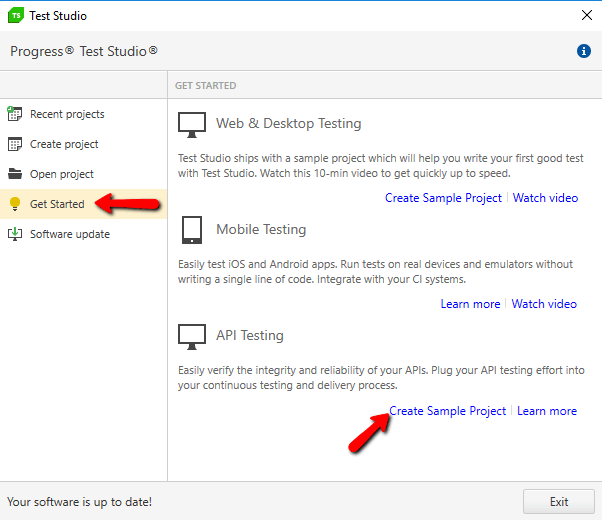
To create an instance of the sample project, start Test Studio Ultimate (or the standalone version of Test Studio for APIs), click on “Get Started” and under the API Testing section select “Create Sample Project”.
Feel free to experiment with the sample project any way you like. You can always create a new fresh copy of it later.

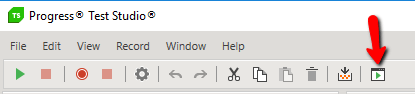
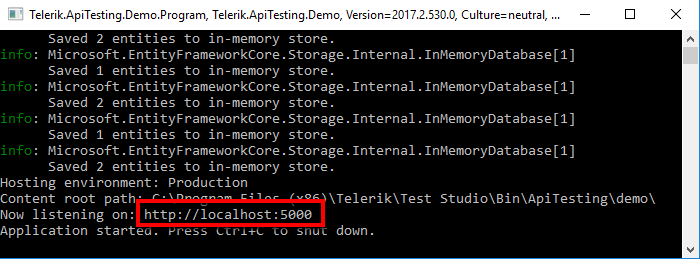
Note that the sample project executes its requests against a simple demo application that comes built-in into Test Studio for APIs. Make sure to run it before you execute the sample project, so that the demo application could serve the tests' requests. To run the demo application, just click the ‘Run Demo Application’ button in the toolbar.
This will start a simple web service, listening on http://localhost:5000.
Except for executing the sample project against it, you can use the demo application to execute your own tests whenever you just wish to experiment with something.
The demo application provides a simple API for management of users. The main endpoints it exposes are:
- GET - http://localhost:5000/api/users – get all users
- GET - http://localhost:5000/api/users/{user-id} – get a specific user by I
- POST - http://localhost:5000/api/users – create a new user
- PATCH - http://localhost:5000/api/users/{user-id} – edit a user
- PUT - http://localhost:5000/api/users/{user-id} – edit a user
- DELETE - http://localhost:5000/api/users/{user-id} – delete a user
- POST - http://localhost:5000/connect/token – get an authentication token
All of these endpoints are exercised in the sample project, so you can take a look at it to get more familiar with the specifics of working with each endpoint.
Back to topCreating Your Project
Exploring the sample project is a great way to get started, but playing with your own project is greater. In the rest of the article, I’ll guide you through the creation of a simple demo project. If this is the first time you're trying Test Studio for APIs, stay with me. More blog posts, covering more advanced scenarios will follow, so stay tuned to our blog.
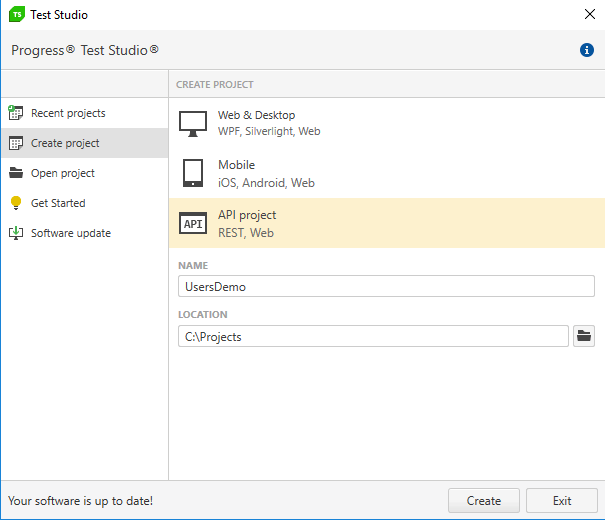
As a start, let’s create a test project. Click on ‘File’ > ‘New Project’, select ‘API Project’, give the project a name (‘UsersDemo’ for this example), select a directory for its location and click ‘Create’.
When a new project is created, a sample test with a HTTP request will be generated by default to help you get started. The test is ready to be executed against the demo application. You can modify and reuse that default test or delete it and create your own.
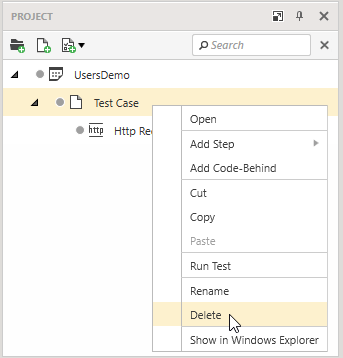
For this exercise, we will create a new test case.
First, delete the test case that was generated by default when you created the project. Click on it in the Project Explorer and select ‘Delete’.
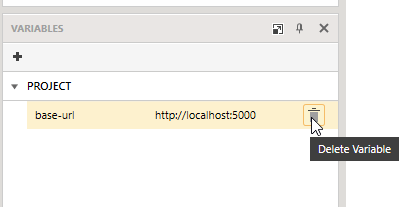
One more thing, that was created by default, was the "base-url" variable in the Variables pane. Delete that too for now. We will create it again on our own when we discuss variables later.
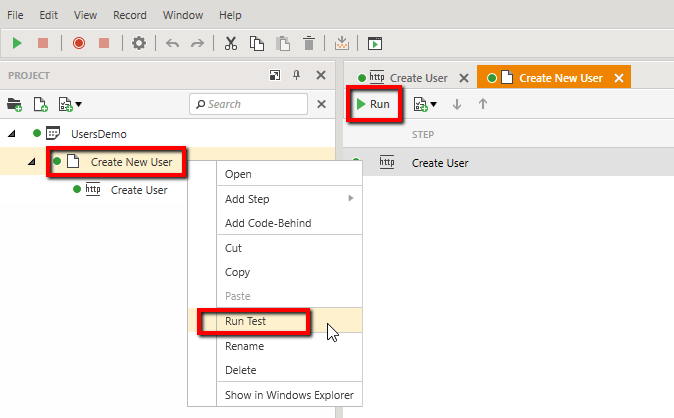
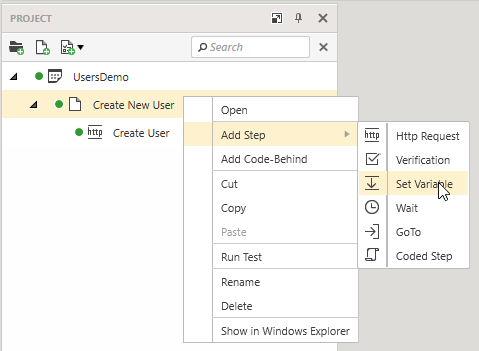
Click on the ‘Create a Test’ button in the Project Explorer or right-click on the project and select 'Add New Test'.
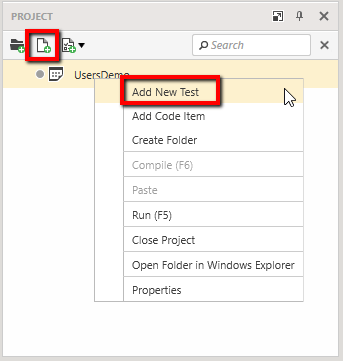
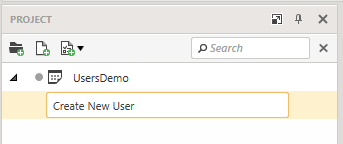
Give the test a name. Let’s call this one 'Create New User'.
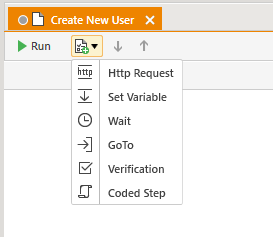
In a test case, you can add one or more test steps per your needs. Just open the test case, click on the ‘Add a Step’ button and select from the range of available step types:
- HTTP Request
- Set Variable
- Wait
- GoTo
- Verification
- Coded Step
Making HTTP Requests
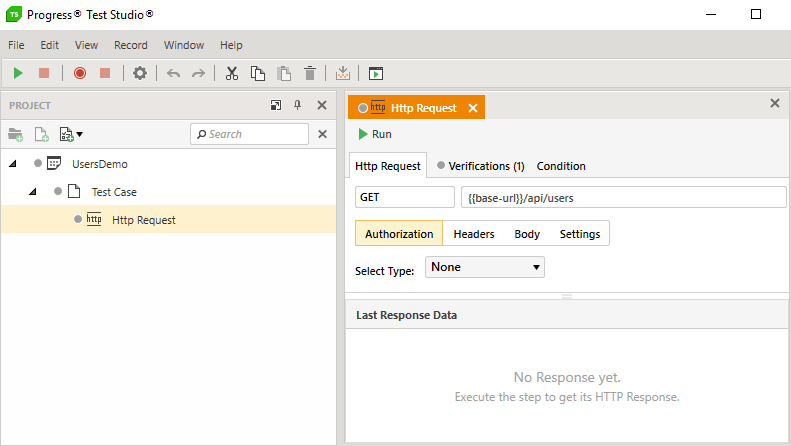
For this test, we need a HTTP request step first. HTTP requests are the heart of Test Studio for APIs. The UI of the HTTP request step makes creating HTTP requests extremely easy.
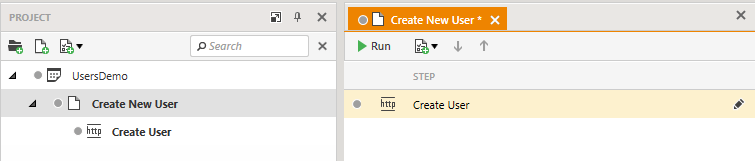
Create a new HTTP request and give its step a friendly name (e.g. “Create User”).
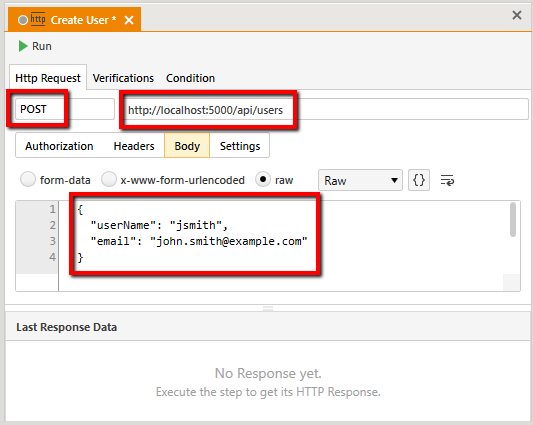
Open the HTTP step, click on the method field and select POST. Next to it, add the URL http://localhost:5000/api/users.
To create a new user in the demo application, our request needs to have a request body. Select the Body tab to open the body editor, select “raw” and type in the following json value:
{
  "userName": "jsmith",
  "email": "john.smith@example.com"
}
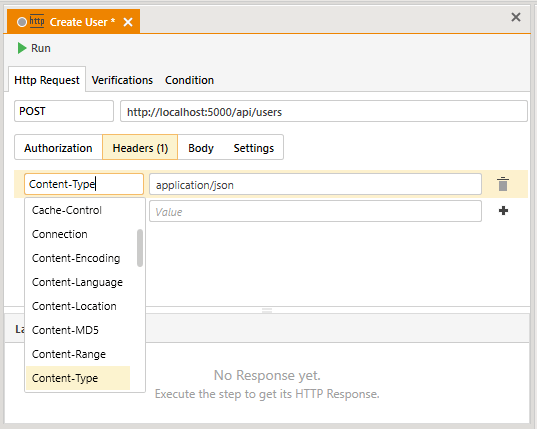
Use the Headers tab to add request headers. A drop-down menu will help you with suggestions for the possible header names. For our example, add one header with name 'Content-Type' and value 'application/json'.
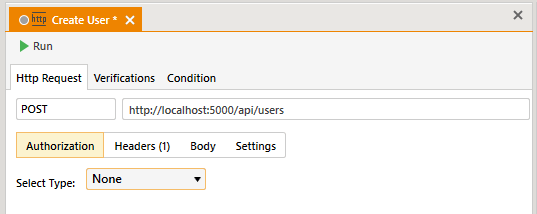
You can also add Authorization to a request, using the Authorization tab. Our example does not require authorization, so we will leave it as 'None'.
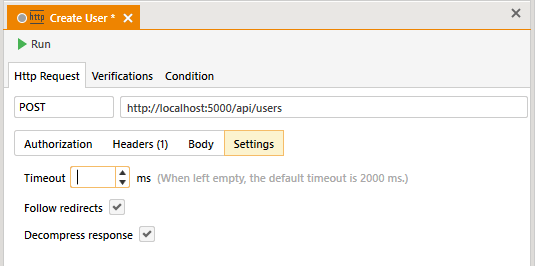
Finally, the Settings tab provides several settings options: request timeout, follow redirects and response decompression. We can leave them all with their default values now.
Executing Test Cases
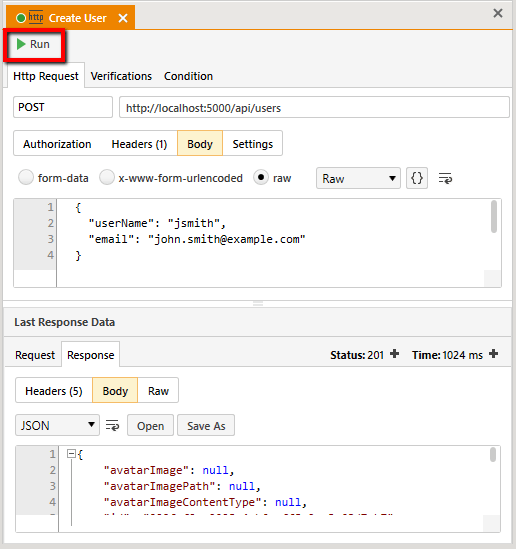
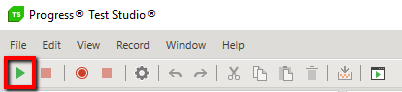
Use Ctrl+Shift+S to save all changes or click on File > Save All from the menu and you are ready to execute the test. Just click on the green Run button in the top-left corner of the HTTP request step and the step will be executed. (Make sure that the demo application is running before that, so that you can receive a response.)
You just executed a single test step. Note that you can run the entire project at once, using the ‘Run’ button in the main toolbar (or hitting F5 on your keyboard).
or you can run a particular test case with all steps within it.
Analyzing Request Responses
Let’s get back to the HTTP request step itself. Once executed, its result will be displayed in the Last Response Data section, below the request editor.
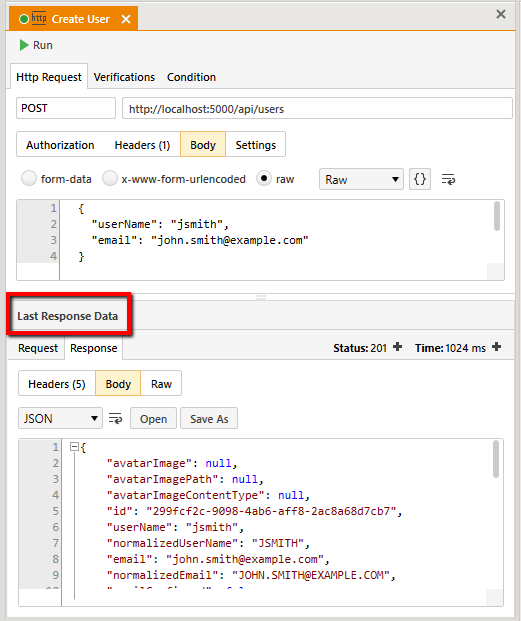
It has two main tabs: Request and Response.
You can use the Request tab to inspect the final state of the request, the way it was executed after all variable references have been resolved and any default headers have been added by the tool (as we can see, Test Studio for APIs inserted several additional headers to the request by default, even though we added only the 'Content-Type' header.

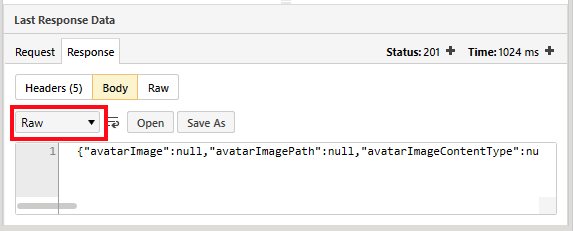
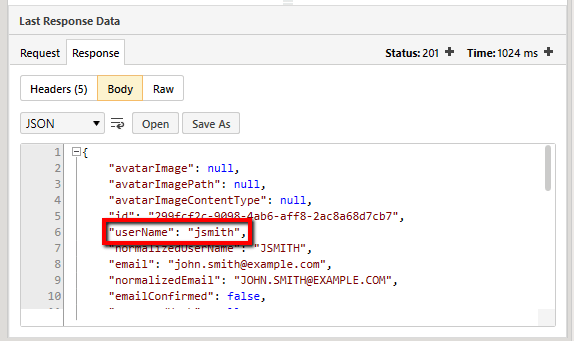
Most of the time, you will need the Response tab to inspect the response that was returned. You can see the status code of the received response and the time elapsed during the execution of the step. The Body tab shows a preview of the response body content. In this case the response body is a JSON value and it is shown with readable format in the preview window (adding new lines, indentation and coloring).
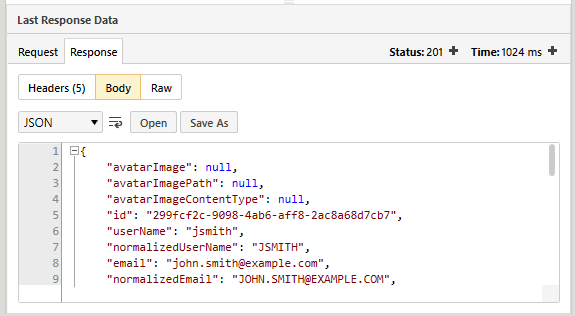
You can click on the dropdown and select ‘Raw’ to see the raw, unformatted value:
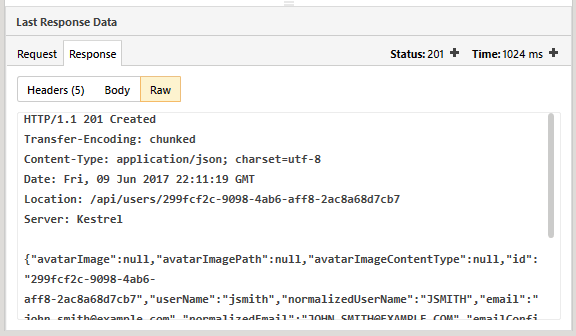
Test Studio for APIs saves all responses as temporary files. You can use the ‘Open’ and ‘Save As’ buttons to open the file in your default editor or save it to a custom location.
Click on the Raw tab to see the raw data of the response (not just the Body).
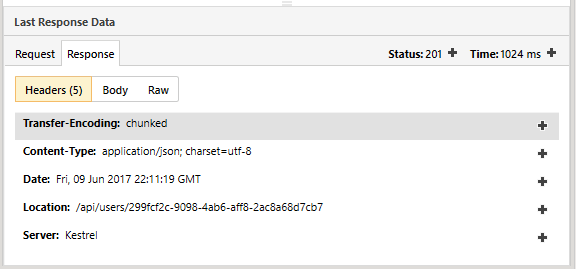
In the Headers tab, you can see a formatted view of the response headers.
Verifications
Verifications are a must-have feature for any testing application. The UI of Test Studio for APIs makes adding verifications quick and easy.
Notice the black ‘plus’ buttons at the end of each header row in the Response Headers tab (as well as next to the Status and Time values above). These are shortcuts that you can use to quickly create some verifications.

Let’s create our first verification. Click on the ‘plus’ button next to the response status. This will create a verification in the Verifications tab of the HTTP request step.
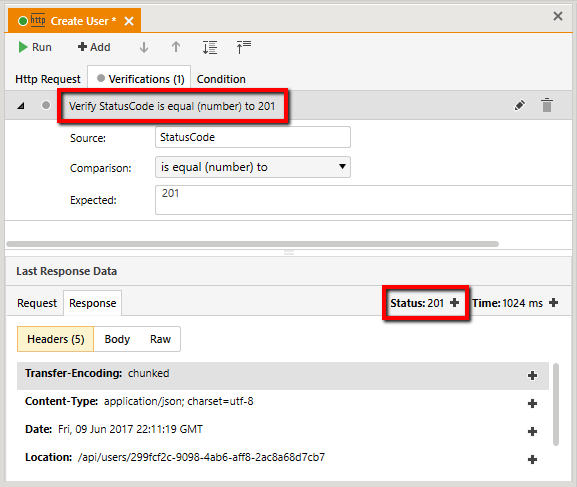
The new verification will be created with a default name and in most cases, you will be just fine leaving it as it is. If you wish though, you could add a custom, more friendly name:

Let’s create another verification. This time click on the Add button. A blank verification will be added.
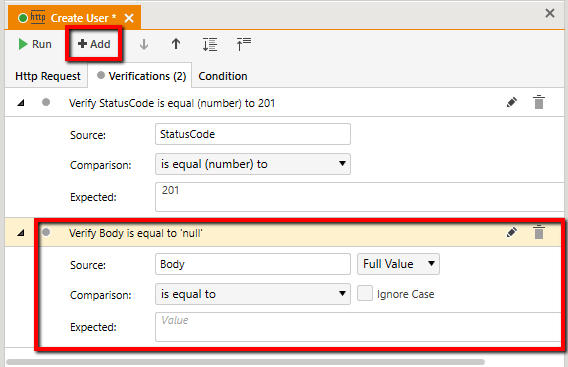
The source field specifies which variable the verification should refer to. This includes variables created by the HTTP request step itself (like Body, StatusCode, Headers, etc.), but also any variable that is created by you manually in the Variables pane or during the execution of the tests using a Set Variable step or a Coded Step (as long as that variable is accessible in the context of the current step).
Now, let’s verify that the response we just received, when we created a new user, contains data for the new user and the username has the correct value.
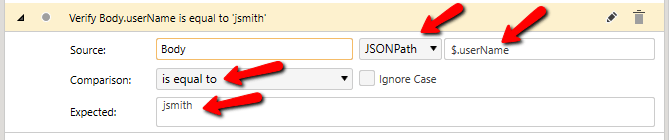
Leave 'Body' as value in the Source field, as suggested by default. The response body is a JSON value and we need to verify just a single property of it. Since the Source field refers to the full content of the Body variable, we need to use the Path field next to it to refine what part of the value we need. We will use a Value Path for that (a.k.a. a 'Source Path'). In the drop-down for Value Path Type select JSONPath. In the Value Path field next to it, add '$.userName' (which will refer to the ‘userName’ property of the root object in the response body). (You can read more about using source path expressions here.)
Now you can run the test again and check the result of the two verifications.
Note: since the HTTP request creates a new user, the demo application may return a "User with username 'jsmith' already exists!" if you have already created the user with the previous test runs. In some of our next blog posts we will show how to use a Coded Step to create a random username and avoid such conflicts. For now, for simplicity of the example, you can just restart the demo application and this will reset its users in-memory data. (To restart the demo application, just click on the Run Demo Application button in the toolbar.)
Variables
Creating Design-time Variables
Now is the time to take a closer look at variables. Variables are used by test steps and test cases to store the outcome of their execution and transfer data between each other. When creating your tests, you would also explicitly create variables to store data or to improve the maintainability of your tests.
In the HTTP request, we already set the URL to "http://localhost:5000/api/users". This will work just fine, but your test project will keep growing with more tests. If, at some point later, you decide to change the url of your api-under-test (changing the port to 9898 for example), you will need to manually open every single HTTP request that uses it and apply the update.
In order to make your tests more maintainable, it's better to store the base URL in a design-time variable. This way you could refer to that variable everywhere you need it. If you need to change the base URL later, you could make the change in a single place - where the variable is defined.
Hint: an additional benefit that you get when using variables is that you can pass their values as parameters when executing the tests from command line. This way you could change the main variables stored on project level (like base-url, username, etc.), depending on the test environment that you are using. This could be especially useful when running tests from a CI server
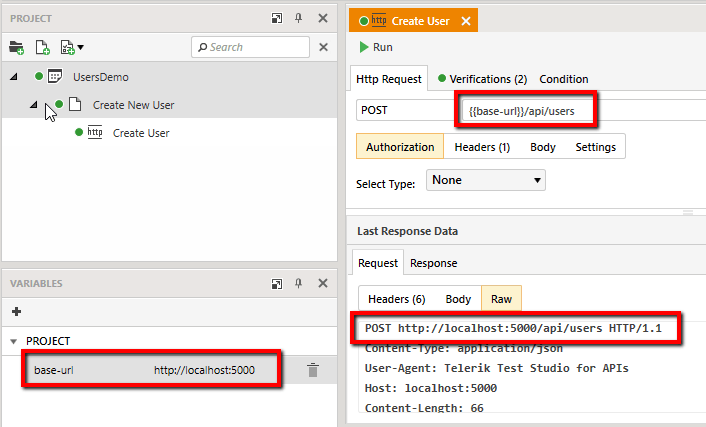
To create a variable, select the root project element in the project explorer (in order to create the new variable in the root scope of the project, so that it can be accessible by all test cases). Next, in the Variables pane, click on the Add Variable button. Set the name of the new variable to "base-url" and its value to "http://localhost:5000".

Now you can use that variable anywhere in your project. Open the HTTP request and replace the "http://localhost:5000" part with the name of the new variable, surrounded by curly braces: "{{base-url}}/api/users". When the test is executed, the "{{base-url}}" variable reference will be replaced with the value of the variable and the final outcome will be "http://localhost:5000/api/users". You can save the test and give it a try. (Make sure to restart the demo application before that in order to reset the existing users.)
Transfering Values from One Step to Another
Let's say we need to make a new test that depends on a value, retrieved by our first test. For example, our first test creates a user and we need the user ID that was returned as a response to make another test that modifies that user based on the ID. In that case we need to extract the ID from the response in the first test and store it as a variable. We can do that using a Set Variable step.
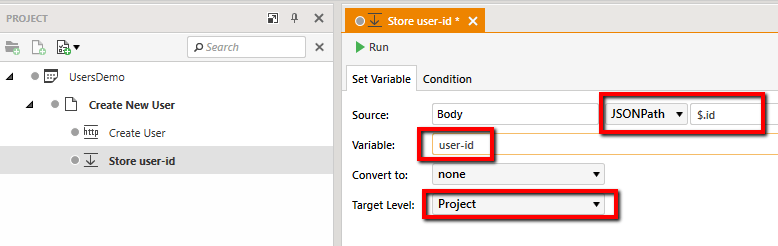
To do that, add a new step of type Set Variable to the "Create New User" test case. Add a descriptive name to the step (e.g. "Store user-id")
In the Source field, leave the value to Body, select JSONPath in the Value Path Type drop-down and add $.id in the Value Path field. (The same way as we did when we were building a verification for the HTTP request step.) Add a name for the variable that you wish to create, e.g. user-id. In the Convert to field, leave the selection to none as we don't need to make any conversions of the value in this case. Finally, select the Target Level for the new variable. You can choose from Test and Project. If you save it on a Test level, this variable will be visible only by steps inside this test case and not by other test cases. In this case we need to use the variable in another test case, so we will save it in the Project scope.
Save the test and execute it. (Make sure to restart the demo application before that in order to reset the existing users.)
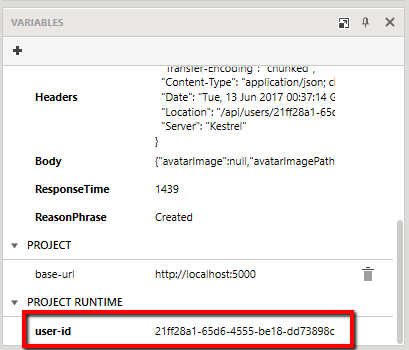
Once you run the test case, take a look at the Variables pane. We just created a runtime variable.
Design-time vs Runtime Variables
Notice the Headers, Body, ResponseTime and ReasonPhrase variables that are also visible on the last screenshot. These are also runtime variables. They were automatically created by the last HTTP request step. The main difference between design-time and runtime variables is that design-time variables are stored permanently in the project file (which is the case with the base-url variable in the last screenshot). This way they can be stored under a version-control system and they will be available every time you run the project. On the other hand, runtime variables are generated on the fly when running the project and have temporary life-span. They will not be saved in the project file and will be reset every time you execute a full project run.
Back to topReusing Variables
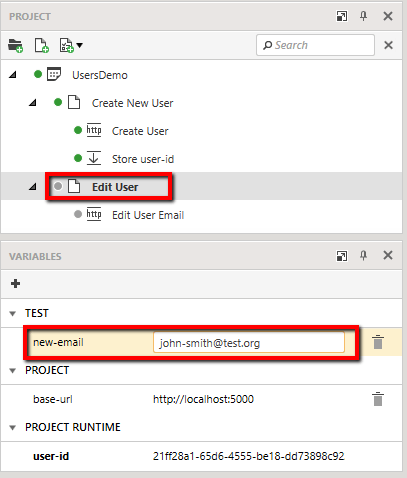
Now, let's get back to the user-id variable. Once we have it created by our "Store user-id" step in the project scope, we can reuse it from any other test case. Let's create a new test case named "Edit User".
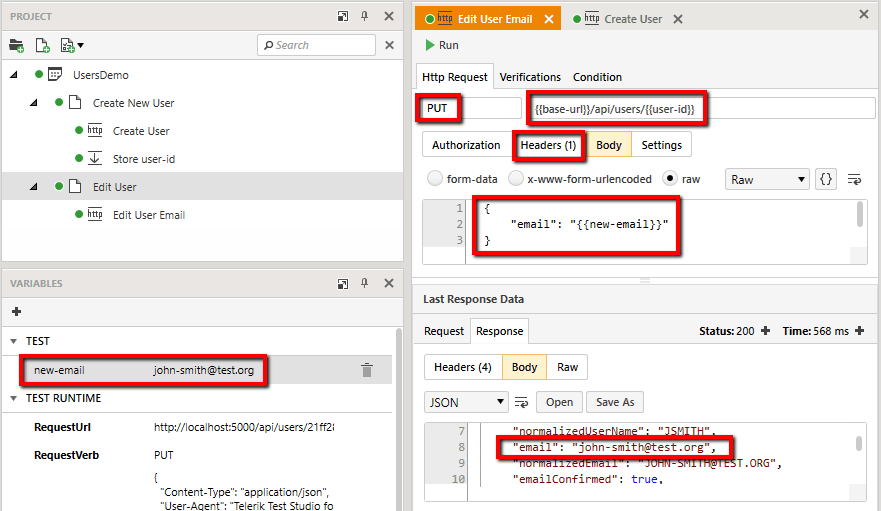
We will need a new design-time variable to hold value that we want to use for the new user email. Click on the test case in the Project Explorer and in the Variables pane add a variable named "new-email" with value "john.smith@test.org". We are creating it in the scope of the test case (not in the root project scope), as we do not need it for other test cases.
In the new test case, let's create a new HTTP request step, named "Edit User Email". Set the request method to PUT. In the URL, we will use the user-id variable that we extracted from the previous test: {{base-url}}/api/users/{{user-id}}. In the request body, we can add a JSON text with a single email property with the desired new value, referring to the new-email variable:
{
	"email": "{{new-email}}"
}
We could skip using the "new-email" variable and add the email value directly in the JSON (i.e. "{ "email": "john.smith@test.org" }"), but using a local variable will help us reuse it later when we make verifications on that value.
Note: make sure to add a request header field with name "Content-Type" and value "application/json".
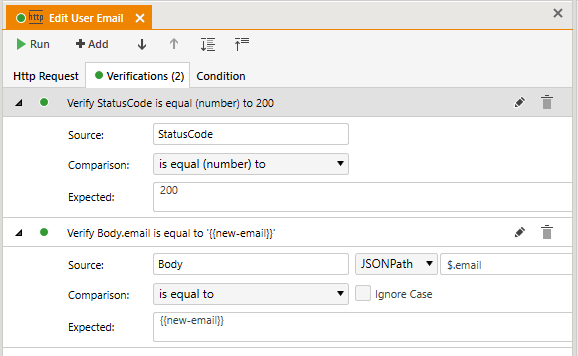
Finally, we can add two verifications to this HTTP request, to make sure it was executed and processed correctly (which is where we can reuse the "new-email" variable, that was previously defined):
Summary
In this "Getting Started" post we discussed the basic concepts of creating and executing your first test projects and tests, making HTTP requests with verifications and using variables. I hope that will make your initial experience with Test Studio for APIs smoother.
You can download the demo project that we worked on from here, or learn more about Test Studio for APIs at the link below.
There are more topics to be covered, so stay tuned for the second part of this API testing series in our blog posts page.
Your feedback is valuable for choosing the next bits to be added to Test Studio for APIs, so please drop us a line with your impressions or feature requests on our Feedback portal.
Back to top

Oleg Georgiev
Oleg is a Software Developer in the Progress Testing Division. He joined the company in the beginning of 2011 as one of the first QA trainers in Telerik Academy. Since then he has been through several teams and technologies as a QA Engineer and Software Developer, working on products like TeamPulse, Progress Telerik Platform and Test Studio.
Related Posts
Comments
All articles
Topics
Latest Stories
in Your Inbox
Subscribe to be the first to get our expert-written articles and tutorials for developers!
All fields are required